
Related Manuals for Joie gemm I0911DA


Summary of Contents for Joie gemm I0911DA
- Page 1 MODEL I0911DA instruction manual IMPORTANT: KEEP THIS INSTRUCTION BOOKLET IN THE PLACE PROVIDED ON THE CHILD RESTRAINT...
-
Page 2: Table Of Contents
™ Welcome to Joie Contents Congratulations on becoming part of the Joie family. We are so ex- Quick Reference ............1 & 2 cited to be part of your journey with your little one. While traveling with the Joie gemm™ Child Restraint you are using a high quality product suitable for use with children who are up to approximately WARNINGS .............. -
Page 3: Quick Reference
Quick Reference - Use Quick Reference - Restraint and Base IMPORTANT: After reading this Quick Reference IMPORTANT: After reading this Quick Reference read the following instructions carefully read the following instructions carefully Head Liners and Infant Shoulder Straps - must always Tether Strap - must always be Carry Handle - must always be Insert - only use for smaller... -
Page 4: Warnings
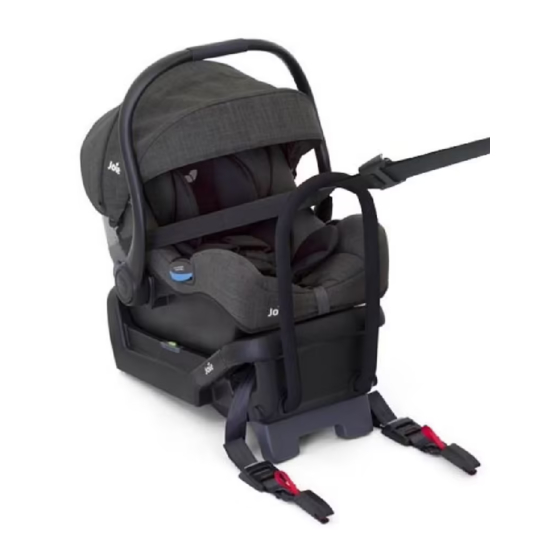
WARNING ADDITIONAL WARNINGS • Use the restraint exactly as shown in the instructions. This Child Restraint is: To be used only in a rearward-facing position until the infant's • Supervision of children is needed because they may be able to shoulders reach the shoulder height marker (approximately 6 undo buckles. - Page 5 Features - Base Features - Child Restraint 15 Tether Strap 21 Instruction Manual Storage Carry Handle Harness Straps 16 Child Restraint Release 22 Recline Adjustment Infant Insert 10 Seat Cover Lever Shoulder Pads 11 Stroller Release Handle 17 Tether Strap Anchorage Buckle and Crotch Belt *only used with infant car 18 Rebound Bar...
-
Page 6: Warnings
Never place carrier on top of a shopping cart. Carrier will not be properly secured and could fall. Do not use carrier if it is damaged or broken. Only use with Joie strollers or appropriate Joie adapters designed for use with other strollers. -
Page 7: Securing Child In The Restraint
Securing child in the restraint Securing child in the restraint 4 Place buckle tongues into FIRST CHECK SHOULDER the quick release buckle. STRAP HEIGHT AND ADJUST IMPORTANT: The buckle IF NECESSARY. See page 12 tongue pushed in last should "CLICK" when it locks into 1 Loosen harness by place. -
Page 8: Shoulder Strap Height
Securing child in the restraint Shoulder Strap Height 7 Verify that the harness is Correct positioning of the shoulder straps is essential for your snug around the child’s waist baby's safety. and shoulders. Requirement: IMPORTANT: The shoulder straps must be in the slots that are Never use clothing or nearest to the child's shoulders, but not lower than the blankets that interfere... - Page 9 Shoulder Strap Height Shoulder Strap Height 3 Pull loose end of harness The shoulder straps must pass loop out through slot and under the steel bars at the back place in correct slot. of the restraint. 4. Re-attach to splitter plate. 5.
-
Page 10: Seat Pad
Seat Pad Seat Pad Seat Pad Removal Remove the seat pad from the stroller release button as 1 Pull the fastening pieces shown. underneath the edge of the seat out. Remove the harness from the splitter plate. VERY IMPORTANT: Only use this child re- straint with the cover supplied or a manu- facturer-authorized replacement cover with identical shoulder height markers. -
Page 11: Infant Insert
Canopy Infant Insert The infant insert can be Canopy front used to provide a snug fit for To fit the canopy simply insert smaller babies. the end of the canopy stay In the back of the liner is an into the mount point attached extra foam pad intended for to the side of the shell and use with low birth weight or... -
Page 12: Carry Handle
Carry Handle The Next Restraint The carry handle can be This restraint is suitable for a baby up to approximately adjusted to 3 positions. 6 months of age. When the baby’s shoulders are level with the shoulder height marker (see page 1 To adjust the handle 13) they should move to a bigger restraint. -
Page 13: Installation -General
Installation -General Installation - Base Where to install the child 2 Position base on a forward restraint? facing vehicle seat. Use recline adjustment to position Only install child restraint in a bubble in indicator. forward facing vehicle seat. Adjust base so bubble is be- Never install in a seat that tween the black patches. - Page 14 Installation - Base Installation - Base 5 Place the base on the 6 CHECK: vehicle seat and route the a) Vehicle belt is securely REARWARD FACING BELT "CLICK" vehicle belt through the engaged in buckle. PATH opening in the base labeled ‘Belt Path’...
-
Page 15: Tether Strap Use
Tether Strap - Use Installation - Restraint TO INSTALL: This child restraint has a WARNING First make sure there is noth- tether strap permanently at- Straps may be dam- ing in or on the base (blankets, tached to the base. aged by unsecured toys etc). -
Page 16: Installation - Tether Anchorage
Installation - Tether Anchorage Installation - Tether Anchorage Always connect the snap If the car is fitted with a child Attachment Bolt hook securely to the anchor- restraint anchorage point: age fitting. Lock Locate the anchorage point Washer behind the rear seating Anchor position (consult the vehicle Fitting... -
Page 17: Use With Strollers
Installation - Tether Anchorage Use with Strollers If the car is not fitted with This Child Restraint is designed to attach to Joie stroller models Attachment a child restraint anchorage featuring a special tray, armbar or leg support. Bolt point:... - Page 18 Use with Strollers To attach the child restraint to 1. Attaching to Tray 3. Attaching to Bumper Bar a Joie stroller, follow these steps: Place child restraint into the stroller so the notches in the rockers fit over the edge of the bumper bar, tray or leg support.
-
Page 19: Cleaning And Maintenance
Cleaning and Maintenance Use with Strollers SEAT COVER Use the straps on both sides of stroller to fix the child Wash with cold water and mild restraint. ( Fig. 5) detergent. Do not iron. Do not bleach or dry clean. Do not twist the soft goods to dry IMPORTANT with great force. - Page 20 Cleaning and Maintenance HARNESS BUCKLE To clean the buckle: rinse using warm water. DO NOT use any soaps, solvents or lubricants. Using anything other than water can cause the buckle to malfunction. Air dry. When the buckle is operating correctly the tongues will push in easily and the second tongue will CLICK when it latches into place.
- Page 21 Australia Power Brands Pty Ltd ACN 081952561 Bambino International Division 82 Bellingara Road, Miranda, NSW 2228 P.O. Box 2145, Taren Point, NSW 2229, Australia. Phone: (02) 8543 5570 Fax: (02) 8543 5571 P-IM0097D...
Need help?
Do you have a question about the gemm I0911DA and is the answer not in the manual?
Questions and answers