Table of Contents
Advertisement
Available languages
Available languages
Multi Rider Intercom System
M A N UA L E D ' U S O
I N S T R U C T I O N G U I D E
B E D I E N U N G S A N L E I T U N G
M A N UA L D E I N S T R U CC I O N E S
G U I D E D ' U T I L I S AT I O N
M A N UA L D E I N S T R U çõ E S
Οδηγίες Χρηςης
G E B R U I k E R S H A N D L E I D I N G
k äy T Tö O pA S
®
Advertisement
Chapters
Table of Contents

Related Manuals for Midland BT Next


Summary of Contents for Midland BT Next
- Page 1 ® Multi Rider Intercom System M A N UA L E D ’ U S O M A N UA L D E I N S T R U çõ E S Οδηγίες Χρηςης I N S T R U C T I O N G U I D E G E B R U I k E R S H A N D L E I D I N G B E D I E N U N G S A N L E I T U N G k äy T Tö...
-
Page 2: Table Of Contents
Sommario Principali caratteristiche......................................2 Caratteristiche tecniche Midland BTNext ................................2 Ricarica delle batterie ......................................3 Descrizione dispositivo e sistema di fissaggio................................. 3 Accensione e spegnimento del BTNext ................................... 5 Modalità operative ......................................... 5 Distanza ..........................................6 Come abbinare un altro dispositivo BTNext ................................6 Talk2All .......................................... -
Page 3: Principali Caratteristiche
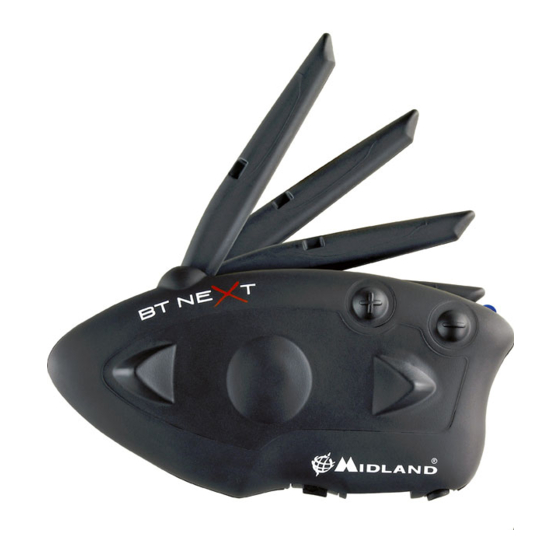
Midland BTNext, anche come sistema intercom senza fili fino a 6 persone (di cui 2 di altre marche) ed una distanza massima di 1.6Km. Grazie al suo design sottile, aerodinamico ed ai suoi tre tasti centrali grandi e ben riconoscibili Midland BTNext è la soluzione più avanzata e ideale per il motociclista. -
Page 4: Ricarica Delle Batterie
Presa Ricarica: Permette la ricarica del dispositivo tramite alimentatore mini USB standard Presa Audio Kit: Permette la connessione del kit audio (cuffie stereo e microfono) Presa audio ausiliaria (AUX): Permette la connessione di una sorgente audio come un iPod/MP3 player stereo o un ricetrasmettitore PMR446 Midland BT Next - 3... - Page 5 Questo tipo di microfono è più indicato per i caschi integrali. Presa Kit Audio Il Kit Audio infine deve essere collegato, tramite il connettore ad “L” al Midland BTNext nella presa centrale. Descrizione sistema di fissaggio al casco Midland BTNext è...
-
Page 6: Accensione E Spegnimento Del Btnext
Distanza La distanza massima di comunicazione tra due dispositivi Midland BTNext è di circa 1.6Km in campo aperto con entrambe le antenne in posizione sollevata. La massima distanza può variare in base all’ o rientamento della testa o alla presenza di ostacoli e interferenze. -
Page 7: Come Abbinare Un Altro Dispositivo Btnext
Potrebbero essere necessari alcuni secondi per l’ e ffettiva apertura della I due dispositivi presenti nella stessa confezione (Midland BTNext TWIN) sono già ac- comunicazione intercom (un tono audio vi avvisa dell’apertura). Se nessuno parla, coppiati tra loro e pronti all’uso, quindi non è... - Page 8 1. Attivate la modalità “Setup” (Spegnete il BTNext. Tenere premuto il pulsante per un totale di 6 (tre dispositivi Midland e 2 Talk2All). I tre dispositivi Midland pos- “Centrale” fino a che la luce non rimane di colore rosso fisso) sono essere indiferentemente abbinati ad uno dei tre pulsanti disponibili: Avanti, 2.
-
Page 9: Talk2All
Ora potete lasciare. avvenire solo verso il dispositivo abbinato tramite il tasto “Centrale”. E’ sufficiente Sull’intercom non Midland, seguite le istruzione per abbinare un telefono, infatti il parlare per aprire la comunicazione Intercom, senza dover togliere le mani dal BTNext verrà... -
Page 10: Utilizzo Di Altri Dispositivi Bluetooth
Sul BT1 e BT2 tenete premuto per 3 sec. il tasto centrale. La luce Rossa si spe- nicazione attive (Intercom, Radio FM, Musica). Quando il telefono è abbinato al gne e al suo posto lampeggia la luce Blu. Ora potete utilizzare i dispositivi. pulsante “Volume +”, la modalità “Phone” sarà attiva. Midland BT Next - 9... - Page 11 “Volume+” fino a quando la luce lampeggia Rosso e Blu. richiamato (sentirete un tono audio di conferma) 3. Dopo pochi secondi sul telefonino comparirà il nome “Midland BTNext”, se- Chiamata vocale: lezionatelo e seguite le istruzioni del vostro telefonino per accettare l’abbi- Premete brevemente il pulsante “Avanti”, se il vostro telefonino supporta la...
- Page 12 “Centrale” fino a che la luce non rimane di colore rosso fisso). Premere il pul- sante “Volume + o Volume -” fino a quando la luce lampeggia Rosso e Blu. 3. Sul GPS comparirà il nome “Midland BTNext”, selezionatelo e seguite le istru- zioni per accettare l’abbinamento. Se viene richiesto, immettete il codice di abbinamento: 0000 (quattro zeri).
-
Page 13: Utilizzo Della Funzionalita' Radio Fm
Centrale, grazie alla funzione VOX, anche la comunicazione Intercom viene aperta. Midland BTNext ha disponibile anche un ingresso audio a filo per collegare una Per ovviare a questo problema, abbinare il dispositivo con cui volete parlare uti- sorgente audio Stereo come ad esempio un iPod (o un qualsiasi altro MP3 Player) lizzando il pulsante “Avanti”... -
Page 14: Configurazioni Speciali
3. Premete brevemente il pulsante “Indietro” fino a che la luce Blu si accenderà fissa. 4. Ora premete “Volume +” o “Volume -“ per aumentare o diminuire la sensibili- tà. La luce Rossa lampeggerà indicando che il pulsante è stato premuto (quan- Midland BT Next - 13... -
Page 15: Configurazione E Aggiornamento Firmware
Configurazione e aggiornamento firmware Certificazioni e Conformità di Sicurezza Midland BTNext può essere configurato e aggiornato tramite connessione USB al CE/Informazioni generali vostro PC, per migliorare la compatibilità con i dispositivi Bluetooth, quali telefoni Questo prodotto è conforme alla direttiva 99/05/CE e può essere liberamente e GPS o per risolvere problematiche legate alla funzionalità. - Page 16 Main features ........................................16 Technical specifications of Midland BT NEXT ................................16 Charging batteries ........................................17 Unit and fixing system description ..................................17 Switching your Midland BT NEXT on and off .................................19 Operative ‘mode’........................................19 Maximum distance ......................................19 How to pair two BT NEXT ......................................20 Talk2All ..........................................22...
-
Page 17: Main Features
› 2 plates with bi-adhesive strip to fix the unit onto the helmet › 2 clamps to fix the unit onto the helmet Attention: Midland BTNext is designed to withstand rain and water. However, if it › 2 stereo audio cable for iPod/ or other MP3 players is raining, always verify that the rubber caps protecting the sockets are fully fitted. -
Page 18: Charging Batteries
Audio kit jack: enable to connect an audio kit (stereo headset and microphone) Auxiliary audio jack (AUX) 2.5mm: can be used to connect an audio source, like a stereo iPod/MP3 player or PMR446 transceiver Midland BT Next - 17... - Page 19 Description of the installation brackets The audio system includes two ultra-flat The Midland BTNext can be fixed onto the helmet in two different ways: By either stereo speakers and two interchangeable using the plate with bi-adhesive strip, or the clamp. These methods allow you to microphones, which are both supplied with safely “fix”...
-
Page 20: Switching Your Midland Bt Next On And Off
› FM Radio mode › Phone mode (if a phone has been paired) Switching your Midland BTNext on and off Every time you turn on the unit, the default mode is Intercom (if it was previously paired to another unit), otherwise it will be Phone (If was paired to a phone).If no Switching the unit on: pairing was made –... -
Page 21: Adjusting The Volume
Adjusting the volume tely, you need to first pair it in order to use it. Your Midland BTNext uses AGC technology, which automatically adjusts the liste- To pair the BTNext to another BTNext unit ning volume in relation to background noises. - Page 22 Middle button Rear button Intercom Short press: Open/Close intercom to paired Short press: Open/Close intercom to paired Short press: Open/Close intercom to paired raider raider raider Long press: Change mode Long press: Toggle on/off wired Midland BT Next - 21...
-
Page 23: Talk2All
If you don’t have more devices to pair, you must exit the setup mode from both units before you can use them: for BT NEXT double click on the Middle button, the To open the intercom communication on the BTNext press long (3 sec) the Red light will turn off and the Blue light will start flashing. - Page 24 4. Enable the Bluetooth device search feature on your mobile phone always in background (the intercom is not closed). 5. After some seconds, “Midland BT NEXT” will be displayed on your mobile pho- Attention: If you need to connect both Phone and GPS, you must pair the GPS to the ne.
- Page 25 4. Enable the Bluetooth device search feature on your GPS › Press the “Forward” button (you will hear an audio confirmation tone). 5. After some seconds, “Midland BT NEXT” will be displayed on your GPS. › Press “End” button on the mobile phone.
-
Page 26: How To Listen To The Fm Radio
› Now press firmly (3 sec) the “Volume -” button, the Blue and Red light will flash. Your Midland BTNext is also supplied with a wired audio input (AUX), that can be › Follow now the pairing procedure explained on the manual of the transceiver... -
Page 27: Setup And Special Configurations
Enabling/disabling the wired input If needed the wired input can be enabled or disabled: In order to connect the transceiver to your Midland BTNext, you need to purchase Enabling/Disabling: Make a Long press on the “Forward” and “Middle” button (you the specific 2.5mm plug AUX cable, sold separately. -
Page 28: Setup And Firmware Update
4. Press the “Rear” button shortly and the red light changes to a steady blue. USB connection to your PC. On the Midland web site www.midlandradio.eu in 5. Now, press “Volume +” or “Volume -“ to increase or reduce sensitivity. Every the BTNext page you can find the PC software and the new firmware updates time you press the Volume buttons the RED light will flash for confirmation. -
Page 29: Warranty
For further information, please go to our website: www.cte.it ›› Connect the equipment into an outlet on a circuit different from that ›› to which the receiver is connected. ›› Consult the dealer or an experienced radio/TV technician for help. 28 - Midland BT Next... - Page 30 Inhalt Hauptmerkmale ........................................30 Technische Daten des Midland BTNext ................................. 30 Aufladen des Akku ....................................... 31 Beschreibung des Geräts und Montagehalterung ..............................31 Ein-/Ausschalten des MIDLAND BTNEXT ................................33 Betriebsarten ........................................33 Max. Reichweite ........................................33 Koppeln (Pairen) von zwei BtNext- Geräten ................................. 33 Talk2All - Koppeln mit einem Fremdhersteller-Gerät ............................
-
Page 31: Hauptmerkmale
› Setup und Firmware-Update über USB-Verbindung mit einem PC › Bluetooth Vers. 3.0 Stereo (Headset/Freisprechen/A2DP-Protokoll) › Das AGC System regelt automatisch die Lautstärke in Abhängigkeit von den Das Midland BTNext ist in zwei Versionen erhältlich: Umgebungs- und Fahrgeräuschen › BTNext Einzel-Intercom Set mit nur einem Gerät ›... -
Page 32: Aufladen Des Akku
Motorrad zu Motorrad-Gruppenkommunikation Kabelverbindungen: › Für Stereo-Audioeingang (iPod/MP3-Player) › Für PMR446-Funkgerät (mit optionalem Kabel) Achtung: Das Midland BTNext ist regen- und wasserfest konzipiert. Stellen Sie aber Zusatzbuchse für Audiogeräte dennoch sicher, dass bei Regen die Gummischutzkappen die Anschlüsse vollständig Ladebuchse (AUX) abdecken. - Page 33 BT Next nach oben. Beschreibung der Montagehalterungen Das Midland BTNext kann auf zwei Arten am Helm befestigt werden: Entweder mit der Montageplatte mit zweiseitigem Klebeband oder mit der Klemmhalte- rung. Mit diesen Methoden können Sie das BTNext jederzeit sicher an Ihrem Helm befestigen und wieder entfernen, um das Gerät aufzuladen oder zu verstauen.
-
Page 34: Ein-/Ausschalten Des Midland Btnext
Fahrer verbindung mit dem zweiten Fahrer verbindung mit dem dritten Fahrer Wahlwiederholung/eingehenden Anruf Telefon annehmen oder ablehnen Telefon (während der Musikwiedergabe) Einen Titel weiter Wiedergabe/Pause Einen Titel zurück Sendersuche aufwärts UKW-Radio ein/aus Sendersuchlauf abwärts UKW-Radio Midland BT Next - 33... - Page 35 Setup-Modus aufrufen: Anpassen der Lautstärke › Schalten Sie das Gerät aus. Ihr Midland BTNext benutzt AGC-Technologie, welche automatisch die Hörer- › Halten Sie die „mittlere“ Taste ca. 7 Sek. gedrückt, bis die rote LED ständig leuchtet. lautstärke den Hintergrundgeräuschen anpasst.
- Page 36 Kurzer Tastendruck: Sprechverbindung mit Kurzer Tastendruck: Sprechverbindung mit dem gekoppelten Fahrer einschalten / dem gekoppelten Fahrer einschalten oder mit dem gekoppelten Fahrer ein- oder ausschalten ausschalten ausschalten Langer Tastendruck: Modus wechseln Langer Tastendruck: Kabelverbindung ein- oder ausschalten Midland BT Next - 35...
-
Page 37: Talk2All - Koppeln Mit Einem Fremdhersteller-Gerät
Talk2 All – Koppeln mit einem Fremdhersteller-Gerät über Talk2All Gerät der BT Serie Dank der „Talk2 All“ Funktion ist es jetzt auch möglich, das BT Next mit Gegen- Koppeln des BTNEXT mit einem älteren BT LINE Gerät sprechanlagen von Fremdherstellern zu koppeln. - Page 38 Die Kopplung beim BT Next muss mit den Tasten „Lautstärke +“ oder „Lautstärke Gerät (und nicht mehr am BT Next über „Lautstärke + “). In diesem Fall bleiben –“ erfolgen. die Navigationsansagen im Hintergrund hörbar und unterbrechen nicht die Inter- ›...
- Page 39 (Wiedergabe, Pause, Vorspulen und Zurückspulen) zu steuern: Mobiltelefon über das BT NEXT bedienen Nachdem Sie Ihr Mobiltelefon mit dem BTNext gekoppelt haben, müssen Sie in den „Telefon“-Modus wechseln, um es zu verwenden. Drücken Sie die „mittlere“ Taste, bis Sie die Ansage „Telefon“ hören. Nun bedienen alle drei Tasten das Tele- fon (siehe die Tabelle B).
-
Page 40: Wiedergabe Vom Ukw-Radio
Für eine manuelle Intercomfunktion müssten Sie dann vorher erst in den Inter- Achtung: Beim Koppeln eines G8E-BT Funkgeräts müssen Sie nach Abschluss des com - Mode umschalten. Koppelns von der BT NEXT Seite her auch noch die Bluetooth Sprechverbindung auf der G8E-BT Seite starten. Verwendung des Audiokabel-Eingangs ›... -
Page 41: Priorität
Einstellung „Kabelverbindung stets im Hintergrund“ akti- Alle Pairing- (Kopplungs-) Informationen zurücksetzen viert ist. Wurde Ihr BT Next bereits öfter mit anderen Geräten gekoppelt, dann kann die Zahl der gekoppelten Verbindungen irgendwann unübersichtlich werden und es 40 - Midland BT Next... -
Page 42: Setup Und Firmware-Aktualisierung
› Doppelklicken Sie auf die „mittlere“ Taste, um den „Setup“-Modus zu verlassen › Schalten Sie das Gerät aus. und das BTNext zu verwenden. › Halten Sie die „mittlere“ Taste ca. 7 Sek. gedrückt, bis die rote LED ständig leuchtet. Midland BT Next - 41... -
Page 43: Gewährleistung
Gewährleistungsfristen Die Firmware Ihres BTNext kann mittels einer USB-Verbindung mit Ihrem PC kon- figuriert und aktualisiert werden. Auf der Website von Midland www.midlandra- Die Gewährleistungsfrist beginnt mit dem Zeitpunkt des Verkaufs an den ersten dio.eu finden Sie auf der BTNext-Seite die PC-Software und die neuen Firmware- Endverbraucher. -
Page 44: Europäische Ce Erklärung Und Sicherheitshinweise
Näheres an technischen Informationen finden Kunden aus dem deutschsprachi- gen Raum auch unter http://hobbyradio.de, in der Rubrik “Biker Sets”, wo Sie die jeweils neueste Ausgabe der Geräteunterlagen zum Download finden Informatio- nen für Kunden in Deutschland gibt es unter www.alan-electronics.de Midland BT Next - 43... - Page 45 44 - Midland BT Next...
- Page 46 Índice Características principales ....................................46 Especificaciones técnicas del Midland BTNext ..............................46 Carga de baterías ......................................... 47 Descripción del dispositivo y del sistema de montaje ............................47 Encender y apagar el BTNext ....................................49 Modos de operación ......................................49 Distancia ..........................................49 Cómo sincronizar otro BTNext ....................................
-
Page 47: Características Principales
Midland BTNext es un dispositivo que se instala en cualquier tipo de casco y que puede enlazarse con cualquier dispositivo Bluetooth, como teléfonos, reproductores MP3, Na- vegadores GPS y, sincronizado con otro Midland BTNext, como sistema Intercom sin hilos hasta 6 personas (de los cuales, 2 de otra marca y a una distancia máxima de 1,6 Km. -
Page 48: Carga De Baterías
Descripción de las conexiones por cable › Toma de carga: para la carga del dispositivo mediante el cargador con toma mini USB › Conector Kit de Audio: para la conexión del kit de audio (auriculares estéreo y micrófono) Midland BT Next - 47... - Page 49 Descripción del sistema de montaje en el casco arriba. Midland BTNext se puede fijar en el casco de dos formas: utilizando la lámina con biadhesivo o con la mordaza. Esto le permite fijar de forma segura el BTNext en el casco y poder retirarlo en cualquier momento para recargarlo o guardarlo.
-
Page 50: Encender Y Apagar El Btnext
“Central” y “Atrás” hasta que el LED parpadee tres veces en rojo; de ese modo disminuyen las oportunidades de un apagado accidental, especialmente cuando La distancia máxima de comunicación entre dos Midland BTNext es de 1,6 Km si la antena está desplegada y en campo abierto, sin obstáculos. Esta distancia se llevan puestos los guantes. -
Page 51: Cómo Sincronizar Otro Btnext
Si por cualquier razón se quiere interrumpir la búsqueda (LED rojo y azul) y volver al de seis (tres dispositivos Midland y 2 Talk2All). Los tres dispositivos Midland pueden modo Setup (LED rojo fijo), basta con hacer doble click en la tecla central. - Page 52 Corto: Corto: Abre/Cierra el Intercom con el Corto: Abre/Cierra el Intercom con el Intercom dispositivo enlazado dispositivo enlazado dispositivo enlazado Largo: Abre/cierra el Intercom con el Largo: Cambia modo Largo: Abre/cierra el Intercom con el dispositivo no Midland dispositivo no Midland Midland BT Next - 51...
-
Page 53: Talk2All
Uso del Intercom con dispositivos Midland BT Gracias a la exclusiva función “Talk2 All - Universal Intercom” puede sincronizar al BT- El BTNext es compatible con los dispositivos de la línea BT de Midland: BT1, BT2, Next hasta dos dispositivos de otra marca. -
Page 54: Uso De Otros Dispositivos Bluetooth
LED rojo y azul. el navegador GPS o un walkie talkie con Bluetooth integrado (G8E-BT) o externo › Pasados unos segundos, en el teléfono aparecerá “Midland BTNext”, selec- (BPA-100/200). ciónelo y siga las instrucciones del teléfono para aceptar la sincronización. - Page 55 LED parpadee rojo y azul Comandos disponibles en modo “Teléfono”: 3. En el GPS aparecerá “Midland BTNext”, selecciónelo y siga las instrucciones Play/pausa de la música: pulse la tecla “Central”. para aceptar la sincronización. Si lo pide el GPS, teclee el código “0000” (cuatro Avanzar una canción: pulse la tecla “Adelante”...
-
Page 56: Uso De La Función Radio Fm
Cómo usar la entrada de audio por cable › Active el modo de sincronización en el walkie talkie siguiendo las instruccio- Midland BTNext dispone de una entrada de audio por cable (AUX), que puede nes de éste. usarse para conectar una fuente de audio, como un iPod (o cualquier otro repro- Atención: en el caso de sincronización a un walkie talkie G8E BT, nada más finalizar... -
Page 57: Configuraciones Especiales
2. Mantenga pulsada la tecla “Central” hasta que el LED rojo quede fijo. Ahora está el BTNext en modo “Setup” 3. Pulse brevemente la tecla “Atrás” hasta que el LED azul quede fijo 4. Ahora pulse “Volume+” y “Volume-” para aumentar o disminuir la sensibi- 56 - Midland BT Next... -
Page 58: Setup Y Actualización De Firmware
El BTNext permite configurar el dispositivo y actualizar el firmware a través del PC, 2 parpadeos = sensibilidad muy baja conectándolo con un cable USB estándar. En nuestra página web www.midland. 3 parpadeos = sensibilidad baja es, encontrará toda la información actualizada sobre su dispositivo y se podrá de- 4 parpadeos = sensibilidad media (por defecto) scargar gratuitamente tanto el software de actualización como eventuales nuevas... -
Page 59: Garantía
La garantía tampoco cubre los defectos causados en las baterías por cortocircuitos de sus contactos, si los sellos o las células están rotos o si muestra evidencia de 58 - Midland BT Next... - Page 60 Allumer et éteindre votre Midland BTNext ................................63 “Mode” de fonctionnement ....................................63 Distance maximale ....................................... 63 Comment coupler deux modules BT Next ................................64 Talk2All ..........................................66 Coupler un BTNext avec un module Bluetooth ..............................67 Comment écouter la radio FM ....................................69 Comment utiliser l’...
-
Page 61: Caractéristiques Principales
› Pour une radio PMR446 (avec câble optionnel) › 2 supports avec bande double face pour fixé le module sur le casque Attention: Le Midland BTNext a été conçu pour résister à la pluie. Cependant, s’il › 2 supports pincés pour fixer sur un casque de moto pleut vérifiez que les capuchons en caoutchouc des connecteurs sont bien en place. -
Page 62: Rechargement Des Batteries
Description des connexions filaires › Jack de charge: Permet de recharger le module à l’aide d’un chargeur standard mini USB. › Jack kit audio: Permet de connecter le kit audio (Oreillette stéréo et micro- phone) Midland BT Next - 61... - Page 63 Jack du kit audio Le kit audio doit être raccordé au connecteur central du Midland BTNext à l’aide de la prise coudée (en forme de L). Mise en place et retrait de votre Midland BTNext Le BTNext peut être facilement mis en place en le glissant vers le bas sur le sup-...
-
Page 64: Allumer Et Éteindre Votre Midland Btnext
› Radio FM › Téléphone (si un téléphone a été connecté) Allumer et eteindre votre Midland BTNext Chaque fois que vous allumez l’appareil, le mode par défaut est l’Intercom (s’il a été précédemment lié à un autre module), sinon c‘est le Téléphone (Si un télé- Allumage: phone a été... -
Page 65: Comment Coupler Deux Modules Bt Next
Attention: Le volume ne peut être réglé que si une connexion audio est active. allumé). Comment coupler le BT Next a plus de deux modules › Maintenant, la procédure de jumelage est terminé, il vous suffit de quitter le mode d’installation avant de pouvoir utiliser les modules: Un BTNext peut être couplé... - Page 66 Touche centrale Touche arrière Intercom Court: Ouvrir/Fermer l’Intercom vers le Court: Ouvrir/Fermer l’Intercom vers le Court: Ouvrir/Fermer l’Intercom vers le modules connecté modules connecté modules connecté Long: Changer de mode Long: Ouvrir/Fermer l’ e ntrée auxiliaire Midland BT Next - 65...
-
Page 67: Talk2All
BT Line (pendant que vous continuez à maintenir la touche enfoncée) lentement. Le BTNext est compatible avec tous les modules de la gamme BT line de Midland. Vous pouvez alors cesser d’appuyer sur la touche. Vous pouvez coupler le BTNext à un BT2, BT1, BTCity/Eva, BTX1, BTX2 ou un autre BTNext. -
Page 68: Coupler Un Btnext Avec Un Module Bluetooth
Coupler un BT Next avec un module Bluetooth Si le GPS est couplé sur “Volume +“, l’annonce interrompra toutes les autres com- munications (Intercom, musique, radio FM, etc.). Si le GPS est couplé sur ”Volume Le BTNext peut être connecté à un autre module Bluetooth, comme un téléphone, -”... - Page 69 Bleu et Rouge. Après quelques secondes votre téléphone affiche « Mi- › Appuyez sur la touche “Fin” de votre téléphone. dland BT NEXT ». Suivez la procédure de couplage du téléphone. Si un code PIN Utiliser la fonction MP3 de votre téléphone est nécessaire il faut entrer “0000”...
-
Page 70: Comment Écouter La Radio Fm
› Suivez la procédure de connexion expliquée dans le manuel de la radio. autre lecteur MP3) ou un émetteur-récepteur PMR446 pour communiquer en Attention: Si vous coupler à la radio G8E-BT, des que le BT NEXT a terminé le coupla- groupe ou pour une augmentation de la couverture. -
Page 71: Prioritè
Quand il est couplé à la touche “Volume -” (priorité › Appuyez simultanément sur les touches “Volume +”et “Volume -” pendant 3 plus faible), l’annonce est toujours en fond même si l’intercom est activé. secondes. La lumière bleue s’allume pendant 1 sec. 70 - Midland BT Next... - Page 72 Quand vous atteignez la limite supérieure ou inférieure le voyant ne clignote plus. 6. Appuyez une nouvelle fois sur la touche “Arrière” brièvement, le voyant cli- gnote bleu plusieurs fois, afin de connaitre le niveau de sensibilité choisi: Midland BT Next - 71...
-
Page 73: Configuration Et Mise À Jour Logiciel
Il est possible de configurer et de mettre à jour le logiciel embarqué du BTNext La garantie ne limite pas les droits (légaux) de l’utilisation dans le cadre des lois en utilisant la connexion USB vers votre PC. Sur le site web Midland www.mid- national applicable relative à la vente de produits de consommation. -
Page 74: Certification De Notice Européenne Ce Et Informations D'agrément Aux Fins De Sécurité
“Cet équipement est conforme à l’ e xposition aux rayonnements Industry Canada limites établies pour un environnement non contrôlé “ Midland BT Next - 73... - Page 75 74 - Midland BT Next...
- Page 76 Τεχνικά χαρακτηριστικά του Midland BT NEXT ..............................76 Φόρτιση Μπαταριών ......................................77 Περιγραφή της συσκευής και των βασικών μερών της ............................77 Ενεργοποίηση και απενεργοποίηση του Midland BT NEXT σας ..........................79 Καταστάσεις λειτουργίας ...................................... 79 Μέγιστη απόσταση εμβέλειας ....................................80 Ζευγάρωμα...
-
Page 77: Τεχνικά Χαρακτηριστικά Του Midland Btnext
Διαθέτει πολύ λεπτό και αεροδυναμικό σχεδιασμό και όλες οι βασικές λειτουργίες είναι πολύ εύκολες στη χρήση χάρη στα τρία μεγάλα πλήκτρα που βρίσκονται στην πρόσοψη της μονάδας. Το BT Next τοποθετείται πάνω στο κράνος με τη βοήθεια της αυτοκόλλητης βάσης ή με τη βιδωτή βάση στήριξης. Χάρη στο κιτ ακουστικών που διαθέτουν πολύ λεπτό... -
Page 78: Φόρτιση Μπαταριών
Κανονικά, μετά την πρώτη φόρτιση, απαιτούνται 6 ώρες για μια πλήρη φόρτιση Υποδοχή αξεσουάρ ήχον Επιπροσθέτως, το BT Next διαθέτει μια λεπτή κεραία στην κορυφή για τη μέγιστη Προσοχή: κάθε φορά που εισάγεται (ή αφαιρείται) το καλώδιο φόρτισης mini USB, απόσταση... - Page 79 τα κάτω ώστε να εφαρμόσει στην υποδοχή της βάσης στήριξης (Βάση με ταινία Το κιτ ακουστικού πρέπει να συνδεθεί στην κεντρική υποδοχή της συσκευής διπλής όψης ή σφιγκτήρας). Το BT Next μένει στη θέση του χάρη στο κλείστρο που Midland BT Next χρησιμοποιώντας τον κονέκτορα “L”.
-
Page 80: Ενεργοποίηση Και Απενεργοποίηση Του Midland Bt Next Σας
βρίσκεστε στην κατάσταση Ράδιο FM τα ίδια πλήκτρα σας επιτρέπουν να κάνετε αναζήτηση ραδιοφωνικού σταθμού της επιλογής σας και να ενεργοποιήσετε ή Το BT Next μπορεί να λειτουργήσει σε τρείς κύριες καταστάσεις: Ενδοεπικοινωνία (Intercom), Τηλέφωνο (Phone) και Ράδιο FM. απενεργοποιήσετε το ράδιο. -
Page 81: Μέγιστη Απόσταση Εμβέλειας
ξεχωριστά, θα πρέπει να τις ζευγαρώσετε προτού τις χρησιμοποιήσετε απενεργοποίηση της συσκευής Για να ζευγαρώσετε μια συσκευή BT Next με μια άλλη συσκευή BT Next, θα Προσοχή: Η ενεργοποίηση μέσω φωνής (VOX) μπορεί να ανοίξει την πρέπει να μεταβείτε στην κατάσταση ρύθμισης (setup): ενδοεπικοινωνία... - Page 82 Πιέστε το πλήκτρο που αντιστοιχεί στον χρήστη με τον οποίο επιθυμείτε να εκτός εμβέλειας. επικοινωνήσετε. Μετά από περίπου 4 δευτερόλεπτα θα ενεργοποιηθεί η Για να ζευγαρώσετε το BT Next με μια άλλη συσκευή BT Next, θα πρέπει ενδοεπικοινωνία. πρώτα να μεταβείτε στην κατάσταση ρύθμισης (setup): Η...
- Page 83 διαφορετικής μάρκας, μία στο πλήκτρο “Forward” και μία στο πλήκτρο “Backward”. μπορείτε να κλείσετε χειροκίνητα την ενδοεπικοινωνία χωρίς να χρειαστεί να • Στη συσκευή BT NEXT μεταβείτε στην κατάσταση ρύθμισης (setup): αυτό περιμένετε 20 δευτερόλεπτα, πατώντας το Μεσαίο πλήκτρο. επιτυγχάνετε όταν σε απενεργοποιημένη μονάδα πατήσετε παρατεταμένα...
-
Page 84: Πώς Να Ζευγαρώσετε Το Βτ Νεχτ Με Συσκευές Bluetooth
Πώς να ζευγαρώσετε το ΒΤ ΝΕΧΤ με συσκευές BLUETO- ΒΤ Το ΒΤ Νext είναι συμβατό με όλες τις συσκευές της σειράς ΒΤ της Midland. To ΒΤ Νext μπορεί να ζευγαρώσει με άλλες συσκευές Bluetooth όπως, κινητό Μπορείτε να ζευγαρώσετε το ΒΤ Νext με ένα ΒΤ2, ΒΤ1, BTCity/Eva, BT X1, BT X2 τηλέφωνο, πλοηγό... - Page 85 μεταβεί σε κατάσταση λειτουργίας (θα αρχίσει να αναβοσβήνει η Μπλε λυχνία) πάντα στο υπόβαθρο και δεν θα διακόπτουν την ενδοεπικοινωνία. › Τώρα μπορείτε να χρησιμοποιήσετε το BT Next σας με το κινητό σας τηλέφωνο. Προσοχή: σας υπενθυμίζουμε να απενεργοποιήσετε τις άλλες ενεργές συσκευές...
- Page 86 Πώς να ζευγαρώσετε το ΒΤ ΝΕΧΤ με έναν πλοηγό GPS Τερματισμός κλήσης Γενικά, είναι εφικτό το ζευγάρωμα του BT Next με όλους τους πλοηγούς GPS για Υπάρχουν πολλοί τρόποι για να τερματίσετε μια κλήση: μοτοσικλέτα που υποστηρίζουν τη σύνδεση κεφαλακουστικών Bluetooth.
-
Page 87: Πώς Να Χρησιμοποιήσετε Το Ραδιόφωνο
αυτό το εμπόδιο ζευγαρώνοντας το κινητό τηλέφωνο με τον πλοηγό GPS και Πιέστε σύντομα τα πλήκτρα “Forward” ή “Backward” για να αναζητήσετε τον στη συνέχεια, τον πλοηγό GPS με το BT Next. Όλες οι λειτουργίες του κινητού ραδιοφωνικό σταθμό FM της αρεσκείας σας. -
Page 88: Χρήση Πομποδέκτη Pmr446 Μέσω Ενσύρματης Σύνδεσης
καλώδιο που περιλαμβάνεται στη συσκευασία του BT Next. Το επίπεδο της έντασης Φωνητική ειδοποίηση πλοηγού GPS μπορεί να διαμορφωθεί από τα πλήκτρα “Volume+” και “Volume-“ ή να ρυθμιστεί Όταν ο πλοηγός GPS συνδέεται με το πλήκτρο “Volume+” (υψηλή προτεραιότητα), αυτόματα από το σύστημα AGC πράγμα που σημαίνει ότι αρκεί να ρυθμίσετε την... - Page 89 Για καλύτερα αποτελέσματα, είναι δυνατή η επιλογή ενός από τα τέσσερα είναι ανοιχτά. Αυτό το χαρακτηριστικό μπορεί να είναι χρήσιμο όταν συνδέσετε επίπεδα ευαισθησίας μικροφώνου: υψηλό, μεσαίο, χαμηλό και πολύ έναν πομποδέκτη PMR446. χαμηλό. Η εργοστασιακή ρύθμιση του BT Next είναι “χαμηλό”. Είναι επίσης Απενεργοποίηση: 88 - Midland BT Next...
-
Page 90: Εγκατάσταση Και Αναβάθμιση Firmware
Έχετε την δυνατότητα να ρυθμίσετε και να αναβαθμίσετε το Firmware του BTNext Για περισσότερες πληροφορίες, επισκεφτείτε την ιστοσελίδα μας: www.cte.it χρησιμοποιώντας την σύνδεση USB στον Η/Υ σας. Στην ιστοσελιδα της Midland www.midlandradio.eu στην σελίδα του BTNext μπορείτε να βρείτε το λογισμικό... - Page 91 90 - Midland BT Next...
- Page 92 Especificações técnicas do Midland BTNext ................................92 Carregar as baterias ......................................93 Descrição do aparelho e sistema de fixação ................................93 Ligar e desligar o seu Midland BTNext.................................. 95 “Modo” de operação ......................................95 Distância máxima ........................................ 95 Como emparelhar duas unidades BTNext ................................96 Talk2All ..........................................
-
Page 93: Características Principais
› 2 cabos de áudio estéreo para iPod/ou outros leitores MP3 Atenção: O Midland BTNext foi concebido para suportar chuva e água. Contudo, se estiver a › 1 fonte de alimentação para montagem na parede mini USB com ficha dupla chover, verifique sempre se as coberturas de borracha que protegem as tomadas estão intro-... -
Page 94: Carregar As Baterias
Tomada de kit de áudio: permite-lhe ligar um kit de áudio (microfone e auricular estéreo) Tomada de áudio auxiliar (AUX): pode ser utilizada para ligar uma fonte de áudio como, por exemplo, um iPod/leitor de MP3 ou emissor-receptor PMR446 Midland BT Next - 93... - Page 95 Tomada de kit de áudio O kit de áudio deve então ser ligado à tomada central da unidade Midland BTNext Instalar e remover o seu Midland BTNext utilizando o conector em forma de “L”.
-
Page 96: Ligar E Desligar O Seu Midland Btnext
› Modo de rádio FM › Modo de telefone (se foi amparelhado outro telefone) Ligar e desligar o seu Midland BTNext Cada vez que ligar a unidade, o modo predefinido é o de intercomunicador (se foi emparelhado previamente a outra unidade), caso contrário será o modo de telefone Ligar o aparelho: (se foi emparelhado a um telefone). -
Page 97: Como Emparelhar Duas Unidades Btnext
Um aparelho BTNext pode ser emparelhado no máximo a cinco outras unidades BT, modo de programação (luz vermelha sempre acesa). ou seja, seis no total (3 unidades Midland + 2 Talk2All). O BTNext tem três botões 5. Agora que o procedimento de emparelhamento está completo, necessita apenas principais (“Forward”... - Page 98 Intercomunicador Pressão breve: abrir/fechar intercomunicador Pressão breve: abrir/fechar intercomunicador Pressão breve: abrir/fechar intercomunicador ao motociclista emparelhado ao motociclista emparelhado ao motociclista emparelhado Pressão longa: alterar modo Pressão longa: alternar entre a ligação com fios ligada/desligada Midland BT Next - 97...
-
Page 99: Talk2All
Como emparelhar o BTNext à unidade anterior da linha BT a luz vermelha esteja permanentemente acesa). O BTNext é compatível com todas as unidades da linha BT da Midland. Pode em- • Mantenha premidos os botões “ Forward” e o “ Backward” durante 7 segundos: a luz parelhar o BTNext a uma unidade BT2, BT1, BTCity/Eva, BTX1, BTX2 ou BTNext e a LED vermelha e azul irão começar a piscar rapidamente, depois (enquanto mantiver... - Page 100 Se o GPS for emparelhado ao “Volume +”, o anúncio de voz da rua irão interromper 5. Após alguns segundos, será apresentado o “Midland BT NEXT” no seu telemóvel. todas as outras comunicações (intercomunicador, música, Rádio FM...). Se o GPS for Siga o procedimento de emparelhamento do seu telefone.
- Page 101 4. Active a funcionalidade de busca de dispositivos Bluetooth no seu GPS. Existem vários modos de terminar uma chamada: 5. Após alguns segundos, será apresentado o “Midland BT NEXT” no seu GPS. › Espere que a pessoa contactada termine a chamada.
-
Page 102: Como Ouvir O Rádio Fm
“Volume -”: › desligue o aparelho. O seu Midland BTNext também possui uma entrada de áudio com fios (AUX), que › Pressione e mantenha pressionado o botão “Middle” (meio) durante cerca de 7 pode ser utilizada para conectar o aparelho a uma fonte de áudio, como um iPod segundos até... -
Page 103: Utilizar Um Emissor-Receptor Pmr446 Com A Ligação Por Cabo
“limpa”. Para realizar esta operação deve primeiro entrar no modo de programação: Para ligar o emissor-receptor ao seu Midland BTNext, é necessário comprar o cabo › desligue o aparelho. AUX com ficha de 2,5 mm específico, vendido separadamente. A ›... -
Page 104: Instalação E Configurações Especiais
É possível configurar e actualizar o firmware do seu BTNext utilizando a ligação USB intermitente como confirmação. Quando chegar aos limites superior e inferior, ao seu computador. No site Web da Midland em www.midlandradio.eu, na página a luz vermelha não pisca. -
Page 105: Garantia
Directiva 1999/5/CE do Parlamento Europeu e do Conselho de 9 de Março de 1999, transposta para a legislação nacional pelo Decreto-Lei n.º 192/2000, de 18 de Agosto. 104 - Midland BT Next... - Page 106 Beschrijving van de unit en bevestigen van systeem ............................107 Uw Midland BTNext in/uitschakelen ..................................109 Bedrijfsmodus ........................................109 Maximum afstand....................................... 109 Hoe twee BT Next units koppelen ..................................109 Talk2All ..........................................111 Koppeling van de BTNext aan Bluetooth-toestellen ............................. 112 Hoe luisteren naar de FM Radio ................................... 115 Hoe de bedrade audio-ingang gebruiken ................................
-
Page 107: Hoofdkenmerken
› 2 klemmen om de unit op de helm te bevestigen › 2 stereo-audiokabels voor iPod/ of andere MP3-spelers Opgelet: Midland BTNext is bestand tegen regen en water. Echter, als het regent, altijd con- › 1 mini USB-voeding met dubbele plug troleren of de rubberen doppen ter bescherming van de stopcontacten goed vast zitten. -
Page 108: Batterijen Opladen
Oplaadaansluiting: mogelijkheid om de unit op te laden door gebruik te maken van de standaard mini-USB-voeding. Audiokitaansluiting: mogelijkheid om een audiokit (stereo headset en microfoon) aan te sluiten. Aux audio-aansluiting (AUX): kan worden gebruikt voor het aansluiten van een audio-bron, zoals een stereo iPod/MP3-speler of PMR446-zendontvangtoestel. Midland BT Next - 107... - Page 109 Beschrijving van de montagebeugels Het audiosysteem bevat twee ultra-platte De Midland BTNext kan worden vastgemaakt op de helm op twee verschillende stereo speakers en twee verwisselbare mi- manieren: met behulp van de plaat met dubbelzijdig klevende strip, of de klem. Met...
-
Page 110: Uw Midland Btnext In/Uitschakelen
Druk op één van de drie toetsen om de intercom te openen. Hoe twee BT Next units koppelen › In de “Telefoonmodus” kunt u uw Bluetooth-GSM beheren om een telefoon- De twee units die in dezelfde BTNext doos geleverd worden, zijn al gekoppeld en oproep te doen of te beantwoorden of om naar muziek (in stereo) te luisteren. - Page 111 Een BTNext unit kan aan maximum vijf andere BT units (vier in het totaal) gekoppeld je beginnen te knipperen. worden. Dat betekent zes in het totaal (3 Midland unit + 2 Talk2All). 4. Voer dezelfde procedure uit op de andere unit. Wanneer ze met succes gekoppeld De BTNext heeft drie hoofdtoetsen (Vooruit, Middelste en Achteruit).
- Page 112 Toets Vooruit Middelste toets Toets Achteruit Intercom Kort drukken: openen/sluiten intercom met Kort drukken: openen/sluiten intercom met Kort drukken: openen/sluiten intercom met gekoppelde rijder gekoppelde rijder gekoppelde rijder Lang drukken: modus wijzigen Lang drukken: bedraad in/uitschakelen Midland BT Next - 111...
-
Page 113: Talk2All
Hoe de BTNext te koppelen aan vorige BT line units • Houd de “ Vooruit”-toets of de “ Achteruit”-toets gedurende 7 seconden ingedrukt: De BTNet is compatibel met alle BT line units van Midland. U kunt de BTNext koppe- het Rode en Blauw LED-lampje zal snel beginnen knipperen, vervolgens (terwijl... - Page 114 4. Schakel de Bluetooth-apparaat zoekfunctie in op uw mobiele telefoon. altijd in de achtergrond en zullen ze de intercomconversatie niet onderbreken. 5. Na enkele seconden verschijnt “Midland BT NEXT” op uw GSM. Volg de koppe- lingsprocedure van uw telefoon. Als de pincode gevraagd wordt, moet u “0000”...
- Page 115 Druk op de middelste toets tot u een stem hoort bruikt. Uw Midland BTNext ondersteunt volledig de A2DP- en AVRCP-protocols die u die Telefoon zegt. De drie hoofdtoetsen zijn nu bruikbaar voor de telefoon (zie Tabel B) toelaten om te luisteren naar stereomuziek en om van op afstand de MP3-speler van uw mobiele telefoon te bedienen.
-
Page 116: Hoe Luisteren Naar De Fm Radio
Hoe de bedrade audio-ingang gebruiken Uw Midland BTNext is tevens voorzien van een bekabelde-audio ingang (gemar- Hoe een PMR446 zendontvangtoestel koppelen met de geïnte- keerd met AUX), waarop u een audiobron kunt aansluiten, zoals een iPod (of een... -
Page 117: Prioriteit
Soms vindt u het nodig om terug te keren naar de fabrieksinstelling, om alle wij- Om de zendontvanger te kunnen verbinden met uw Midland BTNext, moet u de zigingen/instellingen die u gedaan hebt ongedaan te maken en een “cleane” unit specifieke 2.5 plug AUX-kabel afzonderlijk aankopen. - Page 118 Het is mogelijk om de firmware van uw BTNext te configureren en bij te werken via of verlagen. Telkens als u de Volume toetsen indrukt zal het rode lampje knip- de USB-verbinding op uw computer. Op de Midland website www.midlandradio.eu peren ter bevestiging. Als u de volumelimiet bereikt, zal het rode lampje niet in de BTNext pagina vindt u de PC software en de nieuwe firmware-updates indien meer knipperen.
-
Page 119: Garantie
EU-landen gebruikt worden. De gebruikers mogen geen wijzigingen of modificaties aan het toestel aanbrengen. Wijzigingen die niet uitdrukkelijk zijn goedgekeurd door de producent, maken de garantiekaart ongeldig. Voor meer informatie, ga naar onze website: www.cte.it 118 - Midland BT Next... - Page 120 Johdollisen audioliittimen käyttö ..................................128 Prioriteetit .......................................... 128 Asetukset ja määritykset ....................................129 Ohjelmointi ja ohjelmisto päivitys ..................................130 Käyttö omalla vastuulla ..................................... 130 Takuu ..........................................130 Euroopan CE sertifiointi ja turvallisuus tietoja ..............................131 Midland BT Next - 119...
-
Page 121: Tärkeimmät Ominaisuudet
MIDLAND BTNEXT Motoristien intercom järjestelmä Bt Next on moottoripyöräilijöiden kommunikaatio järjestelmä. Suunnittelu on ohut ja aerodynaaminen, kaikki toiminnot on helposti käytettävissä laitteen etupinnassa olevien kolmen ison painikkeen avulla. Bt Next kiinnitetään kypärään liimatarran tai asennuspannan avulla. Ultra ohuen audiosarjan avulla voit nauttia korkealaatuisesta stereomusiikista ajon aikana. -
Page 122: Akkujen Lataus
Eteenpäin Keskipainike Taaksepäin Lankaliitäntöjen seloste › Laturin liitin: laitteen lataaminen standardin mini-USB virtalahteen avulla › Audiosarjan liitin: tähän liitetään audiosarja (stereokuuloke ja › mikrofoni) › Lisäaudioliitin (AUX): tähän liotetaan äänilähde, kuten iPod/MP3-stereosoi- tin tai PMR446-radiopuhelin Midland BT Next - 121... - Page 123 (kaksipuoleisellateipilla varustettu levyä tai puristin). Audiosarjan liitin BTNext pysyy paikallaan yläosan kiinnityspuristimen avulla. BTNext irrotetaan Audiosarja täytyy sitten liittää Midland BTNext Intercom –erillispuhelimen ke- puristamalla puristinta (A) ja työntämällä laitetta ylöspäin skusliittimeen käyttäen L-kirjaimen muotoista liitintä. sennustelineiden seloste Midland BTNext:n voi kiinnittää...
-
Page 124: Näin Kytket Btnext Laitteen Virran Päälle Ja Pois
. › “Intercom mode” voit hallita viestintää jopa 6: n välillä. Näppäimiä painamalla BT Next laitteen paritus toiseen BT Next laitteeseen voit valita yksittäisen henkilön ringistä kenelle puhut. Parittaaksesi laitteet sinun on ensin mentävä setup-tilaan: ›... - Page 125 Yksi BTNext-yksikkö voidaan kytkeä pariksi enintään 5 muun BT-yksikön kanssa. Mikäli sinulla ei ole enempää paritettava BTNext laitteita sinun täytyy poistua Tämä tarkoittaa, että kytkettynä on yhteensä 6 laitetta (3 Midland-yksikköä + 2 setup tilasta. Talk2All-yksikköä). Voit muodostaa yhteydet mihin tahansa kolmeen monitoimi- ›...
-
Page 126: Talk 2 All - Pariksi Kytkeminen Eri Merkkiseen Intercomiin
BTNext pariksi eri merkkiseen markkinoilla saatavilla olevaan intercomiin. linja aukeaa automaattisesti ja pysyy aktiivisena niin kauan kuin puhut. Intercom Voit kytkeä pariksi enintään kaksi laitetta, jotka eivät ole Midland Intercom sulkeutuu mikäli linjalla ei ole liikennettä 40 sekuntiin. Tarvittaessa keskustelun -merkkisiä, yhden eteenpäin-painikkeella ja yhden taaksepäin-painikkeella. - Page 127 3 sekuntia. Sininen ja punainen valo vilkkuu. Matkapuhelin voidaan kytkeä pariksi vain painikkeelle äänenvoimakkuus +. Tällä 4. Noudata toisen Midland BT yksikön ohjeita. (yleensä voit käyttää voimakkuus tavoin on mahdollista hallita kaikkia puhelimen toiminnallisuuksia ja kuunnella + painiketta.
-
Page 128: Matkapuhelimen Käyttö
Prioriteetit: Puheluilla on korkea ensisijaisuus eli puhelun tullessa kaikki muu vie- vilkkuu. stintä keskeytyy tilapäisesti. 4. Aseta matkapuhelimesi etsimään Bluetooth laitteita. 5. Muutaman sekunnin jälkeen, “Midland BT NEXT” näkyy matkapuhelimessasi. Puhelun lopettaminen Seuraa matkapuhelimesi paritusohjeita. Salasana on “0000” (neljä nollaa). on useampia tapoja lopettaa puhelu: Kun laitteiden paritus on onnistunut, sininen valo palaa sekunnin ja yksikkö... -
Page 129: Fm Radion Kuuntelu
3 sekuntia BT Prioriteetti: Musiikin kuuntelulla on alhaisin prioriteetti. Kaikki muu liikenne ke- painiketta. skeyttää musiikin kuuntelun. Tämä täytyy tehdä uudestaan joka kerta kun käynnistät Midland G8BT –radiopuhe- Huomio: On mahdollista kuunnella A2DP-stereomusiikkia vain puhelin tilassa kun limesi. vain GPS on käytössä... -
Page 130: Prioriteetit
äänitiedotus keskeyttää aina intercomin. tämä toiminto poistaa kaikki laitteen pariliitokset ja voit aloittaa uudelleen ohjel- Jos kytketään pariksi äänenvoimakkuuden - painike, (alempi prioriteetti) äänitiedo- moinnin ”puhtaalta pöydältä”. te on aina taustalla, myös silloin kun intercom on aktiivinen Midland BT Next - 129... -
Page 131: Ohjelmointi Ja Ohjelmisto Päivitys
On mahdollista ohjelmoida ja päivittää BTNext-laitteen ohjelmsto BTNext USB- Mikrofonin herkkyyden säätö (VOX) sekä ääniohjauksen poisto liitännän avulla tietokoneella. Midland verkkosivuilla www.midlandradio.eu BTNext sivulta löydät PC-ohjelmiston ja uuden ohjelmistopäivitykset mikäli niitä Ensin sinun pitää asettaa laite ohjelmointitilaan. -
Page 132: Euroopan Ce Sertifiointi Ja Turvallisuus Tietoja
Midland BT Next - 131... - Page 133 132 - Midland BT Next...
- Page 134 • INFORMAZIONE AGLI UTENTI • Alle Artikel, die auf der Verpackung oder der Gebrauchanweisung dieses Symbol Ai sensi dell’art. 13 del decreto legislativo 25 luglio 2005, n.151 “Attuazione delle Direttive tragen, dürfen nicht in den normalen Mülltonnen entsorgt werden, sondern müssen 2002/95/CE, 2002/96/CE e 2003/108/CE, relative alla riduzione dell’uso di sostanze an gesonderten Sammelstellen abgegeben werden.
- Page 135 Signature DECLARATION OF CONFORMITY N° 2012050902 Rev 1 Manufacturer: C.T.E. International S.r.l. Address: Via Sevardi 7 – ZONA INDUSTRIALE MANCASALE – 42124 REGGIO EMILIA BT NEXT Products Name: Product Type: BLUETOOTH HEADSET INTERCOM MIDLAND Brand : The product described above is in conformity with the following Specifications based on sample testing:...
- Page 136 C/Cobalt, 48 - 08940 Cornellà de Llobregat Barcelona España Tel: +34 902 384878 Fax: +34 933 779155 www.midland.es Lea atentamente las instrucciones antes de usar el equipo. si el producto contiene pilas o baterías no las tire al fuego ni las disperse en el ambiente después de su uso, utilice los contenedores apropiados para su reciclaje.
Need help?
Do you have a question about the BT Next and is the answer not in the manual?
Questions and answers