Advertisement
Available languages
Available languages
Quick Links
http://waterheatertimer.org/Woods-timers-and-manuals.html#sprinkler
Installation and User's Guide
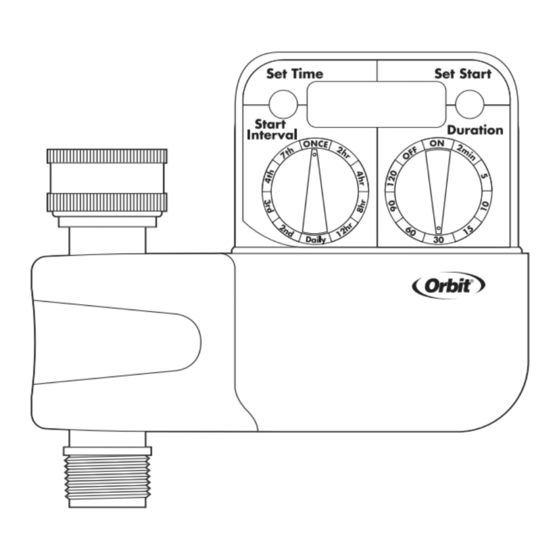
Dual Dial Hose Timer with Electronic Display
Model 62040, 62055 and 91050
Minuterie numérique
d'arrossage à deux boutons,
modèles 62040, 62055 et 91050
Timer Digital de 2 cuadrantes
para riego,
modelos 62040, 62055 y 91050
PN 62040-24 Rev B
Orbit
®
Irrigation Products, Inc.
845 North Overland Rd.
North Salt Lake, Utah 84054
Environmental Conditions
Working Temperature: 32 to 122°F
Storage Temperature: -14 to 140°F
Conditions environnementales
Température propre au fonctionnement : 0 à 50°C (32 à 122°F)
Température d'entreposage : -10 à 60°C (-14 à 140°F)
Condiciones ambientales
Temperatura de trabajo: 0 a 50°C (32 a 122°F)
Temperatura de almacenamiento: -10 a 60°C (-14 a 140°F)
HOSE FAUCET
HOSE WASHER
BRASS
CONNECTOR
AUTOMATIC HOSE
FAUCET VALVE
Features
• One button sets time of day, another button sets watering
start time
• Two rotary dials for setting the watering interval and
watering duration.
• Battery operated (three AA), not included.
• Ten watering interval options (once, 2 hr, 4 hr, 8 hr, 12 hr, daily,
2nd day, 3rd day, 4th day, 7th day).
• Ten watering duration options (on, OFF, 2 min, 5 min,
10 min, 15 min, 30 min, 60 min, 90 min, 120 min).
• Manual watering without interrupting the watering interval.
• Weather resistant design.
• Dependable valve design.
• Low power consumtion soleniod.
START
START
INTERVAL
INTERVAL
DURATION
DURATION
© 2005 Orbit
®
Irrigation Products, Inc.
All rights reserved. All trade names
are registered trademarks of respective
manufacturers listed.
COVER
TIMER
Battery installation
Note:
Orbit recommends the use of Duracell
AA alkaline batteries for optimum timer performance.
(see figure 1).
1. Remove the timer cover.
2. Pull the battery compartment out of the timer.
3. Install three AA alkaline batteries. Refer to the battery
compartment for the correct orientation of the batteries,
(see figure 1).
4. Place the battery compartment back in the timer.
• Three fresh AA alkaline batteries should last for an entire
watering season. When the battery voltage is below a safe
operating voltage the valve will not open. The batteries
should be replaced with new ones when this occurs.
5. Replace the timer cover to protect the timer from moisture
and debris.
Figure 1
Set the time of day and watering start time
• Press the Set Time button, holding it down for 2 seconds. The
digital readout will cycle through a.m. and p.m. time settings.
Release the Set Time Button just before the correct time of
day is reached. Tap the button to advance the time in 1
minute increments until correct time is reached.
• Press the Set Start button, holding it down for 2 seconds. The
digital readout will cycle through a.m. and p.m. time settings.
Release the Set Start button just before the desired watering
start time is reached. Tap the button to advance the time in 1
minute increments until desired start time is reached.
Note:
The timer valve will close when making entries using the Set
Time and Set Start buttons. Set Time and Set Start settings are
accepted by the timer 5 seconds after buttons are released,
except at the ON setting.
Set the watering start interval
Turn the Start Interval dial to the desired watering interval.
(see figure 2).
Note:
All Start Interval settings begin timing at the Set Start time
shown on the digital readout.
The Start Interval dial has ten possible settings:
• Once – the valve will open once for the amount of time on
the Duration dial and then remains inactive until the Start
Interval dial is rotated to another setting.
• 2 hr – the water will come on every two hours.
• 4 hr – the water will come on every four hours.
• 8 hr – the water will come on every eight hours.
• 12 hr – the water will come on every twelve hours.
• Daily – the water will come on once every day.
• 2nd day – the water will come on every other day.
®
or Energizer
®
brand
Advertisement

Related Manuals for Orbit Sunmate 62040


Summary of Contents for Orbit Sunmate 62040
- Page 1 Battery installation Note: Orbit recommends the use of Duracell ® or Energizer ® brand AA alkaline batteries for optimum timer performance. Installation and User’s Guide (see figure 1). Dual Dial Hose Timer with Electronic Display 1. Remove the timer cover.
- Page 2 07SUM002524 62040-24 rB.qxd 12/28/06 12:45 PM Page 2 • 3rd day – the water will come on every third day. ONCE watering can only be stopped when: • 4th day – the water will come on every fourth day. • Entering a Set Time in the digital display (except when •...
- Page 3 REMARQUE : Pour une performance optimale de la minuterie, durée réglée sur le bouton de Durée (Duration) puis demeure Orbit recommande l’utilisation des marques de piles alcalines ainsi jusqu’à ce que le bouton Start Interval AA de marque Duracell ou Energizer.
- Page 4 07SUM002524 62040-24 rB.qxd 12/28/06 12:45 PM Page 4 Réglage de la durée d’arrosage Liste de diagnostic des pannes Tourner le cadran de durée (Duration) jusqu’à la durée désirée _ Mauvaise installation des piles. d’arrosage. (Voir illustration 3). _ Nouvelle installation de piles alcalines. _ Le robinet du tuyau est ouvert.
- Page 5 Intervalo de inicio sea girado a Instalación de las baterías otra posición. NOTA: Orbit recomienda usar baterías alcalinas AA de las mar- • 2 h – el agua saldrá cada dos horas. cas Duracell o Energizer para lograr un óptimo desempeño del •...
- Page 6 07SUM002524 62040-24 rB.qxd 12/28/06 12:45 PM Page 6 Indicador de batería baja • 2 min, 5 min, 10 min, 30 min, 60 min, 90 min, Cuando el voltaje de la batería caiga por debajo del voltaje ideal de operación, la válvula se cerrará. Las baterías deberán 120 min –...
- Page 7 07SUM002524 62040-24 rB.qxd 12/28/06 12:45 PM Page 7...