
Related Manuals for QSC CMX 300Va


Summary of Contents for QSC CMX 300Va
-
Page 1: User Manual
CMXa Series User Manual CMX 300Va CMX 500Va CMX 800Va CMX 2000Va TD-000409-00-A *TD-000409-00*... -
Page 2: Explanation Of Symbols
EXPLANATION OF SYMBOLS The term “WARNING!” indicates instructions regarding personal safety. If the instructions are not followed the result may be bodily injury or death. The term “CAUTION!” indicates instructions regarding possible damage to physical equipment. If these instructions are not followed, it may result in damage to the equipment that may not be covered under the warranty. - Page 3 The CMX 300Va, CMX 500Va, CMX 800Va and CMX 2000Va amplifi ers are in compliance with European Directive 2002/95/EC – Restriction of Hazardous Substances (RoHS). The CMX 300Va, CMX 500Va, CMX 800Va and CMX 2000Va amplifi ers are in compliance with “China RoHS” directives. The following chart is provided for product use in China and its territories: CMXa 有毒有害物质或元素...
- Page 4 Damage to, or loss of any software or data residing on the product is not covered. When providing repair or replacement service, QSC will use reasonable efforts to reinstall the product’s original software confi...
- Page 5 Introduction These rugged, fan-cooled, 2-channel, 2RU/3RU amplifi ers provide high-value performance and power in a strong, compact chassis. The series comprises four models: the CMX 300Va, CMX 500Va, CMX 800Va and CMX 2000Va. CMX 300Va CMX 500Va CMX 800Va CMX 2000Va Stereo Mode (both channels driven) 8...
-
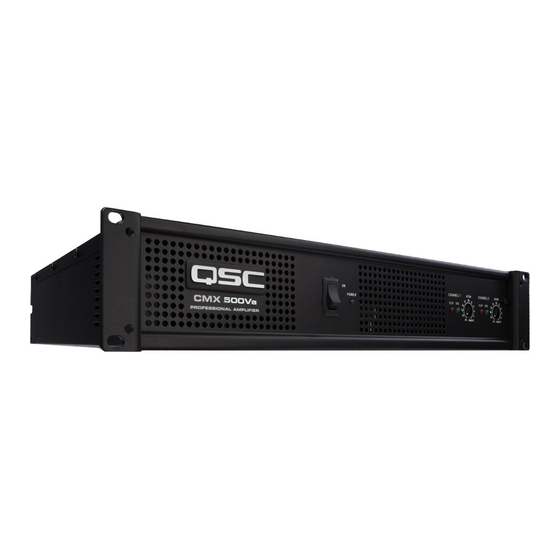
Page 6: Front Panel
Front Panel 1. Power switch 5. Attenuation controls (Channel 1) 2. Power indicator LED 6. Clip and Signal indicator LEDs, (Channel 2) 3. Cooling vents 7. Attenuation control (Channel 2) 4. Clip and Signal indicator LEDs, (Channel 1) 8. Lockout plate retention screw —... -
Page 7: Features And Setup
Features and Setup Attenuation Control Security Plate The Attenuation control security plate (— Figure 4) provides protection against accidently adjusting the Attenuation controls on the amplifi er face. Attach the plate, after making fi nal adjustments to the Attenuation controls, by sliding the tabs into the installation slots. Secure in place with the attachment screw. - Page 8 Input Low-Frequency Filter What it is The low-frequency (LF) fi lter rolls off signals below either 30 Hz or 50 Hz (— Figure 8 — Figure This improves bass performance by limiting sub-audio cone motion, making more power available for the speakers' rated frequency range.
-
Page 9: Parallel Input Mode
Parallel Input Mode What it is The Parallel Input switches let you operate the amplifi er in Parallel mode, delivering the same signal to both channels without using a Y cable. Each channel drives its own speaker load, with independent gain, fi ltering, and clip limiting. Set switch positions 4 and 5 to "PARALLEL INPUTS"... -
Page 10: Bridge Mono Mode
Bridge Mono Mode What it is Bridge Mono mode combines the power of both amp channels into one speaker, resulting in twice the voltage swing, four times the peak power, and approximately three times the sustained power of a single channel. This mode uses Channel 1's input, attenuation control, input fi lter, and clip limiter;... -
Page 11: Stereo Mode
The Difference Between Modes Stereo Mode Stereo mode is the typical way of using the amplifi er. Each channel is fully independent. Separate signals connect at the inputs, the attenuation knobs control their respective channels, and separate speakers connect to each output. The dip switches are set as shown in —... - Page 12 Please refer to the above section on Bridge Mono mode for proper setup confi guration. 70/100 Volt Operation: • The CMX 300Va and 500Va must be confi gured for Bridge Mono mode for 70 Volt operation. • The CMX 800Va and CMX 2000Va can operate in 70 Volt operation in Stereo mode or Bridge Mono mode.
-
Page 13: Installation
Use four screws and washers when mounting the amplifi er to the front rack rails. Support the amp at the rear also, especially in mobile and touring use; rear rack mounting ear kits are available from QSC’s technical services department or by special order from your dealer or distributor. Use the dimensions in —... -
Page 14: Unbalanced Inputs
Connections Inputs Each channel has active balanced XLR and ¼" (6.3 mm) inputs wired in parallel (— Figure 25). The input impedance is 20 k balanced, 10 k unbalanced. Balanced signals are less prone to AC hum, but unbalanced signals can be suitable for short cable runs. -
Page 15: Speaker Cabling
Outputs NL4 Outputs CMXa amplifi ers offer a choice of output connections, with two NL4 jacks and a Terminal Block connector. The NL4 connector is designed specially for high-power speaker connections. It locks in place, prevents shock hazard, and assures the correct polarity. The upper NL4 jack has both Channel 1 and Channel 2 outputs, so it is especially useful for Parallel, bi-amp, or Bridge Mono mode operation (see Bridge Mono Stereo, Bi-amp, or Parallel Mode... -
Page 16: Operation
LEDs will not light. If this occurs during use, see the Troubleshooting section on page Fan Cooling Model Maximum Voltage Gain CMX 300Va 31.6 x (30 dB) The fan speed varies automatically to maintain safe internal CMX 500Va 40 x (32 dB) temperatures. -
Page 17: Troubleshooting
Troubleshooting Problem: No Sound = lit Indication: POWER indicator not lit = blinking Check the AC plug. Also check the circuit breaker on the rear panel. = off Confi rm that the AC outlet works by plugging in another device. If too many amplifi ers are used on one outlet, the building’s —... -
Page 18: Problem: No Channel Separation
Problem: No channel separation Check the switch settings on the back of the amplifi er. Make sure the “Parallel Input” and “Bridge Mode” switches are OFF in dual-channel, bi-amp, or stereo use where different signals go to each channel. Make sure other equipment in the signal path, such as mixers, preamps, etc., are set for stereo, not mono. Problem: Hum Move cabling and signal sources to identify “hot spots”... -
Page 19: Specifications
Specifi cations CMX 300Va CMX 500Va CMX 800Va CMX 2000Va Stereo Mode (both channels driven) 8 / FTC 20 Hz - 20 kHz / 0.1% THD 185 W 260 W 450 W 1050 W 8 / EIA 1 KHZ / 0.1% THD... - Page 20 World Wide Web: www.qsc.com E-mail: info@qsc.com service@qsc.com © 2013 QSC Audio Products, LLC. All rights reserved. QSC™ and the QSC logo are registered trademarks of QSC Audio Products, LLC. All other trademarks are the property of their respective owners. Patents pending.
-
Page 21: Manual Del Usuario
Serie CMXa Manual del usuario CMX 300Va CMX 500Va CMX 800Va CMX 2000Va... -
Page 22: Explicación De Los Símbolos
EXPLICACIÓN DE LOS SÍMBOLOS El término “¡ADVERTENCIA!” indica instrucciones con respecto a la seguridad personal. Si no se siguen dichas instrucciones, se pueden ocasionar lesiones corporales o la muerte. El término “¡PRECAUCIÓN!” indica instrucciones con respecto a posibles daños al equipo físico. Si no se siguen dichas instrucciones, se pueden ocasionar daños al equipo que pueden no estar cubiertos bajo la garantía. -
Page 23: Rohs Statement
Los amplifi cadores CMX 300Va, CMX 500Va, CMX 800Va y CMX 2000Va cumplen con la Directiva Europea 2002/95/EC: Restricción de Sustancias Peligrosas (RoHS). Los amplifi cadores CMX 300Va, CMX 500Va, CMX 800Va y CMX 2000Va cumplen con las directivas “China RoHS”. Se proporciona el cuadro siguiente para la utilización del producto en China y sus territorios: CMXa 有毒有害物质或元素... - Page 24 La garantía limitada de QSC es válida por un periodo de tres (3) años a partir de la fecha de compra en Estados Unidos y en muchos otros países (pero no en todos).
- Page 25 Estos robustos amplifi cadores de 2RU/3RU y 2 canales, enfriados con ventilador, proporcionan un rendimiento de valor alto y potencia en un chasis fuerte y compacto. La serie está compuesta por cuatro modelos: CMX 300Va, CMX 500Va, CMX 800Va y CMX 2000Va.
-
Page 26: Panel Frontal
Panel frontal 1. Interruptor eléctrico 5. Control de la atenuación (Canal 1) 2. LED indicador de potencia 6. Indicadores LED de recorte y señal (Canal 2) 3. Aberturas de ventilación 7. Control de la atenuación (Canal 2) 4. Indicadores LED de recorte y señal (Canal 1) 8. - Page 27 Características y confi guración Placa de seguridad de control de la atenuación La placa de seguridad de control de la atenuación (— Figura 4) proporciona protección contra un ajuste accidental de los controles de atenuación en la cara del amplifi cador. Conecte la placa, después de hacer los ajustes fi...
-
Page 28: Filtro De Entrada
Filtro de entrada Qué es El fi ltro de baja frecuencia (LF) tiene una atenuación progresiva de señales por debajo de 30 Hz ó 50 Hz (— Figura 8 y — Figura 9). Esto mejora el rendimiento de los graves al limitar el movimiento del cono de subaudio, permitiendo que haya más potencia disponible para el rango de frecuencia nominal de los altavoces. - Page 29 Modo de entrada paralela Qué es Los interruptores de entrada paralela le permiten operar el amplifi cador en el modo paralelo, suministrando la misma señal a ambos canales sin utilizar un cable en estrella. Cada canal excita su propia carga del altavoz, con ganancia independiente, fi ltrado y limitación del recorte.
- Page 30 Modo monofónico puenteado Qué es El modo monofónico puenteado combina la potencia de ambos canales del amplifi cador en un solo altavoz, resultando en el doble del giro de voltaje, cuatro veces la potencia pico y aproximadamente tres veces la potencia sostenida de un solo canal. Este modo utiliza la entrada, control de la atenuación, fi...
- Page 31 La diferencia entre modos Modo estereofónico El modo estereofónico es la manera típica de utilizar el amplifi cador. Cada canal es completamente independiente. Se conectan señales separadas en las entradas, las perillas de atenuación controlan sus respectivos canales, y se conectan altavoces separados a cada salida. Los interruptores dip se fi jan tal como se muestra en la (—...
- Page 32 Operación a 70/100 voltios: • Los modelos CMX 300Va y 500Va deben confi gurarse en el modo monofónico puenteado para operación a 70 voltios. • El modelo CMX 800V apuede operar a 70 voltios en los modos estereofónico o monofónico puenteado.
-
Page 33: Instalación
Brinde también apoyo en la parte posterior del amplifi cador, especialmente para uso móvil y para giras; también hay disponibles juegos de orejas de montaje en la parte posterior del bastidor en el departamento de servicios técnicos de QSC o por pedido especial a su vendedor o distribuidor. Utilice las dimensiones (—... - Page 34 Conexiones Entradas Cada canal tiene un XLR balanceado activo y entradas de ¼" (6,3 mm) cableadas en paralelo (— Figura 25). La impedancia de entrada es de 20 kΩ balanceado, 10 kΩ no balanceado. Es menos probable que las señales balanceadas ocasionen zumbido por CA, pero las señales no balanceadas pueden ser apropiadas para tramos de cable cortos.
- Page 35 Salidas NL4 Salidas Los amplifi cadores CMXa ofrecen una opción de conexiones de salida, con dos tomas NL4 y un conector del bloque de terminales. El conector NL4 está diseñado especialmente para conexiones de altavoz de alta potencia. Se bloquea en posición, evita peligros de descarga eléctrica y garantiza la polaridad correcta.
-
Page 36: Operación
LED de señal y recorte. Si esto ocurre durante el uso, consulte la sección de resolución de problemas en las página Modelo Voltaje máximo Ganancia CMX 300Va 31,6 x (30 dB) CMX 500Va 40 x (32 dB) CMX 800Va... -
Page 37: Resolución De Problemas
Resolución de problemas Problema: No hay sonido = lit iluminado Indicación: No está iluminado el indicador POWER = blinking parpadeo Revise el enchufe de CA. También revise el disyuntor en el panel posterior. = off apagada Confi rme que el tomacorriente de CA esté funcionando al enchufarle otro dispositivo. Si se utilizan demasiados amplifi... - Page 38 Problema: No hay separación entre los canales Verifi que los ajustes del interruptor en la parte posterior del amplifi cador. Asegúrese de que los interruptores “Parallel Input” y “Bridge Mode” estén en la posición OFF en los modos de canal doble, biamplifi cación o estereofónico cuando haya diferentes señales que ingresan en cada canal. Asegúrese que otros equipos en el camino de la señal, tal como mezcladores, preamplifi...
-
Page 39: Especificaciones
Especifi caciones CMX 300Va CMX 500Va CMX 800Va CMX 2000Va Modo estereofónico (ambos canales excitados) 8 / FTC 20 Hz - 20 kHz / 0.1% THD 185 W 260 W 450 W 1050 W 8 / EIA 1 KHZ / 0.1% THD... - Page 40 © 2013 QSC Audio Products, LLC. Reservados todos los derechos. QSC™ y el logotipo de QSC son marcas comerciales registradas de QSC Audio Products LLC. Todas las demás marcas comerciales son propiedad de sus respectivos propietarios. Patentes trámite.
- Page 41 Série CMXa Manuel d'utilisation CMX 300Va CMX 500Va CMX 800Va CMX 2000Va...
-
Page 42: Explication Des Symboles
EXPLICATION DES SYMBOLES La mention « AVERTISSEMENT ! » indique des instructions concernant la sécurité personnelle. Risque de blessures ou de mort si les instructions ne sont pas suivies. La mention « ATTENTION ! » indique des instructions concernant des dégâts possibles pour le matériel. Risque de dégâts matériels non couverts par la garantie si ces instructions ne sont pas suivies. - Page 43 Les amplifi cateurs CMX 300Va, CMX 500Va, CMX 800Va et CMX 2000Va asont conformes à la Directive européenne 2002/95/CE – Restriction d'utilisation de substances dangereuses (RoHS). Les amplifi cateurs CMX 300Va, CMX 500Va, CMX 800Va et CMX 2000Va sont conformes aux directives RoHS chinoises. Le tableau suivant est fourni pour une utilisation du produit en Chine et sur ses territoires: RMXa 有毒有害物质或元素...
- Page 44 QSC Audio Products – Garantie limitée de 3 ans QSC Audio Products, LLC (« QSC ») garantit que ses produits sont dépourvus de tout vice de fabrication et / ou de matériel et remplacera les pièces défectueuses et réparera les produits qui fonctionnent mal dans le cadre de cette garantie si le défaut survient dans des conditions normales d'installation et d'utilisation –...
-
Page 45: Caractéristiques
Ces amplifi cateurs 2RU/3RU à deux canaux refroidis par ventilateur robuste sont un gage de haute performance et de puissance dans un châssis compact solide. La série comprend quatre modèles : CMX 300Va, CMX 500Va, CMX 800Va et CMX 2000Va. -
Page 46: Panneau Avant
Panneau avant 1. Interrupteur de marche/arrêt 5. Commande d'atténuation (Canal 1) 2. Voyant d'alimentation POWER LED 6. Voyants limiteur (CLIP) et signal (SIG) (Canal 2) 3. Bouches d'aération 7. Commande d'atténuation (Canal 2) 4. Voyants limiteur (CLIP) et signal (SIG) (Canal 1) 8. - Page 47 Fonctions et confi guration Plaque de sécurité de commande d'atténuation La plaque de sécurité de commande d'atténuation (— Figure 4) fournit une protection contre la modifi cation accidentelle des réglages de commande d'atténuation sur la face de l'amplifi cateur. Attacher la plaque, après avoir apporté les derniers réglages aux commandes d'atténuation, en glissant les onglets dans les deux fentes d'installation. Fixer en place avec la vis.
-
Page 48: Filtre D'entrée
Filtre d'entrée Défi nition Le fi ltre basses fréquences (LF) affaiblit les signaux en dessous de 30 Hz ou de 50 Hz (— Figure 8 — Figure 9). Ceci permet d'améliorer la performance des graves en limitant le mouvement de la membrane infrasonore, mettant plus de puissance à la disposition de la gamme de fréquences nominale des haut-parleurs. - Page 49 Mode PARALLEL INPUTS (Entrées parallèles) Défi nition Les commutateurs PARALLEL INPUTS vous permettent d'utiliser l'amplifi cateur en mode parallèle, délivrant le même signal aux deux canaux sans câble Y. Chaque canal pilote la charge de son propre haut-parleur, avec gain, fi ltrage et limitation d'amplitude indépendants.
- Page 50 Mode Mono pont Défi nition Le mode Bridge Mono combine la puissance des deux canaux d'amplifi cateur en un haut-parleur, donnant deux fois l'excursion de tension, quatre fois la puissance maximale et environ trois fois la puissance soutenue d'un canal unique. Ce mode utilise l'entrée du canal 1, la commande d'atténuation, le fi...
-
Page 51: Mode Entrées Parallèles
Différence entre les modes Mode STEREO Le mode STEREO est la mode d'utilisation typique de l'amplifi cateur. Chaque canal est entièrement indépendant. Des signaux séparés sont connectés aux entrées, les boutons d'atténuation commandent leur canal respectif et des haut-parleurs séparés sont branchés sur chaque sortie. Les commutateurs DIP sont réglés comme illustré... - Page 52 Voir la confi guration correcte à la section ci-dessus sur le mode BRIDGE MONO. Fonctionnement à 70/100 V : • Les CMX 300Va et 500Va doivent être confi gurés pour le mode BRIDGE MONO pour un fonctionnement à 70 V.
-
Page 53: Installation
Soutenir l'amplifi cateur à l'arrière également, surtout pour une utilisation mobile et en tournée ; des kits de pattes de fi xation pour bâti arrière sont disponibles auprès du service technique QSC ou sur commande spéciale chez votre revendeur ou distributeur. Utiliser les dimensions (—... - Page 54 Branchements Entrées Chaque canal a une entrée XLR équilibrée active, une entrée de 6,3 mm et un bornier à cloisons câblés en parallèle (— Figure 25). L'impédance d'entrée pour les entrées équilibrées est de 20 k ; pour les entrées non équilibrées, elle est de 10 k.
- Page 55 Sorties Sortie NL4 Les amplifi cateurs CMXa offrent un choix de connecteurs de sortie, avec deux prises NL4 et un connecteur de bornier. Le connecteur NL4 a été spécialement conçu pour les branchements de haut- parleur à grande puissance. Il se verrouille en position, empêche le risque d'électrocution et garantit la polarité...
-
Page 56: Ventilateur De Refroidissement
SIG et CLIP ne s'allument pas. Si cela se produit en cours d'utilisation, voir la section Dépannage, à la page Model Maximum Voltage Gain CMX 300Va 31.6 x (30 dB) CMX 500Va 40 x (32 dB) CMX 800Va 46 x (33 dB) —... -
Page 57: Dépannage
Dépannage Problème: Pas de son = lit Indication: Voyant POWER allumé = blinking Vérifi er la fi che d'alimentation (~). Vérifi er aussi le disjoncteur sur le panneau arrière. = off Confi rmer que la prise secteur fonctionne en branchant un autre appareil dessus. Si trop d'amplifi cateurs sont utilisés sur une prise, le disjoncteur général de l'immeuble risque de sauter et de couper l'alimentation. - Page 58 Problème: Pas de séparation des canaux Vérifi er les réglages des commutateurs à l'arrière de l'amplifi cateur. S'assurer que les commutateurs PARALLEL INPUTS et BRIDGE MONO sont sur OFF en mode double canal, bi-ampli ou stéréo lorsque des signaux différents entrent dans chaque canal. S'assurer que les autres équipements sur le chemin du signal, tels que mixers, préamplis, etc., sont réglés sur stéréo et pas mono.
-
Page 59: Caractéristiques Techniques
Caractéristiques techniques CMX 300Va CMX 500Va CMX 800Va CMX 2000Va Mode STEREO (deux canaux pilotés) 8 / FTC 20 Hz - 20 kHz / 0.1% THD 185 W 260 W 450 W 1050 W 8 / EIA 1 KHZ / 0.1% THD... - Page 60 E-mail : info@qsc.com service@qsc.com © 2013 QSC Audio Products, LLC. Tous droits réservés. QSC™ et le logo QSC sont des marques de QSC Audio Products, LLC. Toutes les autres marques de commerce appartiennent à leur propriétaire respectif. Brevets instance.
- Page 61 Serie CMXa Benutzerhandbuch CMX 300Va CMX 500Va CMX 800Va CMX 2000Va...
-
Page 62: Wichtige Sicherheitshinweise
SYMBOLERKLÄRUNG Der Begriff ACHTUNG! kennzeichnet Anweisungen, die die persönliche Sicherheit betreffen. Werden die Anweisungen nicht befolgt, können Körperverletzungen oder tödliche Verletzungen die Folge sein. Der Begriff VORSICHT! kennzeichnet Anweisungen, die mögliche Geräteschäden betreffen. Werden diese Anweisungen nicht befolgt, können Geräteschäden verursacht werden, die nicht von der Garantie gedeckt sind. Der Begriff WICHTIG! kennzeichnet Anweisungen oder Informationen, die zur erfolgreichen Durchführung des Verfahrens unerlässlich sind. - Page 63 Die QSC-Verstärker CMX 300Va, CMX 500Va, CMX 800Va und CMX 2000Va erfüllen die Bestimmungen der EG-Richtlinie 2002/95/EG – Beschränkung der Verwendung bestimmter gefährlicher Stoffe in Elektro- und Elektronikgeräten (RoHS). Die QSC-Verstärker CMX 300Va, CMX 500Va, CMX 800Va und CMX 2000Va erfüllen die chinesischen RoHS-Richtlinien. Die folgende Tabelle ist zur Nutzung der Produkte in China und seinen Hoheitsgebieten vorgesehen: CMXa 有毒有害物质或元素...
- Page 64 Beschränkte Sechsjahresgarantie durch QSC Audio Products QSC Audio Products, LLC ("QSC") gewährleistet, dass seine Produkte für einen Zeitraum von sechs (6) Jahren ab dem Kaufdatum keine Material- und/oder Ausführungsfehler aufweisen werden, und QSC verpfl ichtet sich zum Ersatz defekter Teile und zur Reparatur funktionsgestörter Produkte gemäß...
- Page 65 Einführung Diese robusten, lüftergekühlten 2RU/3RU-Verstärker mit 2 Kanälen erzeugen eine hochgradige Leistung in einem festen, kompakten Gehäuse. Die Serie besteht aus vier Modellen: dem CMX 300Va, CMX 500Va, CMX 800Va und dem CMX 2000Va. CMX 300Va CMX 500Va CMX 800Va CMX 2000Va STEREO-Modus (beide Kanäle angesteuert)
- Page 66 Vorderseite 1. Netzschalter 5. Dämpfungsregler (Kanal 1) 2. Betriebsanzeigen-LED 6. Clip- und Signal-Anzeige-LEDs, (Kanal 2) 3. Belüftungsschlitze 7. Dämpfungsregler (Kanal 2) 4. Clip- und Signal-Anzeige-LEDs, (Kanal 1) 8. Sperrplatten-Halteschraube — Abbildung 1 — — Abbildung 2 — Rückplatte 1. Barrier-Strip-Eingang 5.
- Page 67 Funktionsmerkmale und Setup Dämpfungsregler-Sicherheitsplatte Die Dämpfungsregler-Sicherheitsplatte (— Abbildung 4) schützt vor einem versehentlichen Verstellen der Dämpfungsregler auf der Vorderseite des Verstärkers. Befestigen Sie die Platte, nachdem Sie einige abschließende Korrekturen an der Einstellung der Dämpfungsregler vorgenommen haben, indem Sie die Vorsprünge in die beiden Installationsschlitze schieben.
- Page 68 Eingangsfi lter Beschreibung Der Tiefpass-(LF-)Filter schneidet Signale unterhalb von 30 bzw. 50 Hz (— Abbildung 8 — Abbildung 9) ab. Durch die Begrenzung der Membranauslenkung im Infraschallbereich wird die Bassleistung verbessert, sodass für den Nennfrequenzbereich der Lautsprecher mehr Leistung zur Verfügung steht. Die Filtereinstellungen für jeden einzelnen Kanal werden über die DIP-Schalter vorgenommen (siehe —...
- Page 69 Paralleleingangsmodus Beschreibung Mit den Paralleleingangsschaltern kann der Verstärker in einem Parallelmodus betrieben werden, wobei beiden Signalen das gleiche Signal zugeführt wird, ohne dass ein Y-Kabel benötigt wird. Jeder Verstärkerkanal steuert dabei seinen eigenen Lautsprecher mit unabhängiger Verstärkung, Filterung und Spitzenbegrenzung an. Stellen Sie die Schalterpositionen 4 und 5 auf PARALLEL INPUTS ein, um die Eingänge miteinander zu verkoppeln (—...
- Page 70 Mono-Brücken-Modus Beschreibung Der Monobrücken-Modus vereint die Leistung beider Verstärkerkanäle in einem einzigen Lautsprecher, was eine doppelte Spannungsschwankung, die vierfache Spitzenleistung und etwa die dreifache Dauerleistung eines einzelnen Kanals zur Folge hat. Diese Betriebsart nutzt den Eingang, den Dämpfungsregler, den Eingangsfi lter und den Clip-Limiter von Kanal 1;...
- Page 71 Unterschiede zwischen den Betriebsarten Stereo-Modus Der Stereo-Modus ist die Betriebsart, in der der Verstärker normalerweise läuft. Jeder Kanal arbeitet unabhängig. An den Eingängen sind separate Signale angeschlossen, die Dämpfungsregler steuern ihre jeweiligen Kanäle, und an jedem Ausgang sind separate Lautsprecher angeschlossen. Die DIP-Schalter sind so eingestellt, wie dies in —...
- Page 72 Beachten Sie zu korrekten Aufstellung und Konfi guration die Hinweise im Abschnitt „Mono-Brücken-Modus“ weiter oben. 70/100 V-Betrieb: • Der CMX 300Va und 500Va müssen für den Mono-Brücken-Modus für den Betrieb mit 70 V konfi guriert werden. • Der CMX 800Va kann im Stereo- oder Mono-Brücken-Modus mit 70 V betrieben werden.
- Page 73 Stützen Sie den Verstärker auch auf der Rückseite ab, insbesondere bei einer mobilen und Tournee-Verwendung. Der technische Kundendienst von QSC hält rückseitige Montagewinkel-Kits für den Rackeinbau bereit; diese können per Sonderbestellung auch von einem Fach- oder Vertriebshändler angefordert werden. Beachten Sie bei der Planung die Abmessungen in —...
- Page 74 Verbindungen Eingänge Jeder Kanal verfügt über parallel geschaltete aktive, symmetrische XLR- und 1/4"-(6,3 mm-)Eingänge (— Abbildung 25). Die Eingangsimpedanz bei symmetrischen Eingängen beträgt 20 k, bei asymmetrischen Eingängen 10 k. Symmetrische Signale neigen weniger zum Netzbrummen, aber asymmetrische Signale können sich für kürzere Kabelstrecken eignen. Die Ausgangsimpedanz der Signalquelle sollte unter 600 ...
- Page 75 Ausgänge NL4 Ausgänge CMXa bieten mit zwei NL4 Buchsen und einem Klemmleistenanschluss mehrere Ausgangsverbindungsoptionen. Der NL4 Anschluss wurde eigens für Hochleistungs-Lautsprecherverbindungen entwickelt. Er rastet ein, verhindert Stromschläge und gewährleistet die richtige Polarität. Die obere NL4 Buchse ermöglicht sowohl Kanal-1- als auch Kanal-2- Ausgangssignale, weshalb sie sich besonders gut für den Parallel-, Bi-Amp- und Mono-Brücken-Betrieb eignet.
-
Page 76: Bedienung
Die grünen SIGNAL-LED-Anzeigen leuchten bei ca. 0,1 % der vollen Maximale Leistung auf. Model Spannungsverstärkung Die rote CLIP-LED-Anzeige blinkt CMX 300Va 31.6 x (30 dB) bei Übersteuerungen (Clipping). CMX 500Va 40 x (32 dB) Wenn die Schutzschaltung des Verstärkers eine Schutzabschaltung... -
Page 77: Fehlerbehebung
Fehlerbehebung Problem: Kein Ton Symptom: NETZ-Anzeige leuchtet nicht = lit Netzstecker überprüfen. Außerdem den Trennschalter auf der Rückplatte überprüfen. = blinking Durch Anschließen eines anderen Geräts überprüfen, ob die Steckdose ordnungsgemäß funktioniert. Wenn zu viele Verstärker = off an derselben Steckdose angeschlossen sind, kann der Trennschalter des Gebäudes aktiviert werden, d. h. die Stromversorgung wird abgeschaltet. - Page 78 Problem: Keine Kanaltrennung Die Schaltereinstellungen auf der Rückseite des Verstärkers überprüfen. Sicherstellen, dass die Schalter „Parallel Input“ und „Bridge Mono“ im Doppelkanal-, Bi-Amp- oder Stereo-Modus ausgeschaltet sind (OFF), wenn jedem Kanal verschiedene Signale zugeleitet werden. Sicherstellen, dass andere Gerät auf dem Signalpfad wie Mischpult, Vorverstärker usw. auf den Stereo-, nicht auf den Monobetrieb eingestellt sind. Problem: Brummen Position von Kabel und Signalquellen ändern, um „Hot Spots“...
-
Page 79: Technische Daten
Technische Daten CMX 300Va CMX 500Va CMX 800Va CMX 2000Va STEREO-Modus (beide Kanäle angesteuert) 8 / FTC 20 Hz - 20 kHz / 0.1% THD 185 W 260 W 450 W 1050 W 8 / EIA 1 KHZ / 0.1% THD... - Page 80 © 2013 QSC Audio Products, LLC. Alle Rechte vorbehalten. QSC™ und das QSC-Logo sind eingetragene Marken von QSC Audio Products, LLC Alle anderen Marken sind Eigentum ihrer jeweiligen Inhaber. In den USA und anderen Ländern zum Patent angemeldet.
- Page 81 CMXa 系列 用户手册 CMX 300Va CMX 500Va CMX 800Va CMX 2000Va...
- Page 82 符号说明 “ ”一词指示有关人身安全的说明。如果不遵照这些说明,可能会导致人身伤亡。 警告! “ ”一词指示有关可能造成物理设备损坏的说明。如果不遵照这些说明操作,可能会导致设备损坏,而且这种损 小心! 坏不在质保范围内。 “ ”一词指示对于成功完成某一过程至关重要的说明或信息。 重要信息! “ ”一词用于指示其他有用信息。 注意 三角形内带箭头的闪电符号用于提醒用户该产品外壳内存在未绝缘的“危险”电压,此电压足以对人体造成 电击危险。 等边三角形内部的惊叹号用于提醒用户注意本手册中重要的安全、操作和维护说明。 重要安全说明 警告: 为了防止火灾或电击,请勿将此设备暴露在雨中或潮湿环境中。 • 请保存好这些说明。 • 请谨记所有警告。 • 请遵守所有说明。 • 请不要在靠近水的地方使用本设备。 • 清洁设备时只能用干布擦拭。 • 不要堵塞任何通风口。根据制造商的说明进行安装。 • 不要将本产品安装在会产生热量的热源,如散热器、热调节装置、炉子或其他设备(包括放大器)附近。 • 请勿使极化插头或接地插头丧失安全功能。极化插头有两个叶片,一个较宽,另一个较窄。接地插头有两个叶片, 还有第三个接地插脚。较宽的叶片或第三个插脚用于安全目的。如果所提供的插头不适合于您的插座,请向电工咨 询以更换过时的插座。 • 保护电源线不被踩踏或挤压,特别是在插头、电源插座处,以及从设备上的引出点处。 • 只能使用制造商指定的附件/配件。...
- Page 83 RoHS Statement QSCCMX300Va,CMX500Va,CMX800Va和CMX2000a放大器都符合欧盟电子电气设备有害物质限用指令 (RoHS)。 QSCCMX300Va,CMX500Va,CMX800Va和CMX2000a放大器均符合“中国RoHS”。以下图表适用于在中国及 其各地区中使用的产品: CMXa 有毒有害物质或元素 (Toxic or hazardous Substances and Elements ) 部件名称 (Part Name) 铅 汞 镉 六价铬 多溴联苯 多溴二苯醚 (Pb) (Hg) (Cd) (Cr(vi)) (PBB) (PBDE) 电路板组件 (PCB Assemblies) 机壳装配件 (Chassis Assemblies) O:表明这些有毒或有害物质在部件使用的同类材料中的含量是在SJ/T11363_2006极限的要求之下。 O: Indicates that this toxic or hazardous substance contained in all of the homogeneous materials for this part is below the limit requirement in SJ/ T11363-2006.
- Page 84 质保(仅限美国;其它国家/地区,请联系您的经销商或分销商 QSC Audio Products 3 年有限质保 QSCAudioProducts,LLC(“QSC”)担保其产品不会出现材料和/或制造工艺缺陷;若在正常安装和使用条件下出现 质量问题,QSC将按照本质保协议更换有缺陷的零件并维修故障产品,但前提是,您需要预付运费将产品送回我们的 工厂、任一授权维修站或授权的QSC国际分销商,并附带购买证明(即销售收据)复印件。此质保协议规定,退回的 产品必须经我们检查断定是否存在制造缺陷。本质保不适用于任何因误用、疏忽、意外或不正确安装导致损坏的产品 或日期编码被去掉或破损的产品。QSC不对意外和/或间接发生的损坏承担责任。此质保赋予您特定的法律权利。 此有限质保在质保期内可自由转让。如果产品购自未经授权的零售商/网上零售商,或者以任何方式去掉、破坏或覆盖 了原始出厂序列号,则此QSC产品质保无效。对于此产品中软件或数据的损坏或丢失,不属于质保范围。在进行维 修或更换服务时,QSC将只承担重新安装此产品原始配置软件及后续更新版本等合理范围内的工作,对于所维修设备 上非此产品原始附带的软件或数据,不进行任何恢复或传输操作。 客户可能享有更多权利,具体取决于所在的国家/地区或州/省/自治区。如果本有限质保的某一条款被当地法律视为无 效、禁止或被取代,则其余条款仍然有效。 在美国和许多(但不是全部)其他国家/地区, 有限质保期限为三 年,从购买之日算起。 要了解美国之外其他国家/地区的QSC质保信息,请联系相应的QSC授权国际分销商。可在www.qsc.com 中找到QSC国际分销商列表。 若要在线注册您的QSC产品,请转至www.qsc.com并选择“ProductRegistration”(产品注册)。对于此质保协 议的其他问题,可以通过电话、电子邮件寻求答复,或者联系授权的QSC分销商。 1-800-854-4079(美国和加拿大),+1-714-754-6175(国际), warranty@qsc.com, 电话: 电子邮件: www.qsc.com。 网址:...
- Page 85 简介 这些扇冷式双通道2RU/3RU放大器坚固耐用,底盘强大紧凑,具有高价值的性能和功率。此系列包含四种型 号:CMX300Va、CMX500Va、CMX800Va和CMX2000Va。 CMX 300Va CMX 500Va CMX 800Va CMX 2000Va 立体声模式,双通道驱动 8Ω/FTC20Hz-20kHz/0.1%THD 185W 260W 450W 1050W 8Ω/EIA1KHZ/0.1%THD 200W 300W 500W 1100W 4Ω/FTC20HZ-20KHZ/0.1%THD 280W 400W 650W 1600W 4Ω/EIA1KHZ/0.5%THD 300W 500W 800W 4Ω/EIA1KHZ/1%THD 2000W 2Ω/EIA1KHZ/1%THD 430W 700W 1200W 2500W 70V-直接驱动/EIA1kHz/1%THD 400W 2500W 100V-直接驱动/EIA1kHz/1%THD 1000W 桥式单声模式 8Ω/FTC20Hz-20kHz/0.1%THD 530W 800W...
- Page 86 前面板 1.电源开关 5. 衰 减控制(通道1) 2. 电 源指示灯LED 6. 削 波和信号指示灯(通道2) 3. 通 风口 7. 衰 减控制(通道2) 4. 削 波和信号指示灯(通道1) 8. 闭 锁钢板定位螺钉 —图1— —图2— 后面板 1.阻阻挡跨接片输入接片输入 7. 接 线盒连接器输出,通道1和通道2 2. X LR输入,通道1和通道2 8. 断...
- Page 87 功能和设置 衰减控制安全板 衰减控制安全板(—图4)可提供保护,以防不小心调整放大器面上的衰减控件。 对衰减控件作最后调整后,将垂片滑入两个安装槽口以附加面板。然后,用随附的螺钉将其牢固就位。 —图4— 设置模式开关 CMXa拥有针对立体声、并行输入或桥式单声模式的模式开关。每个声道皆有独立的削波限制和低频滤波。 削波限制器 作用 当音频信号使放大器的输出电路超过其可能功率时,它能削减、拉 平波形的高峰。削波限制器检测到此情况并降低增益,以尽量减少 过载量。为了保持尽可能多的动态程序,限制降低平均程序电平, 直到高峰几乎完全被削减。 每个通道都有自己的削波限制器,可以独立地打开或关闭,如(— 图5)所示。 何时使用(或不使用) 驱动全频程扬声器时,削波限制降低低音过载造成的高频失真。还 —图5— 能使频率较高的驱动器免受过度超速驱动和苛刻的削减谐波损害。 驱动低音扬声器时,有些用户无限制地任放大器削波,因为它会给予鼓声和类似的声音额外的“重音”。 小心: 在双放大器系统中,过度限制会影响频率平衡。...
- Page 88 输入滤波器 作用 低频(LF)滤波器滚降低于30Hz或50Hz的信号(—图8)和(— 图9)。这样就通过限制亚音频锥形扬声器引动提高了低音表现,让更 多功率用于扬声器的额定频率范围。 每个通道的滤波器设置由DIP开关设置独立控制,如(—图6)所示。 当过滤器关闭时(—图7),5Hz滚降可保护防止DC或较深的亚音 频输入。 何时使用(或不使用) —图6— 通常情况下,您的扬声器如果滤波适当,将能更好地发音。除非之前的 设备中已有过滤,否则请将设置与扬声器的低 频级别匹配。当频率低于额定限制时,通风的 (低音反射、带孔)扬声器对锥形扬声器过度 偏移尤其敏感。 对于大多数小巧的全频程扬声器来说,50Hz 的滤波器能很好工作,有时甚至能达到100 Hz。30Hz滤波器用于超低音扬声器和大的全 频程机柜。“关”位置应仅用于如录音棚回放 监控的应用程序,您需要了解混音中是否存在 不想要的亚音频信号。 —图7— —图8— —图9—...
- Page 89 并行输入模式 作用 使用并行输入开关可以在并行模式中对放大器进行操作,发送相同信号 到两个声道而不使用Y电缆。每个声道均通过独立的增益、滤波和削波 限制来驱动其自身的扬声器负载。 将开关位置4和5设置为“并行输入”,使输入成对(—图10)。对 于立体声、双放大器或其他双声道模式,请将开关拨至“立体声”。 通过并行输入,您可以使用另一组输入连接器将信号携带到其他放大器 (—图11)。这通常称为“菊链”。 —图10— 何时使用 用一个输入信号驱动两个扬声器(并行模式),同时保持对两个声道增益、滤波和限制的独立控制时,使用并行模式。 使用并行模式和桥式单声模式通过另外的输入插孔将信号添加到其他放大器中。 注意: 如果您正使用平衡信号,请仅使用平衡连接线缆;即使是一根非平衡线缆也将使整个信号链失去平 衡,甚至可能导致嗡嗡声。 Amp 1 Amp 2 —图11— 注意: 向放大器输送两个单独的信号时,请关闭“并行输入”开关。...
- Page 90 桥式单声模式 作用 桥式单声模式将放大器两个声道的功率组合到一个扬声器中,产生相当于单 个声道两倍的电压摆幅、四倍的峰值功率和近三倍的稳定功率。此模式使用 声道1的输入、衰减控件、输入滤波器以及削波限制器;声道2的DIP开关 设置应处于OFF位置,而衰减控件应处于最大衰减位置(—图12和—图 13)。 声道2设置、开关8和10设置为关。 何时使用(或不使用) —图12— 使用桥式单声模式将两个声道的功率传送到一个8Ω或4Ω的负载。将开关 6和7的位置设置为桥式单声模式开(—图12)。使用声道1的输入,并连接扬声器,如(—图14和—图15) 所示。 桥式单声模式注意事项 此模式下的放大器与扬声器均高负荷运转,过度的削波可能会产生防御性的 静音或导致扬声器损坏。确保扬声器有足够的额定功率。 大于100伏特RMS的输出电压可用于CMXa的桥接终端之间。根据国家 标准以及地方标准中指定,必须使用CLASS3接线方法(NEC1999)连接扬 声器。 要将信号添加到其他放大器,请使用并行输入模 式下描述的并行输入开关设置。 —图13— —图14— —图15—...
- Page 91 模式间的差异 立体声模式 立体声模式是使用放大器时采取的典型方式。每个声道完全独立。各种信号在输入处连接,衰减旋钮控制它们各自的 声道,各个扬声器连接至各个输出。DIP开关按(—图16)中所示设置,(—图17)为示意图。 示例: • 双声道(立体声)播放。 • 两个独立的单声信号,如主混音和监听混音。 • 双放大操作,在声道1中使用低频,而在声道2中使用高频。 —图17— —图16— 并行输入模式 此模式类似于立体声模式,但是声道1和声道2的输入是内部相连。到声道1插孔的信号直接驱动两个声道(—图 18)。使用声道1输入,不要将不同的源连接到两个声道。每个声道的衰减控件仍像往常一样工作,并且每个声道输 送其各自的扬声器负载。DIP开关如(—图19)中所示设置。 在并行输入模式中,您可以使用剩下输入插孔中的任一个,将输入信号添加到其他放大器中。请参见(—图18)中的 Ch.2。 示例: • 一个单声信号驱动两个声道,每个扬声器系统均包含独立的衰减控件。 —图18— 可用于菊链其他放大器 —图19—...
- Page 92 桥式单声模式 此模式将两个声道的完整功率功能整合到一个扬声器系统中。放大器内部重新 配置,这样两个声道便作为一个单元操作。此操作可使输出电压加倍,导致单 个8Ω或4Ω扬声器负载中功率峰值增加四倍,稳定功率增加三倍。第10页 中的桥式单声模式部分介绍了所使用的特殊扬声器连接。 示例: • 使用两个声道的4Ω功率合并驱动一个8Ω扬声器。 • 使用两个声道的2Ω功率合并驱动一个4Ω扬声器。 注意事项: • 您可以通过桥式单声模式将成千上万瓦特驱动到一个扬声器中。AC电流消 将声道2DIP开关8和10设置为关。 耗通常会更高。避免过度信号电平,并确保接线和扬声器能在该功率下正常 —图20— 工作。 • 如果负载为4Ω或更少,并出现长期超载的情况,则放大器将可能在出现峰值时静音几秒钟,断路器可能会出错。 • 不要使用2Ω负载。 • 确保声道2的DIP开关设置为关(—图20),且衰减控件处于最大衰减位置。 注意: 请参见第10页上的其他桥式单声注意事项。 分布式常量电压输出 请参考前面关于桥式单声模式的部分,进行正确的设置配置。 70/100 伏操作: • CMX300Va和500Va必须针对桥式单声模式配置以进行70伏 电压操作。 • CMX800Va可在立体声模式或桥式单声模式中的70伏电压操 作中工作。 声道1输入,声道2输入未使用 • CMX500Va和CMX800Va必须针对桥式单声模式配置以进行 —图21— 100伏电压操作。 • CMX2000Va可在立体声模式或桥式单声”式下执行70伏特或100伏特操作。 CMX 300Va CMX 500Va CMX 800Va...
- Page 93 安装 放大器机架安装为可选。 使用四颗螺钉和垫圈将放大器安装到前机架导轨上。 还需背后对放大器进行支撑,尤其是在移动使用中;QSC技术服务部提供后机架柄安装件,也可从您的经销商或分销 商处特别订购。使用尺寸规格(—图23和—图24)进行规划。 2.25” 5.7 mm 3.5” 88.9 mm —图23— 3.0” 2.25” 76 mm 57 mm 5.2” 133 mm —图24—...
- Page 94 连接 输入端 每个声道均有活动的平衡XLR以及并行连接的¼"(6.3mm) 输入端(—图25)。输入阻抗为20kΩ(已平衡), 10kΩ(未平衡)。平衡信号不容易产生交流杂声,但不平 衡信号适合短电缆运行。信号源的输出阻抗应低于600Ω 以避免长电缆中的高频损耗。` 平衡输入 使用XLR或¼"(6.3mm)TRS输入插孔或阻挡跨接片。 (—图26——图28) —图25— 非平衡输入: 将平衡输入的不使用的端(引脚3)接地(引脚1),如(—图26)所示。 tip-sleeve¼"(6.3mm)连接器将正确地终止不使用的输入端(—图27)。 对于立体声操作,请使用声道1与声道2的输入。对于并行或桥式单声操作,请使用声道1输入。 如需更多信息,请参见介绍操作模式的部分。要将音频信号添加到其他放大器(仅并行和桥式单声模式),请参见第9 页上的使用并行输入的说明。 2 = + TRS非平衡 无需任何修改 XLR非平衡跳线引脚1至引脚3 —图27— —图26— 均衡不平衡 —图28—...
- Page 95 输出 NL4 输出 CMXa放大器具有两个NL4插孔和一个接线盒连接器,是输出连 接的不二之选。 NL4连接器专为高功率扬声器连接而设计。它锁定就位,可防止 电击危险,并确保电极正确。 上面的NL4插孔同时具有声道1和声道2输出,因此对并行、双 放大器或桥式单声模式操作特别有用(请参见第10页上的桥式单 立体声、双放大器或并行模式 声模式操作注意事项)。另一个NL4仅传送来自声道2的输出。 —图29— 为方便插入,使用新型的带快速锁定指按门栓的NL4FC连接器( 未显示)。 扬声器布线 更粗的电缆和更短的长度能使功率损耗和阻尼因数的降低最小。 不要使扬声器电缆靠近输入线缆。 警告: 为避免电击,请勿在扬声器电线的导体暴露在外 时操作放大器。 立体声、双放大器或并行模式 —图30— 接线盒 连接器接线盒连接器需要按如下方式装配。 1.剥开电线,露出7-8mm 2. 根 据使用的模式将电缆插入连接器的凸起部分。参见下文。 3. 使 用平头螺丝刀固定电缆。将螺钉拧紧到6in.-lbs。 4. 将 插头插入放大器上的插座。 5. 使 用平头螺丝刀固定连接器。将螺钉拧紧到6in.-lbs。 桥式单声模式 立体声和并行模式:將電线连接-如—图30所示,或者如—图 —图31—...
- Page 96 操作 交流电源开关 (交流电源) 确保将放大器连接到正确的交流线电压,如序列号标签上所示。连接到错误的线电 压非常危险,可能损坏放大器(—图33)。 通电之前检查所有连接并将衰减控件完全逆时针调到最大衰减。 120 VAC 220-240 VAC 放大器打开或关闭时一秒钟的静音属于正常情况(—图34)。 —图33— 衰减控件 顺时针转动衰减控件可减小衰减;逆时针转动则增大衰减。 衰减控件以∞至0(顺时针)之间的数字增量标记,表示衰减量。正常情况下,应 在较低衰减范围内进行设置。高于衰减级别14的范围不能用于正常程序电平,因为 输入净空可能被超过,但可在降低增益电平下测试。在最大衰减设置(∞)处,信号完 全中断。(—图35)。 LED 指示灯 大约在全功率的0.1%时,绿色LED信号指示灯亮起。 —图34— 过载时,红色LED削波指示灯会闪动(正在削波)。如果放大器的保护电路触发保护 性静音,信号和削波LED指示灯不会亮。如果使用中发生此情况,请参考 第17-18页上的“故障排除”部分。 模型 最大电压增益 CMX300Va 31.6x(30dB) CMX500Va 40x(32dB) CMX800Va 46x(33dB) CMX2000Va 31.6x(30dB) —表4— —图35— 风扇冷却 风扇速度会自动变化,以保持安全的 热风从放大器 冷风流入放大 内部温度。保持前后通风口畅通,让 和机架流出。...
- Page 97 故 障排除 问题:没有声音 指示:电源指示灯不亮 = lit =指示灯亮着 检查交流插头。还需检查后面板上的断路器。 =指示灯闪烁 = blinking 通过插入另一个设备,确认交流电源插座可用。如果在一个插座上使用过多放大器,大厦的断 路器可能会断开并关闭电源。 = off =该指示灯不亮 桥式单声模式中的过载可能导致放大器关闭数秒。检查负载阻抗(至少4Ω),或降低信号水 平。 —图37— 如果放大器经常关闭,则可能是内部出现严重故障。请关闭放大器,断开 交流电源,由合格的技术人员对放大器进行维修。 POWER CLIP CLIP 指示:信号LED指示灯对信号水平有反应 如果绿色的信号指示灯正常亮起,则可能是放大器与扬声器之间的某个位置 —图38— 出现故障。请检查扬声器接线是否断开。用另一个扬声器和线缆试一下。 POWER CLIP CLIP 指示:信号LED指示灯不亮 如果绿色的电源LED指示灯亮,风扇处于运行中,而信号LED指示灯不指 —图39— 示信号,请检查输入。确保信号源正在工作,换一根输入电缆再试。将信 号源连接至另一个声道或放大器,确认其正常工作。 POWER CLIP CLIP 指示:削波LED指示灯闪烁...
- Page 98 问题:嘶嘶声 拔掉放大器输入端,检查嘶嘶声是来自源还是来自设备上游;奇怪的声音或砰砰声说明该故障单元中的电子出现问题。 要保持较低的正常固有噪声电平,请在完整级别上操作主要信号源而无需削波,并避免将信号提高到源与放大器之间的 更深处。 问题:刺耳声和回声 应通过混频器控件来控制麦克风的回声。如果将麦克风增益调至零时,噪声依然持续,则说明信号处理器或线缆有严 重故障。持续从信号源朝放大器作用时,请通过减小其增益或将其拔掉的方式检查信号路径中的每个设备。...
- Page 99 规格 CMX 300Va CMX 500Va CMX 800Va CMX 800Va 立体声模式(双声道驱动) 8Ω/FTC20Hz-20kHz/0.1%THD 185W 260W 450W 1050W 8Ω/EIA1KHZ/0.1%THD 200W 300W 500W 1100W 4Ω/FTC20HZ-20KHZ/0.1%THD 280W 400W 650W 1600W 4Ω/EIA1KHZ/0.5%THD 300W 500W 800W 4Ω/EIA1KHZ/1%THD 2000W 2Ω/EIA1KHZ/1%THD 430W 700W 1200W 2500W 70V-直接驱动/EIA1kHz/1%THD 400W 2500W 100V-直接驱动/EIA1kHz/1%THD 1000W 桥式单声模式 8Ω/FTC20Hz-20kHz/0.1%THD 530W 800W 1300W 3200W...
- Page 100 通信地址: QSCAudioProducts,LLC 1675MacArthurBoulevard CostaMesa,CA92626-1468USA 电话: 总机:(714)754-6175 销售和市场部门:(714)957-7100或 (仅限美国)免费电话(800)854-4079 客服部门:(714)957-7150或 (仅限美国)免费电话(800)772-2834 传真: 销售和市场部门传真:(714)754-6174 客服部门传真:(714)754-6173 网址: www.qsc.com 电子邮件: info@qsc.com service@qsc.com ©2013QSCAudioProducts,LLC.保留所有权利。QSC™和QSC徽标是QSCAudioProducts,LLC。 所有其他商标是其各自所有者的财产。美国和全球待批专利。...
Need help?
Do you have a question about the CMX 300Va and is the answer not in the manual?
Questions and answers