Table of Contents
Advertisement
1
2
24
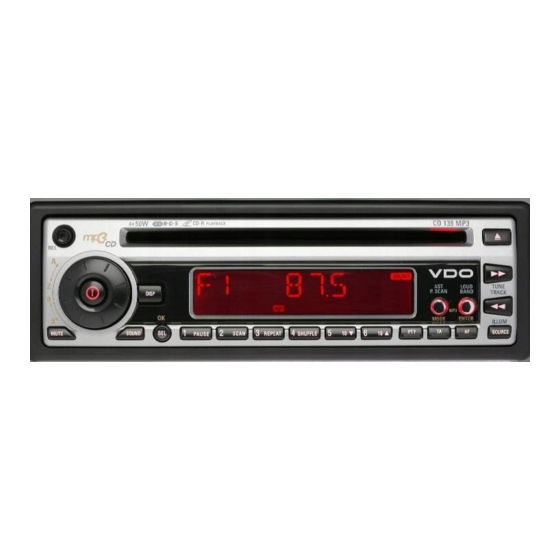
1.
Detachable front release button
2.
Volume rotary/MP3 character selection
button
3.
Power ON/OFF button
4.
Display button
5.
CD slot
6.
LCD display
7.
AST/P.SCAN/MODE button
8.
LOUD/BAND/ENTER button
9.
CD eject button
10. TUNE/TRACK up/forward button
11. TUNE/TRACK down/backward button
12. SOURCE/Illumination button
13. AF button
14. TA button
15. PTY button
3
3
4
5
23
22
21
RESET
25
26
6
20
19
18
17
16. Radio preset 6/MP3 10 steps advance
button
17. Radio preset 5/MP3 10 steps reverse
button
18. Radio preset 4/CD SHUFFLE button
19. Radio preset 3/CD REPEAT button
20. Radio preset 2/CD SCAN button
21. Radio preset 1/CD PAUSE button
22. SEL (to set Vol., Bass, Treble, Balance &
Fader)/MP3 O.K button
23. SOUND button (to select Flat, Classics,
Pop, Rock & DSP OFF)
24. Mute button
25. Blinking LED
26. Reset button
27. Detachable unit connector
7
16
15
14
13
27
8
9
10
12
11
Advertisement
Table of Contents

Subscribe to Our Youtube Channel
Related Manuals for VDO CD 139


Summary of Contents for VDO CD 139
- Page 1 RESET Detachable front release button 16. Radio preset 6/MP3 10 steps advance Volume rotary/MP3 character selection button button 17. Radio preset 5/MP3 10 steps reverse Power ON/OFF button button Display button 18. Radio preset 4/CD SHUFFLE button CD slot 19. Radio preset 3/CD REPEAT button LCD display 20.
-
Page 2: Connection
** For this accessory, contact your dealer * For CD 139 model only... -
Page 3: Table Of Contents
BEFORE YOU START... The unit may not operate correctly in extremely hot or cold temperatures. Thank you for purchasing this VDO product The unit is equipped with a built in which has been designed and manufactured self-protection circuit. When the... -
Page 4: How To Remove And Install The Front Panel
DIN FRONT-MOUNT (Method A) JIN REAR-MOUNT (Method B) Installation of the unit Installation using the screw holes on the sides of the unit. 1. Metal Sleeve Install the metal sleeve in the dashboard. Remove the outer rim around the front panel For optimal performance of the CD and the side springs. -
Page 5: General Operation
GENERAL OPERATION • ILLUMINATION COLOR Press the button (12) for 2 seconds to • ON/OFF change the color of LCD. Switch on the unit by pressing any button, except REL button (1) and the CD eject • RESET button (9). When system is on, press RESET button (26) is placed on the front POWER button (3) to turn off the unit. -
Page 6: Rds Operation
- Program Scanning - When region is on, the current listening Press P.SCAN button (7) shortly to scan program remains unchanged. all preset stations throughout the entire When region is off, it allows the reception band. moves to the regional station. Using PTY to Select Program •... -
Page 7: Advanced Rds Settings
Briefly press the TA button (14) to select the - MASK ALL mode: TA mode on or off. Masked the AF which has different PI When TA mode is on, you will hear the and any other interfering non PI station Traffic Announcement when broadcast. -
Page 8: Mp3 Operation
• Playing a CD-R MP3 OPERATION Depending on the type of CD-R CD, surface condition of the disc, as well as • HOW ARE MP3 FILES RECORDED AND the performance and condition of the CD PLAYED BACK ? writer, certain CD-R CD may not operate MP3 files (song) can be recorded in normally on this unit. - Page 9 inclusive of root directory ) • Use encoder rotary knob (2) to list all Playback, file search and directory search songs under this album and select the orders on a disc are determined by writing title (encoding) application. Therefore , playback •...
-
Page 10: Maintenance
• PLAY SONG IN RANDOM ORDER MAINTENANCE During MP3 operation, press SHUFFLE button (18) to play songs in random order. The following suggestions help you care for the product so that you can enjoy it for Press again to cancel the function. years. -
Page 11: Specification
SPECIFICATION GENERAL Power Supply Requirements : DC 12 Volts, Negative Ground Chassis Dimensions : 180 (W) x 155 (D) x 50 (H) Tone Controls - Bass (at 100 Hz) : + 10 dB / – 10 dB - Treble (at 10 KHz) : + 10 dB / –... -
Page 12: Trouble Shooting
TROUBLE SHOOTING Before going through the check list, check wiring connection. If any of the problems persist after check list has been made, consult your nearest service dealer. Symptom Cause Solution No power. The car ignition is not on. If the power supply is properly connected to the car accessory terminal, switch the ignition key to “ACC”.
Need help?
Do you have a question about the CD 139 and is the answer not in the manual?
Questions and answers