Table of Contents
Advertisement
Advertisement
Table of Contents

Subscribe to Our Youtube Channel
Related Manuals for Google Nexus 5


Summary of Contents for Google Nexus 5
- Page 1 User Guide...
-
Page 2: Table Of Contents
Status Bar ..........................13 Enter Text ..........................14 Text Input Methods ....................... 14 Google Keyboard ......................15 Google Voice Typing ....................16 Tips for Editing Text ..................... 16 Phone Calls ..........................17 Make Phone Calls ........................ 17 Call Using the Phone Dialer ..................17 Call from History ...................... - Page 3 Accounts and Messaging ......................33 Gmail / Google ........................33 Create a Google Account ..................... 33 Sign In to Your Google Account ................... 34 Access Gmail ....................... 34 Send a Gmail Message ....................35 Read and Reply to Gmail Messages ................35...
- Page 4 Apps and Entertainment ......................44 Google Play Store........................ 44 Find and Install an App ....................44 Create a Google Wallet Account .................. 45 Request a Refund for a Paid App ................. 45 Open an Installed App ....................46 Uninstall an App ......................46 Get Help with Google Play ...................
- Page 5 LTE ..........................51 Your User Name ......................51 Data Connection Status and Indicators ................ 52 Virtual Private Networks (VPN) .................... 52 Prepare Your Phone for VPN Connection ..............53 Set Up Secure Credential Storage ................53 Add a VPN Connection ....................53 Connect to or Disconnect from a VPN .................
- Page 6 Tools and Calendar ........................68 Calendar ..........................68 Add an Event to the Calendar ..................68 Invite Guests to Your Calendar Event (Google Account Only) ........69 Send a Meeting Request (Exchange ActiveSync Only) ..........69 Calendar Event Alerts ....................69 View Calendar Events ....................
- Page 7 Update Your Phone ......................79 Update Your System ....................79 Update Your Profile ...................... 79 Update Your PRL ......................79 Sprint Worldwide Wireless Service ..................... 80 Activate Sprint Worldwide Service on Your Account ............80 Your Phone’s SIM Card for International GSM Roaming ............ 80 Enable Global Roaming Mode .....................
- Page 8 Owner Information ......................96 Encrypt Phone ......................96 Make Passwords Visible ....................96 Device Administration ....................96 Credential Storage ....................... 97 Language & Input Settings ....................97 Language ........................97 Spell Checker ....................... 97 Default Input Method ....................98 Google Keyboard ......................98...
- Page 9 Google Hindi Input ......................98 Google Korean Keyboard ..................... 98 Google Pinyin ....................... 99 Google Voice Typing ....................99 iWnn IME ........................99 Voice Search Settings ....................99 Text-to-Speech Output Settings ................. 100 Pointer Speed ......................100 Back Up and Reset Phone ....................100 Accounts ..........................
-
Page 10: Get Started
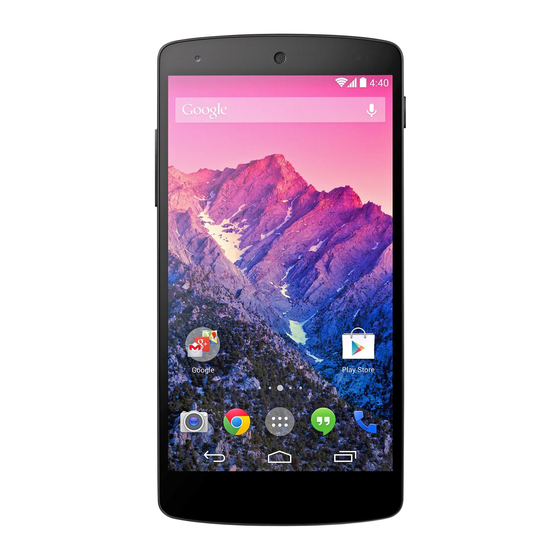
Get Started Your phone is packed with features that simplify your life and expand your ability to stay connected to the people and information that are important to you. The following topics will introduce the basic functions and features of your phone. Your Phone at a Glance The illustrations and descriptions below outline your phone’s basic layout. -
Page 11: Activate Your Phone
Plug one end of the USB cable into the phone's Charger/Accessory Port and the other end into an electrical outlet. The charge time varies depending upon the battery level. Note: Your phone’s battery should have enough charge for the phone to turn on and find a signal, run the setup application, set up voicemail, and make a call. -
Page 12: Make Your First Call
Note: You do not need to sign up for a Google Account to use your phone. However, to download apps from the Google Play Store app, you must link your phone to a Google Account. -
Page 13: Set Up Voicemail
1. Touch > > 2. Use the dialpad to enter a phone number. If you enter a wrong number, tap to erase digits one by one. To erase the entire number, touch and hold 3. Touch to dial the number. Note: Your phone's battery should have enough charge for your phone to turn on and find a signal, set up your voicemail, and make a call. -
Page 14: Phone Basics
Phone Basics Your phone is packed with features that simplify your life and expand your ability to stay connected to the people and information that are important to you. The following topics will introduce the basic functions and features of your phone. Your Phone’s Layout The illustrations and descriptions below outline your phone’s basic layout. -
Page 15: Turn Your Phone On And Off
● Back Key lets you return to the previous screen, or close a dialog box, options menu, the Notifications panel, or onscreen keyboard. ● Home Key returns you to the Home screen. Press and hold to open the recently-used applications window. ●... -
Page 16: Turn Your Screen On And Off
Turn Your Screen On and Off Your phone allows you to quickly turn the screen off when not in use and to turn it back on and unlock it when you need it. Turn the Screen Off When Not in Use ■... - Page 17 Touch When you want to type using the onscreen keyboard, select items onscreen such as application and settings icons, or press onscreen buttons, simply touch them with your finger. Touch and Hold To open the available options for an item (for example, a contact or link in a Web page), touch and hold the item.
- Page 18 Swipe or Slide To swipe or slide means to quickly drag your finger vertically or horizontally across the screen. Drag To drag, press and hold your finger with some pressure before you start to move your finger. While dragging, do not release your finger until you have reached the target position. Flick Flicking the screen is similar to swiping, except that you need to swipe your finger in light, quick strokes.
- Page 19 Rotate For most screens, you can automatically change the screen orientation from portrait to landscape by turning the phone sideways. When entering text, you can turn the phone sideways to bring up a bigger keyboard. See Enter Text for more details. Note: The Auto-rotate check box needs to be selected for the screen orientation to automatically change.
-
Page 20: Your Home Screen
Your Home Screen The home screen is the starting point for your phone’s applications, functions, and menus. You can customize your home screen by adding application icons, shortcuts, folders, widgets, and more. Phone Basics... -
Page 21: Home Screen Overview
Home Screen Overview Your home screen extends beyond the initial screen. Swipe the screen left or right to display additional screens. Note: Your phone’s home screens cycle through so that you can keep swiping in one direction and make it back to the main home screen. The small circles above the primary shortcuts let you know your current screen position. -
Page 22: Extended Home Screens
To add a Home screen, swipe to the rightmost screen and drag an app or widget to the right edge. ● The screen to the left of the main Home screen is reserved for Google Now, and is available only when Google Now is turned on. Status Bar The status bar at the top of the home screen provides phone and service status information on the right side and notification alerts on the left. -
Page 23: Enter Text
Google Hindi Input lets you enter letters and words using Hindi characters. ● Google Korean Keyboard lets you enter letters and words using Korean characters. ● Google Pinyin lets you enter letters and words using the Chinese Pinyin system. Phone Basics... -
Page 24: Google Keyboard
Google Keyboard. Gesture Typing The Google Keyboard’s Gesture Typing feature lets you enter words by drawing a path from letter to letter in one continuous motion. When you lift your finger after the last letter of a word, a space is automatically added. -
Page 25: Google Voice Typing
Google Voice Typing Google Voice typing uses Google voice recognition to convert speech to text. Use Google Voice Typing to Enter Text 1. From a screen where you can enter text, drag down from the top of the screen to open the Notifications Panel, and then tap Google Voice Typing. -
Page 26: Phone Calls
Phone Calls With our wireless service and your phone’s calling features, you can enjoy clear phone calls across the country. Make Phone Calls There are several convenient ways to place calls from your phone. Call Using the Phone Dialer The most “traditional” way to place a call is by using the phone’s dialer screen. 1. -
Page 27: Call From History
Call from History The History list lets you quickly place calls to recent incoming, outgoing, or missed numbers. 1. Touch > to display the phone app. 2. Touch to display History. 3. Touch an entry to display the call details. 4. - Page 28 Note: If your phone is turned off, all calls automatically go to voicemail. Answer an Incoming Call ■ Drag the call icon to the right to answer the call. Mute the Ringing Sound ■ To mute the ringer without rejecting the call, press the volume down button. Phone Calls...
- Page 29 Reject an Incoming Call ■ Drag the call icon to the left. The call will be sent directly to voicemail. Reject a Call and Send a Text Message You can reject an incoming call and automatically send a text message to the caller. ■...
-
Page 30: Voicemail
You can edit the quick responses through the Call settings menu. From the phone app, touch > Settings > Call settings > Quick responses. Voicemail The following topics outline your phone’s voicemail service. Voicemail Setup You should set up your voicemail and personal greeting as soon as your phone is activated. ■... -
Page 31: Retrieve Your Voicemail Messages
Retrieve Your Voicemail Messages You can review your messages directly from your wireless phone (using either traditional voicemail or Visual Voicemail) or from any other touch-tone phone. Use Traditional Voicemail to Access Your Messages 1. Touch > > 2. Touch and hold . -
Page 32: In-Call Options
In-call Options While you’re on a call, you will see a number of onscreen options. Touch an option to select it. ● End call: End the current call. ● Dialpad: Use the onscreen dialpad to enter additional numbers, for example, an extension or access code. -
Page 33: Caller Id
Caller ID Caller ID identifies a caller before you answer the phone by displaying the number of the incoming call. If you do not want your number displayed when you make a call, follow these steps. 1. Touch > > 2. -
Page 34: Call Forwarding
3. When you’re connected to the second party, touch MERGE CALLS. Your conference call is now in session. Note: If one of the people you called hangs up during your call, you and the remaining caller stay connected. If you initiated the call and are the first to hang up, all callers are disconnected. 4. -
Page 35: Call Settings
1. Touch > to display the phone app. 2. Touch to display the call log. 3. Touch > Clear call log. 4. Touch OK to clear the log. Call Settings Your phone’s Call Settings menu lets you configure your ringtone, voicemail options and a number of other settings for the phone application. - Page 36 Your phone is compatible with select TTY devices. Please check with the manufacturer of your TTY device to ensure that it supports digital wireless transmission. Your phone and TTY device will connect using a special cable that plugs into your phone’s headset jack. If this cable was not provided with your TTY device, contact your TTY device manufacturer to purchase the connector cable.
-
Page 37: Contacts
Before using the People application, it’s best to learn a few basics. When you first turn on your device and sign into a Google Account, any existing contacts from that account are synced with your People app. Contact entries are sorted alphabetically. -
Page 38: Your Contacts List
• To add contacts shortcut to the home screen, touch > Apps . Touch and hold the People icon, drag the icon to the home screen, and release the icon to place it. Your Contacts List Learn how to view and navigate through your contacts list. ■... -
Page 39: Save A Phone Number
Note: To add more phone numbers, email addresses, etc., touch Add new. 5. When you have finished adding information, touch DONE. Save a Phone Number You can save a phone number to Contacts directly from the phone dialpad. 1. Touch >... -
Page 40: Delete A Contact
2. Touch a contact to display it, and then touch > Edit. 3. Touch the Add picture icon. 4. Touch Picture and select a location. Take photo launches the Camera and lets you take a photo to use as the contact picture. - Page 41 Gmail to send the information as a Gmail attachment. Address the message, add a subject and a message, and then touch Send. See Send a Gmail Message details. Contacts...
-
Page 42: Accounts And Messaging
Google Account. Create a Google Account If you do not already have a Google Account, you can create one online or using your phone. Note: You can also create and sign into your Google/Gmail account through your phone’s Setup application. -
Page 43: Sign In To Your Google Account
Next arrow. Note: When setting up a new Google Account, either on your phone or online, you will be prompted to add a secondary email address. Enter a second Gmail address or any other email address from which you currently send and receive email. -
Page 44: Send A Gmail Message
Select messages and conversations: Touch the box before the email or conversation. View the inbox of your other Gmail account: • Touch the account name at the top of the inbox, and then touch the account you want to view. ... -
Page 45: Email
1. Touch > Apps > Gmail 2. Touch a message to display it. Tip: You can also access new messages through the Notifications bar. When a new Gmail message arrives, you’ll see the icon in the Notifications bar. Touch and hold the bar and slide it down to display notifications. -
Page 46: Add An Exchange Activesync Account
1. Touch > Apps > Email Touch IMAP or POP3. 2. Enter the Email address and Password for the email account and then touch Next. Touching Next prompts your phone to attempt a "regular" email setup and test the incoming and outgoing servers. -
Page 47: View And Reply To Email
1. Touch > Apps > Email 2. On the email account inbox, touch Compose Tip: Touch the account name at the top of the screen to switch to a different email account. 3. Enter the message recipient’s email address in the To field. If you are sending the email message to several recipients, separate the email addresses with a comma. -
Page 48: Manage Your Email Inbox
For Forward, enter or select recipients and then enter an additional message. 4. After composing your message, touch Send Manage Your Email Inbox Your email inbox provides management options for viewing, sorting, and deleting your email messages. View Your Email Inbox 1. -
Page 49: Text Messaging
2. Touch WIDGETS. 3. Touch and hold the Email widget and drag it to an empty space on a home page. Text Messaging With Text Messaging (SMS), you can send and receive instant text messages between your wireless phone and another messaging-ready phone. The Hangouts application lets you send and receive instant messages and video calls, including SMS messages. -
Page 50: Hangouts Options
Touch > Apps > Hangouts and then touch the text message or message thread to open and read it. If you have a new message notification, touch and hold the status bar, and then slide the status bar down to open the Notifications panel. Touch the new message to open and read it. - Page 51 Sound Vibrate ● Advanced Delete old messages Auto retrieve MMS • Roaming auto-retrieve Wireless alerts About Google+ Hangouts ● About Hangouts Build version Open source licenses Privacy policy Accounts and Messaging...
- Page 52 Terms of service Accounts and Messaging...
-
Page 53: Apps And Entertainment
Note: Available applications and services are subject to change at any time. Google Play Store Google Play™ is the place to go to find new Android apps, books, movies, and music for your phone. Choose from a wide variety of free and paid content ranging from productivity apps and games to bestselling books and blockbuster movies and music. -
Page 54: Create A Google Wallet Account
Google Wallet account. – or – ■ The first time you use your phone to buy an item from Google Play, you’re prompted to enter your billing information to set up a Google Wallet account. Warning: When you’ve used Google Wallet once to purchase an application from the Google Play Store app, the phone remembers your password, so you don’t need to enter it the next... -
Page 55: Open An Installed App
4. When prompted, touch OK to remove the app from your phone. Get Help with Google Play The Google Play store app offers an online help option if you have questions or want to know more about the app. ■ Touch >... -
Page 56: Google Play Music
> Play Music Google Play Movies & TV The Google Play Movies & TV app lets you connect to Google Play, download a movie or TV show, and then watch it instantly. Choose from thousands of movies and TV shows, including new releases and HD titles, and stream them on your Android phone. -
Page 57: Youtube
YouTube YouTube™ is a video sharing website on which users can upload and share videos. The site is used to display a wide variety of user-generated video content, including movie clips, TV clips, and music videos, as well as video content such as video blogging, informational shorts and other original videos. -
Page 58: Web And Data
Web and Data Your phone’s data capabilities let you wirelessly access the Internet or your corporate network through a variety of connections, including Wi-Fi, 4G, 3G, and Virtual Private Networks (VPN). The following topics address your phone’s data connections and the built-in Web browser. Additional data-related features can be found in Accounts and Messaging,... -
Page 59: Check The Wireless Network Status
Check the Wireless Network Status Check the status of your current wireless network, including speed and signal strength, through the Wi-Fi settings menu. 1. Touch > Apps > Settings > Wi-Fi. 2. Touch the wireless network that the phone is currently connected to. You will see a message box showing the Wi-Fi network name, status, speed, signal strength, and other details. -
Page 60: Data Services General Information (3G And Lte Networks)
Data Services General Information (3G and LTE Networks) The following topics will help you learn the basics of using your data services, including managing your user name, launching a data connection, and navigating the Web with your phone. Important: Certain data services requests may require additional time to process. While your phone is loading the requested service, the touchscreen or QWERTY keyboard may appear unresponsive when in fact they are functioning properly. -
Page 61: Data Connection Status And Indicators
Update Your User Name If you choose to change your user name and select a new one online, or make any changes to your services, you must then update the profile on your phone. 1. Touch > Apps > Settings >... -
Page 62: Prepare Your Phone For Vpn Connection
Prepare Your Phone for VPN Connection Depending on the type of VPN you are using at work, you may be required to enter your login credentials or install security certificates before you can connect to your company’s local network. You can get this information from your network administrator. Before you can initiate a VPN connection, your phone must first establish a Wi-Fi or data connection. -
Page 63: Browser
Connect to a VPN 1. Touch > Apps > Settings > More… > VPN. 2. In the VPNs section, touch the VPN that you want to connect to. 3. When prompted, enter your login credentials, and then touch Connect. When you are connected, a VPN connected icon appears in the notification area. - Page 64 Scrolling As with other parts of your phone’s menu, you’ll have to drag up and down to see everything on some websites. To scroll through a website’s page: ■ In a single motion, touch and drag across or up and down a page. Selecting To select onscreen items or links: ■...
-
Page 65: Browser Menu
2. Touch Go to launch the new page. Browser Menu The browser menu offers additional options to expand your use of the Web on your phone. Open the Browser Menu The browser menu may be opened anytime you have an active data session, from any page you are viewing. -
Page 66: Go To A Specific Website
(copy) to copy the selected text. (share) to share the selected text via Bluetooth, Drive, Email, Gmail, Google+, or Hangouts. Go to a Specific Website Follow the instructions to go to a particular website by entering a URL (website address). -
Page 67: Create Website Settings
• Content settings • Bandwidth management • About Chrome Create Website Settings You can create settings for individual websites. 1. Touch > Apps > Chrome 2. From any open Web page, touch > Settings > Content settings > Website settings. 3. -
Page 68: Connect To Portable Hotspot
3. Touch Setup Wi-Fi hotspot to configure the Network SSID, Security type, and password. Note: Using both LTE service and hotspot drains your phone’s battery at a much faster rate than when using any other feature combination. The best way to keep using the phone as a hotspot is to have it connected to a power supply. -
Page 69: Camera And Video
Camera and Video You can use the camera or camcorder to take and share pictures and videos. Your phone comes with a 8 megapixel camera with an autofocus feature that lets you capture sharp pictures and videos. Camera The following topics teach you how to take pictures with your phone’s camera. Open or Close the Camera You can open the camera through the applications list and close it from the camera menu. -
Page 70: Review Screen
To zoom in, “spread” the screen with your thumb and finger. To zoom out, “pinch” the screen. 3. On the Viewfinder screen, touch > to select a camera flash mode depending on your lighting conditions. 4. Frame your subject on the screen. Tip: Hold the phone vertically when taking portrait shots or hold the phone horizontally when taking landscape shots. -
Page 71: Camera Settings
1. Touch > Apps > Camera 2. Touch to switch to the video camera. 3. If prompted, choose a recording mode: Normal, Limit for MMS, Slow motion, or Fast motion. 4. Holding the phone in landscape mode, frame your subject on the screen. 5. -
Page 72: Video Camera Settings
● Flash Mode: Set the camera’s flash mode to OFF, AUTO, or ON. ● Switch camera lens: Switch between the back camera lens and the front-facing camera lens (for self portraits, video chatting, etc.). Video Camera Settings You can adjust your video camera settings using the icons on the main video camera screen and the full video camera settings menu. -
Page 73: Open Or Close Gallery
Open or Close Gallery The Gallery app opens in the Albums tab where your pictures and videos are organized by albums for easy viewing. Open the Gallery App 1. Touch > Apps > Gallery 2. Touch a folder location (such as Camera), and then touch an image to view the picture. If you have downloaded any pictures and videos, these will be placed in the All downloads album. -
Page 74: Watch Video
■ Use pinch and spread to zoom in or out. “Spread” the screen using your thumb and forefinger to zoom in when viewing a picture. “Pinch” the screen to zoom out. (Move fingers outward to zoom in and inward to zoom out.) Watch Video The screen automatically switches to landscape mode when you play a video. -
Page 75: Share Pictures And Videos
The cropped picture is saved in the album as a copy. The original picture remains unedited. Share Pictures and Videos The Gallery application lets you send pictures and videos using email or multimedia messages. You can share pictures on your social networks (such as Facebook, Flickr, Picasa, and Twitter) and share videos on YouTube. -
Page 76: Send Pictures Or Videos Using Bluetooth
4. Touch Share via and then touch Hangouts 5. Compose your message and then touch Send Send Pictures or Videos Using Bluetooth You can select several pictures, videos, or both and send them to someone’s phone or your computer using Bluetooth. 1. -
Page 77: Tools And Calendar
Note: You can create multiple Google Calendars only in Google Calendar on the Web. After creating them in Google Calendar on the Web, you’ll be able to see them in the Calendar application on your phone. For more information about creating and managing multiple Google Calendars, visit the Google website: calendar.google.com. -
Page 78: Invite Guests To Your Calendar Event (Google Account Only)
9. Scroll to the bottom of the screen and then touch Save. Invite Guests to Your Calendar Event (Google Account Only) If you want to invite guests to your event, you need to create and add the event in your Google Calendar. -
Page 79: View Calendar Events
● By playing the assigned ringer type. ● By showing the Event Alert icon on the status bar. ● By showing the Alert screen. Event Reminders If you have set at least one reminder for an event, the upcoming event icon ( ) will appear in the notifications area of the status bar to remind you of the upcoming event. -
Page 80: Erase Calendar Events
● Touch an event to view its details. ● Slide left or right across the screen to view earlier or later weeks. Month View In Month view, you’ll see markers on days that have events. When in Month view: ● Touch the viewing mode at the top of the screen to switch to Agenda view. -
Page 81: Choose Calendars To Synchronize With Your Phone
The calendars are kept synchronized on your phone, whether or not you hide them. Choose Calendars to Synchronize With Your Phone You can choose which Outlook and Google Calendars to keep synchronized on your phone or which ones to stop synchronizing. -
Page 82: Timer
Timer Use a timer with your phone’s Clock app. 1. Touch > Apps > Clock 2. Touch the Timer tab and then touch . 3. Enter the amount of time and touch START to start the timer. Stopwatch Use a stopwatch with your phone’s Clock app. 1. -
Page 83: The Bluetooth Settings Menu
The Bluetooth Settings Menu The Bluetooth settings menu gives you access to information and controls for your phone’s Bluetooth feature. ■ Touch > Apps > Settings > Bluetooth. Touch SEARCH FOR DEVICES to search for other visible in-range Bluetooth devices. -
Page 84: Reconnect A Headset Or Car Kit
Note: Due to different specifications and features of other Bluetooth-compatible devices, display and operations may be different, and functions such as transfer or exchange may not be possible with all Bluetooth-compatible devices. Reconnect a Headset or Car Kit When you have paired a headset with your phone, you should be able to reconnect it automatically by turning on Bluetooth on your phone and then turning on the headset. -
Page 85: Send And Receive Information Using Bluetooth
Send and Receive Information Using Bluetooth You can use Bluetooth to transfer information between your phone and another Bluetooth- enabled device such as a phone or notebook computer. The first time you transfer information between your phone and another device, you need to enter or confirm a security passcode. After that, your phone and the other device are paired, and you will not need to exchange passcodes to transfer information in the future. - Page 86 6. If prompted, accept the connection on the receiving device, and enter the same passcode on both your phone and the other device, or confirm the auto-generated passcode. 7. On the receiving device, accept the file. Receive Information from Another Device Your phone is capable of receiving a wide variety of file types with Bluetooth, including pictures, music tracks, and documents such as PDFs.
-
Page 87: Near Field Communication (Nfc) Technology
Near Field Communication (NFC) Technology NFC (Near Field Communication) technology is a short-range, wireless technology that lets you quickly and wirelessly exchange information between your phone and other NFC-enabled smartphones, smart accessories, and NFC-enabled access points. You can also use NFC technology to save, view, create, or change smart tags. -
Page 88: Update Your Phone
4. On your computer, navigate to the detected device (such as through the My Computer menu) and open it. 5. If available, select a drive (Card for microSD card, Phone for internal phone storage). 6. Select a folder (for example, Music for songs and albums) and copy files to it from your computer. -
Page 89: Sprint Worldwide Wireless Service
Sprint Worldwide Wireless Service With your phone and global roaming service from Sprint Worldwide Wireless Service, you can make phone calls and use wireless data services around the globe on compatible CDMA and GSM/UMTS networks.. Activate Sprint Worldwide Service on Your Account Before using your phone in global roaming mode, you must activate Sprint Worldwide service. -
Page 90: Make And Receive Worldwide Calls
1. Touch > Apps > Settings > More… > Mobile network settings. 2. Touch Data roaming to connect to data services when roaming. To set your network mode options manually: 1. Touch > Apps > Settings > More… > Mobile networks settings > System Select. -
Page 91: International Voicemail Service
International Voicemail Service Your voicemail will follow you as you travel. All of your unanswered calls will be forwarded to your voicemail. You will need to be sure your voicemail box is already set up and that you know your voicemail password. Note: Voicemail may not be available on all networks;... -
Page 92: International Voicemail Troubleshooting
1. Touch > > > All contacts. 2. Select the voicemail contact or enter your voicemail access number for international use. 3. When your voicemail answers, follow the prompts to retrieve your voicemail messages. International Voicemail Troubleshooting There are a few tips to keep in mind when using voicemail while traveling. ●... - Page 93 Status Messages Message Description Number Not in Service The number that you entered is not valid. The phone that you called is either busy, out-of-range, or User Not Available turned off. Please try again later. The phone that you called is either busy, out-of-range, or User Not Authorized turned off.
-
Page 94: Contact Your Wireless Service Provider For Assistance With International Service
Status Messages Message Description An incorrect SIM PIN was entered three consecutive times. You will be unable to send or receive calls on your phone. Contact your wireless service provider to obtain the PIN PIN Blocked. Call Your Unblocked Key (PUK) code. Your provider sets the default to Provider PIN off;... -
Page 95: Settings
Settings The following topics provide an overview of items you can change using your phone’s Settings menus. Wi-Fi Settings The Wi-Fi settings menu lets you turn Wi-Fi on or off, set up and connect to available Wi-Fi networks, and configure advanced Wi-Fi options. Access the Wi-Fi Settings Menu ■... -
Page 96: Data Usage Settings
Access the Bluetooth Settings Menu ■ Touch > Apps > Settings > Bluetooth. Data Usage Settings The Data usage menu lets you view your phone’s mobile and Wi-Fi data usage, set data limits, restrict hotspot usage, and more. ■ Touch >... -
Page 97: Nfc Settings
Preferred network type System select Carrier settings NFC Settings NFC (Near Field Communication) is a wireless technology that enables data transmission between two objects when they are brought within a few inches of each other. When you enable NFC on your phone, it can exchange data with other NFC-enabled devices or read information from smart tags embedded in posters, stickers, and other products. -
Page 98: Sound Settings
Sound Settings The Sound settings menu lets you control your phone’s audio, from ringtones and alerts to touch tones and notifications. Volumes Configure your phone’s volume settings. 1. Touch > Apps > Settings > Sound. 2. Touch Volume and use the sliders to set the volume level for Music, video, games, and other media, Ringtone, Notifications, and Alarms. -
Page 99: Touch Sounds
Touch Sounds When Touch sounds is enabled, tones play when you touch the screen to make selections. 1. Touch > Apps > Settings > Sound > Default notifications. 2. Touch the check box next to Touch sounds to enable or disable the option. Screen Lock Sound When Screen lock sound is enabled, tones play when you touch the screen to lock or unlock it. -
Page 100: Wallpaper
2. Touch Sleep and then select a time. Daydream The Daydream setting controls what the screen displays when the phone is docked, or while charging. You can choose to display a Clock, Colors, Google Photos, Photo Frame, or Photo Table. 1. Touch >... -
Page 101: Pulse Notification Light
> Display. 2. Touch the check box next to Pulse notification light to enable or disable the option. Wireless Display Your Nexus 5 is compatible with devices that support the Wi-Fi Certified Miracast™ protocol for wireless display. 1. Touch > Apps >... -
Page 102: Application Manager
> Tap & pay. 2. Touch an app to make it your default payment app. Note: If your device doesn’t have a default app, such as Google Wallet, you can browse Google Play for other payment apps. Important: This feature manages payment apps like Google Wallet. The tap & pay option doesn’t apply to Android Beam and won’t include certain apps, such as money transfer apps. - Page 103 In order from least secure to most secure, the available screen lock options are: ● None ● Slide ● Face Unlock ● Pattern ● ● Password Important: To protect your phone and data from unauthorized access, it is recommended that you use the highest security level available (Password protection).
-
Page 104: Disable The Screen Lock
8. Enter a backup PIN, touch Continue, re-enter the PIN, and touch OK to save your screen unlock pattern. Note: Clear the Make pattern visible check box if you do not want the unlock pattern to display on the screen when you unlock it. If you fail to draw the correct unlock pattern on the screen after five attempts, you will be prompted to wait for 30 seconds before you can try again. -
Page 105: Owner Information
Owner Information Enter text to display on the lock screen. 1. Touch > Apps > Settings > Security > Owner info. 2. Enter text, and then touch Show owner info on lock screen to display it on the lock screen. Encrypt Phone You can encrypt your accounts, settings, downloaded apps and their data, media, and other files. -
Page 106: Credential Storage
Review the device administration details for the account To remove administration from the account, tap Deactivate. Unknown Sources By default, you can only install apps from the Google Play Store. When Unknown sources is enabled, you can install apps from other sources. 1. Touch > Apps >... -
Page 107: Default Input Method
2. Touch Settings to configure your Google keyboard options. Google Hindi Input Google Hindi Input is an Indic IME which allows you to type messages, update on social networks or compose emails in Hindi on your phone. 1. Touch > Apps >... -
Page 108: Google Pinyin
1. Touch > Apps > Settings > Language and input. 2. Touch the check box next to Google voice typing to enable or disable the feature. 3. Touch Settings to configure your Google voice typing options. iWnn IME iWnn IME is a Japanese IME which supports emoji input on your phone. -
Page 109: Text-To-Speech Output Settings
Your phone’s Back up and reset menu lets you back up your phone’s data and settings to Google servers before resetting your phone to the original factory settings. The Factory data reset erases all data from the phone’s application storage, including: ●... -
Page 110: Accounts
Back up my data: This option lets you back up your app data, Wi-Fi passwords, and other settings to Google servers. Backup account: Select a Google Account for your phone backup. Automatic restore: This option lets you restore backed up settings and data when reinstalling an application after a factory data reset. -
Page 111: Date & Time Settings
3. Enter your account information and touch Next. Depending on the account type, you may need to enter an email address or user address, password, domain name, or other information. For Corporate Sync accounts, contact your server administrator to determine what information you will need. -
Page 112: Printing
System updates: Use System update options to update your phone’s internal software. Status: View information about your phone’s current status. Legal information: Display open source licenses, configure license settings, including your DivX® VOD registration, and Google info. Regulatory information: View regulatory information related to your phone. Settings... - Page 113 Model number: View your phone’s model number. Android version: View the firmware version of your phone. Baseband version: View the baseband version of your phone. Kernel version: View the kernel version of your phone. Build number: View the build number of your phone. Settings...
-
Page 114: Index
Application Manager, 104 Invite guests, 78 Applications, 52 Meeting request, 78 Apps, 52 Show or hide calendars, 81 Find and install, 52 Sync Google calendars, 81 Open, 54 View events, 79 Request refunds, 53 Call Forwarding, 33 Uninstall, 54 Call Logs... - Page 115 Timer, 82 Enter Text, 22 World Clock, 82 Exchange ActiveSync Conference Calling, 32 Add account, 45 Configure Google Keyboard, 23 Extended Home Screen, 21 Connect to Portable Wi-Fi Hotspot, 67 Factory Data Reset, 112 Contacts, 36 Files Add contact, 37...
- Page 116 Newsstand, 55 Make and Receive Worldwide Calls, 91 Store, 52 Make Your First Call, 11 Google Play Music, 55 Maps, 54 Google Voice Typing, 24, 110 Messaging, 41 Settings, 110 Mic, 14 Google Wallet, 53 Mobile Hotspot, 66 GPS Satellites, 104...
- Page 117 Assign to contacts, 38 Share Crop, 73 Contacts, 39 Rotate, 73 Share Pictures and Videos, 74 Share via Bluetooth, 75 SIM Card, 90 Share via email, 74 Sleep, 102 Share via messaging, 75 Slide, 17 Take with camera, 68 Sound Settings, 100 View, 72 Speaker, 14 Zoom, 72...
- Page 118 Turn NFC On and Off, 87 Voicemail Access Number, 92 Turn Phone On and Off, 14 Volume Turn Screen On and Off, 15 Button, 14 Typing, 22 Volume Settings, 100 Unknown Sources, 108 VPN, 60 Update Your Phone, 88 Add connection, 61 Vibrate on Touch, 101 Connect or disconnect, 61 Vibration Intensity, 100...
Need help?
Do you have a question about the Nexus 5 and is the answer not in the manual?
Questions and answers