Table of Contents
Advertisement
Advertisement
Table of Contents

Related Manuals for Hitachi RA-08JDF2


Summary of Contents for Hitachi RA-08JDF2
-
Page 2: Safety Precaution
SAFETY PRECAUTION ● Please read the “Safety Precaution” carefully before operating the unit to ensure correct usage of the unit. ● Pay special attention to signs of “ Warning” and “ Caution”. The “Warning” section contains matters which, if not observed strictly, may cause death or serious injury. The “Caution” section contains matters which may result in serious consequences if not observed properly. -
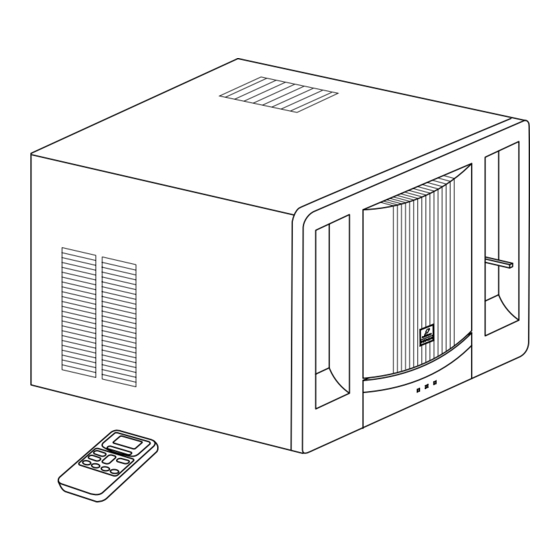
Page 3: Control Panel
4 Vertical Deflector 5 Air Exhaust Lever 6 Front Cover 7 Control Panel Cover REMOTE CONTROLLER Model Width Height Depth RA-08JDF2 ", 470mm ", 345mm ", 610mm RA-10JDF2 CONTROL PANEL INDICATION LAMP RECEIVING PART TIMER LAMP This lamp lights when the timer is set. -
Page 4: Batteries Installation
NAMES AND FUNCTIONS OF REMOTE CONTROL UNIT ■ This controls the operation function and timer setting of the room air conditioner. The range of control is about 4 meters. If indoor lighting is controlled electronically, the range of control may be shorter. Signal Transmission ∞... -
Page 5: How To Use
HOW TO USE AUTOMATIC OPERATION ■ The device will automatically determine the operation mode either COOL or DEHUMIDIFY depending on the initial room temperature. Press the (START/STOP) button Operation start with a “beep”. ● Press the (START/STOP) button STOP Please make sure you have selected the (Automatic) mode ●... -
Page 6: Circulation Operation
HOW TO SET THE SLEEP TIMER Mode Indication 1 hour 2 hours 3 hours 7 hours Sleep Timer Sleep timer off Sleep Timer: The device will continue working for the desired number of hours and then turn off. Point the signal window of the remote controller toward the unit, and press the (SLEEP TIMER) button. -
Page 7: Operation Mode Selection
MANUAL OPERATION [Cooling • Dehumidify • Circulation] ■ Please use under below condition when you want to set the function mode, room temperature and fan speed by manually. DEHUMIDIFYING COOLING Room Temperature Outdoor Temperature 16°C above 22–42°C OPERATION MODE SELECTION Every time you press the button, the mode will change as the ●... - Page 8 ■ DEHUMIDIFYING CONDITION Operation condition depend on the setting Temperature. ● SETTING TEMPERATURE OPERATION CONDITION Device will dehumidify, reducing the room temperature to the LOWER THAN ROOM preset level. Operation stop when room temperature becomes lower than setting temperature and start again operation when it is higher TEMPERATURE than setting temperature.
-
Page 9: Timer Reservation
TIMER RESERVATION ■ ON Timer and OFF Timer are available. OFF Timer Reservation ■ Operation stop at setting time OFF TIME setting Select the OFF TIME by pressing the ● (OFF) button. Setting time will change according to the below ●... -
Page 10: Power Switch
AIR DEFLECTORS VERTICAL DEFLECTORS HORIZONTAL DEFLECTORS Vertical deflectors at both sides of outlets can Horizontal deflectors at both sides of the outlets be set to either auto-swing or static position to can be set to direct discharge air upward, direct discharge air rightward, leftward or downward or forward direction. -
Page 11: Air Cleaning Filter
AIR CLEANING FILTER ALWAYS STOP THE OPERATION BEFORE INSTALLING THE AIR CLEANING FILTER. Air Cleaning Hook Filter 1. Open the suction grille 2. Remove the normal 3. Install the air cleaning filter filter in the frame 4. Install back the normal filter and close the suction grille AIR CLEANING FILTER IS WASHABLE AND REUSABLE UP TO 20 TIMES BY USING VACUUM CLEANER OR RINSE WITH RUNNING TAP WATER. - Page 12 THE IDEAL WAYS OF OPERATION Suitable Room Temperature Install Curtain or Blinds Ventilation Caution Warning It is possible to Do not close the room for a long Freezing temperature reduce heat period of time. Occasionally open the is bad for health and a entering the room door and windows to waste...
-
Page 13: Maintenance
MAINTENANCE CAUTION ALWAYS TURN OFF AND UNPLUG BEFORE ANY CLEANING OR MAINTENANCE TO ENSURE SAFETY. AIR FILTER If the air filter is clogged with dust, the air flow volume will decrease and resulting in poor cooling performance, and increased operating noise. Be sure to clean the filter about every 20 days. -
Page 14: Before Asking For Service
FRONT COVER AND SUCTION GRILLE Clean the front cover and suction grille with a soft dry cloth. When it is excessively dirty, wipe it with a soft cloth dampened with mild soap, then wipe it again thoroughly with a soft dry cloth. -
Page 15: Installation Instructions
INSTALLATION INSTRUCTIONS REMOVE ALL THE SHIPPING PARTS BEFORE INSTALLATION CONSULT YOUR DEALER CONCERNING INSTALLATION REQUIREMENTS. LOCATION ● Select a location that can support the weight of the air conditioner and will not cause increased operating noise and vibration. ● Select a location where direct sunlight does not fall on your air conditioner. ●... -
Page 16: Power Source
● Ground the air conditioner to prevent danger of electric shock. ● Connect the air conditioner with power source securely. ● Use a fuse as below: RA-08JDF2 15A time delay fuse RA-10JDF2 Voltage rating 50Hz 220-240V Operatable 50Hz 198-264V... -
Page 17: Power Cord Arrangement
SLIDE OUT OF UNIT 1 Remove the four screws which fasten the base pan to the cabinet at the side and back. 2 Slide out the unit by pulling the handles. Handle After slide in the unit, please install the sealer between the base pan and cabinet to prevent from entering rain water in case of typhoon. -
Page 18: Drain Pan
DRAIN PAN CONDENSED WATER DRAINAGE This air conditioner employs a “turbo fan splashing ring” which is designed to splash the condensated water on the condenser surface for maximum cooling efficiency, thus producing a splashing sound. If you are uncomfortable with the sound, you can install an outside drainage by using the following procedure which may, however cause a small loss of performance. - Page 19 安 全 上 應 特 別 注 意 之 事 項 使用前,請詳細閱讀「安全上的注意事項」,以正確的使用機體。 ● ● 在所示注意事項的“ 警告”、“ 注意”需特別加以注意。“警告”欄中記載之事項,表示處理錯誤時, 可能會造成死亡或重傷,而“注意”欄中記載之事項,因狀況也可能造成重大之後果,所以請務必遵守,以 維護安全。 另外圖像中的“ ”表示禁止事項。 ● ● 閱讀完後,請務必妥善保管。 安裝上的 注 意 事 項 安 裝 時 ,請 委 託 經 銷 商 或 專 門 技 術 人 員 安 裝 。 ●...
- Page 20 4 垂 直 風 向 調 整 板 5 排 氣 桿 6 前 面 蓋 7 控 制 板 蓋 遙控器 寬度 型號 高度 長度 RA-08JDF2 ", 470mm ", 610mm ", 345mm RA-10JDF2 控 制 板 指 示 燈 接收部 定時器燈...
- Page 21 遙 控 器 各 部 名 稱 及 功 能 ■ 控制冷氣機的操作及時間的設定。控制範圍是約 4 米。如果室內 照明燈是以電子方法控制時,控制範圍則可能較短。 信號傳送 ∞ 開/關鈕 傳送信號 按下此鈕以開始操作。 當 信 號 傳 送 時 , 此 信 號 再按一次則停止操作。 將 閃 亮 。 室溫鈕 功能轉換鈕 室 溫 設 定 。 持 續 按 下 此 選擇操作模式。...
- Page 22 使 用 法 自動操作 ■ 冷氣機將按照最初室溫自動確定冷卻或除濕操作。 按下 鈕 “嗶”一聲開始操作。 ● 停止 按下 鈕 請確定你已使用 鈕選擇 模式。 ● 開始操作時會發出異聲(超速聲)但不會影嚮操作功能。 ● 在此操作下,風扇速度選擇將無法使用。 ● ■ 你可稍微調節室溫。 按下 鈕 每按下一次溫度設定將轉換 1℃。 ● 上 下 你可最多提高或降低溫度設定 3℃。 ● 在自動操作模式時,顯示器將不會顯示出所預設的溫 ● 度。冷氣機以“嗶”聲作為設定信號的接收。 ■ 自動操作的條件 即使室溫改變,所選擇的操作模式在操作中也不會改變。 ● 最初室溫(概略值)...
- Page 23 如何設定適溫睡眠 模式 指示 適溫睡眠 適溫睡眠:裝置將繼續操作至要求數小時後再關 閉。 將遙控器的信號窗描向冷氣機,再按 鈕。 定時器的資料將會顯示在遙控器上。 定時器會在“嗶”一聲後亮燈。 例:設定 3 個小時睡眠時間。 循環操作 ■ 如 室 溫 高 於 恆 溫 器 設 定 溫 度 的 話 , 只 有 風 扇 動 作 而 使 上 面 的 暖 氣 循 環 到 下 面 。 如 這...
- Page 24 手動操作〔冷卻 除濕 循環〕 ● ● ■ 以 手 動 設 定 操 作 模 式 , 室 溫 及 風 扇 速 度 時 , 請 在 以 下 條 件 下 使 用 。 除 濕 冷 卻 室溫攝氏 室外溫度攝氏...
- Page 25 ■ 除濕條件 操作條件是視設定溫度而定。 ● 設定溫度 操作條件 冷 氣 機 將 開 始 除 濕 , 使 室 溫 降 低 到 預 設 水 平 。 低於室溫 當 室 溫 降 低 到 設 定 溫 度 以 下 時 , 操 作 就 停 止 及 當...
- Page 26 時間預校 ■ 開機及關機時間均可。 關機時間預校 ■ 在設定時間停止操作。 關 機 時 間 設 定 使 用 鈕 選 擇 關 機 時 間 。 ● 每 按 下 此 鈕 時 , 時 間 將 按 照 以 下 次 序 轉 ●...
- Page 27 風向調整板 垂直風向調整板 水平風向調整板 垂直調整板兩邊的吹出口可調置於自動掃 水平調整板兩邊的吹出口可將風向設於上、 蕩或靜止狀態,將風向設於右、左或直面 下或直面排風。 排風。 垂直風向 水平風向 調整板 垂直風向 調整板 水平風向 調整板 調整板 注 意 為 了 避 免 露 水 滴 在 調 整 板 上 , 請 勿 長 時 間 在 冷 卻 操 作 下 把 水 平 調 整 板 調 得 太 低 或 者 把 垂...
- Page 28 空氣濾清器 安裝濾清器前必須要停止操作。 空氣濾清器 鉤 2. 拿掉普通隔濾網 3. 安 裝 空 氣 濾 清 器 在 框 架 1. 打開吸氣柵 內 4. 裝 回 普 通 隔 濾 網 及 關 上 吸氣柵 用吸塵機或清水將空氣濾清器清洗,它可被再用多達二十次。 空氣濾清器應每個月或當灰塵累積時清洗。如果使用過期,僅有可能失去除臭功能。 每 3 ∼ 6 個月更換濾清器一次或視施用需求而定以達到最佳功效。 空氣濾清器型號為 <SPX-CFH8W>,更換時請使用此型號向經銷店購買。 操作注意...
- Page 29 最佳的使用方法 室溫設定要適當 裝置窗簾或百葉窗 換氣 注意 警告 可 隔 絕 從 窗 房 間 不 要 關 閉 太 久 , 請 偶 爾 戶 進 來 的 熱 過 冷 對 健 康 不 好 打開窗戶,換新 源 。 且 會 浪 費 電 力 。 鮮...
- Page 30 維 修 保 養 注意 清掃之前請務必關掉操作開關及拔掉電源插頭,以確保安全。 空氣隔濾網 若空氣隔濾網沾滿灰塵,吹出風量將減少而造成冷卻功能減低,及增大操作噪音。請確 保每 20 天清理隔濾網一次。 吸氣柵 1 在 吸 氣 柵 兩 邊 的 下 端 一 拉 , 然 後 稍 微 提 起 吸 氣 柵 直至將吸氣柵取出。 2 提起空氣隔濾網下端後把它拿出。 3 用 吸 塵 機 清 除 網 上 的 灰 塵 。 若 隔 濾 網 太 過 骯 髒,用少許清潔劑清洗及用水完全洗淨,用柔...
- Page 31 前面蓋和吸氣柵 請用柔軟乾布擦抹前面蓋。如果它過度骯髒,請用沾以溫水及中性洗潔劑的軟布擦抹, 然後用柔軟的乾布完全抹乾。 吸氣柵也可拆出來清洗。請按照下例方法拆出吸氣柵。 1 在 吸 氣 柵 下 端 左 右 角 一 拉 後放開。 2 稍微提起吸氣柵。 3 稍 微 在 吸 氣 柵 上 端 的 架 鉤 向內一推後拆出它。 注意 請勿用 5 0 ℃以上的熱水、化學劑或刷子來清洗前面蓋及吸氣柵,因為它們將會損壞塑 膠表面。 要 求 服 務 之 前 在要求修理或服務之前,請先檢查下列各點。如果故障依舊,則請洽詢維修服務中心。...
- Page 32 安 裝 方 法 安裝前請拆除裝運用的部件及向經銷店諮詢有關安裝的需要。 地點 選 擇 一 個 能 夠 承 受 冷 氣 機 的 重 量 且 不 會 增 加 操 作 噪 音 和 震 動 的 地 點 。 ● 選 擇 一 個 沒 有 陽 光 直 射 在 冷 氣 機 的 位 置 , 建 議 地 點 是 北 、 東 面 。 ●...
- Page 33 冷 氣 機 應 接 地 以 避 免 發 生 觸 電 危 險 。 ● 冷 氣 機 電 源 插 頭 應 緊 牢 地 插 入 電 源 插 座 。 ● 請 使 用 以 下 的 保 險 絲 。 ● RA-08JDF2 15A 時間延遲保險絲 RA-10JDF2 定額電壓 50Hz 220-240V 適用電壓範圍...
- Page 34 固 定 板 當 無 法 在 左 右 兩 旁 用 螺 絲 鎖 緊 機 箱 時 , 請 使 用 固 定 板 ( 在 塑 膠 袋 裡 與 絕 緣 墊 子 一 起 附 上 的 “ L” 形 鐵 片 ) 將 機 箱 與 位 置 於 冷 氣 機 前 面 的 底 盤 固 定 。 電氣箱...
- Page 35 注 意 在開始操作自動風擺功能前,請將右邊的垂直風向調整板轉到最右邊後開動風 擺開關,以便檢查垂直風向板的轉動。 異聲會在調整垂直風向調整板時發出, 但不會影嚮自動掃蕩功能。 在 使 用 自 動 風 擺 時 , 如 果 垂 直 風 向 板 角 度 有 改 變 , 請 再 用 以 上 方 法 調 整 風 向 板。 下雨時,雨水會掉落在室外機內。當冷氣機開始操作(雨後)大約...
- Page 36 <737W> – 36 –...
Need help?
Do you have a question about the RA-08JDF2 and is the answer not in the manual?
Questions and answers