Table of Contents
Advertisement
Available languages
Available languages
Quick Links
Advertisement
Table of Contents

Subscribe to Our Youtube Channel
Related Manuals for Manta DVBT03


Summary of Contents for Manta DVBT03
- Page 1 Instrukcja obsługi User’s Manual DVBT03...
- Page 2 Tuner DVBT01 DVB-T HD Tuner to nowoczesny tuner telewizyj- ce na dyskretne filmowanie i fotografowanie w doskonałej jakości ny firmy Manta Multimedia dedykowany do odbioru kanałów cyfro- HD. Można je wykorzystać jako wygodny aparat do rejestrowania wej telewizji naziemnej DVB-T w standardzie MPEG-2 i MPEG-4 wyczynów sportowych, do zastosowań...
-
Page 3: Table Of Contents
DVB-T HD TUNER Instrukcja obsługi Zapoznaj się z instrukcją ................................5 Panel przedni ....................................6 Panel tylny ....................................6 Pilot ........................................7 Podłączenie baterii ..................................7 Sterowanie przy użycia pilota ..............................7 Podłączenie tunera ..................................8 Pierwsza instalacja ..................................9 Podstawowe operacje ................................9 Ustawienia programów ................................9 Ustawienia Obrazu ..................................10 Wyszukiwanie kanałów ................................11 Ustawienie czasu..................................11 Opcje ......................................12... - Page 4 DVB-T HD TUNER User’s Manual Safety Instructions ...................................17 Front Panel ....................................18 Rear Panel ....................................18 Remote Control ..................................19 Using the Remote Control ..............................19 Connection ....................................20 First time installation ................................21 Basic operation..................................21 Program Manage Settings ..............................21 Video Setting................................... 22 Channel Search ..................................23 Time Setting ....................................
-
Page 5: Zapoznaj Się Z Instrukcją
InSTRukcja obSługI Instrukcja obsługi Żadne odkryte źródła ognia, takie jak zapalone świece, nie mogą być umieszczane na urządzeniu. Baterie powinny być używane zgodnie z zasadami Uwaga! ochrony środowiska. Wyczerpane baterie należy uty- Konstrukcja produktów i parametry techniczne mogą ulec lizować zgodnie z lokalnymi przepisami. zmianie bez wcześniejszego powiadomienia. -
Page 6: Panel Przedni
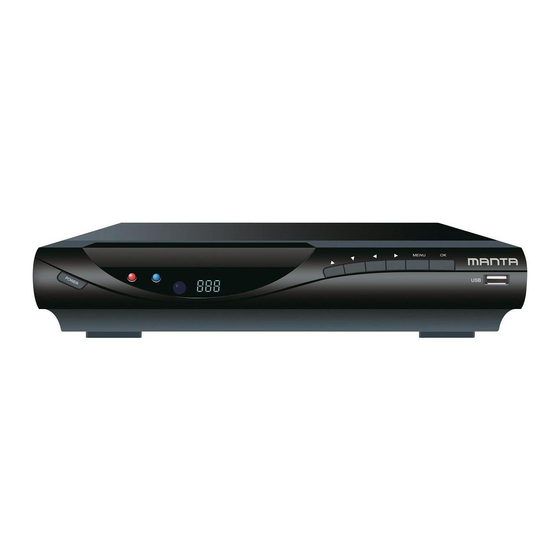
InSTRukcja obSługI Panel przedni Oznaczenia na panelu przednim: WYŁĄCZNIK ZASILANIA (POWER): włączenie/wyłą- czenie głównego zasilania sieci energetycznej. W GÓRĘ/W DÓŁ (UP/DOWN): wybieranie kanałów (na- stępnego lub poprzedniego). LEWO/PRAWO (LEFT/RIGHT) CZUJNIK ZDALNEGO STEROWANIA (REMOTE CON- TROL SENSOR): odbiera sygnał z pilota. KLAWISZ MENU KLAWISZ ZATWIERDZAJĄCY (OK) USB (USB PORT): gniazdo USB do podłączenia pamięci... -
Page 7: Pilot
InSTRukcja obSługI Pilot Podłączenie baterii Zdejmij pokrywę pojemnika na baterie w pilocie zdalnego STANDBY: włączenie/wyłączenie urządzenia. sterowania i włóż do środka baterie rozmiaru AAA zachowu- lub utrzymanie w funkcji czuwania. jąc biegunowość. Rysunki wewnątrz pojemnika przedstawią EPG: (Electronic Program Guide) elektroniczny prze- poprawny sposób instalacji baterii. -
Page 8: Podłączenie Tunera
InSTRukcja obSługI Podłączenie tunera Ostrzeżenie: Upewnij się czy napięcie sieci w gniazdku jest zgodne z przewidzianym dla tego urządzenia. By zapobiec ryzy- ku porażenia prądem, nie otwieraj metalowej pokrywy urządzenia. -
Page 9: Pierwsza Instalacja
InSTRukcja obSługI Pierwsza instalacja Po poprawnym podłączeniu tunera, włącz odbiornik te- lewizyjny i upewnij się czy tuner podłączony jest do prądu. Naciśnij przycisk STANDBY. Jeśli podłączasz urządzenie po raz pierwszy albo przywracasz ustawienia fabryczne na ekranie zobaczysz Menu Główne. Ustawienie ulubionych programów Możesz stworzyć... -
Page 10: Ustawienia Obrazu
InSTRukcja obSługI Przesuwanie programów telewizyjnych i radiowych Wybierz preferowany program I naciśnij CZERWONY przycisk. Pojawi się symbol przesunięcia. Przyciskami W GÓRĘ/W DÓŁ przemieść program na liście. Naciśnij OK, żeby zatwierdzić. Powtórz poprzednią czynność, żeby przesunąć więcej programów. Blokada programów Możesz zablokować oglądanie określonych kanałów telewizyjnych: Przyciskami W GÓRĘ/W DÓŁ... -
Page 11: Wyszukiwanie Kanałów
InSTRukcja obSługI Rozdzielczość Jeśli obraz nie wyświetla się poprawnie, możesz zmienić ustawienia rozdzielczości i wybrać najbardziej właściwe dla HDMI. [480i]: dla systemu NTSC. [480P]: dla systemu NTSC. [576i]: dla systemu PAL. [576P]: dla system PAL. [720P]: dla system NTSC lub PAL. [1080 i]: dla systemów NTSC lub PAL. -
Page 12: Opcje
InSTRukcja obSługI Strzałkami W GÓRĘ/W DÓŁ wybierz opcję. Strzałkami W PRAWO/W LEWO możesz zmienić ustawienia. Naciśnij EXIT jeśli chcesz wyjść z Menu ustawień czasu. Opcje Naciśnij przycisk MENU i wybierz [Opcje]. W tym Menu Wyrównanie różnicy (strefy) czasowej możesz dostosować język OSD, język napisów, język Audio Wybierz ręczne lub automatyczne dodanie lokalnej różnicy i rodzaj cyfrowego Audio. -
Page 13: Ustawienia Systemowe
InSTRukcja obSługI Ustawienia Informacje systemowe Informacja o modelu I wersji oprogramowania. systemowe Naciśnij przycisk MENU I wybierz [System]. Menu pokazuje dostępne opcje ustawień. Naciśnij przycisk MENU I wybierz [USB]. Strzałkami W GÓRĘ/W DÓŁ wybierz opcję, strzałkami Urządzenie czyta pliki MP3,WMA,JPEG,BMP,AVI,MP4 W PRAWO/W LEWO możesz zmienić... -
Page 14: Ustawienia Wideo
InSTRukcja obSługI Ustawienia Wideo USB] wtedy nacisnij przycisk REC Ukaże się napis [Rozpo- częcie zapisu, czekaj…] . Urządzenie jest w trybie zapisu. W lewym, górnym rogu ekranu pojawi się ikona czas zapisu 00:00:15. Wyjście z trybu zapisu: naciśnij przycisk STOP, pojawi się informacja [Czy chcesz przerwać... -
Page 15: Rozwiązywanie Problemów
InSTRukcja obSługI − Po dokonaniu tych czynności nagranie pojawi na liście zaprogramowanych nagrań. − Naciśnij EXIT, żeby przejść do oglądania programu telewizyjnego. − Przesunięcie (opóźnienie) czasowe − Jeśli oglądasz program telewizyjny na żywo i chcesz zatrzymać obraz żeby oglądać program z opóźnieniem, postępuj następująco: −... -
Page 16: Specyfikacja Techniczna
InSTRukcja obSługI Specyfikacja techniczna POZYCJA OPCJA PARAMETRY Czestotliwość wejściowa 177.5~226.5MHz, 474~858MHz Poziom sygnału wejść. RF -20~78dBm Tuner Szerokość pasma IF 7 & 8MHz Modulacja QPSK, 16QAM, 64QAM MPEG-2(ISO/IEC 13818-2) MPEG-4(ISO/IEC 14496) Format dekodowania H.264 (ISO/IEC 14496-10) 1080i@30fps Wideo 4:3,16:9, Letter Box Format obrazu 1920*1080i, 1280*720P, 720*576i Porty wyjściowe... -
Page 17: Safety Instructions
USER’S MANUAL User’s Manual Safety Instructions The symbol indicates that dangerous voltages constituting a risk of electric shock are present within this unit. Read these instructions. Keep these instructions. Heed all warnings. Follow all instructions. Do not use this apparatus near water The symbol instructions indicate that there are important Clean only with dry cloth. -
Page 18: Front Panel
USER’S MANUAL Front Panel POWER BUTTON: Turn on/off the main power supply UP/DOWN: Navigate through the Menus and Select the next or previous Channel LEFT/RIGHT REMOTE CONTROL SENSOR: Receive the signal from the remote control MENU KEY ENTER KEY USB: Data input from USB storage devices Rear Panel AC IN: Power supply 90-240V Y:Connect to TV set Y input terminal... -
Page 19: Remote Control
USER’S MANUAL Remote Control Installing the batteries Remove the battery cover from the Remote Control and put 2pcs size batteries inside the compartment.5 V AAA, STANDBY: Switch the product to on or standby The diagram inside the Battery Compartment shows the EPG:(Electronic Program Guide) Call up the EPG correct way to install the batteries. -
Page 20: Connection
USER’S MANUAL Connection Caution: Make sure to check the voltage specification of the wall outlet is the same rating with the receiver. To prevent the risk of electric shock, do not open the cover or the back of the receiver. -
Page 21: First Time Installation
USER’S MANUAL First time installation After all connections have been made properly, switch on TV and make sure the receiver is switch on restoring receiver. connected to the Main Power. Press Power button to If you are using the receiver for the first time or to Factory Default, the Main Menu will appear on your TV screen. -
Page 22: Video Setting
USER’S MANUAL Press the UP/DOWN button to move the program Press the OK button to confirm Repeat the above steps to move more program Lock Program You can lock the selected programs for restricted view Lock a TV or Radio Program: Select the will appear preferred program then press the YELLOW button. -
Page 23: Channel Search
USER’S MANUAL Resolution [480i]: for NTSC system TV. [480P]: for NTSC system TV. [576i]: for PAL system TV. [576P]: for PAL system TV. [720P]: for NTSC or PAL system TV. [1080 i]: for NTSC or PAL system TV If the video does not appear correctly, change the set- ting. -
Page 24: Time Setting
USER’S MANUAL Time Setting Press the MENU button then select [Time]. The Menu provides options to adjust the time settings. Press the UP/DOWN button to select an option and press the RIGHT/LEFT button to adjust the settings. Press the EXIT button to exit the menu. Option Press the MENU button and select [Option]. -
Page 25: System Setting
USER’S MANUAL System Setting Press the MENU button and select [USB].The menu Press the MENU button and select [System]. provides options to play back Music, The menu provides options to change the system Photo and Movie files, supports: MP3, WMA, JPEG, BMP, settings. -
Page 26: Movie Configure
USER’S MANUAL Movie configure Press “OK”, receiver will exit from recording mode, recording icon and recording time 00:00:37 will disappear on screen; Receiver will return to recording mode and remain recording if user press “NEXT”. Subtitle Specific Playback for PVR record. Select PVR item and press “OK’, then select „PVR RECORD”... -
Page 27: Troubleshooting
USER’S MANUAL − Press the UP or DOWN button to move the cursor to set Start date, Star time and End time. − After Star date, Start time and End time are set, please set the mode to Record. Press the −... -
Page 28: Specification
Zasilanie POWER Max 10 W Dział Obsługi Klienta tel: +48 22 332 34 63 lub e-mail: serwis@manta.com.pl od poniedziałku do piątku w godz. 9.00-17.00 Producent zastrzega sobie możliwość wprowadzenia zmian w specyfikację produktu bez uprzedzenia. Made in P.R.C. FOR MANTA EUROPE...
Need help?
Do you have a question about the DVBT03 and is the answer not in the manual?
Questions and answers