Table of Contents
Advertisement
Installation & Operation
LG Programmable Thermostat
• Please read this Installation manual completely before installing the
product.
• Installation work must be performed in accordance with the national
wiring standards and local code by authorized personnel only.
• Please retain this manual for future reference after reading it thor-
oughly.
Type : LG Programmable Thermostat
Models : PREMTB10U
P/NO : MFL62129209
www.lg.com
Advertisement
Table of Contents

Related Manuals for LG PREMTB10U


Summary of Contents for LG PREMTB10U
- Page 1 • Installation work must be performed in accordance with the national wiring standards and local code by authorized personnel only. • Please retain this manual for future reference after reading it thor- oughly. Type : LG Programmable Thermostat Models : PREMTB10U www.lg.com P/NO : MFL62129209...
-
Page 2: Tips For Saving En
TIPS FOR SAVING ENERGY TIPS FOR SAVING ENERGY Here are some tips that will help you minimize power consumption when you use the air condi- tioner. You can use your air conditioner more efficiently by referring to the instructions below: •... -
Page 3: Important Safety Instructions
IMPORTANT SAFETY INSTRUCTIONS IMPORTANT SAFETY INSTRUCTIONS READ ALL INSTRUCTIONS BEFORE USING THE APPLIANCE. Always comply with the following precautions to avoid dangerous situations and ensure peak performance of your product. WARNING It can result in serious injury or death when the directions are ignored. CAUTION It can result in minor injury or product damage when the directions are ignored. - Page 4 IMPORTANT SAFETY INSTRUCTIONS • Do not touch or pull the lead wire with wet hands. There is risk of product breakdown or electric shock. CAUTION In-use • Do not clean using powerful detergents like solvent; instead, use soft cloths and mild detergents. Failure to do so may result in a risk of fire, electric shock, explosion, equipment malfunction, or de- formation.
-
Page 5: Table Of Contents
TABLE OF CONTENTS TABLE OF CONTENTS Function setting - Changing Current TIPS FOR SAVING EN- Time ERGY Function Setting - Override set time IMPORTANT SAFETY IN- Function Setting - Set back tempera- STRUCTIONS ture Function Setting - Filter Sign Clear PART DESCRIPTION Programming - Simple Reservation OPERATION... - Page 6 TABLE OF CONTENTS Installer Setting - E.S.P. Function Installer Setting – Setting temperature range Installer Setting - Thermistor Installer Setting - Static Pressure Step Installer Setting - Ceiling Height Selec- Setting tion Installer setting – Guard timer Installer Setting - Static Pressure Set- ting Installer setting –...
-
Page 7: Part Description
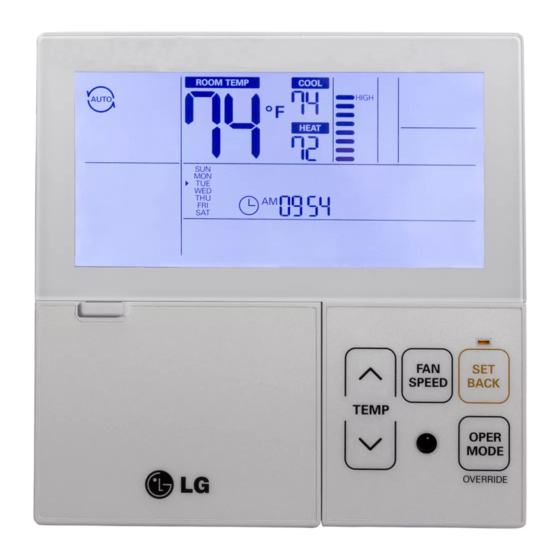
PART DESCRIPTION PART DESCRIPTION Name and Function of Thermostat Operation indication screen Air flow button Set temperature button Desired cooling temperature Fan Speed button Function setting button Set back button Up, Down, Left, Right button Operation mode selection button On/Off button Wireless Thermostat receiver Desired heating temperature - Some product don’t receive the wireless... -
Page 8: Part Description
PART DESCRIPTION Icon description Function Icon Description Auto mode - Product automatically switches between cooling and heating modes. Cooling mode - Product is running cooling mode. Operation Dehumidification Mode mode - Product is running dehumidifying mode. Heating mode - Product is running heating mode. Fan only operating mode - Product is running only the fan for ventilation. - Page 9 PART DESCRIPTION Function Icon Description Current temperature - Display current room temperature. Cooling set point temperature Tempera- - temperature set point for cooling operation. ture Heating set point temperature - temperature set point for heating oper- ation. Displays current fan speed. POW : Fan speed - power HIGH : Fan speed - high Fan Speed...
- Page 10 PART DESCRIPTION Function Icon Description Simple schedule in operation Sleep schedule in operation Schedule Weekly schedule in operation Holiday schedule in operation Day of the week The number of weekly reservation event(s) Time - AM/PM Schedule & Time Time – value of hour / minute minute / hour Turn on/off by schedule Display weekly schedule occupied / unoccupied state...
- Page 11 PART DESCRIPTION Function Icon Description Grill state : up / : stop / : down Child lock setting step :Child lock set / : Child lock cancel Minimum difference value setting step between cooling / heating set points Function Current time setting step setting Schedule override timer setting step Default Set back cooling / heating temperature set points setting step...
-
Page 12: Operation Instruction
OPERATION INSTRUCTION OPERATION INSTRUCTIONS Standard Operation - Cooling Mode Press button to turn on the indoor unit. Press button to select Cooling operation mode. Adjust the desired temperature by pressing buttons. When setting the desired temperature higher than room temperature, the fan will blow room temperature air instead of cold air. -
Page 13: Standard Operation - Power Cooling
OPERATION INSTRUCTION Standard Operation - Power Cooling Press button to turn on the indoor. Press button to select cooling operation mode. Press button until ’Po’ is displayed. What is Power Cooling? Power cooling cools the room quickly by blowing cold air at the powerful setting until the room reaches 64 °F (18 °C). -
Page 14: Standard Operation - Heating Mode
OPERATION INSTRUCTION Standard Operation - Heating Mode Press button to turn on the indoor. Press button to select Heating mode. Adjust the desired temperature by pressing buttons. When setting the desired temperature lower than room temperature, there is only ventilation wind" should be "the fan will blow room-temperature air. -
Page 15: Standard Operation - Dehumidification Mode
OPERATION INSTRUCTION Standard Operation - Dehumidification Mode Press button to turn on the indoor. Press button to select dehumidification mode. (The temperature setting cannot be adjusted during this mode) • In rainy season or high humidity climates, it is possible to operate dehumidifier and cooling mode simultaneously to remove humidity effectively. -
Page 16: Standard Operation - Fan Mode
OPERATION INSTRUCTION Standard Operation - Fan Mode Press button to turn on the indoor. Press button to select fan mode. • Fan mode only provides ventilation, it does not provide cool air. • The menu item of fan speed may be unavailable depending on the unit. -
Page 17: Standard Operation - Auto Operation Mode
OPERATION INSTRUCTION Standard Operation - Auto Operation Mode Press button to turn on the indoor. Press button to select Auto operation mode. Press the button to select the cooling set point, and set the cooling set point by pressing the button Press the button to select the heating set point, and set the heating... - Page 18 OPERATION INSTRUCTION • Auto heating drive only operates on cooling and heating models. • Auto heating doesn’t operate on cooling only models. • 87~99 °F (30.5~37.5 °C) When setting the desired cooling temperature, the indoor unit shuts off on condition that the indoor temperature is lower than the desired temperature. •...
-
Page 19: Standard Operation - Timed Override
OPERATION INSTRUCTION Standard Operation - Timed Override Timed override operation temporarily changes the occupied/unoccupied schedule for override time. - It reverts to the last occupied schedule in unoccupied override. - It reverts to the last unoccupied schedule in occupied override. - You can set ‘Override time’... -
Page 20: Standard Operation - Set Back
OPERATION INSTRUCTION Standard Operation - Set back Set back operation reverts to the last unoccupied schedule until Set back operation is canceled. • It changes to ‘function setting - set back setting’ if Thermostat doesn’t have last unoccupied schedule. - Set back operation setting : Auto operation mode / Set back setting temperature: Function setting –... -
Page 21: Standard Operation - Hold
OPERATION INSTRUCTION Standard Operation - Hold It is a function that holds the current mode of operation. - If it is on hold, daytime schedule cannot be programmed. - If it is on hold, current room temperature does not display. Operate Hold mode. -
Page 22: Standard Operation - Temperature Setting
OPERATION INSTRUCTION Standard Operation – Temperature Setting Press the buttons to adjust the desired temperature. In Auto mode, adjust cooling and heating set points individually by pressing the cool or heat set point selection button. : Increase Temp. per one time pressing : Decrease Temp. -
Page 23: Standard Operation - Airflow Setting
OPERATION INSTRUCTION Standard Operation - Airflow Setting Fan speed : You can simply adjust desired fan speed. Please set up desired fan speed by fan speed button. • Every time you press fan speed, you can select the fan speed in order of ‘SLO →... -
Page 24: Sub Function - Plasma Purification
OPERATION INSTRUCTION Sub Function - Plasma Purification Only products with Plasma Purification function can use this. The method to set up plasma purification Press button until icon flashes. Operate or cancel Plasma Purification function by pressing button. After setting, press button to exit. -
Page 25: Sub Function - Energy-Saving Cooling Operation
OPERATION INSTRUCTION Sub Function - Energy-Saving Cooling Operation Energy-Saving Cooling Operation is the function to improve user's comfort and power saving ca- pacity by adjusting the desired temperature while running air-cooling. When operating cooling, setting the Energy-saving cooling function is available. h Except for cooling operated by the auto mode. -
Page 26: Sub Function - Automatic Drying
OPERATION INSTRUCTION Sub Function - Automatic Drying It is the function that dries the inside of an indoor unit when the indoor unit is OFF, and allows for the Fan to operate for a certain time in order to prevent mold and moisture. This function is only available on some indoor units. -
Page 27: Sub Function - Electric Heater
OPERATION INSTRUCTION Sub Function - Electric Heater It is a function to allow auxiliary heating ability by turning on the electric heater during the heating operation. It can only be set during Heating operation or Auto(heating mode) operation. Press button until icon flashes. -
Page 28: Sub Function - Humidifier
OPERATION INSTRUCTION Sub Function - Humidifier Only products with humidifying function can use this. Press button until icon flashes. Turn on/off humidifier by pressing button (the icon will be displayed when humidifier is enabled). Press button to exit. After setup, it automatically exits after 25 seconds if there is no input. -
Page 29: Sub Function - Fan Auto
OPERATION INSTRUCTION Sub Function - Fan Auto It is the function that operates the fan when the outdoor unit is running. Only indoor units with fan auto function can use this. The method to set up Fan auto function Press button until icon flashes. -
Page 30: Function Setting - Vane Angle Control
OPERATION INSTRUCTION Function Setting - Vane Angle Control This function is to adjust airflow angle. Press button until icon flashes. Press button to select active vane : 1 / 2 / 3 / 4 / All / Standard Select Vane number using buttons. -
Page 31: Function Setting - Elevation Grill
OPERATION INSTRUCTION Function Setting - Elevation Grill This function is to move the indoor filter up/down for cleaning filter. Press button until icon flashes. Move to descent using buttons and press button will display descent icon and the grill with the filter will descend. -
Page 32: Function Setting - Child Lock
OPERATION INSTRUCTION Function Setting - Child Lock This function prevents children or other users from using the Thermostat carelessly. Press button until icon flashes. Use the buttons to move to the Setup icon area and press to set child lock. When cancelling the child lock, use the buttons to select the Cancel icon and press... -
Page 33: Function Setting - Minimum Difference Between Heating And Cooling Set Points
OPERATION INSTRUCTION Function Setting - Minimum Difference Between Heating and Cooling Set Points This function sets the difference between Heating and Cooling set points. Press button until icon flashes. Press buttons to change. ❈ minimum difference values : 0~10°F(0~5°C) Press button to complete the setting process. -
Page 34: Function Setting - Changing Current Time
OPERATION INSTRUCTION Function setting - Changing Current Time Press the function setup button until it moves to time setup menu. The ‘Time setup’ icon appears and the time and day blink in the current time indication area. The example demonstrates changing the current time to ’Monday at 10:20 a.m. - Page 35 OPERATION INSTRUCTION Press buttons to move to ’Minute’ setting mode. (the ’Minute’ segment will flash) Set the Minute value by pressing buttons. Press button to finish. After setup, it automatically exits after 60 seconds if there is no input. If the Setting/Cancel button is not pressed, the mode will not change.
-
Page 36: Function Setting - Override Set Time
OPERATION INSTRUCTION Function Setting - Override set time This function is to set a schedule override operation time. button to select Override time setting. If you press button, you will be able to select Override time with the icon, icon will be blinking. Using buttons, you can set Override time from 30 to 240 minutes... -
Page 37: Function Setting - Set Back Temperature
OPERATION INSTRUCTION Function Setting - Set back temperature This function is to set the default temperature set points for set back operation. It is used when the controller doesn't have a last known unoccupied schedule. button to select Set back temperature setting. -
Page 38: Function Setting - Filter Sign Clear
OPERATION INSTRUCTION Function Setting - Filter Sign Clear This function is to clear the indoor filter cleaning indicator. Press button until flashes. When the is flashing, press to clear this display. h If the indoor unit product has a function to dis- play the remaining time until the filter cleaning, it displays the remaining time until the filter cleaning in the current time display area. -
Page 39: Programming - Simple Reservation
OPERATION INSTRUCTION Programming - Simple Reservation A schedule can be set between 1 and 7 hours in 1 hour increments. Press button on the Thermostat. (the ‘SIMPLE’ segment will blink) Press buttons to adjust reservation time. Press buttons to finish setting. Press button to exit. -
Page 40: Programming - Sleep Reservation
OPERATION INSTRUCTION Programming - Sleep Reservation Sleep reservation is the function of air conditioners to run and stop after a certain period of time at sleep mode before sleep. Sleep reservation will slowly reduce or turn off your unit while you sleep based on the time that you set. -
Page 41: Programming - Weekly Reservation
OPERATION INSTRUCTION Programming - Weekly Reservation You can set individual daily schedules for the week. - For correct operation of Weekly Reservation, please set current time correctly. Press button to enter WEEK setting mode. “WEEK” will blink on the display. Select desired day by pressing the buttons. - Page 42 OPERATION INSTRUCTION Enter AM/PM setting mode by pressing button. AM or PM will blink on the display screen as pictured below. Select the AM or PM by pressing button. Enter hour setting mode by pressing the button. The hour icon will blink on the display screen as pictured below.
- Page 43 OPERATION INSTRUCTION Enter minute setting mode by pressing button. The minute icon will blink on the display screen as pictured below. Select desired minute by pressing the buttons. Enter ON/OFF setting mode by pressing the button. ON or OFF icon will blink on the display screen as pictured below.
- Page 44 OPERATION INSTRUCTION Enter OCCUPIED/UNOCCUPIED setting mode by pressing the button. OCCUPIED or UNOCCUPIED icon will flash as pictured below. Select OCCUPIED/UNOCCUPIED condition of timer by pressing the buttons. Enter operation mode setting mode by pressing the button. Operation mode icon will flash on the display screen as pictured below.
- Page 45 OPERATION INSTRUCTION Enter Cooling set point setting mode by pressing the button and the button. Cooling set point icon will flash on the display screen. Select desired cooling set point by pressing the buttons. Enter Heating set point setting mode by pressing the button.
- Page 46 OPERATION INSTRUCTION Enter fan speed setting mode by pressing the button. Fan speed icon will flash as pictured below. Select desired fan speed by pressing button. If finishing weekly reservation setup, please press the button. Weekly reservation setup for the day that you set is finished.
- Page 47 OPERATION INSTRUCTION • You cannot change operate mode, fan speed, setting temperature when in Unoccupied. - Display ‘Unoccupied Lock’ in the window.
-
Page 48: Programming - Weekly Reservation Schedule Copy/Paste
OPERATION INSTRUCTION Programming - Weekly Reservation Schedule Copy/Paste You can copy weekly timer schedule data to another day. Press button to enter Week setting mode. Select desired day by pressing the buttons. The day icon will blink. Press and hold button for 3 seconds to copy the schedule of the selected day. -
Page 49: Programming - Holiday Reservation
OPERATION INSTRUCTION Programming - Holiday Reservation You can set a holiday schedule. Press button to enter Holiday setting mode. Select desired day by pressing the buttons. The day icon will blink. Press the button to set a day as a holiday. -
Page 50: Programming - Delete All Reservation
OPERATION INSTRUCTION Programming - Delete All Reservation You can delete all reservation schedules. - Simple, sleep, weekly, and holiday reservations. Press button and button simultaneously and hold for 3seconds to delete all reservation schedules. -
Page 51: Different Mode Drive
OPERATION INSTRUCTION Different mode drive (This is not a US feature.) Different mode drive is a phenomenon taking place when indoor units' drive mode is different in the case that a few indoor units are set up at one AHU. Note: Different mode drive is not available for cooling-only models While a few indoor units are running cooling on a heat pump system, it... -
Page 52: Ventilation Product - Lnterlocked Air Conditioner And Ventilator
OPERATION INSTRUCTION Ventilation Product - lnterlocked Air conditioner and Ventilator Control using Thermostat where air conditioner indoor unit and the ventilation product is in- stalled at the same time. - When the power is turned on, your thermostat will recognize the ventilation product(it could take about 30 seconds) and then resume normal operation. -
Page 53: Ventilation Product - Lnterlocked Oper- Ation With General Ventilator
OPERATION INSTRUCTION Ventilation Product - lnterlocked Operation with General Venti- lator It is used when air conditioner is interlocked with ventilation product. This function allows air conditioning and fresh air using the ventilation product at the same time. Ventilation interlinked operation Press button on the Thermostat control panel. -
Page 54: Ventilation Product Function Settings
OPERATION INSTRUCTION Ventilation Product - Ventilator single operation Press button on the Thermostat. Pressing button will change the ventilation mode. Ventilation Thermostat Contents mode Display Heat Circulate indoor air without exchange loss of heat Directly circulate indoor air Normal without going through heat exchanger Circulate indoor air with Automatic... -
Page 55: Ventilation Product Reservations Settings
OPERATION INSTRUCTION Ventilation Product Reservations Settings Sleep Reservation : Sets to operate ventilation lightly during the sleep. Press button to enter the Programming mode. Ex) Setting Sleep Reservation time as ’3’. Press button to enter the SLEEP reservation setting mode. Press buttons to adjust reservation time. -
Page 56: Troubleshooting Mode Self Diagnosis
OPERATION INSTRUCTION Troubleshooting Mode Self Diagnosis The unit will automatically diagnose itself for any problems it experiences. It displays an error code for Troubleshooting and repair. When an error occurs, the phrase “CH” and an error code number are displayed on the screen alternately as below. -
Page 57: Checkups Before Reporting Breakdown
OPERATION INSTRUCTION Checkups Before Reporting Breakdown Please first check the items below for troubleshooting before consulting a service center. Symptoms Check-up Management • Please check the circuit breaker. • Is air-conditioner's power on? • Please check the Thermostat wire setup condition. -
Page 58: Installation Method
INSTALLATION METHOD INSTALLATION METHOD Fix the backplate to the wall where you want to place it by fixing it to the wall with the pro- vided screws. - Be sure not to bend the backplate while attaching it to the wall. A bent backplate may affect the proper setup for the thermostat. - Page 59 : AWG#22 CAUTION • Specification of LG supplied extension cable : AWG#22, 3 core shielded. (Model : PZCWRC1) • Apply enclosed noncombustible conduit(metal raceway) totally or use FT-6 rated cable or above level in case of local electric & building code that requires plenum(CMP) cable usage.
- Page 60 INSTALLATION METHOD ③ Make sure each wire is securely fastened under each screw terminal and the wires are not in contact with each other. ④ Please connect the Terminal blocks of indoor unit’s C/BOX and wired remote controller by referring to the images and contents shown below. Connect the yellow(signal) part of the Thermostat’s terminal block and the ‘YL’...
-
Page 61: Thermostat Installation
INSTALLATION METHOD Thermostat installation Since the room temperature sensor is in the Thermostat, the Thermostat box should be installed in a place away from direct sunlight, high humidity, and direct supply of cold air to maintain proper space temperature. Install the Thermostat about 5ft(1.5m) above the floor in an area with good air circulation at an average temperature. -
Page 62: Group Control
GROUP CONTROL GROUP CONTROL When installing more than 2 units of air conditioner to one Thermostat, please connect as pictured to the right. - Set one indoor unit to master and the re- Signal wire maining to slave. Signal wire When controlling multiple indoor units with one Thermostat, you must change the master/slave setting from the indoor unit. -
Page 63: Installation Instructions
INSTALLATION INSTRUCTIONS INSTALLATION INSTRUCTIONS Installer Setting - How to enter installer setting mode Press and hold the button for 3 seconds to enter the Thermostat installer setup mode. - If it is not held for 3 second, it enters into user setup mode instead. When you enter the setting mode initially, Function code is displayed on the bottom of the LCD screen. -
Page 64: Function
INSTALLATION INSTRUCTIONS <Installer Setting Code Table> 1) General air-conditioner product Code Function Value Test Run 01: Cooling 02: Heating Address Setting 00~FF : Address <ESP Step> <ESP Value> <Example> 01:VeryLow 0 ~ 255 02:Low E.S.P. Value 03:Med 04:High 05:Very High Function Code ESP step ESP value... - Page 65 INSTALLATION INSTRUCTIONS Code Function Value Static Pressure 00: use static pressure (code 06) set value 01~11: static pressure step (code 32) set value step 00: 0 minute 01: 15 minutes Guard timer 02: 30 minutes 03: 45 minutes 04: 60 minutes 01: Cooling - Upper limit / Lower limit (50~99 °F / 10~37.5 °C)
- Page 66 INSTALLATION INSTRUCTIONS 2) General Ventilation product Code Function Value Test Run 01 : Test Run Setup Address Setting 00~FF : Address of Central Control SA(Supply Air) ESP <ESP Step> <ESP Value> <Example> 01:Low 0 ~ 255 02:High EA(Exhaust Air) ESP 03:Very High Function Code ESP step...
-
Page 67: Installer Setting - Test Run Mode
INSTALLATION INSTRUCTIONS Installer Setting - Test Run Mode After installing the product, you must run a Test Run mode. For details related to this operation, refer to the product manual. If pressing button long for 3 seconds, it enters into Thermostat installer setup mode. -
Page 68: Installer Setting - Setting Address Of Central Control
INSTALLATION INSTRUCTIONS Installer Setting - Setting Address of Central Control After installing the product, you must run a Test Run mode. For details related to this operation, refer to the product manual. Press the button for 3 seconds to enter the Thermostat installer setter setup mode. -
Page 69: Installer Setting - E.s.p. Function
INSTALLATION INSTRUCTIONS Installer Setting - E.S.P. Function This function determines the fan speed strength setting for each level (low, med, high). • If you set ESP incorrectly, the air conditioner may malfunction. • This setting must be carried out by a certificated-technician. Press the button for 3 seconds to enter Thermostat... - Page 70 INSTALLATION INSTRUCTIONS Select ESP fan step again by using buttons and set up ESP values as No. 4 and 5 to correspond to each fan speed. Press button to save. Press button to exit. After setup, it automatically exits after 25 seconds if there is no input.
-
Page 71: Installer Setting - Thermistor
INSTALLATION INSTRUCTIONS Installer Setting - Thermistor This is a function to determine if you will use the indoor unit mounted sensor or the thermostat sensor. Press the button for 3 seconds to enter Thermostat installer setup mode. - If pressed for a shorter time, it enters into user setup mode. -
Page 72: Installer Setting - Ceiling Height Selection
INSTALLATION INSTRUCTIONS Installer Setting - Ceiling Height Selection This function is to adjust FAN Airflow rate according to ceiling height (For ceiling type product) Press the button for 3 seconds to enter Thermostat installer setup mode. - If pressed for a shorter time, it enters into user setup mode. -
Page 73: Installer Setting - Static Pressure Setting
INSTALLATION INSTRUCTIONS Installer Setting - Static Pressure Setting This function is applied to only duct type. Setting this in other cases will cause malfunction. Press the button for 3 seconds to enter the Thermostat installer setting. - If pressed for a shorter time, it enters into user setup mode. -
Page 74: Installer Setting - Override Master/Slave Setting
INSTALLATION INSTRUCTIONS Installer Setting - Override Master/Slave Setting Since Multi V II, the override master/slave function is to prevent product's different mode opera- tion. If it is setup as the slave, any changes to run in the opposite mode from the outdoor unit are blocked.) Press the button for 3... -
Page 75: Installer Setting - Dry Contact Mode Setting
INSTALLATION INSTRUCTIONS Installer Setting - Dry Contact Mode Setting Dry contact function is the function that is possible to use only when dry contact equipment is separately purchased/setup. Press the button for 3 seconds to enter the Thermostat installer setting. - If pressed for a shorter time, it enters into user setup mode. -
Page 76: Installer Setting - Fahrenheit / Celsius Switching
INSTALLATION INSTRUCTIONS Installer Setting - Fahrenheit / Celsius Switching This function is used for switching the display between Celsius and Fahrenheit. Press the button for 3 seconds to enter the Thermostat installer setting. - If pressed for a shorter time, it enters into user setup mode. -
Page 77: Installer Setting - Emergency Heater Setting
INSTALLATION INSTRUCTIONS Installer Setting - Emergency Heater Setting This function is only available on some products. This function will set the Emergency Heater Setting. Emergency Heater is used to heat the space in emergency cases such as heat pump error. Emergency heat is in place of and does not supplement heat pump. - Page 78 INSTALLATION INSTRUCTIONS Move to Low Outdoor Ambient Heating Operation setting by pressing button. Press buttons to setup Low Outdoor Ambient Heating Operation. 00: Not use 01~03: compressor on/off Setting step 01~15: compressor on/off Setting step(step expand indoor unit) Emergency heater operation in Low Ambient temperature - compressor off : Emergency heater enabled - compressor on : Emergency heater disabled Move FAN Speed Setting during...
-
Page 79: Installer Setting - Function Setting In Group Control
INSTALLATION INSTRUCTIONS Installer setting – Function setting in group control It is the function to enable the control of common functions or some other functions by the in- door unit standard during the group control. If pressing button long for 3 seconds, it enters into Thermostat installer setup mode. -
Page 80: Installer Setting - Option Function Setting
INSTALLATION INSTRUCTIONS Installer Setting - Option Function Setting Setting feature for indoor unit when plasma purification / electric heater / humidifier / elevation grill / ventilation kit / auxiliary heater is newly installed, or installed unit is removed. Press the button for 3 seconds to enter the Thermostat installer setting... -
Page 81: Installer Setting - Check Indoor Unit Address Number
INSTALLATION INSTRUCTIONS Installer setting – Check indoor unit Address Number It is the function to verify the indoor unit address designated by the outdoor unit. Press the button for 3 seconds to enter the Thermostat installer setting If pressed for a shorter time, it enters into user setup mode. -
Page 82: Installer Setting - Use Refrigerant Leakage Sensor
INSTALLATION INSTRUCTIONS Installer setting – Use Refrigerant leakage Sensor It is the function to set when the refrigerant leakage sensor is newly installed in the indoor unit or when the installed refrigerant leakage sensor is removed. Press the button for 3 seconds to enter the Thermostat installer setting If pressed for a shorter time, it... -
Page 83: Installer Setting - Setting Temperature Range
INSTALLATION INSTRUCTIONS Installer Setting – Setting temperature range This function is used to select the temperature range options. Press the button for 3 second to enter Thermostat installer setup mode. - If pressed for a shorter time, it enters into user setup mode. Press button to select Function code 31. -
Page 84: Installer Setting - Static Pressure Step Setting
INSTALLATION INSTRUCTIONS Installer Setting - Static Pressure Step Setting This function is applied to only duct type. Setting this in other cases will cause malfunction. This function is only available on some models. This is the function that static pressure of the product is divided in 11 steps for setting. If pressing button long for 3 seconds, it enters into Thermostat... -
Page 85: Installer Setting - Guard Timer
INSTALLATION INSTRUCTIONS Installer setting – Guard timer It is a function that sets the minimum running time of outdoor unit cycle mode when switching from cooling mode to heating mode and vice versa during Auto Operation mode. Under the condition of cooling/heating switching, it switches between cooling and heating mode after operation during the time scheduled in the Guard timer. -
Page 86: Installer Setting - Set Point Range Lock
INSTALLATION INSTRUCTIONS Installer setting – Set point range Lock It is a function that sets upper and lower bounds of the desired heating/cooling temperature con- trollable from wired remote control. The desired temperature can be set only in the range of the desired temperature set when the desired temperature range locks. - Page 87 INSTALLATION INSTRUCTIONS Move to ‘Upper limit set point’ setting by pressing button. Set point Upper Limit Press button to setup Upper limit set point. Setting temperature range Move to ‘Lowerr limit set point’ setting by pressing button. Set point Lower Limit Press button to setup Lower limit set point.
-
Page 88: Installer Setting - Fan Operation In The Cooling Mode And Thermal Off Conditions
INSTALLATION INSTRUCTIONS Installer setting – Fan operation in the cooling mode and thermal off conditions It is a function that sets the indoor unit fan movement, in cooling mode, when thermal is off. If pressing button long for 3 seconds, it enters into Cooling thermal off Fan operation installer setup mode. -
Page 89: Installer Setting - Primary Heater Control Setting
INSTALLATION INSTRUCTIONS Installer setting – Primary Heater control setting It is a function that sets the outdoor unit to operate with auxiliary heat source and the heater to run with main heat source in heating mode. If pressing button long for 3 seconds, it enters into Use Primary Heater control installer setup mode. -
Page 90: Installer Setting - Hold Enable / Disable
INSTALLATION INSTRUCTIONS Installer setting – Hold Enable / Disable It is a function that sets whether to use Hold mode. If pressing button long for 3 seconds, it enters into Hold Enable / Disable installer setup mode. - If pressing once shortly, it enters into user setup mode. -
Page 91: Installer Setting - Air Conditioner Fan Operation Interlocked With Ventilation
INSTALLATION INSTRUCTIONS Installer setting – Air conditioner Fan operation interlocked with ventilation It is a function that sets the availability of air conditioner FAN movement when only the ventila- tion is running while air conditioner is off, in case of interlock of the air conditioner operation with the ventilation operation. -
Page 92: Installer Setting - Indoor Unit Auto-Start Setting
INSTALLATION INSTRUCTIONS Installer setting – Indoor unit Auto-Start setting It is a function that sets whether to restore the indoor unit operation by resuming the previous power-on state or as power-off state in the power failure compensation. If pressing button long for 3 seconds, it enters into Indoor unit Auto-Start setting installer setup mode. -
Page 93: Installer Setting - Occupancy Duration Time Setting
INSTALLATION INSTRUCTIONS Installer setting – Occupancy Duration Time Setting It is a function that sets the light-on/occupancy duration after motion is detected when installing an occupancy sensor. If pressing button long for 3 seconds, it enters into Occupy sensor ‘occupy maintain’ time setting installer setup mode.
Need help?
Do you have a question about the PREMTB10U and is the answer not in the manual?
Questions and answers