D-Link DWR-932 User Manual
4g/lte mobile router
Hide thumbs
Also See for DWR-932:
- User manual (98 pages) ,
- Quick installation manual (81 pages) ,
- Quick start manual (2 pages)
Table of Contents
Advertisement
Quick Links
Advertisement
Table of Contents

Related Manuals for D-Link DWR-932


Summary of Contents for D-Link DWR-932
- Page 1 Version 1.0 | May 06, 2015 User Manual 4G/LTE Mobile Router DWR-932...
-
Page 2: Manual Revisions
Preface D-Link reserves the right to revise this publication and to make changes in the content hereof without obligation to notify any person or organization of such revisions or changes. Manual Revisions Revision Date Description May 06, 2015 • Initial release for hardware revision D1... -
Page 3: Table Of Contents
To DHCP Service Setting ..........28 Network Setup ................15 DHCP Service ..............29 Setup Wizard ................15 Wi-Fi Settings ................30 APN For LTE/3G ...............16 Wi-Fi Status ................30 Connection Settings ............16 General Information .............30 Wi-Fi 2.4 GHz Access Name ........17 D-Link DWR-932 User Manual... - Page 4 Connecting to a Wireless Network .........68 Port Forwarding .............50 Using Windows 8 ...............68 Add Port Forwarding ............51 Using Windows 7 ...............70 URL Filter ................52 Configuring Wireless Security ........72 SD Sharing ................53 Using Windows Vista™ ..............75 SD Sharing ................53 D-Link DWR-932 User Manual...
- Page 5 Table of Contents Configuring Wireless Security ........76 Using Windows XP ..............78 ® Configure WEP ..............79 Troubleshooting ..............81 Networking Basics ............88 Check your IP address ...............88 Statically Assign an IP address ..........89 Technical Specifications ..........90 Regulatory Information ..........91 D-Link DWR-932 User Manual...
-
Page 6: Product Overview
Section 1 - Product Overview Product Overview Package Contents D-Link DWR-932 4G/LTE Mobile Router USB Cable Power Adapter If any of the above items are missing from your package, please contact your reseller. System Requirements • A compatible (U)SIM card with mobile data service •... -
Page 7: Introduction
High-Speed Mobile Internet with LTE Connectivity The DWR-932 4G/LTE Mobile Router gives you high-speed Internet wherever you are and lets you share it on the go. Using LTE technology, you can achieve download speeds of up to 150 Mbps and upload speeds of up to 50 Mbps . -
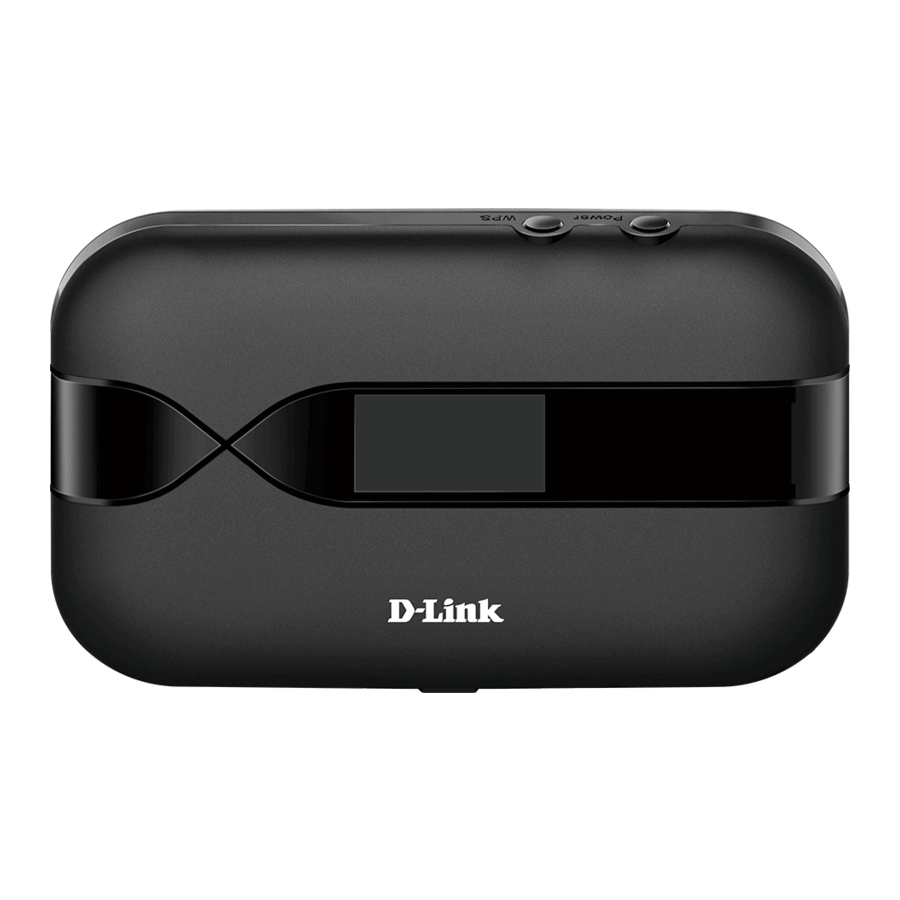
Page 8: Hardware Overview
Press this button to add new wireless devices quickly and easily using Wi-Fi Protected WPS Button Setup (WPS). Use the included cable to connect to a powered USB port to charge the device, or to Micro-USB Connector access the configuration utility. D-Link DWR-932 User Manual... -
Page 9: Under Side And Battery Cover
Note: Ensure that the battery is inserted and the unit is powered on when pressing the reset button. Wi-Fi Network (SSID) The network name (SSID) of the DWR-932 will be displayed here. Network (SSID) The network (SSID) password of the DWR-932 will be displayed here. -
Page 10: Lcd Display
Press the power button to change to a screen displaying your device’s SSID and press once again to display the SSID password. When connecting to the DWR-932 the SSID will be displayed in your device’s wireless networking utility. By selecting SSID and entering in the SSID password you will be able to connect to the DWR-932. -
Page 11: Installation
After a few moments, the LCD will change to a home screen. The network name (SSID) and password of the DWR-932 can be accessed from the LCD screen by pressing the power button. For more details on the LCD display, please refer to “LCD Display” on page 5. -
Page 12: Driver Installation
When you plug the DWR-932 into your computer, any necessary drivers will immediately install (with your permission). Note: These drivers are Windows-only. Mac and Linux users will still be able to configure the DWR-932 using the web configuration utility described in “Configuration Utility”... -
Page 13: Wireless Installation Considerations
Wireless Installation Considerations The DWR-932 can be accessed using a wireless connection from anywhere within the operating range of its wireless network. Keep in mind that the quantity, thickness, and location of walls, ceilings, or other objects that the wireless signals must pass through may adversely affect wireless signals. -
Page 14: Configuration
Section 2 - Installation Configuration This section will show you how to configure your new D-Link mobile router using the configuration utility that can be obtained through a software interface or a web-based user interface. Initial Connection to the Router When configuring the router for the first time, you will need to establish a direct connection with the router in order to access the web-based configuration utility. -
Page 15: Connect Via Wi-Fi
To connect to the router using Wi-Fi, open your operating system’s wireless networking utility and scan for available networks to connect to. By default, the network name (SSID) of the DWR-932 will be in the format dlink_DWR-932_xxxx, where “xxxx” represents the last four character’s of the DWR-932’s MAC address. - Page 16 You will then be prompted to enter the network security key for your router. The unique security key for your router will be displayed on the DWR-932’s screen. Enter the security key in the box provided and click OK. Your wireless connection utility will confirm that the connection is successful, and you can move to the next step to continue to the configuration process.
-
Page 17: Web-Based Configuration
Once you have reached the configuration utility through your web browser, you will need to log in. Enter admin as the username, and then enter the password. By default, the password is blank. Click Sign in to continue. D-Link DWR-932 User Manual... -
Page 18: Navigation
The Applications tab allows you to configure firewall and security settings to protect your network from WAN-side intrusions. System The System tab allows you to view system information and alter your login password. Help From the Help tab, you can access a general mobile router FAQ. D-Link DWR-932 User Manual... -
Page 19: Quick Access
Section 3 - Configuration Quick Access A quick access page will be displayed on the initial homepage for the DWR-932. The headings below link through to windows where you can alter settings in more detail. Internet This area displays your Internet provider, the type of Internet service you are using, the signal strength and your current data usage. -
Page 20: Network Setup
The Wizard page will guide you through the steps required to configure the basic settings of your router such as the IP address, network name (SSID), and password. Click on the Setup Wizard button to begin the quick setup wizard. D-Link DWR-932 User Manual... -
Page 21: Apn For Lte/3G
Select this if your service provider uses this protocol. Password Authentication Protocol. Select this if your service provider uses this protocol. CHAP Challenge Handshake Authentication Protocol. Select this if your service provider uses this protocol. Click Next to move to the next section. D-Link DWR-932 User Manual... -
Page 22: Wi-Fi 2.4 Ghz Access Name
The pre-shared key is the password which clients will require in order to connect to your network. Enter a password of between 8 and 63 characters in length. Click Next to move to the next section. D-Link DWR-932 User Manual... -
Page 23: Admin Settings
Adjust the dials on the screen with your mouse curser or pointer to set the time and date. Selected Date and Time Displays your new, dial adjusted time. Click Next to move to the next section. D-Link DWR-932 User Manual... - Page 24 Enter the time zone where you are currently using the DWR-932 to accurately set the time. Synchronization You can specify in hours how frequently the Cycle DWR-932 will update the time from a SNTP server. Click Next to move to the next section. D-Link DWR-932 User Manual...
-
Page 25: Apply Settings
Section 3 - Configuration Apply Settings Check all settings in the wizard and click Apply. After applying the new settings you will need to reboot your system. Click Apply to save changes. D-Link DWR-932 User Manual... -
Page 26: Internet Settings
Connection Time The length of time you have been connected to the network. Network Status IP Address (IPV4) Displays your current IP address. Total DL Displays your average download speed. Total UL Displays your average upload speed. D-Link DWR-932 User Manual... -
Page 27: Apn Settings
Access Point Name (APN) Settings APN Selection Mode Auto Connect Check this option if you want the DWR-932 to automatically connect to a mobile network after it has been powered on, or has been disconnected from its current mobile network. -
Page 28: Apn Mode
Choose the authentication method that your ISP uses to connect to its mobile network. If you do not know this information, please contact your service provider. For more information refer to “Connection Settings” on page 16. Click Apply to save changes. D-Link DWR-932 User Manual... -
Page 29: Connect Mode Settings
Enabling this feature can lead to very high data expenses. Choose between Always or Manual for connecting Connection Mode to the Internet. If you selected Manual Connection Mode: Connect/disconnect Toggle the switch to enable/disable your Internet. manually Click Apply to save changes. D-Link DWR-932 User Manual... -
Page 30: Sim Card Pin Lock Settings
Section 3 - Configuration SIM Card PIN Lock Settings This section allows you to lock the SIM card currently inserted into the DWR-932. No. of Retry The number of retries left to access your SIM. Note: If you exceed the number of retries, you will be locked from using your SIM. -
Page 31: My Operator (Plmn)
This page allows you to view available Public Land Mobile Networks (PLMN). This page can also be used to select a preferred network when you are roaming outside of your home network. Operator Mode (PLMN) PLMN Mode Displays the current mode the DWR-932 is operating in. Select Automatic to allow the DWR-932 to automatically connect to the first available network when roaming. -
Page 32: Available Operators
Check the box to select your desired network. Status The network’s current status. Operator Name The name of the cellular network. Access Technology Allows you to see what the cellular network’s access technology is. Click Apply to save changes. D-Link DWR-932 User Manual... -
Page 33: Router Lan Settings
The DWR-932 has a built-in DHCP server which can assign IP addresses to connected clients. This section shows your current settings and allows you to configure the IP address for the DWR-932 as well as configure its DHCP settings. Configure DHCP This button takes you through to DHCP Settings where you can configure your IP address and IP range. -
Page 34: Dhcp Service
Section 3 - Configuration If you selected Configure DHCP: DHCP Service Here you can configure the IP address for the DWR-932, as well as the range of IP numbers that the DHCP will give out. DHCP Service Enable/disable the DHCP Service. -
Page 35: Wi-Fi Settings
Encryption Displays your current Wi-Fi security encryption mode. DHCP Displays whether you are using a DHCP server or not. IP Address Your router’s IP address. Your router’s subnet number. Subnet Your router’s MAC address. MAC Address D-Link DWR-932 User Manual... -
Page 36: Wi-Fi Control
By default the channel is set to Auto Channel. This can be changed to fit the channel setting for an existing wireless network or to customize your wireless network. Click Apply to save changes. D-Link DWR-932 User Manual... -
Page 37: Wi-Fi Wps
Section 3 - Configuration Wi-Fi WPS PBC (Push Button Configuration) enables you to easily connect your devices to the DWR-932 by pushing a PBC button on both devices. Simultaneously click Start Via PBC, as well as your device’s PBC button, to begin the Wi-Fi Protected Setup feature. -
Page 38: Wi-Fi Clients
Note: If you deny access to a Wi-Fi client you will see their MAC address in “MAC Filter” on page 36. You can re- allow access to the client there. Click Apply to save changes. D-Link DWR-932 User Manual... -
Page 39: Wi-Fi Security Settings
WPA2 will not be able to associate with the router. AES - A newer cipher used by the WPA2 standard. Cipher Type Use of this cipher type is required in order to achieve 802.11 speeds. D-Link DWR-932 User Manual... - Page 40 Section 3 - Configuration Pre-Shared Key The pre-shared key is the password which clients require in order to connect to your network. Enter a password of between 8 and 63 characters in length. Click Apply to save changes. D-Link DWR-932 User Manual...
-
Page 41: Mac Filter
MAC address of the client that you wish to deny access to your network. Note: You can view the current list of clients connected to your network and their MAC addresses in“Wi-Fi Clients” on page 33. Click Apply to save changes. D-Link DWR-932 User Manual... -
Page 42: Application Settings
Section 3 - Configuration Application Settings Contacts Settings This page lets you view, add and organize contacts stored on your SIM card and DWR-932. Contacts On Device A number given to each contact on your SIM card. Contact Name The name of contacts on your SIM card. -
Page 43: Contacts On Sim Card
Contact Name The name of contacts on your SIM card. Phone Number SIM card contacts phone number. Add New Click Add New to add a new contact to your SIM card. Click Apply to save changes. D-Link DWR-932 User Manual... -
Page 44: Short Messages
On the Short Messages Settings page you can organize, send and receive Short Message Service (SMS) messages by selecting between a setup, inbox and drafts tab. These messages can either be saved to the DWR-932 4G/LTE Mobile Router directly or on the SIM card itself. - Page 45 Click Add New to send a new message. Click Apply to save changes. If you clicked Add New: Send to The number or contact name of the person you wish to send the message to. Content Type your message content here. D-Link DWR-932 User Manual...
- Page 46 Delete Check this box to select and delete a message in your drafts folder. The SMS sender’s number. Time The time the message was last edited. Content The SMS message’s content. Click Apply to save changes. D-Link DWR-932 User Manual...
-
Page 47: Dhcp Settings
Section 3 - Configuration DHCP Settings Here you can enable your router’s DHCP Service, configure the IP address for the DWR-932 as well as the IP range of numbers that the DHCP will give out. DHCP Service DHCP Service Enable/disable the DHCP Service. -
Page 48: Ussd
Unstructured Supplementary Service Data (USSD) allows ISP-specific applications to be activated with a SMS message. USSD USSD Code Enter an application activation code and click the Send button. This will allow you to activate applications by sending an SMS to your ISP. D-Link DWR-932 User Manual... -
Page 49: Diagnostics
This test displays how many IP addresses are between your router and the IP address you wish to check. IP or Hostname Enter the IP address that you wish to check and click either Ping or Traceroute. D-Link DWR-932 User Manual... -
Page 50: Log
You may view these in the display below. Filter Level Select your desired filter level. Save Log File Click this button to download the log file to your computer. Clear Click this button to clear the current displayed data. D-Link DWR-932 User Manual... -
Page 51: Firewall Settings
IPsec protocol. Allows multiple machines on the LAN to connect to L2TP Pass Through their corporate network using L2TP protocol. The DWR-932 will not respond to pings. WAN Ping Blocking Clicking this toggle allows access from WAN. Access from WAN Click Apply to save changes. - Page 52 Type in the IP address of the computer you wish to disable firewall protection on. If you selected Access from WAN: Port Number The port number used to access the router from the WAN. Click Apply to save changes. D-Link DWR-932 User Manual...
-
Page 53: Ip Filter
Section 3 - Configuration IP Filter The DWR-932 can filter certain IP addresses and ports. IP filtering will help to protect your network from outside intrusions and malicious attacks. Click Add New to add a new filtering rule. ID number given to new IP filters. -
Page 54: Add Ip Filter
Dest IP Type in the destination IP address. Enter a two-digit subnet number. Subnet Destination Port Click the toggle if you wish to enter a range of port Number numbers to allow or deny access to. D-Link DWR-932 User Manual... -
Page 55: Port Forwarding
Click here to select the rules you wish to delete. Delete The selected protocol for the IP filter rule. Protocol The IP address that will be port forwarded to. Destination IP The port number that incoming traffic will be Port forwarded from. D-Link DWR-932 User Manual... -
Page 56: Add Port Forwarding
Click the toggle to enter the ports you want port Port Number forwarding on. Enter a single port or a range of ports that you wish Destination Port Range to allow port forwarding on. Separate port numbers with a comma. Click Apply to proceed. D-Link DWR-932 User Manual... -
Page 57: Url Filter
Click here to select the rules you wish to delete. The name of the URL or domain that you wish to filter. Keyword of URL/Domain Click Add New to create a new URL filter. Add New Click Apply to proceed. D-Link DWR-932 User Manual... -
Page 58: Sd Sharing
Create Folder Click this button to create a new folder. File System File storage system. Storage Maximum amount of storage space on your microSD card. Available Space Current amount of available storage space on your microSD card. D-Link DWR-932 User Manual... -
Page 59: System
SIM IMSI has a unique number called International Mobile Subscriber Identity (IMSI). This is used to identify and authenticate users on cellular devices. The model name of your D-Link router. Model Name Your router’s current battery life. Battery Capacity The length of time your system has been running for. -
Page 60: Admin Settings
This tab allows you to customize your own username and password as well as adjust the auto logout timer. Username Adjust your login username here. Password Change new password here. Confirm Password Confirm new password here. Auto logout after Click on the blue text to adjust the automatic logout timer. Click Apply to proceed. D-Link DWR-932 User Manual... -
Page 61: Language
Section 3 - Configuration Language This tab allows you to change the default language of the router web page interface. Language Select your desired language here. Click Apply to proceed. D-Link DWR-932 User Manual... -
Page 62: Date & Time
Select your current Coordinated Universal Time zone (UTC). Date & Time Adjust the dials on the screen with your mouse pointer to set the date and time. Selected Date and Time Displays your new adjusted time. Click Apply to proceed. D-Link DWR-932 User Manual... - Page 63 Enter the time zone where you are currently using the DWR-932 to correctly set the time offset. Synchronization You can specify in hours how frequently the Cycle DWR-932 will update the time from a SNTP server. D-Link DWR-932 User Manual...
-
Page 64: Settings Profile
Section 3 - Configuration Settings Profile In the Import Profiles tab, you can import previously configured settings for the router. Import Select Browse your computer for previously exported settings. Click Apply Import to proceed. D-Link DWR-932 User Manual... -
Page 65: Export Profiles
Section 3 - Configuration Export Profiles In the Export Profiles tab you can export your currently configured settings to a computer. Export To Get Current Click the Click Me button to download the current Profile settings of your DWR-932. D-Link DWR-932 User Manual... -
Page 66: Reset And Reboot
WPS button and power button simultaneously for 5~10 seconds. Reset and Reboot Reset to Default Select the Reset to Default button to reset the DWR-932 to factory default. Reboot Select the Reboot button to reboot the DWR-932. D-Link DWR-932 User Manual... -
Page 67: Firmware Upgrade
Select the appropriate file for the upgrade. Current Version The current version of your firmware. Note: The FW version number displayed on the image to the right will not be the same as your router’s. Click the Start Update button. D-Link DWR-932 User Manual... -
Page 68: Network Statistics
Notification Setting for Packet Data Usage Maximum Packet Data Allows you to set the maximum amount of data usage Limitation for the DWR-932. Data Usage Reminder Allows you to set a reminder when your data usage goes over the specified percentage. D-Link DWR-932 User Manual... -
Page 69: Statistics
This page allows you to view your router’s packet data usage. Total Packet Data Uploads Your total amount of uploaded data. Downloads Your total amount of downloaded data. Clear All Data Click this button to clear data records. D-Link DWR-932 User Manual... -
Page 70: Advanced Options
On this page you can enable and disable a Universal Plug and Play (UPnP) feature. UPnP devices can easily view and interact with other compatible networking equipment, software and peripherals. UPNP UPnP Click the toggle to use the Universal Plug and Play (UPnP) feature. D-Link DWR-932 User Manual... -
Page 71: Power Saving
Section 3 - Configuration Power Saving On this page you can configure power saving settings, to help give your DWR-932 longer battery life when you don’t have easy access to a charger. Suspend Allows you to set the length of time before the DWR-932 goes to sleep when no Wi-Fi clients are connected. -
Page 72: Help
Section 3 - Configuration Help General Mobile Router FAQs On this page you can find answers to some frequently asked questions. D-Link DWR-932 User Manual... -
Page 73: Connecting To A Wireless Network
To join an existing network, locate the wireless network icon in the taskbar, next to the time display. ƒ Wireless Icon Clicking on this icon will display a list of wireless networks which are within connecting proximity of your computer. Select the desired network by clicking on the network name. D-Link DWR-932 User Manual... - Page 74 WPS function. When you have established a successful connection to a wireless network, the word Connected will appear next to the name of the network to which you are connected. D-Link DWR-932 User Manual...
-
Page 75: Using Windows 7
If you receive the Wireless Networks Detected bubble, click on the center of the bubble to access the utility. You can also click on the wireless icon in your system tray (lower-right corner). Wireless The utility will display any available wireless networks in your area. D-Link DWR-932 User Manual... - Page 76 Highlight the wireless network (SSID) you would like to connect to and click the Connect button. If you get a good signal but cannot access the Internet, check your TCP/IP settings for your wireless adapter. Refer to “Networking Basics” on page 88 for more information. D-Link DWR-932 User Manual...
-
Page 77: Configuring Wireless Security
1. Click on the wireless icon in your system tray (lower-right corner). Wireless 2. The utility will display any available wireless networks in your area. D-Link DWR-932 User Manual... - Page 78 Section 4 - Connecting to a Wireless Network 3. Highlight the wireless network (SSID) you would like to connect to and click the Connect button. 4. The following window appears while your computer tries to connect to the router. D-Link DWR-932 User Manual...
- Page 79 It may take 20-30 seconds to connect to the wireless network. If the connection fails, please verify that the security settings are correct. The key or pass phrase must be exactly the same as on the wireless router. D-Link DWR-932 User Manual...
-
Page 80: Using Windows Vista
(displayed using the SSID) and click the Connect button. If you get a good signal but cannot access the Internet, check the TCP/IP settings for your wireless adapter. Refer to “Networking Basics” on page 88 for more information. D-Link DWR-932 User Manual... -
Page 81: Configuring Wireless Security
Wireless Utility by right-clicking on the wireless ® ™ computer icon in your system tray (lower right corner of screen). Select Connect to a network. 2. Highlight the wireless network (SSID) you would like to connect to and click Connect. D-Link DWR-932 User Manual... - Page 82 It may take 20-30 seconds to connect to the wireless network. If the connection fails, please verify that the security settings are correct. The key or passphrase must be exactly the same as on the wireless router. D-Link DWR-932 User Manual...
-
Page 83: Using Windows
(displayed using the SSID) and click the Connect button. If you get a good signal but cannot access the Internet, check the TCP/IP settings for your wireless adapter. Refer to “Networking Basics” on page 88 for more information. D-Link DWR-932 User Manual... -
Page 84: Configure Wep
XP Wireless Utility by right-clicking on ® the wireless computer icon in your system tray (lower-right corner of screen). Select View Available Wireless Networks. 2. Highlight the wireless network (SSID) you would like to connect to and click Connect. D-Link DWR-932 User Manual... - Page 85 It may take 20-30 seconds to connect to the wireless network. If the connection fails, please verify that the WEP settings are correct. The WEP key must be exactly the same as on the wireless router. D-Link DWR-932 User Manual...
-
Page 86: Troubleshooting
• Make sure that the computer you are using is not connected to any other devices (such as routers or switches) which might have the same IP address as the DWR-932, as this may cause an IP address conflict. If you have a conflict, temporarily unplug any other devices from your computer while you configure the DWR-932. - Page 87 If you forgot your password, you must reset your router. Please note that this process will change all your settings back to the factory defaults. To reset the router, open the battery cover and using a paper clip, press and hold this button for 6 seconds to reboot the unit. The DWR-932 will restore the factory default settings.
-
Page 88: Wireless Basics
D-Link wireless products are based on industry standards to provide easy-to-use and compatible high-speed wireless connectivity within your home, business or public access wireless networks. Strictly adhering to the IEEE standard, the D-Link wireless family of products will allow you to securely access the data you want, when and where you want it. You will be able to enjoy the freedom that wireless networking delivers. - Page 89 D-Link is the worldwide leader and award winning designer, developer, and manufacturer of networking products. D-Link delivers the performance you need at a price you can afford. D-Link has all the products you need to build your network. How does wireless work? Wireless works similar to how cordless phones work, through radio signals to transmit data from one point A to point B.
- Page 90 Who uses wireless? Wireless technology has become so popular in recent years that almost everyone is using it, whether it’s for home, office, business, D-Link has a wireless solution for it. Home • Gives everyone at home broadband access •...
- Page 91 The wireless connection in public places are usually called “hotspots”. Using a D-Link CardBus Adapter with your laptop, you can access the hotspot to connect to the Internet from remote locations like: airports, hotels, coffee shops, libraries, restaurants, and convention centers.
-
Page 92: Wireless Modes
• Ad-hoc – Directly connecting to another computer, for peer-to-peer communication, using wireless network adapters on each computer, such as two or more DWR-932 wireless network CardBus adapters. An Infrastructure network contains an access point or wireless router. All the wireless devices, or clients, will connect to the wireless router or access point. -
Page 93: Networking Basics
Check your IP address After you install your new D-Link adapter, by default, the TCP/IP settings should be set to obtain an IP address from a DHCP server (i.e. wireless router) automatically. To verify your IP address, please follow the steps below. -
Page 94: Statically Assign An Ip Address
Set Primary DNS the same as the LAN IP address of your router (192.168.0.1). The Secondary DNS is not needed or you may enter a DNS server from your ISP. Step 5 Click OK twice to save your settings. D-Link DWR-932 User Manual... -
Page 95: Technical Specifications
• DL MIMO (1x2) • One internal diversity antenna USB Interface • Micro-USB port USIM Slot • Standard 6-pin SIM card interface Status Indicators • 0.96 inch OLED display Wireless Security • WPA & WPA2 (Wi-Fi Protected Access) D-Link DWR-932 User Manual... -
Page 96: Regulatory Information
• This device is restricted from functioning in Ad-hoc mode while operating in 5 Ghz. Ad-hoc mode is direct peer-to-peer communication between two client devices without an access point. • Access points will support DFS (Dynamic Frequency Selection) and TPC (Transmit Power Control) functionality as required when operating in 5 Ghz within the EU. D-Link DWR-932 User Manual... - Page 97 Spectrum Regulation MHz, Europa (ETSI) max. EIRP Innenbereich max. EIRP Außenbereich Europa 2400 - 2483.5 MHz 100 mW 100 mW 2400 - 2454 MHz 100 mW 100 mW Frankreich 2454 - 2483.5 MHz 100 mW 10 mW D-Link DWR-932 User Manual...
- Page 98 Hereby, D-Link, declares that this DWR-932 is in compliance with the essential requirements English and other relevant provisions of Directive 1999/5/EC. Por medio de la presente D-Link declara que el DWR-932 cumple con los requisitos esenciales Español [Spanish] y cualesquiera otras disposiciones aplicables o exigibles de la Directiva 1999/5/CE.
- Page 99 D-Link declara que este DWR-932 está conforme com os requisitos essenciais e outras Português [Portuguese] disposições da Directiva 1999/5/CE. D-Link izjavlja, da je ta DWR-932 v skladu z bistvenimi zahtevami in ostalimi relevantnimi Slovensko [Slovenian] določili direktive 1999/5/ES. D-Link týmto vyhlasuje, že DWR-932 spĺňa základné požiadavky a všetky príslušné...
-
Page 100: Safety Instructions
D-Link may result in the loss of product warranty. Unless expressly approved by an authorized representative of D-Link in writing, you may not and may not permit others to: • Disassemble or reverse engineer the device or attempt to derive source code (underlying ideas, algorithms, or structure) from the device or from any other information provided by D-Link, except to the extent that this restriction is expressly prohibited by local law. - Page 101 • To help protect your device from sudden, transient increases and decreases in electrical power, use a surge suppressor, line conditioner, or uninterruptible power supply (UPS). • Do not modify power cables or plugs. Consult a licensed electrician or your power company for site modifications. Always follow your local/national wiring rules. D-Link DWR-932 User Manual...
- Page 102 • Use the device only with approved equipment. • Move products with care; ensure that all casters and/or stabilizers are firmly connected to the system. Avoid sudden stops and uneven surfaces. D-Link DWR-932 User Manual...
- Page 103 Static electricity can harm delicate components inside your system. To prevent static damage, discharge static electricity from your body before you touch any of the electronic components, such as the microprocessor. You can do so by periodically touching an unpainted metal surface on the chassis. D-Link DWR-932 User Manual...
- Page 104 2. When transporting a sensitive component, first place it in an antistatic container or packaging. 3. Handle all sensitive components in a static-safe area. If possible, use antistatic floor pads, workbench pads, and an antistatic grounding strap. D-Link DWR-932 User Manual...
- Page 105 D-Link and the Environment At D-Link, we understand and are committed to reducing any impact our operations and products may have on the environment. To minimise this impact D-Link designs and builds its products to be as environmentally friendly as possible, by using recyclable, low toxic materials in both products and packaging.
- Page 106 D-Link seine Produkte mit dem Ziel größtmöglicher Umweltfreundlichkeit her und verwendet wiederverwertbare, schadstoffarme Materialien bei Produktherstellung und Verpackung. D-Link empfiehlt, Ihre Produkte von D-Link, wenn nicht in Gebrauch, immer auszuschalten oder vom Netz zu nehmen. Auf diese Weise helfen Sie, Energie zu sparen und CO2-Emissionen zu reduzieren.
- Page 107 Appendix D - Regulatory Information à le réduire. Pour limiter cet impact, D-Link conçoit et fabrique ses produits de manière aussi écologique que possible, en utilisant des matériaux recyclables et faiblement toxiques, tant dans ses produits que ses emballages. D-Link recommande de toujours éteindre ou débrancher vos produits D-Link lorsque vous ne les utilisez pas. Vous réaliserez ainsi des économies d’énergie et réduirez vos émissions de CO2.
- Page 108 D-Link cerca da sempre di ridurre l'impatto ambientale dei propri stabilimenti e dei propri prodotti. Allo scopo di ridurre al minimo tale impatto, D-Link progetta e realizza i propri prodotti in modo che rispettino il più possibile l'ambiente, utilizzando materiali riciclabili a basso tasso di tossicità sia per i prodotti che per gli imballaggi.
- Page 109 D-Link raadt aan om steeds uw D-Link producten uit te schakelen of uit de stekker te halen wanneer u ze niet gebruikt. Door dit te doen bespaart u energie en beperkt u de CO2-emissies.
- Page 110 Firma D-Link zaleca, aby Państwo zawsze prawidłowo wyłączali z użytku swoje produkty D-Link, gdy nie są one wykorzystywane. Postępując w ten sposób pozwalają Państwo oszczędzać energię i zmniejszać emisje CO2.
- Page 111 és gyárt azáltal, hogy újrahasznosítható, alacsony károsanyag-tartalmú termékeket gyárt és csomagolásokat alkalmaz. A D-Link azt javasolja, hogy mindig kapcsolja ki vagy húzza ki a D-Link termékeket a tápforrásból, ha nem használja azokat. Ezzel segít az energia megtakarításában és a széndioxid kibocsátásának csökkentésében.
- Page 112 å bruke resirkulerbare, lav-toksiske materialer både i produktene og forpakningen. D-Link anbefaler at du alltid slår av eller frakobler D-Link-produkter når de ikke er i bruk. Ved å gjøre dette hjelper du å spare energi og å redusere CO2-utslipp.
- Page 113 D-Link anbefaler, at du altid slukker eller frakobler dine D-Link-produkter, når de ikke er i brug. Ved at gøre det bidrager du til at spare energi og reducere CO2-udledningerne.
- Page 114 På D-Link förstår vi och är fast beslutna att minska den påverkan våra verksamheter och produkter kan ha på miljön. För att minska denna påverkan utformar och bygger D-Link sina produkter för att de ska vara så miljövänliga som möjligt, genom att använda återvinningsbara material med låg gifthalt i både produkter och förpackningar.
- Page 115 Na D-Link compreendemos e comprometemo-nos com a redução do impacto que as nossas operações e produtos possam ter no ambiente. Para minimizar este impacto a D-Link concebe e constrói os seus produtos para que estes sejam o mais inofensivos para o ambiente possível, utilizando meteriais recicláveis e não tóxicos tanto nos produtos como nas embalagens.
Need help?
Do you have a question about the DWR-932 and is the answer not in the manual?
Questions and answers