Advertisement
INSTALLATION INSTRUCTIONS FOR THE EAX-500 EXIT ALARM
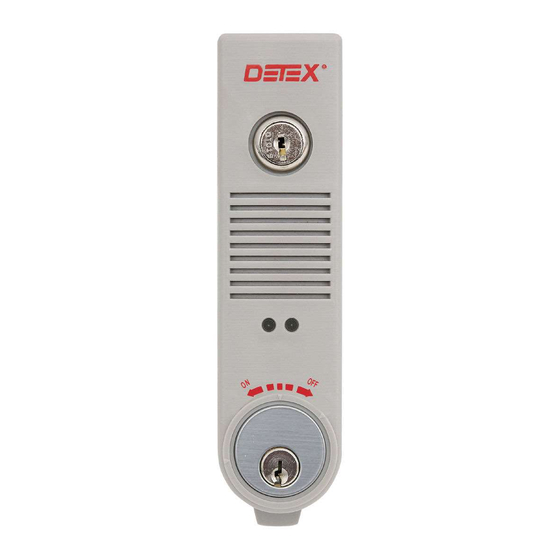
The Detex EAX-500 is designed for applications that require an alarmed exit device on secured doors. The alarm, with
approximately 100dB, will sound when someone attempts an unauthorized exit. The EAX-500, with it's smaller size
makes it the choice for quick and easy installations on emergency exit and restricted doors.
Drawing # 102600
Cover lock,
nut, and 2 keys
P/N: PP-5572
Mag switch
(surface mount)
P/N: MS-1039S
Cylinder nut
(EAX-500SK only)
P/N: 100783
Cam assembly kit
P/N: 102655
OPTIONAL:
Cylinder nut socket
P/N: 103779
.313"
.715"
Mortise Cylinder with
standard Yale cam
required
Detex Corporation, 302 Detex Drive, New Braunfels, Texas 78130-3045
(830)629-2900 / 1-800-729-3839 / Fax (830)620-6711
E-MAIL: detex@detex.com
(EAX-500 / 500W / 500SK)
U.S. PATENT NUMBERS:
Parts breakdown depiction
(Mortise cylinder required)
9V Battery
P/N: PP-5567 (or equivalent)
#8-32 Truss HD screw
P/N: 102627-15
Hardware Kit
P/N: 102633
(includes Keystop
P/N: 102688)
Device will vary based on
configuration and order options.
101321 Page 1
101321
INTERNET: www.detex.com
20050257389
20050231363
20050223764
Battery retainer
Circuit board kit
P/N: 102606
P/N: 102656-1 (Standard)
P/N: 102656-2 (Weatherized)
P/N: 102613
Backplate
P/N: 102603
03 Rim cylinder plate
P/N: 102638
(not used on wall
mounted devices)
September 26, 2011
Switch guard
Magnet Kit
P/N: 102665
Magnet locator
P/N: 102607
Locate this component
for Step 6
Advertisement
Table of Contents

Related Manuals for Detex EAX-500


Summary of Contents for Detex EAX-500
- Page 1 (EAX-500 / 500W / 500SK) The Detex EAX-500 is designed for applications that require an alarmed exit device on secured doors. The alarm, with approximately 100dB, will sound when someone attempts an unauthorized exit. The EAX-500, with it's smaller size makes it the choice for quick and easy installations on emergency exit and restricted doors.
- Page 2 Key required to reset the alarm after it has been activated. OFF* Extended Bypass (see OPERATIONS page) AUTO REARM Alarm will automatically rearm 2 minutes after alarm has been activated and door closed. Custom settings can be programmed by DETEX. Non-Extended (Timed) Bypass (see OPERATIONS page) 101321 Page 2...
- Page 3 (all models except SK) DOOR DOOR IMPORTANT! PROVIDED TAILPIECE Cylinder Side: Drill 1-1/4" hole through outside 1-1/4" 1-3/8" door face Device Side: Drill 1-3/8" hole through inside ASSEMBLE door face 3/4" Rim cylinder - Detex P/N: ECL-445K-X 101321 Page 3...
- Page 4 STEP 6: For SK models BACKPLATE MOUNTING Install backplate with (2) #1/4-20 or #14 screws STEP 7: Multi-door & SK function wiring connection (if required) (Recommended installation) Flex walls outward to remove guard Reassembly: & board Recommended hole size Fitting or nut NOT included Drill 7/8 dia P/N: PP-5107 (1) place...
-
Page 5: Step 8: Install Device
STEP 8: INSTALL DEVICE Install device onto backplate Turn key CW to lock cover Hook at bottom, then tilt cover over backplate Front View STEP 9: KEY STOP INSTALLATION (Key stop included in hardware kit) KEY STOP POSITIONS Top surface of Key Stop should "OFF"... - Page 6 OPERATIONS Key orientation SPECIAL NOTES and DEFINITIONS: without Key Stop 1. The door needs to be closed to test the unit. 2. When operating the ON/OFF switch, there is a slight delay. installed 3. The key is inserted and removed only in the vertical position (home position). 4.
-
Page 7: Low Battery Alert
1) Remove battery and firmly reinstall. 2) Microswitch needs to be replaced. 2) Cylinder microswitch lever broken. Remove PCB and return to Detex repair. 3) Cylinder installed incorrectly. 3) Check cylinder installation. Make sure key is turned counter-clockwise all the way to ON. -
Page 8: Optional Accessories
Optional Accessories Inswing Door Kit Cylinder Nut Tool P/N: 102644 P/N: 103779 101321 Page 8...
Need help?
Do you have a question about the EAX-500 and is the answer not in the manual?
Questions and answers
Need key to replace battery? DT012
To replace the battery for the Detex EAX-500 using key DT012, follow these steps:
1. Use the DT012 key to unlock and remove the cover of the EAX-500 unit.
2. Remove the old battery from the unit.
3. Firmly install a new battery in the correct position.
4. Reinstall the unit on the door.
5. If needed, slide the Status Indicator and Auto Rearm switches to the ON position.
Ensure the battery is properly connected and the unit powers up.
This answer is automatically generated