Advertisement
Detex Corporation, 302 Detex Drive, New Braunfels, Texas 78130-3045
(830)629-2900 / 1-800-729-3839 / Fax (830)620-6711
E-MAIL: detex@detex.com
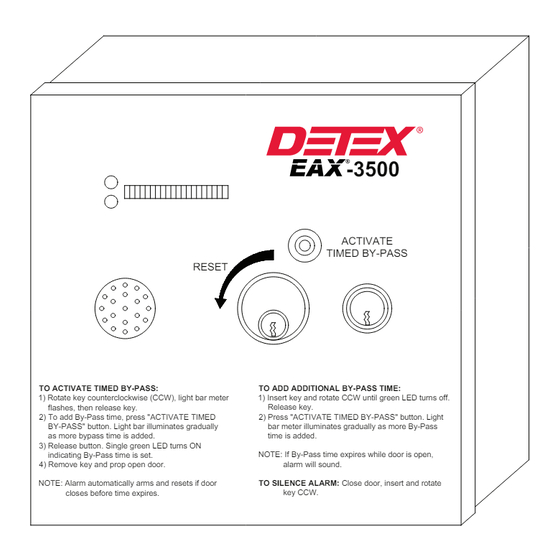
INSTALLATION INSTRUCTIONS FOR DETEX EAX-3500 ALARM
TO ACTIVATE TIMED BY-PASS:
1) Rotate key counterclockwise (CCW), light bar meter
flashes, then release key.
2) To add By-Pass time, press "ACTIVATE TIMED
BY-PASS" button. Light bar illuminates gradually
as more bypass time is added.
3) Release button. Single green LED turns ON
indicating By-Pass time is set.
4) Remove key and prop open door.
NOTE: Alarm automatically arms and resets if door
closes before time expires.
INTERNET: www.detex.com
TIMED BY-PASS
RESET
TO ADD ADDITIONAL BY-PASS TIME:
1) Insert key and rotate CCW until green LED turns off.
Release key.
2) Press "ACTIVATE TIMED BY-PASS" button. Light
bar meter illuminates gradually as more By-Pass
time is added.
NOTE: If By-Pass time expires while door is open,
alarm will sound.
TO SILENCE ALARM: Close door, insert and rotate
key CCW.
103140 Page 1
103140 March 3, 2011
-3500
ACTIVATE
Advertisement
Table of Contents

Subscribe to Our Youtube Channel
Related Manuals for Detex EAX-3500


Summary of Contents for Detex EAX-3500
- Page 1 103140 March 3, 2011 Detex Corporation, 302 Detex Drive, New Braunfels, Texas 78130-3045 (830)629-2900 / 1-800-729-3839 / Fax (830)620-6711 E-MAIL: detex@detex.com INTERNET: www.detex.com INSTALLATION INSTRUCTIONS FOR DETEX EAX-3500 ALARM -3500 ACTIVATE TIMED BY-PASS RESET TO ACTIVATE TIMED BY-PASS: TO ADD ADDITIONAL BY-PASS TIME: 1) Rotate key counterclockwise (CCW), light bar meter 1) Insert key and rotate CCW until green LED turns off.
-
Page 2: Cylinder Installation
NOT REQUIRED Sheetmetal Screws 1/4" All other Applications w/ Anchors Screw Driver Tape Measure #10 x 1" Center Punch EAX-3500 Installation and Usage Guide Modular Cable Power Supply Board Pushbutton Switch p/n 104017-5 p/n 103957 p/n 103941 Display Board p/n 103943... -
Page 3: Display Board
see step 5 POWER BOARD DISPLAY BOARD POWER CONTROL +/ - DISPLAY TAMPER 12V AC BOARD BATTERY BOARD 24V AC/DC CABLE CABLE see step 5 see step 5 & DETAIL A MAX BYPASS TIME SETTINGS 5 min 10 min 20 min 40 min STATUS INDICATOR DISABLE AUTO REARM... -
Page 4: Enclosure Installation
Connect magnetic switch wires to PC board located on enclosure door. (See FIG 3 and DETAIL A). Examples shown are for Detex supplied magnetic switches. Transformers and magnetic switches are required and can be purchased separately. Connect power wires to the two place terminal block located on lower left corner of power board. Wires are not polarity sensitive (Fig. - Page 5 This is a low battery indication. Make sure optional plug-in transformer is plugged in and the holding screw installed. Check for damaged wiring between the transformer and the EAX-3500. The battery should be replaced every three years 103140 Page 5...
Need help?
Do you have a question about the EAX-3500 and is the answer not in the manual?
Questions and answers