Table of Contents
Advertisement
Quick Links
Advertisement
Table of Contents

Related Manuals for ElliptiGO ElliptiGO 2015


Summary of Contents for ElliptiGO ElliptiGO 2015
- Page 2 READ THIS GUIDE BEFORE ASSEMBLING OR RIDING YOUR ELLIPIGO BIKE. It contains very important information about safety and performance, as well as instructions for how to assemble, ride and maintain your ElliptiGO bike. PAY PARTICULAR ATTENTION TO THE SAFETY INFORMATION CONTAINED WITHIN – IT COULD SAVE YOUR LIFE. Keep this manual available for reference and if you sell your ElliptiGO bike to someone else, make sure to transfer this manual to them.
- Page 3 We hope you enjoy many years of healthy exercise and fun while riding your ElliptiGO. As you will see throughout this owner’s manual, we value your safety. We have designed your ElliptiGO bike to be a safe, fun and effective workout system.
-
Page 4: Table Of Contents
This owner’s manual contains information regarding your components and how to do basic maintenance and service on your ElliptiGO. However, it is not intended to be a substitute for having your ElliptiGO serviced by a professional bicycle mechanic. YOU SHOULD HAVE YOUR BIKE ASSEMBLED, MAINTAINED AND SERVICED BY A PROFESSIONAL BICYCLE MECHANIC. -
Page 5: Important Notifications
As a result, we cannot provide guidance on how to safely ride the ElliptiGO Safety Warning bike in every circumstance and under all conditions. There are many... -
Page 6: Parental Advisory
Children are naturally curious about many things that can seriously injure them and your ElliptiGO bike is likely to be one. As with other hazards like boiling water, sharp knives, tools, cars, and chemicals, you are responsible for teaching your children not to use the ElliptiGO bike and to take active measures to prevent them from doing so. -
Page 7: Proper Use
It should never be used by children, people weighing more ABUSIVE ACTIVITIES. than 250 pounds, or by two or more people simultaneously. Because the ElliptiGO was designed to be ridden on paved surfaces by a single rider with Bike Owner's Manual... -
Page 8: Preparing To Ride
Before you take your first ride, you should thoroughly review and cause you to lose control of the ElliptiGO bike and fall, resulting in serious understand the sections below and follow any instructions contained injury or death. - Page 9 ElliptiGO bike, and reflective stickers or straps on your helmet and clothing. Ensure that these reflective surfaces b. Anticipate obstacles and dangerous conditions by looking ahead and are free from obstruction by objects you are carrying and your other paying attention to the environment around you.
- Page 10 ElliptiGO bike. The failure of a critical element of the bike is likely to result in the rider falling and suffering a serious injury or death.
-
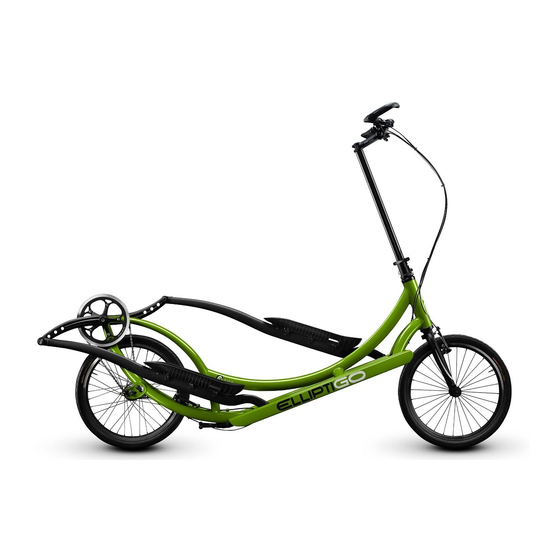
Page 11: Terminology And Component Overview
B. Terminology & Component Overview The picture below gives an overview of the components which make up an ElliptiGO bike. These names will be referred to throughout the Owner's Manual. FRAME FORK KICKSTAND FRONT BRAKE DRIVE ARM STEERING COLUMN DRIVE ARM AXLE... -
Page 12: Steering Columns
WARNING! The steering column is one of the most important safety features on your ElliptiGO. Before you ride, it is critical that you ensure it is secured properly, that the quick release is properly closed, and the safety pin is inserted in a hole. Failure to properly... - Page 13 MARKS causing a fall. Never use the ElliptiGO bike with the steering extender “MAX EXTENSION” mark situated above the collar. SHOULD NOT BE 4.
- Page 14 3. The extender, stem, and handlebar assembly can now be placed securely near the ElliptiGO bike for storage. Note: Refer to Section III. A. for the procedure for proper tightening and adjustment of quick release mechanisms.
- Page 15 - The storage position WARNING! The steering column is one of the most important safety features on the ElliptiGO bike. Before you ride, it is critical that you ensure it has been secured properly in the riding position and the quick release lever is fully closed with the appropriate amount of tension.
- Page 16 Never use your ElliptiGO when the “MAX EXTENSION” mark is visible above the column. Bike Owner's Manual...
- Page 17 The Storage Position (Folding Steering Column) To place the folding steering column into the storage position, follow these steps: 1. Open both collar quick releases. 2. Rotate collar 90 degrees counter- clockwise until index mark on collar lines up with "OPEN" mark on base.
-
Page 18: Proper Handling & Carrying Procedure
Picture 1 to the right demonstrates the proper method for handling, lifting or carrying your ElliptiGO. The bike should be handled with one hand on the frame member which goes over the top of the rear wheel and the other hand on the steering column. -
Page 19: Kickstand Operation
E. Kickstand Operation The ElliptiGO is equipped with a very stable double leg kickstand. To operate the kickstand, follow these steps: 1. Retracting the Kickstand - To retract the kickstand grab the steering column with one hand and the frame member which goes over the top of the wheel with the other hand. -
Page 20: Pre-Ride Safety Checklist
Check that the brake elbow is seated ElliptiGO until the problem is resolved. When in doubt, take the bike to a into the brake quick release system and the brake cable is seated into the professional bicycle mechanic for service or contact our service top end of the elbow and is free from pinches or sharp turns. - Page 21 WARNING! Improper brake alignment and functioning can result in shifter is shifting smoothly in both directions. the rider losing control of the ElliptiGO bike and suffering a fall, which can result in significant injury or death. Always make sure your brakes are 14.
-
Page 22: Adjusting The Fit
20. Check that the bolts holding on the rear wheel and internal hub are tightened appropriately. For torque specification refer to Appendix C: - The ElliptiGO is designed to be adjustable to fit a wide range of riders and "Torque Requirements for Screws and Fasteners". - Page 23 1. Adjustable Stride Length The crank arms are designed to allow four different mounting positions for the drive arms. Each mounting position generates a different stride length for the ElliptiGO bike according to the following table: Mounting Position Stride Length [in.] Three 1.a –...
- Page 24 (Continued from previous sheet) Tighten 5. Insert the drive arm axle into the new mounting position on Tighten the right crank arm. Using a 6mm Allen wrench on the back of the drive arm axle, rotate it counter-clockwise (still looking at the bike from left side) to tighten it. While tightening, ensure that the washer stays seated flat into the counter-bore on the crank arm.
- Page 25 COLLAR! Riding while the “MAX EXTENSION” mark is above the collar could result in the steering extender breaking during operation or being pulled out of the collar, causing a fall. Never use the ElliptiGO with the “MAX EXTENSION” mark above the collar. MARKS SHOULD 4.
- Page 26 EXTENSION” mark is visible above the collar could result in the steering extender breaking during operation or being pulled out of the collar, causing a fall. Never use the ElliptiGO bike with the steering extender “MAX EXTENSION” mark situated above the collar.
- Page 27 Positioning the controls correctly is a fundamental requirement for the WARNING! Because the braking force is created by pulling on the safe operation of the ElliptiGO bike and should only be done by a trained brake levers, the shorter the reach, the more important it becomes to professional.
-
Page 28: Familiarization Ride
Check to make sure nothing is dangling from H. Familiarization Ride your body or is so loose that it could contact any of the ElliptiGO’s Before heading out into traffic on a “real ride,” you should become familiar moving parts. - Page 29 Braking with only one hand on the hand objects like tree branches, signs, underpasses, etc. that are usually grips can cause the rider to lose control of the ElliptiGO bike and suffer higher than pedestrians or cycling traffic, but may be low enough to a fall.
-
Page 30: Riding Techniques
Braking with only one hand on the hand foot and stand up onto your platform-based foot, balancing the ElliptiGO grips can cause the rider to lose control of the ElliptiGO bike and suffer a bike. Once you have your balance, place your ground-based foot onto the fall. -
Page 31: Climbing And Descending Hills
Braking with only one hand on the hand objects like tree branches, signs, underpasses, and the like that could strike grips can cause the rider to lose control of the ElliptiGO bike and suffer a you on your ride if you are not paying attention. - Page 32 ElliptiGO bike at night or during periods of low visibility. Even with stopping. This could result in a fall causing you serious injury or death. In proper lighting and highly-visible clothing, cyclists are difficult to see.
-
Page 33: Competitive And Group Riding
Before riding, check to make sure that the faces of your reflectors are be safe to ride an ElliptiGO bike in the event and to find out what kind of free from dirt and other obstructions, and that the reflectors are support will be available. -
Page 34: Components And Service
We strongly recommend coasting downhill and using the brakes to maintain information you should be better able to recognize when your ElliptiGO bike a safe speed. Even using these techniques, it is possible for the ElliptiGO is not operating as designed so that you can contact us or a professional bike to reach speeds in excess of 40 mph. -
Page 35: Components
Any of these situations could cause the rider to release clamping systems: one on the front wheel lose control of the ElliptiGO bike and suffer a serious and three on the folding steering column or one on injury or be killed. IT IS CRITICAL THAT YOU UNDERSTAND the non-folding steering column. - Page 36 CLOSE LOOSE Adjusting the Quick Release Mechanism The amount of clamping force is controlled by the tension adjusting nut. To increase clamping force, turn the tension nut clockwise while holding cam lever fixed with the other hand. TIGHT To decrease clamping force, turn the tension nut counter-clockwise while holding cam lever fixed OPEN with the other hand.
-
Page 37: Brakes
The brakes on the ElliptiGO bike are the primary means for controlling the controlled stop. speed of the bike, including bringing it to a stop. The ElliptiGO bike comes However, there is more to it than this, especially in emergency braking equipped with front and rear rim brakes actuated by hand levers attached situations. - Page 38 Dirt or other debris on the surface of your rims or brakes can also reduce your stopping power and should be removed prior to riding. Finally, brakes wear out by design. Regular use of your ElliptiGO bike will require regular replacement of brake pads. Every time you inspect the bike,...
-
Page 39: Wheels, Tires And Tubes
ElliptiGO bike to a professional bicycle lose control of the ElliptiGO bike and suffer a serious injury or be killed. mechanic to have your wheel trued prior to riding. Riding on a wheel IT IS CRITICAL THAT YOU UNDERSTAND HOW TO OPERATE THE QUICK that is not true could cause you to lose control and suffer a fall. - Page 40 Front Wheel Removal To remove the front wheel, follow these steps: 1. Place the bike on the kickstand. 2. Pull the brake calipers into the rim with one hand while releasing the brake cable with the other. 3. Open the quick release lever on the front wheel.
-
Page 41: Front Wheel Installation
If any of these conditions are present, DO NOT RIDE. Instead, consult a bicycle mechanic or contact ElliptiGO Customer Service. Bike Owner's Manual... - Page 42 Your rear wheel is secured by two nuts that engage locking washers in the horizontal drop-outs built into the bike frame. These locking washers are then engaged by a chain-tensioning screw. When the ElliptiGO bike is operating, the drive train applies a significant amount of rearward force through the chain to the rear wheel.
- Page 43 Rear Wheel Removal To remove the rear wheel, follow these steps: 1. Place the bike on the kickstand. 2. Pull the rear brake calipers into the rim with one hand while releasing the brake cable with the other. 3. Disconnect the shifter cable from the rear hub.
- Page 44 DO NOT RIDE. Also check the rim to ensure it is free from damage, the wear indicator groove is visible and the rim sidewalls are flat and not bowed. If any of these conditions are present, DO NOT RIDE. Instead, consult a bicycle mechanic or contact service@elliptigo.com. Bike Owner's Manual...
- Page 45 When you are ready for a new set of tires, take your ElliptiGO bike to a WARNING! Never inflate a tire beyond the maximum pressure – this professional bike mechanic and have him replace your tires with the same can cause the tire to explode off of the rim and injure you or a bystander.
-
Page 46: Gear Selection
D. Gear Selection Your ElliptiGO bike comes with high-pressure tubes with presta valves. The Your ElliptiGO bike comes equipped with a Shimano Alfine 8-speed or 11- presta valve includes a locking mechanism that must be unscrewed before speed internally geared hub or a Sturmey-Archer 3-speed internally geared the tube can be inflated. -
Page 47: Adjustable Crank Arms
ElliptiGO bike unstable, resulting in the rider losing control and suffering the rider to lose control of the ElliptiGO bike and suffer a fall resulting in a fall. -
Page 48: Servicing The Elliptigo Bike
We designed the ElliptiGO to have all of the components work in concert to then drop the wheel back down, feeling for movement through the provide a safe and enjoyable experience to the rider. - Page 49 – we can’t make another one of you. Even if you are unhurt, DO NOT RESUME RIDING your ElliptiGO. Instead, take it to a professional bike mechanic or bring it to the ElliptiGO Retail and Service Center at 722 Genevieve Ave., Suite O in Solana Beach, California.
- Page 50 ElliptiGO bike, and this could result in catastrophic failure of key components during regular riding. In addition, even if the ElliptiGO bike does not appear to be damaged by a Bike Owner's Manual...
-
Page 51: Appendix B: How Long Will My Elliptigo Last
ElliptiGO bike and if one of them breaks, you will ElliptiGO and be able to spot damage or accelerated aging more easily than almost certainly suffer a fall and be seriously injured or killed. - Page 52 Cracks can come in any size, but regardless of how small a crack is, you something unusual this could be a sign of delamination. Before riding, take should not ride an ElliptiGO bike with a crack in the drive arm. Once a crack the ElliptiGO bike to a professional bicycle mechanic or ElliptiGO technician has formed it will continue to grow and splinter over time and use, for inspection.
-
Page 53: Appendix C: Torque Requirements For Screws And Fasteners
APPENDIX C: TORQUE REQUIREMENTS FOR SCREWS AND FASTENERS Torque Requirements Torque Fastener Spec Item Fastener Location / Description Fastener Size Tool Required (N-m) Stem to Handlebars M5x0.8 4mm allen Stem to Steering Extender M6x1.0 5mm allen Extender Star Nut M6x1.0 5mm allen Steering Column Base to Fork Steering Tube M6x1.0... -
Page 54: Appendix D: Satisfaction Guarantee And Limited Warranty
ElliptiGO bike) This is the only warranty for your ElliptiGO and it is limited to the initial Exceeding the rider weight limit of 250 pounds purchaser (it expires upon resale or transfer of the product to another party). - Page 55 Bike Owner's Manual...
Need help?
Do you have a question about the ElliptiGO 2015 and is the answer not in the manual?
Questions and answers