Table of Contents
Advertisement
Quick Links
WIRELESS 868MHZ WEATHER STATION
Instruction Manual
Cat. No. 35.1064.10.50.IT
Thank you for choosing this wireless weather station from TFA.
BEFORE YOU USE IT
Please be sure to read the instruction manual carefully.
This information will help you to familiarise yourself with your new device, learn all of its
functions and parts, find out important details about its first use and how to operate it, and
get advice in the event of faults.
Following the instruction manual for use will prevent damage to the device and loss of your
statutory rights arising from defects due to incorrect use.
We shall not be liable for any damage occurring as a result of not following these
instructions. Likewise, we take no responsibility for any incorrect readings and for
any consequences which may result from them.
Please take particular note of the safety advice!
Please look after this manual for future reference.
SCOPE OF SUPPLY:
Weather station (basic unit)
•
Outdoor transmitter
•
Batteries (4 x AA, IEC LR6, 1.5V)
•
45
Advertisement
Table of Contents

Related Manuals for TFA 35.1064.10.50.IT


Summary of Contents for TFA 35.1064.10.50.IT
- Page 1 WIRELESS 868MHZ WEATHER STATION Instruction Manual Cat. No. 35.1064.10.50.IT Thank you for choosing this wireless weather station from TFA. BEFORE YOU USE IT Please be sure to read the instruction manual carefully. This information will help you to familiarise yourself with your new device, learn all of its functions and parts, find out important details about its first use and how to operate it, and get advice in the event of faults.
- Page 2 Instruction manual • FIELD OF OPERATION AND ALL OF THE BENEFITS OF YOUR NEW WEATHER STATION AT A GLANCE: DCF-77 Radio controlled time with manual setting options • DCF Time reception ON/OFF • 12/24 hour display • Hour, minute and second time display •...
-
Page 3: For Your Safety
LCD contrast setting • Low battery indicator • LED backlight • Table standing/ wall mounting • FOR YOUR SAFETY: The product is exclusively intended for the field of application described above. The • product should only be used as described within these instructions. Unauthorised repairs, modifications or changes to the product are prohibited. - Page 4 ! Important information on product safety! Do not expose the instrument to extreme temperatures, vibration or shock. • The outdoor transmitter is protected against splash water, but is not watertight. • Choose a shady and dry position for the transmitter. ELEMENTS The weather station LCD display...
- Page 5 The outdoor temperature transmitter Remote transmission of outdoor temperature to weather • station by 868 MHz Shower proof casing • Wall mounting case • Mounting at a sheltered place. Avoid direct rain and • sunshine INSTALL AND REPLACE BATTERIES IN THE TEMPERATURE TRANSMITTER The temperature transmitter uses 2 x AA, IEC LR6, 1.5V battery.
- Page 6 INSTALL AND REPLACE BATTERIES IN THE WEATHER STATION The weather station uses 2 x AA, IEC LR6, 1.5V batteries. To install and replace the batteries, please follow the steps below: Remove the cover at the back of the weather station. Insert batteries observing the correct polarity (see marking).
- Page 7 SETTING UP: When one transmitter is used: First, insert the batteries into the temperature transmitter. (see “Install and replace batteries in the temperature transmitter“). Immediately after and within 45 seconds, insert the batteries into weather station (see “Install and replace batteries in the weather station”). Once the batteries are in place, all segments of the LCD will light up briefly.
- Page 8 When more than one transmitter is used: User shall remove all the batteries from the weather station and transmitters and wait for 60 seconds if setting has been done with one transmitter before. Insert the batteries to the first transmitter. Within 25 seconds of powering up the first transmitter, insert the batteries to the weather station.
- Page 9 outdoor data from the third transmitter will be displayed and the channel icon will display "3" once the third transmitter is successfully received. If this is not happen, user shall restart the setting up from step 1. Note: User shall insert the batteries into the third transmitter within 10 seconds of reception •...
-
Page 10: Dcf Radio Controlled Time
DCF RADIO CONTROLLED TIME The time base for the radio controlled time is a Cesium Atomic Clock operated by the Physikalisch Technische Bundesanstalt Braunschweig which has a time deviation of less than one second in one million years. The time is coded and transmitted from Mainflingen near Frankfurt via frequency signal DCF-77 (77.5 kHz) and has a transmitting range of approximately 1,500 km. -
Page 11: Function Buttons
During nighttime, the atmospheric disturbances are usually less severe and reception • is possible in most cases. A single daily reception is adequate to keep the accuracy deviation below 1 second. FUNCTION BUTTONS: Weather station: The weather station has five easy to use function buttons. SNOOZE/SUN key SET key ALM key... - Page 12 To toggle between the display of "Weekday + date + month", "Second", "Alarm time", • and "Date + month + year" To press and hold for 3 seconds to reset at the same time the maximum/ minimum • temperature and humidity records of indoor and the currently selected outdoor channel (will reset all records to current level) To stop the alarm •...
- Page 13 CH/ + button To toggle between the outdoor transmitters 1, 2 and 3 (if more than 1 transmitter is • used) To adjust LCD contrast, time zone, time reception ON/OFF, 12/24 hour display, hour, • minute, year, month, day, snooze time duration, °C/ °F and weather forecasting icon sensitivity in setting modes To adjust the alarm time in alarm setting mode •...
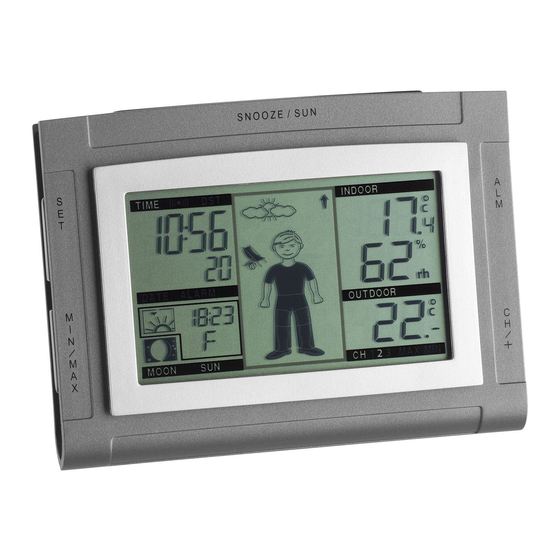
- Page 14 LCD SCREEEN: Weather station low Weather Alarm icon battery icon tendency icon DCF Tower icon (for time reception) Indoor temperature Time Indoor relative Calendar humidity % Transmitter low battery icon Outdoor Moon phase temperature display Weather forecast Number showing Sunrise/Sunset icon (Weather boy) Outdoor transmitter unit...
-
Page 15: Section 1 - Time And Calendar
* When the signal is successfully received by the weather station, the outdoor transmission icon will be switched on. (If not successful, the icon will not be shown on LCD). The user can then easily see whether the last reception was successful (icon on) or not (icon off). On the other hand, the short blinking of the icon shows that a reception is currently taking place. -
Page 16: Section 3 - Weather Icon (Featured By Weather Boy)
Section 3 – WEATHER ICON (featured by weather boy) Display of the weather to be expected in form of 15 fancy weather symbols (featured • by weather boy) which change their appearance depending on the air pressure development and the current outdoor temperature. Format of the weather boy icons refers to the "WEATHER FORECAST AND •... -
Page 17: Lcd Contrast Setting
Time zone setting • Time reception ON/OFF setting • 12/24-Hour setting • Manual time setting • Calendar setting • Sunrise/sunset and city location • Snooze setting • °C/ °F setting • Weather forecasting icon sensitivity setting • Press and hold the SET button for about 3 second to advance to the setting mode: LCD CONTRAST SETTING flashing The LCD contrast can be set to 8 different levels to suit the user needs (default LCD contrast... -
Page 18: Time Zone Setting
TIME ZONE SETTING flashing The time zone default of the weather station is 0. To change to another time zone: Press the SET button after completing the LCD contrast setting in order to enter the time zone setting (flashing). Using the CH/ + button, set the time zone. The range runs from –2h to +5h in consecutive in 1 hour intervals. -
Page 19: 12/24 Hour Time Display Setting
Flashing (time reception icon) Digit flashing The digit “ON” and the time reception icon will start flashing on the LCD. Use the CH/ + button to turn OFF the time reception function. Confirm with the SET button and enter the “12/24-Hour time display setting” or exit the setting mode by pressing the SNOOZE/ SUN button. -
Page 20: Manual Time Setting
After setting time reception ON/OFF, press the SET button, “12h” or “24h” flashes in the LCD. (default 24 h) Press the CH/ + button to select the “12h” or “24h” display mode. Press the SET again to confirm and to enter the “Manual time setting” or exit the setting mode by pressing the SNOOZE/ SUN button. -
Page 21: Calendar Setting
The minute will be flashing. Press the CH/ + button to just the minutes. Confirm with the SET button and enter the “Calendar setting” or exit the setting mode by pressing the SNOOZE/ SUN button. Note: The unit will still try to receive the signal at each full hour despite it being manually set. When it does receive the signal, it will change the manually set time into the received time. - Page 22 Using the CH/ + button, set the year required. The range runs from 2011 to 2029 (default is 2011). Press the SET button to enter the month setting mode. The month digit will be flashing. Press the CH/ + button to set the month and then press the SET button to go to the date setting.
-
Page 23: Snooze Setting
F- Frankfurt LYO - Lyon PAR - Paris BAI - Bari FL - Flensburg M - München ROM - Roma BAR - Barcelona H - Hannover MAD - Madrid S - Stuttgart BOL - Bologna HB - Bremen MAR - Marseille SB - Saarbrücken BOR - Bordeaux HEL - Helsinki... -
Page 24: C/°F Temperature Unit Setting
The snooze time (in minute) digit will be flashing. Use the CH/ + button to set the snooze time (in minute). Each pressing of the button will increase the snooze time by 5 minutes. The snooze can also be set OFF when the “OFF” digit is being displayed. Confirm with the SET button and enter the “ºC/ºF temperature unit setting”... -
Page 25: Alarm Setting
Using the CH/ + button to set the weather sensitivity level. There are 3 levels of setting: 1, 2 and 3; level 1 is the most sensitive setting, level 3 is the least sensitive setting (default setting is "2"). flashing flashing Confirm with the SET button and exit the manual settings. -
Page 26: Weather Forecast And Tendency
To set alarm: Press and hold ALM for about 3 seconds until the alarm time display flashes. The hour digit and the alarm icon will be flashing. Press the CH/ + button to adjust the hour. Press ALM button once and minute digit will be flashing. User shall then press CH/ + button to set the minute. - Page 27 to air pressure level (Sunny, Sunny + Cloudy or Cloudy + Rainy) and the current outdoor temperature (temperature value detected by Channel 1): ≥ ≥ ≥ ≥ 26° ° ° ° C 19 – 25.9° ° ° ° C 10 – 18.9° ° ° ° C 0 –...
- Page 28 ≥ ≥ ≥ ≥ 26° ° ° ° C 19 – 25.9° ° ° ° C 10 – 18.9° ° ° ° C 0 – 9.9° ° ° ° C < 0° ° ° ° C Sunny + Cloudy ≥ ≥ ≥ ≥ 26° ° ° ° C 19 –...
- Page 29 For every sudden or significant change in the air pressure, the weather icons will update accordingly to represent the change in weather. If the icons do not change, then it means either the air pressure has not changed or the change has been too slow for the weather station to register.
-
Page 30: The Weather Tendency Indicator
If the weather station is moved to another location significantly higher or lower than its initial standing point (for example from the ground floor to the upper floors of a house), remove the batteries and re-insert them after about 30 seconds. By doing this, the weather station will not mistake the new location as being a possible change in air-pressure when really it is due to the slight change of altitude. -
Page 31: Display Of Indoor Temperature And Humidity Reading
DISPLAY OF INDOOR TEMPERATURE AND HUMIDITY READING: The indoor temperature and humidity are measured automatically and displayed on the fourth section of the LCD. Indoor temperature in °C Indoor relative humidity in % Minimum icon DISPLAY OF OUTDOOR TEMPERATURE: Outdoor reception Outdoor temperature icon... -
Page 32: Display Of Indoor Maximum And Minimum Records
The last LCD section shows the outdoor temperature, a reception symbol and a channel number under the temperature will also show if more than one transmitter has been used. DISPLAY OF INDOOR MAXIMUM AND MINIMUM RECORDS: In normal display mode, press the MIN/ MAX button three times. The maximum indoor temperature and humidity will be shown. - Page 33 Press the MIN/MAX button once more, the min temperature of the selected channel will be shown. Press the ALM button to go back to the normal display mode. RESETTING THE OUTDOOR MAXIMUM/ MINIMUM RECORDS Note: It is required to reset the outdoor MIN/MAX temperature records of each channels separately.
- Page 34 SUNSET/ SUNRISE/ SUN DURATION TIME: Sunrise time/ Sunset time/ Sun duration time Sunrise/ sunset display Short form of city name Press the SNOOZE/ SUN button to toggle between the sunrise, sunset, and sun duration time: Sunrise time • Sunrise icon Sunrise time Sunset time •...
-
Page 35: The Moon Phase
Sun duration time (total number of hours of sunlight on the day) • Sun duration Sun duration time time icon (hh:mm) THE MOON PHASE The moon icon of the weather station will also display 12 different moon phases according to the set calendar. -
Page 36: Led Back-Light
LED BACK-LIGHT The LED back-light will be automatically switched ON when any button is pressed. The LED back-light will be switched on for approximately 9 seconds before automatically switching OFF. TEMPERATURE TRANSMITTER: The range of the temperature transmitter may be affected by the temperature. At cold temperatures the transmitting distance may be decreased. -
Page 37: Positioning The Weather Station
Note: When the 868MHz signal is received correctly, do not re-open the battery cover of either the transmitter or weather station, as the batteries may spring free from the contacts and force a false reset. Should this happen accidentally then reset all units (see Setting up above) otherwise transmission problems may occur. - Page 38 POSITIONING THE TEMPERATURE TRANSMITTER: The transmitter is supplied with a holder that may be attached to a wall with the two screws supplied. The transmitter can also be position on a flat surface by securing the stand to the bottom to the transmitter.
-
Page 39: Care And Maintenance
CARE AND MAINTENANCE Clean the instrument and the transmitter with a soft damp cloth. Do not use solvents • or scouring agents. Protect from moisture. Remove the batteries if you do not use the product for a lengthy period. • MALFUNCTION Problems Troubleshooting... -
Page 40: Waste Disposal
WASTE DISPOSAL This product has been manufactured using high-grade materials and components which can be recycled and reused. Never throw flat batteries and rechargeable batteries in household waste. As a consumer, you are legally required to take them to your retail store or to appropriate collection sites according to national or local regulations in order to protect the environment. - Page 41 Relative humidity measuring range: Indoor : 20% to 95% with 1% resolution (Display “- -“ if temperature is OL.F; display “19%” if < 20% and “96%” if > 95%) Indoor temperature checking interval : every 16 seconds Indoor humidity checking interval every 16 seconds Outdoor temperature reception every 4 seconds...
-
Page 42: Declaration Of Conformity
TFA Dostmann GmbH & Co. KG, Zum Ottersberg 12, D - 97877 Wertheim No part of this manual may be reproduced without written consent of TFA Dostmann. The technical data are correct at the time of going to print and may change without prior notice.
Need help?
Do you have a question about the 35.1064.10.50.IT and is the answer not in the manual?
Questions and answers