Advertisement
Quick Links
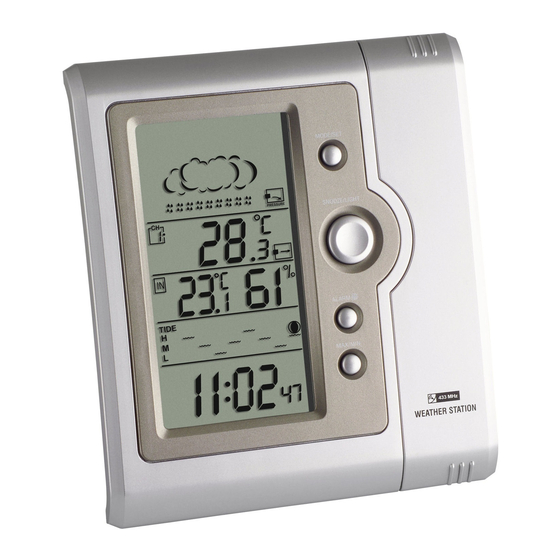
Wireless Weather Station AMBIENTE 35.1057
Instruction Manual
1. Installation
1.1 Introduction
You have been purchasing a wireless weather station. You can control your room
climate (temperature/humidity), measure the outdoor temperature and inform
yourself about the local weather trend. The set contents a receiver (display unit)
and a transmitter, which are battery operated.
The outdoor data will be transmitted wireless using 433 Mhz up to 30 meters in
open space. You can install up to three transmitters and receive temperature
information from other rooms (like childrens room, green house, wine cellar,
storage rooms...)
To get started you need:
Receiver (Display unit)
Transmitter
Batteries 2 x 1.5 V AA for receiver and 2 x 1.5 V AA for transmitter (included)
Small screwdriver (not included)
Please read this instruction manual carefully and keep it!
1.2 Features:
This weather station has the following functions
- Radio controlled time with manual setting option
- Weather forecast with 5 weather symbols
- Wireless transmission of outdoor temperature 433MHz (up to 3 sensors)
- Measuring range:
Indoor temperature:
Indoor humidity:
Outdoor temperature: -50°C ~ +70°C
- Temperature high/low alert function (settable)
- Max/Min memory
- Moon phase and tide display
- Low-battery indicator for Outdoor Remote Sensor
- Perpetual Calendar Up to Year 2069
0°C ~ +50°C
30% ~ 90%
Advertisement

Related Manuals for TFA AMBIENTE 35.1057


Summary of Contents for TFA AMBIENTE 35.1057
- Page 1 Wireless Weather Station AMBIENTE 35.1057 Instruction Manual 1. Installation 1.1 Introduction You have been purchasing a wireless weather station. You can control your room climate (temperature/humidity), measure the outdoor temperature and inform yourself about the local weather trend. The set contents a receiver (display unit) and a transmitter, which are battery operated.
- Page 2 - 12/24Hour time display selectable - Day of week in 8 Languages Selectable - Power supply: Receiver DC 1.5 V AA size x 2 pcs Transmitter DC 1.5 V AA size x 2 pcs Size : 145 x 130 x 22 mm, standing or hanging purpose Caution: Please participate in the preservation of the environment by properly disposing of used-up batteries and accumulators at designated disposal points.
- Page 3 LCD: A1: Weather Forecast A2: Outdoor Temperature A3: Indoor Humidity A4: Indoor Temperature A5: Moon Phase/Tide Indicator A6: Radio Controlled Time Buttons: B1: “WEATHER” button B2: “CHANNEL” button “MODE/SET” button B4: “ALERT“ button B5: “+ (12/24)” button B6: “SNOOZE/LIGHT” button B7: “- (°C/°F)”...
- Page 4 1.3.2 Thermo Sensor Unit (Transmitter) D1: Outdoor Temperature D2: Transmission Indication LED D3: Temperature Probe D4: “°C/°F” button D5: Channel Selecting Switch D6: “TX” button D7: Wall Mount Hole D8: Battery Door 1.4. Getting started • Open the battery compartment of display unit and transmitter and place both instruments on a desk with a distance of approximately 1.5 meter.
- Page 5 controlled clock) frequency signal. “ ” flashes on the LCD. The signal “ ” appears permanently when the signal is received successfully. • The clock automatically scans the time signal at 3.00 a.m. everyday to maintain accurate timing. For failed reception, scanning stops (“ ” on the LCD disappear) and repeats again at 4.00 a.m.
- Page 6 Dutch, NE Italian, IT Spanish, ES French, FR • The Time Setting Mode will automatically exit in 5 seconds without any adjustment. • During Daylight Saving Time DST appears on the display. • Choose 12 HR or 24 HR system by pressing the “+ (12/24)” button (B5). 1.5.2 Snooze Alarm Clock Function: •...
- Page 7 means Sunny . means Slightly Cloudy. means Cloudy. means Rainy means Cloudburst. There are 3 different symbols for the trend of atmospheric pressure: “ increasing “ steady “ decreasing The weather forecast relates to a range of 6 to 24 hours and indicates only a general weather trend.
- Page 8 steady decreasing 1.5.6.1 Temperature Alert function: • Press “ALERT” button (B4) to set the Temperature Alert function on or off. “ ” appears on the LCD if this function is on. • Hold “ALERT” button for 3 seconds to enter the Alert setting mode. Indoor temperature flashes.
- Page 9 symbol. • To cancel an unused channel hold “CHANNEL” button for 3 seconds. If a new channel is received it will be automatically registered again. 1.5.7.2 The use of 1.5m cord Temperature Probe: • Insert the probe plug on the right hand side of the Thermo Sensor Unit. Put the metal casing outside and leave the Thermo Sensor Unit in an indoor area to avoid freezing up the battery when the outdoor temperature is below -20 °C or when measuring liquids.
- Page 10 Improper use or unauthorized opening of housing will mean the loss of warranty. No part of this manual may be reproduced without written consent of manufacturer. Hereby, TFA declares that this equipment is in compliance with the essential requirements and other relevant provisions of Directive 1999/5/EC.
Need help?
Do you have a question about the AMBIENTE 35.1057 and is the answer not in the manual?
Questions and answers