Table of Contents
Advertisement
Quick Links
Advertisement
Table of Contents

Related Manuals for Ariterm MYSINGE


Summary of Contents for Ariterm MYSINGE
- Page 1 INSTALLATION and OPERATING INSTRUCTIONS PELLET STOVE MYSINGE...
- Page 3 PELLET STOVE KMP MYSINGE Important points to note! In order for the stove to function properly, the following rules must be followed. • The stove needs air in order to function, never close the supply air vent to the house. Note that there must be at least one air supply ventilator in the room where the stove is located. • The room temperature must exceed 5˚C for the thermostat to work. • Your installer must adjust the stove in connection with commissioning and fill in the values in the warranty/proof of installation at the end of these user instructions. • The store should be emptied periodically and the sawdust removed using a vacuum cleaner. Also test the safety switch by unlocking one of the filler hatches or the door during operation or start-up. The pellet feeder should then be stopped. • We recommend removing the ash daily during the firing season, or each time pellets are filled. Remove ash through the door using the handle supplied. Lift out the burner from the burner housing and remove any ash from the ash box (unburned pellets must not be emptied into the ash box, there is a risk of them starting to smoulder). • After a period of operation the glass in the door becomes coated with ash dust and eventually becomes opaque. It should be wiped off from the inside using kitchen roll moistened with...
- Page 4 PELLET STOVE KMP MYSINGE ARITERM SWEDEN AB Installation Instructions - 2010.05.20 - 4/24...
-
Page 5: Table Of Contents
PELLET STOVE KMP MYSINGE Table of Contents 1 Product description 1.1 General Product description 1.1 General ........5 The stove has been developed to work as a primary heat source. The stove’s high level of... -
Page 6: Components
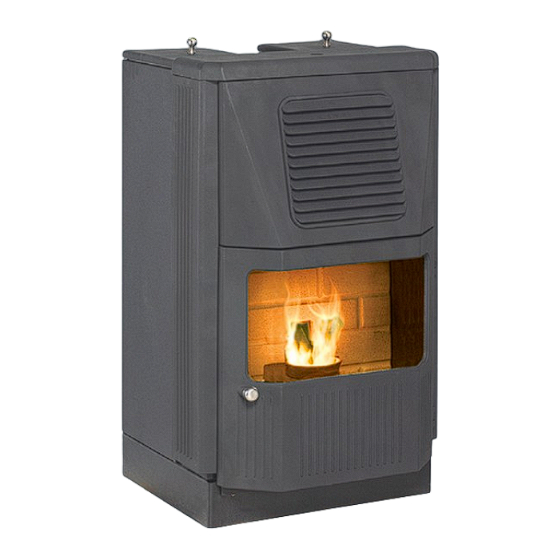
PELLET STOVE KMP MYSINGE 1.2 Components The top (1) lies loose on top of the stove, with two guide lugs or is locked with quick release locks. The top is lifted to access the cleaning hatch (2). When there is a hatch it is opened by removing the four screws, one can then sweep the flue (3) and the smoke Cleaning hatch (2) tubes (4). Filling hatch (18) The flue can easily be turned through 90˚, which makes it possible to connect it to the chimney vertically or horizontally. Top (1) The front (5) can be opened. This is how one accesses the soot scrapers (6). These (four per handle) can be slid forwards and backwards, and scrape off the soot between the Flue (3) smoke tubes. The door (7) is opened with the handle supplied and can be swung up on its Smoke tubes (4) two adjustable hinges. The burner housing (8) is located in the hearth and is accessible when the door has been opened. It is installed with four screws on the rear of the stove body. Front (5) The burner (9) sits loose in the burner housing. The firing element (10) is located in the burner housing behind the burner. It is the firing element that gives off the heat required to Safety thermostats (20) Pellet hopper (17) Soot scraper (6) ignite the pellets. The flame sensor (11) is beside the ignition unit and indicates if there is flame in the burner or not. The ash box (12) is inset in the bottom of the hearth under the burner housing. It can be removed when the door has been opened. Door (7) The combustion fan (13) is placed on the rear of the burner housing and provides the burner with air for combustion. The control circuit board (15) is placed inside the stove and contains Pellet feeder (19) a transformer for 12V-voltage to the electronics and control and supervision. The hot air fan (16) is located inside the stove and sucks air from the rear of the stove, which is then heated up in the smoke tubes and expelled through the holes in the front. Hot air fan (16) The pellet hopper (17) has space for 38 litres of pellets, and is filled through the filler hatches Control card (15) (18). There is a hatch on each side, so that one can place the stove in a corner if one so... -
Page 7: Technical Data
PELLET STOVE KMP MYSINGE 1.3 Technical data 1.4 Control panel The control panel has a display and adjustment dial (see fig. 3): Heating output max ........approximately 6 kW Heating output min ........approximately 3.5 kW - The display shows the operating mode and the current temperature. Explanatory text scrolls through the display every 5 seconds. Pellet hopper ........38 litres (approx 20 - 25 kg*) - The adjustment dial is used by pressing or turning. Efficiency level ............approx 93% Smoke temperature ............<200 ˚ C - Turn to scroll through the menu or change the value when adjusting. Temperature range thermostat ......approx 10 - 30˚C - Pushing once makes a selection in the menu. Weight ..............100 - 138 kg Example: Electrical connection ..........230 V 50 Hz Connect the stove to the wall socket. Pressing once causes the panel to ask “Start?”. - Page 8 PELLET STOVE KMP MYSINGE Installing the control panel Removing the control panel 1. Install the wall mounting with 2 screws. 1. Slide the panel straight up. 2. Hook one corner of the panel onto the wall mounting. 2. Lift the panel straight out from the wall 3. Press the other corner of the panel onto the wall mounting. Connecting the control panel Connect the control panel in the modular connection on the side of the control circuit board (image). ARITERM SWEDEN AB Installation Instructions - 2010.05.20 -...
-
Page 9: Safety System
PELLET STOVE KMP MYSINGE Main menu 1.5 Safety system Start? (Stop?) - Confirm by pressing once to start (stop). Stop T - Press to select and adjust desired stop temperature. The stove is equipped with five independent safety systems. Usermenu - Press for Usermenu. 1. The feeder releases the pellets from a chute, which separates the burner from Back - Press for display. -
Page 10: Control Duration
PELLET STOVE KMP MYSINGE 1.6.1 control process Otherwise the electronics manage all processes as follows: START • LOW OUTPUT • Time Events Comments Time Events Comments 0 secs • Firing element on. After "Start". • ”LoPower” scrolls through the The time depends on the set • The firing element symbol illuminates. display. pellet amount at low output. • The feeder runs according to 120 secs • The motor symbol illuminates. -
Page 11: Installation
PELLET STOVE KMP MYSINGE 2 Installation 2.2 Chimney 2.1 Positioning The regulations regarding chimneys can be found in the Building regulations. The stove should be located in a central position on the lower floor of the house to facilitate heat spread. Observe the following: The Building regulations contain a number of regulations to prevent fires. • The highest surface temperature of the flue including insulation and surrounding shaft Generally speaking, the regulations are applied if the following is being observed: may be 100˚C when the stove is running at full output. The surface temperature of adjacent building parts may not exceed 80˚C. • The stove must be placed at least 100 mm from the wall. • Minimum diameter (round duct) or side (rectangular duct) should be 80 mm. • The underlay must be made of non-flammable material, and extend at least 300 mm to the front and 100 mm to the side of the stove. If the hearth surface is made of steel it • The smoke ducts must be made of non-flammable material of sufficient durability and must be at least 0.7 mm thick. with sufficient resistance to temperature variations, climate effects, corrosive smoke gases and slag and use of sweeping tools etc. • Flammable material must not be exposed to temperatures exceeding 80˚C. • It must be possible to clean the flue. If fallen ash cannot be removed via the stove’s To facilitate servicing and cleaning, leave space on each side of the stove. The weight of the cleaning hatch another cleaning hatch must be arranged. The cleaning hatch must not stove is so low that no extra demands are made on the joists etc. be located in a room other than the one in which the stove is located. -
Page 12: Electrical Connection
PELLET STOVE KMP MYSINGE 2.4 Electrical connection white black The back of the stove is equipped with a Light sensor orange 1.5 m long cable with plug, which must black black black be connected to a 230 V 50 Hz, earthed, black brown black Combustion fan mains supply. The internal wiring diagram black brown black brown orange is shown in fig. 8. Ignition element Connector blue NOTE! If the connection cable is damaged orange it must be replaced by one of the same röd type, contact the dealer. Ignition unit... -
Page 13: Operation And Maintenance
PELLET STOVE KMP MYSINGE 3 Operation and maintenance 3.2 Ash removal The stove is designed for a long service life, motors and other moving parts are of a very high The amount of ash that build up in the burner varies depending partially on how the stove is fired (number of starts and stops, division between full and half speed), and partially on quality. All bearings are lifetime lubricated and the only preventative maintenance that is normally required is sweeping and cleaning the quality of the pellets. The ash content varies between different pellets, but can also differ between different batches from the same factory. This can only be established through trial 3.1 Fuel and error, but generally the ash layer in the bottom should be a maximum of a centimetre deep. We recommend removing the ash daily during the firing season, or each time pellets The stove must be lit with wood pellets, 6 or 8 mm, class 1 according to Swedish standard. are filled. The pellets are supplied in plastic sacks that can be stacked on pallets or other suitable surfac- es. Avoid exposing the sacks to moisture or mechanical stresses (vibrations or blows). Careless Remove ash through the door using the handle supplied. Lift out the burner from the burner handling of pellets can easily reduce them to sawdust, which can cause feed and combustion housing and remove any ash from the ash box. Certain pellets generate a hard cake of cin- problems. Fill the hopper with pellets slowly and without too great a drop. The store should ders, this may need to be broken up using a screwdriver or removed using one’s hands. be emptied periodically and the sawdust removed using a vacuum cleaner. Ash from the stove must be stored in a container made of non-flammable material, for The hopper is filled by opening the hatches above the pellet magazine. example a metal bucket, until it has cooled sufficiently that it can be held in one’s hand. The different stove models have different types of hatches. Where there is a knob the hatch It can then be thrown away, bear in mind that wood ash contains nutrients that can be is opened by turning the knob a 1/4 turn anti-clockwise. To fully fill the magazine one has to beneficial to gardens. open the other hatch. The hopper can be filled while the stove is running, but because the feeder switches off when the hatches are opened, you only have a few minutes before the 3.3 The glass... -
Page 14: Sweeping
PELLET STOVE KMP MYSINGE 3.4 Sweeping The chimney must be swept by a chimney sweep, normally twice a year. Remove the cleaning hatch, under the top plate / stone (4 x Allen screws). The flue and the area underneath the cleaning hatch must be cleaned at least once between the chimney sweep’s visits. Sweeping of the stove is carried out once a week during the firing Measurement hole season using the integrated soot rakes. They are located behind the front panel and must be pulled backwards and forwards a couple of times each, starting from above. Use the handle for the door to open the front of KMP Mysinge. Slide the handle diagonally upwards and then to the side (see above). 3.5 Hot air fan Remove the soot rakes as follows: Vacuum cleaning of the fans with a brush nozzle should be carried out a couple of times 1. The silicon seal seals against the stove body. annually after removing the side hatch. 2. Slacken off the nut a couple of turns. Do not forget to pull the plug out before the side hatch is removed. 3. Press the soot rake upwards or downwards. -
Page 15: Fault Tracing And Remedy
PELLET STOVE KMP MYSINGE 3.6.1 Fault tracing and remedy Fault Cause Action Fault Cause Action • T oo much ash in the crucible or Clean the burner crucible. • T he cable is not connected. Connect to earthed 230V socket. Black ash or soot on The stove does the glass. blocked vent. not start, nothing • N o voltage at the socket. Check the fuse. displayed. • D irty combustion fan. Clean the combustion fan. - Page 16 PELLET STOVE KMP MYSINGE Error codes Error code Cause Action Error code Cause Action • P ower failure. Check the electrical connection. • I ncorrectly adjusted fuel and/or See Menu. Powfail. ErrorHI: The flame sensor has air amount. • T oo much ash in the burner. Sweep your stove once a week ("FeedHI" or "Fan HI") not detected a flame during the firing season. during high output. • T he hopper is empty.
-
Page 17: Removal
PELLET STOVE KMP MYSINGE Flame detector 4 Removal Burner Terminal block 4.1 Burner 1. Open the door and remove the ash box. Combustion fan 2. Remove the four screws holding the burner flange to the stove wall (fig 10). 3. Pull the burner straight out until the cables connecting the burner to the control circuit board are visible. Pull the two connectors apart. The burner can now be removed. 4. Reinstall in reverse order. 4.2 Firing element 1. Remove the burner as above. 2. Remove the four screws (1) holding the upper part of the ignition bracket. The firing element is now free. Standard 3. Disconnect the firing element’s cables from the triac control and the terminal block. 4. Slacken off the screw (3) that secures the firing element. Remove the firing sleeve from the element. Pull out the cables from the lead-ins. 5. Reinstall in reverse order. Terminal block 4.3 Combustion fan 1 Remove the burner and the ignition console according to the Firing element section. -
Page 18: Hot Air Fan
PELLET STOVE KMP MYSINGE 4.5 Hot air fan Work is best carried out with both side hatches removed, but they can also be accessed from one side or the other. 1. Remove the plug from the wall socket. 2. Open the top and slacken off the two panel screws on the upper edge of the side hatch. 3. Pull the upper section of the hatch straight out and then lift up the panel so that it is free. 4. Disconnect the cables from the fan by pulling the plastic covered flat pin sleeves from the motor. 5. Remove the screws that hold the fan brackets to the stove body (2 x). 6. Reinstall in reverse order. 4.6 Control circuit board 1. Remove the plug from the wall socket. 2. Remove one of the side hatches according to the Hot air fan section. 3. Remove the edge connectors on the long sides of the control circuit board by pulling them straight out from the circuit board. -
Page 19: Warranty
PELLET STOVE KMP MYSINGE 5 Warranty For warranty issues Ariterm Sweden AB refers to our local Distributor. ARITERM SWEDEN AB Installation Instructions - 2010.05.20 - 19/24... - Page 20 PELLET STOVE KMP MYSINGE ARITERM SWEDEN AB Installation Instructions - 2010.05.20 - 20/24...
-
Page 21: Declaration Of Conformity
PELLET STOVE KMP MYSINGE Declaration of conformity ARITERM SWEDEN AB Installation Instructions - 2010.05.20 - 21/24... - Page 24 If these instructions are not followed at installation, operation and maintenance, Ariterm Sweden AB’s applicable warranties are not binding. Ariterm reserves the right to make changes to components and specifications without prior notice. Ariterm Sweden AB Flottiljvägen 15, SE-392 41 Kalmar...
Need help?
Do you have a question about the MYSINGE and is the answer not in the manual?
Questions and answers