Duplo DocuCutter CC-228 Operational Manual
Hide thumbs
Also See for DocuCutter CC-228:
- Service and parts manual (37 pages) ,
- Installation and training (12 pages)
Table of Contents

Related Manuals for Duplo DocuCutter CC-228


Summary of Contents for Duplo DocuCutter CC-228
- Page 1 Ver. 042013 Effective from S/N 881041304078 DocuCutter CC-228 Operational Manual Before operating the machine, read this manual. Follow all safety precautions. Duplo USA Corporation 3050 S. Daimler St, Santa Ana, CA 92705 www.duplousa.com...
-
Page 2: Declaration Of Conformity
IEC61000-4-6 IEC61000-4-8 IEC61000-4-11 EN60950-1 IEC60950-1 EN50581 CISPR 16-2-3 CISPR 16-2-1 CISPR 16-2-2 Keeper of the CE technical file in the European Community: Duplo International Ltd. Hanskampring 6, Automated Precision House, Hamm Moor Lane, Addlestone, Surrey, KT15 2SD UK Page 2... -
Page 3: Table Of Contents
Table of Contents Declaration of Conformity. ……………………………………………………………………………………………………………………………………..3 Safety Pecaution ………………………………………………………………………………………………………………………………………………4 Introduction……………………………………………………………………………………………………………………………………………………….……6 Specifications…………………………………………………………………………………………………………………………………………………….…….6 Accessories……………………………………………………………………………………………………………………………………………………………..6 Major Components and Assemblies…………………………………………………………………………………………………………………….….7 Control Panel……………………………………………………………………………………………………………………………………………………………9 Installation……………………………………………………………………………………………………………………………………………………………….10 Setting Up Procedure……………………………………………………………………………………………………………………………………………….11 The Job Selection…………………………………………………………………………………………………………………………………………………..12 Job Layout………………………………………………………………………………………………………………………………………………………………..13 Selecting a Job………………………………………………………………………………………………………………………………………………………….14 Batch Count……………………………………………………………………………………………………………………………………………………………..14 User Define Job………………………………………………………………………………………………………………………………………………………..15 Cut Mark………………………………………………………………………………………………………………………………………………………………….16 Turbo Mode……………………………………………………………………………………………………………………………………………………………..16 Empty the Waste Bin………………………………………………………………………………………………………………………………………………..16 Reset Counter…………………………………………………………………………………………………………………………………………………………..16 Clear Jam………………………………………………………………………………………………………………………………………………………………….16... -
Page 4: Safety Pecaution
SAFETY PRECAUTIONS Always observe the cautions and wBatch s given below to prevent personal injury or property damage. Disposal of Waste Electrical and Electronics Equipment (WEEE) This symbol (the symbol of the crossed out wheeled bin) indicates that in European countries this product should not be disposed of as household waste. - Page 5 WEEE information (for Europe) As a minimum the following substances, preparations and components has to be removed from any separately collected WEEE (Waste Electrical and Electronics Equipment). In this parts catalogue, these WEEE symbols are appended to corresponding parts in this parts catalogue. WEEE Symbol Meaning (Poly Acrylonitrile Butadiene Styrene) Plastic Material...
-
Page 6: Introduction
INTRODUCTION The Docucutter CC-228 is designed to simplify business card, photo and post card cutting in letter size which printed by digital press, color laser printer or inkjet image printer in one pass. SPECIFICATIONS Paper Size LT / Legal Size/ 9” x 14” (Max) -
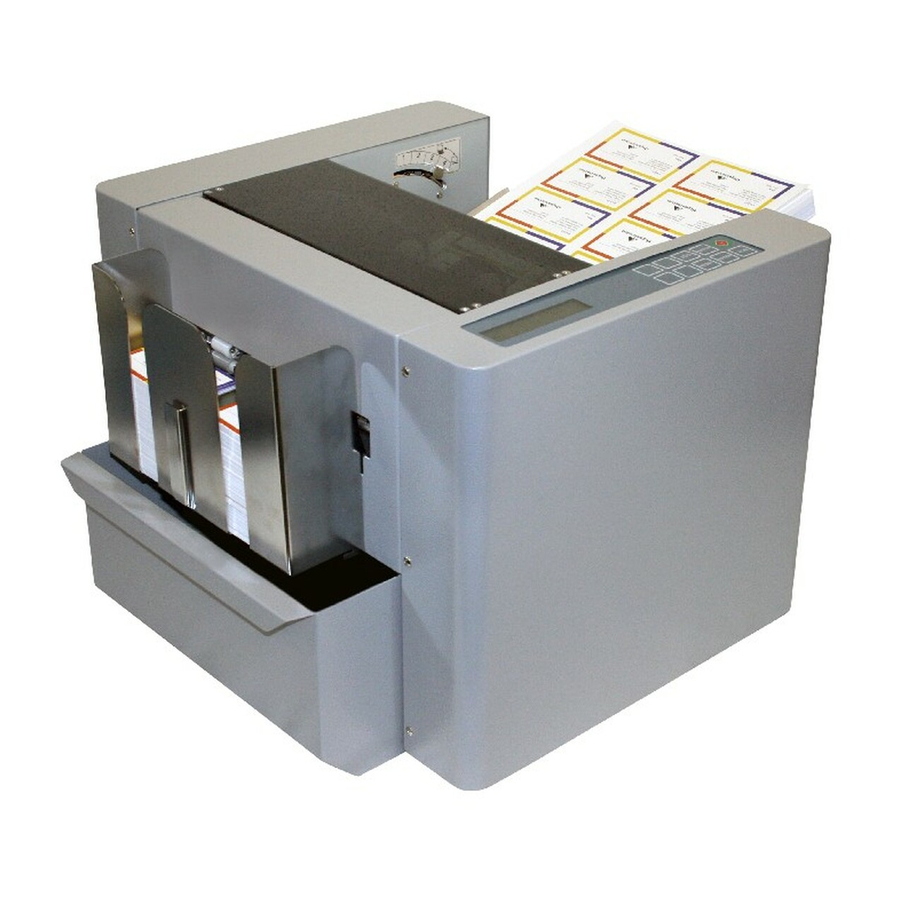
Page 7: Major Components And Assemblies
MAJOR COMPONENTS AND ASSEMBLIES Power Switch Control Panel Extended Tray Slitting Registration Adjustment Paper Feed Guide Feed Rollers Top Cover Page 7... - Page 8 Waste Bin Stack Tray 10 Rear Safety Cover 11 Slitter Thumb Release Knob 12 Slitter Module 13 Feed Tray Pressure Adjustment Page 8...
-
Page 9: Control Panel
CONTROL PANEL Note: A label is provided for advance control panel which enable user to customize job. Simple Control Panel Advance Control Panel Keys Simple Control Panel Advance Control Panel Start and Stop the cutter Start and Stop the cutter Change job Change job Select batch count... -
Page 10: Installation
INSTALLATION Note: No tool is required for installation. Waste Bin Slide the waste bin into the slot. Make sure waste bin is all the way inside. Stack Tray Mounting Hook the tray onto the mounting slot on the Slot machine. Refer to the picture. Power Cord caution when plug in power cord. -
Page 11: Setting Up Procedure
SETTING UP PROCEDURE Thumbscrew knob To set the width of paper, Markings loosen thumbscrew knob on the side guide and slide to position. Use marking as reference point. Paper feed guide Fan paper before loading. This will reduce static and toner adhesion due to printing. -
Page 12: The Job Selection
The knob will allow ± 2mm of adjustment. THE JOB SELECTION DocuCutter CC-228 offers 6 different types predefined job selection from #01 to # 05 Job # Description Finished Size Layouts #01, 2” x 3.5” business card with 2”... -
Page 13: Job Layout
JOB LAYOUT Job 1-5 are predefine job that cannot be change. Job#1 - Job#2 - Job#3 - Business card with or without cut mark. Business card with or without cut mark. 3.5 x 5 card with gutter cut. Job#4 – Job#5 –... -
Page 14: Selecting A Job
SELECTING A JOB Actions Display Example # 1 L 50.8M19.0G00.0 Turn on the power. Previous job will appear. count Press until the desire job is display. # 4 L127.0M12.7G 6.3 01 → 02 → 03 → 04 … 12 count # 4 L127.0M12.7G 6.3 count Press... -
Page 15: User Define Job
USER DEFINE JOB Only job# 7 – 12 can be program. Actions Display Examples # 4 L127.0M12.7G 6.3 Turn on the power. Previous job will appear. batch Press until the desire job is display. #10 L000.0M00.0G00.0 01 → 02 → 03 → 04 … 12 count #10 L000.0M00.0G00.0 Press... -
Page 16: Cut Mark
CUT MARK The purpose of cut mark is to compensate horizontal cut due to image shifting during printing. Refer to page 11 for cut mark printing. Hold and press to enable or disable cut mark. This will toggle (M) for mark and (N) for not mark on the display. -
Page 17: Error Message And Trouble Shooting Guide
3. If necessary, depending on location of jam occurs, open the corresponding cover or covers. If jam persists, refer to “Error Message and Trouble Shooting Guide”. 4. After clearing the jams, press to clear all errors. ERROR MESSAGE AND TROUBLE SHOOTING GUIDE Any error occur the beeper keep beeping to remind the operator, the error message is displayed in low box on 2 line of the LCD display.
Need help?
Do you have a question about the DocuCutter CC-228 and is the answer not in the manual?
Questions and answers