Table of Contents
Advertisement
Advertisement
Table of Contents

Subscribe to Our Youtube Channel
Related Manuals for Duplo 486P


Summary of Contents for Duplo 486P
- Page 1 486P Paper Cutter Operation Manual...
- Page 2 Revison History Date Changes Reason Page Technical Bulletin From...
-
Page 3: Table Of Contents
Index 1. Safety Rules…………………………………………………………………………………………………………………………4 2. Specifications………………………………………………………………………………………………………………………7 3. Name Plate………………………………………………………………………………………………………………………….7 4. Accessories………………………………………………………………………………………………………………………….8 5. Key Components………………………………………………………………………………………………………………….9 6. Control Panel and Function Keys………………………………………………………………………………………..10 7. Power On……………………………………………………………………………………………………………………………11 8. Cutting Procedure………………………………………………………………………………………………………………12 8.1 Manual Cut…………………………………………………………………………………………………………………..12 8.2 Repeating Cut……………………………………………………………………………………………………………….12 8.3 Push-Out After Cut……………………………………………………………………………………………………….12 8.4 Define a Job.…………………………………………………………………………………………………………………13 8.5 Select a Defined Job……………………………………………………………………………………………………..13 8.6 Check Cutting Factor on A Job………………………………………………………………………………………14 8.7 Editing an Existing Job…………………………………………………………………………………………………..14... -
Page 4: Safety Rules
1. SAFETY RULES The machine has many safety features which make it a safe to operate. Regardless of your experience, safety instructions must be read carefully, completely understood, and applied to your daily work habits. If you do not understand or are confused by certain safety instructions presented in this manual, discuss them with your supervisor. - Page 5 equipment, power must be shut off to adjustments while it is running. all circuits before any work is attempted. Individual switches must be opened and the equipment circuits tested to make sure there is no power. 7. Be sure all operators are aware of all 7.
- Page 6 1.4 AC Supply 1.4.1 Voltage steady state voltage: 0.9 to 1.1 of nominal voltage. 1.4.2 Frequency 099 to 1.01 of nominal frequency continuously; 0.98 to 1.02 for short time. 1.4.3 Harmonics distortion not exceeding 10% of the total r.m.s. voltage between live conductors for the sum of the 2 through to the 5 harmonic.
-
Page 7: Specifications
2. Specifications Specification DocuCutter 486P Cutting Width 19.1” Cutting Height 3” Narrow Cut 1” Power Supply 220VAC, 50/60Hz, 20A Dimensions (D x W x H) 37.8” x 30.7” x 49.60” Weight 280Kgs Note: A dedicated AC power line is required. -
Page 8: Accessories
4. Accessaries 4.1 Knife Replacement Tool 4.2 Tool Set 4.3 Registration Block 4.4 Operation and Service Manual 4.6 Cutting Stick x 2 821-483-220A... -
Page 9: Key Components
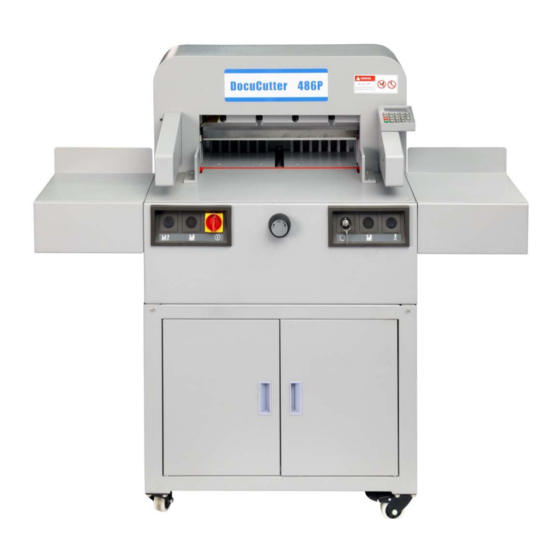
5. Key Components Safety Beam Key Pad Blade Key Switch 2-Hand Switch 2-Hand Switch Manual Power Side Table Switch Switch... -
Page 10: Control Panel And Function Keys
6. Control Panel and Function Keys Function Key Function Backward/Program Setting Forward Stop Start/Run Clear the figure on display Program Repeating Cut Metric (cm) and Standard Selection Ejection Mode Setting... -
Page 11: Power On
7. Power On the System 7.1 Switch main power clockwise to on ” ” 7.2 Insert the key into key switch 7.3 Switch the key switch to on 7.4 Press reset the backgauge to home position... -
Page 12: Cutting Procedure
8. Cutting Procedure 8.1 Manual Cut 8.1.1 Press 8.1.2 Press to push-out if necessary 8.1.3 Enter the sheet length 8.1.4 Press to bring the backgauge to the desire length as per the setting, or rotate the manual switch clockwise to the desire length 8.1.5 Load the sheet, against backgauge and the left margin. -
Page 13: Define A Job
◎ Enter the desire cutting length 8.3.3 Press to move the backgauge to the length set, backgauge push-out the cut length then back to the 2 cut desire length automatically 8.4 Job Setting The system enable 99 jobs setting, each job has maximum 9 cut. For Example, Job #1 for a book 3-side cutting job 8.4.1 Press to get into job setting mode... -
Page 14: Check Cutting Factor On A Job
8.5.6 After 2 cut, backgauge moves to 3 cut position automatically 8.5.7 After 3 cut, the backgauge will cycling for 2 book 1 Note: Once a job is selected, using to check cutting factor 8.6 Check Cutting Factor on a Job 8.6.1 Press into program mode 8.6.2 Enter Job #... -
Page 15: Trouble Shooting Guide
9.0 Trouble Shooting Guide 9.1 No Display Reset the circuit breaker inside the cabinet close to the top of the door 9.2 Cutter No Function Reset the circuit breaker inside the cabinet close to the top of the door Clamp No Function Reset the circuit breaker inside the cabinet close to the top of the door 10. -
Page 16: Cutting Blade Level Adjustment
10.2 Cutting Depth Adjustment 10.2.1 If the blade is not cut deep enough for clean cut 10.2.1 Rotates the adjustment screw clockwise one turn 10.2.2 If the blade cut onto cutting stick too deep, rotate the adjustment screw counterclockwise one turn... -
Page 17: Cutting Blade Replacement
11. Cutting Blade Replacement Cam Screws Screw #3 Screw #4 Screw #5 Screw#1 Screw #2 12.1 Rotate the cutting depth adjustment screw counterclockwise 2 turns 11.2 Rotate the cam screw counterclockwise to disengage it with blade 11.3 Bring blade half way down to let far right #5-screw exposed. 11.4 Remove screw #5 11.5 Bring the blade up 11.6 Remove the #2 and #4 screw which blade replacement holder handle screw is fastening... -
Page 18: Cutting Stick Replacement
11.9 Loosen the blade replacement holder screw a bit then remove the blade from blade carrier 11.10 Install a new blade onto blade replacement holder and fastening the hand screw onto the blade mounting hole #2 and #4 11.11 Install new blade onto blade carrier and fasten it tight and secure 11.12 Fasten screw #1 and #3 half way in 11.13 Remove blade replacement holder 11.14 Fasten screw #2 and #4 half way in...
Need help?
Do you have a question about the 486P and is the answer not in the manual?
Questions and answers