Panasonic AG-AC8P Operating Instructions Manual
Hide thumbs
Also See for AG-AC8P:
- Operating instructions manual (125 pages) ,
- Quick manual (4 pages) ,
- Specifications (2 pages)
Table of Contents
Advertisement
Vol.1
Please read first
This document explains basic operations of the unit. For more detailed explanation, please refer
to "Operating Instructions Vol.2" (PDF file) which is recorded in the enclosed CD-ROM.
Please read these instructions carefully before using this product, and save this manual for future
use.
F0913TC1035
Printed in Japan
Operating Instructions
Memory Card Camera-Recorder
Model No.
AG-AC8P
ENGLISH
VQT5D95-1
Vol.1
Advertisement
Table of Contents

Related Manuals for Panasonic AG-AC8P


Summary of Contents for Panasonic AG-AC8P
-
Page 1: Operating Instructions
Operating Instructions Vol.1 Memory Card Camera-Recorder AG-AC8P Model No. Vol.1 Please read first This document explains basic operations of the unit. For more detailed explanation, please refer to “Operating Instructions Vol.2” (PDF file) which is recorded in the enclosed CD-ROM. -
Page 2: Information For Your Safety
Information for Your Safety WARNING: To reduce the risk of fire, electric shock or product damage, ≥ Do not expose this unit to rain, moisture, dripping or splashing. ≥ Do not place objects filled with liquids, such as vases, on this unit. ≥... - Page 3 Model Number: AG-AC8P Trade Name: Panasonic Responsible Party: Panasonic Corporation of North America Two Riverfront Plaza Newark NJ 07102 Support contact: 1-800-524-1448 This device complies with Part 15 of the FCC Rules. Operation is subject to the following two conditions: (1) This device may not cause harmful interference, and (2) this device must accept any interference received, including interference that may cause undesired operation.
- Page 4 AC adaptor This AC adaptor operates on AC between 110 V and 240 V. ≥ In the U.S.A. and Canada, the AC adaptor must be connected to a 120 V AC power supply only. ≥ When connecting to an AC supply outside of the U.S.A. or Canada, use a plug adaptor to suit the AC outlet configuration.
- Page 5 ∫ Product identification marking Product Location Memory Card Camera-Recorder Bottom AC adaptor Bottom Conforms to UL STD 60065. Certified to CAN-CSA STD C22.2 No.60065. U.S.A./CANADA CONSUMERS: ATTENTION: A lithium ion battery that is recyclable powers the product you have purchased. Please call 1-800-8-BATTERY for information on how to recycle this battery.
-
Page 6: Important Safety Instructions
IMPORTANT SAFETY INSTRUCTIONS Read these operating instructions carefully before using the unit. Follow the safety instructions on the unit and the applicable safety instructions listed below. Keep these operating instructions handy for future reference. Read these instructions. 10) Protect the power cord from being walked on or pinched particularly at plugs, Keep these instructions. - Page 7 Brazil Only Brasil Apenas <Manuseio de baterias usadas> Cobrir os terminais positivo (_) e negativo (`) com uma fita isolante adesiva, antes de depositar numa caixa destinada para o recolhimento. O contato entre partes metálicas pode causar vazamentos, gerar calor, romper a blindagem e produzir fogo. Não desmonte, não remova o invólucro, nem amasse a bateria.
-
Page 8: Cautions For Use
Cables not conforming to the HDMI standard like, remove air from the bag, and seal the bag.) will not work. Panasonic HDMI cable is When condensation has occurred, remove the recommended. Part No.: RP-CHE15 (1.5 m battery and/or the AC adapter and leave the (4.9 feet)) -
Page 9: This Unit
∫ Cards that you can use with ≥ Function that can be used for Motion Picture Recording Mode: this unit Function that can be used for Still Picture SD Memory Card, SDHC Memory Card and Recording Mode: SDXC Memory Card ≥... -
Page 10: Table Of Contents
Contents ∫ How to open the Operating Instructions PDF file When you insert the CD-ROM and open the [INDEX.pdf] in the CD-ROM, the Operating Instructions list will be displayed. Click the document name of the Operating Instructions you would like to open. ≥... -
Page 11: Accessories
Accessories Check the accessories before using this unit. Keep the accessories out of reach of children to prevent swallowing. Product numbers correct as of Sep. 2013. These may be subject to change. Optional accessories Battery pack Some optional accessories may not be available in some countries. -
Page 12: Preparation
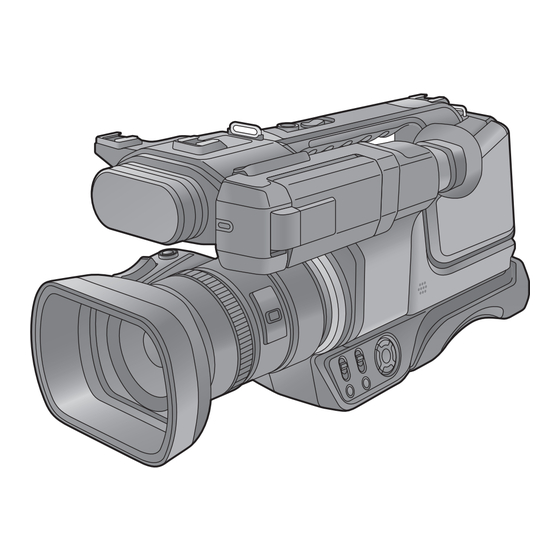
Preparation Names and Functions of Main Parts 4 5 6 18 19 Shoulder strap fixture Zoom lever [W/T] (In Recording Mode) Handle (l 29) Sub zoom lever [W/T] (l 29) Volume lever [rVOLs]/Thumbnail ≥ This lever functions in the same manner as display switch [ ] (In Playback the zoom lever. - Page 13 MANUAL FOCUS MENU O.I.S. 20 Ring LED 21 Shoulder strap fixture 22 Internal microphones 23 Recording lamp 24 Lens (l 16) 25 Lens hood 26 Multi manual ring (l 30) 27 Camera function button [CAMERA FUNCTION] (l 30) 28 Mode switch 29 Intelligent auto/Manual/Manual focus switch [iA/MANUAL/FOCUS] (l 28) 30 Cursor button...
- Page 14 35 LCD monitor (Touch screen) (l 22) 39 Viewfinder (l 23) ≥ Extend the viewfinder before use. ≥ It can open up to 90o. 40 Speaker 41 Battery release button [PUSH] (l 18) 42 Battery holder (l 18) 43 Video output terminal [VIDEO OUT] (l 32) 44 Audio output terminal [AUDIO OUT] (l 32) ≥...
- Page 15 47 48 49 50 46 SD card cover (l 21) 47 Card slot 2 (left) (l 21) 48 Access lamp (card 2) (l 21) 49 Card slot 1 (right) (l 21) 50 Access lamp (card 1) (l 21) (ENG) VQT5D95...
-
Page 16: Attaching The Eye Cup
∫ Adjust the length of the grip belt so that it fits your hand. 1, 2 Flip the belt cover and the belt. Adjust the length. 4, 5 Replace the belt. ∫ Attaching the eye cup Attach by aligning the notch of the eye cup attachment part with the protrusion at the inside of the eye cup. - Page 17 ∫ About the external stereo Attaching the external stereo microphone microphone to the unit Attach the microphone to the External stereo microphone accessory shoe. 1 Loosen the lock ring. 2 Attach the microphone. 3 Firmly tighten the lock ring. ≥...
-
Page 18: Power Supply
Please be advised that we are not liable for any accident or failure occurring as a result of use of a counterfeit battery pack. To ensure that safe products are used we would recommend that a genuine Panasonic battery pack is used. Inserting/removing the battery ≥... -
Page 19: Charging The Battery
Charging the battery When this unit is purchased, the battery is not charged. Charge the battery fully before using this unit for the first time. The unit is in the standby condition when the AC adaptor is connected. The primary circuit is always “live”... -
Page 20: Charging And Recording Time
≥ We recommend using Panasonic batteries (l 11, 18). ≥ If you use other batteries, we cannot guarantee the quality of this product. ≥ Do not heat or expose to flame. ≥ Do not leave the battery(ies) in a car exposed to direct sunlight for a long period of time with doors and windows closed. -
Page 21: Recording To A Card
Inserting/removing an SD card When using an SD card not from Panasonic, or one previously used on other equipment, for the first time on this unit, format the SD card. (l 26) When the SD card is formatted, all of the recorded data is deleted. -
Page 22: Turning The Unit On/Off
Preparation Turning the unit on/off Set the power switch to ON while pressing the lock release button B to turn on the unit. To turn off the unit Set the power switch to OFF while pressing the lock release button. The status indicator goes off. -
Page 23: Viewfinder Adjustment
∫ Slide while touching Move your finger while pressing on the touch screen. ∫ About the operation icons ≥ To operate the following icons using the cursor buttons, select the desired icon using the cursor buttons and then press the button in the center. (Excluding some functions) These icons are used to switch the menu and thumbnail display page, for item selection and setting etc. -
Page 24: Setting Date And Time
Preparation Setting date and time The clock is not set at the time of purchase. Make sure to set the clock. Select the menu. (l 25) : [OTHER FUNCTION] # [CLOCK SET] MENU Example: For USA Select the date and time to be set using the cursor button right or left, then adjust the desired value using the cursor button up or down. -
Page 25: Using The Menu Screen
Preparation Using the menu screen ≥ You can also perform operations by touch operation. (l 22) Press the MENU button. MENU Select the desired item, then Select the desired top menu A press the button in the center using the cursor button, then to enter the setting. -
Page 26: Basic
Basic Selecting a media to record [SD CARD 1] and [SD CARD 2] can be selected separately to record motion pictures or still pictures. Change the mode to Select the menu. (l 25) : [SW & DISP SETUP] # [MEDIA SELECT] MENU Select the media you want to record motion pictures or still pictures on... -
Page 27: Recording Motion Pictures
Basic Recording motion pictures Change the mode to Open the LCD monitor. Press the recording start/stop button B to start recording. A When you begin recording, ; changes to ¥. ≥ Recording will stop when you press the recording start/stop button again. ... -
Page 28: Intelligent Auto Mode
Basic Intelligent Auto Mode The modes (appropriate for the condition) are set just by pointing the unit to what you want to record. MANUAL FOCUS iA/MANUAL/FOCUS switch Slide the switch to change the Intelligent Auto Mode/Manual Mode/Manual Focus Mode. VQT5D95 (ENG) -
Page 29: Using The Zoom
Basic Using the zoom Zoom lever/Sub zoom lever T side: Close-up recording (zoom in) W side: Wide-angle recording (zoom out) Ring Zoom T side: Close-up recording (zoom in) W side: Wide-angle recording (zoom out) (ENG) VQT5D95... -
Page 30: Manual Recording
Basic Manual recording Set the iA/MANUAL/FOCUS switch to manual mode. is displayed in the Manual Mode. ≥ MANUAL FOCUS ∫ When using the multi manual ring Press the CAMERA FUNCTION button to select the desired item. ZOOM ZOOM ZOOM ≥... -
Page 31: Motion Picture/Still Picture Playback
Basic Motion picture/Still picture playback ≥ You can also perform operations by touch operation. (l 22) Change the mode to Select the play mode select icon A using the cursor button, then press the button in the center. Select the media type B and press the button in the center. -
Page 32: Watching Video/Pictures On Your Tv
Select the playback operation by selecting the operation icon and press the button in the center. E Operation icon TC 00:00:00:00 TC 00:00:00:00 TC 00:00:00:00 ≥ Operation icons and screen display will disappear when no operation is performed for a specific period of time. To display them again, press the cursor button. -
Page 33: Others
Others Specifications Memory Card Camera-Recorder Information for your safety Image sensor: Power source: 1/4.5z 1MOS image sensor DC 9.3 V (When using AC adaptor) Effective pixels; 4140 K DC 7.2 V (When using battery) Motion picture ; 4140 K (16:9), 3110 K (4:3) Still picture;... - Page 34 Minimum required illumination: AC adaptor Approx. 2 lx (1/30 with Low Light Mode in the Information for your safety Scene Mode) Approx. 1 lx with the Color Night Rec function Power source: AV connector video output level: AC 110 V to 240 V, 50/60 Hz 1.0 Vp-p, 75 h, NTSC system Power consumption: Component connector video output level:...
-
Page 35: About Copyright
≥ “AVCHD”, “AVCHD Progressive” and the ≥ Separate license contracts must be obtained “AVCHD Progressive” logo are trademarks of from MPEG LA where SD Memory Cards Panasonic Corporation and Sony containing information recorded with this Corporation. product are to be distributed to end users for ≥... - Page 36 Web Site: http://www.panasonic.com © Panasonic Corporation 2013...
Need help?
Do you have a question about the AG-AC8P and is the answer not in the manual?
Questions and answers