
Subscribe to Our Youtube Channel
Related Manuals for RS 1327


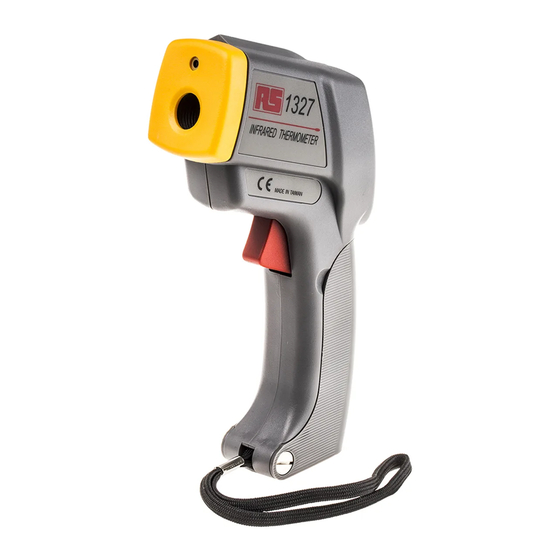
Summary of Contents for RS 1327
- Page 1 Infrared Thermometer Remote Temperature Measurement ( Non-Contact ) 1327 INSTRUCTION MANUAL...
-
Page 2: Table Of Contents
TABLE OF CONTENTS TITLE PAGE INTRODUCTION ...............1 Ⅰ. SAFETY INFORMATION.............1 Ⅱ. FEATURES................3 Ⅲ. SPECIFICATIONS ...............3 Ⅳ. GENERAL LAYOUT AND OPERATING CONTROLS ..5 Ⅴ. LCD DISPLAY DESCRIPTION ..........7 Ⅵ. EMISSIVITY ADJUSTMENT ..........8 Ⅶ. TEMPERATURE MEASUREMENT........11 Ⅷ. SETTING MODE..............13 Ⅸ.BATTERY REPLACEMENT ..........15... -
Page 3: Introduction
INTRODUCTION The RS 1327 hand-held Infrared Thermometer is easy to use and operate. The thermometer has a laser to assist in sighting the sensor for making measurements. The Liquid Crystal Display has a backlight function which may be turned on to assist measurements made in a dark place. - Page 4 sources of ignition. 2. Precautions: a). Do not operate the thermometer in the presence of strong electrical or magnetic fields, as this may prevent correct operation. b). Use and store the thermometer away from direct sunlight or other strong source of light, high temperatures, high humidity or dust.
-
Page 5: Ⅱ. Features
If repair or servicing is required, contact the supplier or RS Components. The address is given at the end of these instructions. b). Periodically clean the case with a dry cloth. Do not use abrasives or solvents. - Page 6 Over-range indication: “OL” or “-OL”. Low battery indication: symbol is displayed on LCD when the battery voltage drops below the operating voltage. Power supply: Single 9V battery 006P 9V, IEC6F22, or NEDA1604. Battery life: Approx. 100 hours (with laser pointer and backlight off) Operating temperature: 0 to 50 to 122...
-
Page 7: Ⅳ. General Layout And Operating Controls
F and 82 F to 122 Measurement rate: 2 times per second. Spectral Response: 6 to 14um. Field of view: 10:1; optics ratio with a 1” min target. Emissivity: 0.17 ~ 1.00 (presettable) Sighting: Laser marker < 1mw (class 2). Sensor: Thermopile. - Page 8 ¢X C ¢X F ¢X C ¢X F 1. Display. Press and hold Button Press once for 3 seconds From MAX/MIN Enter MAX/MIN recording mode. mode will exit this MAX MIN Current reading (MAX/MIN) mode and return to MODE normal operation. From normal mode will enter setting mode.
-
Page 9: Ⅴ. Lcd Display Description
From Read mode increments the memory location number From SET mode increases the ▲ value of the selected parameter. 5. Measuring trigger : Trigger for turning the thermometer on. Pull the trigger to turn on the thermometer and make a measurement. -
Page 10: Ⅵ. Emissivity Adjustment
3. Minimum reading 13. Hi alarm 4. Low battery indicator 14. Memory and Read address number 5. Maximum/minimum value 15. Read memory data 6. Emissivity value setting 16. Memory clear indication 7. Measured value 17. Memory full indication 8. Measure indication 18. - Page 11 d). Pull the trigger store the setting value and exit set mode. The following table gives typical emissivity values for common materials Emissivity VALUES Typical Emissivity Values; Metals SURFACE EMISSIVITY Zinc (oxidized) 0.1* Galvanized iron Tin-plated steel 0.1* Gold (polished) 0.1* Silver (polished) 0.1*...
- Page 12 Aluminum oxide at 260℃ Aluminum oxide at 800℃ Aluminum Alloys various 0.1 to 0.25 Brass Brass (polished) 0.1* Brass (roughened surface) Brass (oxidized) Copper Copper (polished) 0.05* Copper plate (oxidized) Molten copper 0.15 Lead Lead (pure) 0.1* Lead (oxidized at 25℃) Lead (oxidized , reated to 200℃) Nickel and its alloys Nickel (pure)
-
Page 13: Ⅶ. Temperature Measurement
℃ Zirconium silicate at 850 Quartz (rough) Carbon (graphite) 0.75 Carbon (soot) 0.95 Timber (various) 0.8 to 0.9 Miscellaneous Enamel (any color) Oil paint (any color) 0.95 Lacquer Matte black paint 0.95 to 0.98 Aluminum lacquer Water 0.98 Rubber (smooth) Rubber (rough) 0.98 Plastics (various, solid) - Page 14 button and then pull the trigger to turn the meter on enter Deleted: to continuous measurement mode. The symbol will not be visible in the LCD, indicating the Hold function is disabled To exit continuous measurement mode: Pull the trigger to stop continuous measurement and turn the meter off.
-
Page 15: Ⅷ. Setting Mode
Press ▲ or ▼ to select the desired C or F units and then pull trigger to store the setting. 5. Data memory store and read procedure : To clear the data from the memory: With the instrument turned off, press and hold the M button, then pull trigger until “CLR”... - Page 16 “℃/ ℉”: Temperature unit / ℉, press ▲ or ▼ to select units ℃or ℉. ALM (Alarm function ON/OFF): Press ▲ or ▼ to select alarm function on or off. ALM (Lo Alarm Function): Press ▲ or ▼ to set a value as an alarm value.
-
Page 17: Ⅸ.battery Replacement
Alarm point) setting mode. Press the ▲ or ▼ button until the display reads100.0℃. f). Pull the trigger to store the setting and exit the setting mode. ε (Emissivity): Press ▲ or ▼ to adjust the value. ▲ : Button for increasing the value. Hold down to increase the parameter value rapidly. - Page 18 e) Close the battery cover. f) Turn the instrument on and check for correct operation. OPEN...
Need help?
Do you have a question about the 1327 and is the answer not in the manual?
Questions and answers