Paradox NVX80 Installation Manual
Hide thumbs
Also See for NVX80:
- Reference and installation manual (20 pages) ,
- Installation quick manual (4 pages) ,
- Quick start manual (2 pages)
Table of Contents
Advertisement
Advertisement
Table of Contents

Related Manuals for Paradox NVX80


Summary of Contents for Paradox NVX80
- Page 1 Version 1.12...
- Page 2 Please ensure compliance with the applicable laws of local jurisdictions including privacy laws. © 2014 Paradox Security Systems Ltd. All rights reserved. Specifications may change without prior notice. Canadian and international patents may apply. Paradox, BabyWare, EVO Digiplex, Pet Immunity are trademarks or registered trademarks of Paradox Security Systems (Bahamas) Ltd.
-
Page 3: Table Of Contents
Installing the NVX80 6 Mounting Considerations 6 Installing the NVX80 Step-by-Step 7 Installation Using the Swivel Bracket 8 Connecting the NVX80 to a Control Panel 12 Chapter 3 NVX80 Menu-Driven Settings and Configuration 13 OLED 4-button interface 13 PIR: Passive Infrared Detection with Independent Creep Zone 14... - Page 4 NVX80 Installation Manual...
-
Page 5: Nvx80 Overview
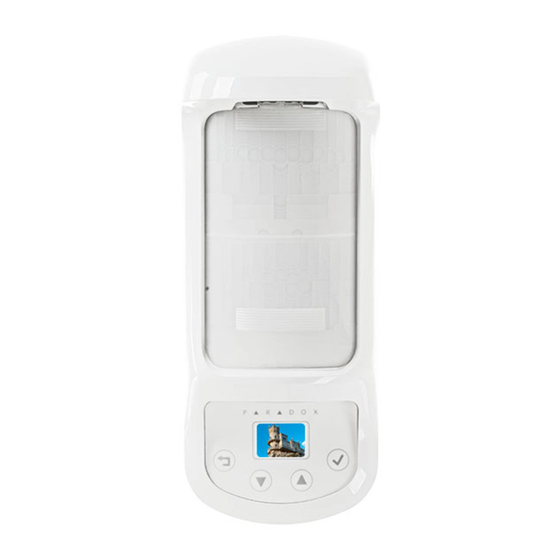
NVX80 Overview NVX80 Overview The Paradox NVX80 motion detector is above and beyond anything in its class. The NVX80 features resilience to extreme conditions, a series of active infrared anti-masking and microwave proximity technologies to detect if anyone is trying to mask the detection, and unparalleled detection performance using SeeTrue™ (patent pending). The NVX80... -
Page 6: Installing The Nvx80
• Keep a minimum distance between adjoining NVX80 detectors to prevent MW cross interference • The NVX80 can be placed under a roof, awning, or the all-weather cover can be installed for outdoor installations • Install the detector within the suggested range: installing the unit lower than 2.5 m / 8 ft 2 in may compromise the Pet Immunity capability. -
Page 7: Installing The Nvx80 Step-By-Step
1. Loosen the captive screw located at the bottom of the unit. 2. Separate the back cover from the front of the NVX80 by carefully sliding it up and off. 3. Prepare the back cover for a wall-mount installation by drilling out the appropriate knock-out holes (see Figure 1).... -
Page 8: Installation Using The Swivel Bracket
10. Insert the protective foam into the NVX80’s opening to prevent element infiltration. 11. Slide the front section of the NVX80 onto the back cover of the unit. The power up sequence will automatically start (if power is being supplied) and takes about 30 seconds. - Page 9 19. Insert the protective foam into the NVX80’s connector opening to prevent element infiltration to the serial connector. 20. Slide the front section of the NVX80 onto the back cover of the unit. The power up sequence will automatically start (if power is being supplied) and takes about 30 seconds.
- Page 10 Step 6. P A R A D O X Remove this screw. Step 5. Figure 4: Remove the Mounting Bracket P A R A D O X Screw in this Steps 7, 8, and 9. Steps 11, 12, and 13. Step 14. Figure 5: Install the Mounting Bracket NVX80 Installation Manual...
- Page 11 R+ B‐ GRN YEL TMP N01 C1 NC1 NC2C0M NC3 floor. Tighten this screw Steps 16, 17, 18, and 19. Step 15. Figure 6: Wire the Module Step 20. Figure 7: Attach the Module NVX80 Installation Manual...
-
Page 12: Connecting The Nvx80 To A Control Panel
• To MG/SP control panels or a third party system with a Dry Contact connection 2.4.1 Digiplex Connection Connect the NVX80 to the EVO control panel with four colored wires corresponding to the marking on the terminal board as displayed below. -
Page 13: Nvx80 Menu-Driven Settings And Configuration
SeeTrue™ can detect at the highest performance level, even where most PIR detectors fail. The NVX80 together with SeeTrue™ can detect intruders in high temperature environments, detect camouflaged movements (to and from the device), and detect intruders using insulated materials such as umbrellas, coats, cartons or other similar type of materials that are used to breach common PIR detectors. -
Page 14: Pir: Passive Infrared Detection With Independent Creep Zone
Menu Item Description Idle SeeTrue™ is off. This is the default mode. SeeTrue™ detection is combined with PIR detection. The NVX80 will Secure provide very high movement detection through the combination of the SeeTrue™ functionality with the PIR detection events. -
Page 15: Pet Immunity
Set for small pet, large pet, or Off (Default is Off) The NVX80’s Pet Immunity can filter out the movement of small and large animals, under 80 cm /32 in high, and weighing up to 20 kg / 44 lbs, in both indoor and outdoor environments. By ignoring the movement of the pets the detector’s reliability increases. -
Page 16: Ir Anti-Mask
50% from factory-set levels. The NVX80 anti-mask technology protects the detector from a wide range of materials; including but not limited to clear lacquer, aluminum foil, cling wrap, clear adhesive tape, and spray paint. -
Page 17: Outputs
Clean Lens Trouble Creep Zone Using Relay 1 (form C) provides a higher safety level, as an indication may be generated on power loss (line NOTE: cut). It should be noted that this feature increases power consumption. NVX80 Installation Manual... -
Page 18: Diagnostics
Use the built-in diagnostics to pinpoint troublesome installations. Test the NVX80 detector settings and bus operation. The Test Bus option will test the bus voltage and Digiplex connection, by checking the status of data and lines reporting no connection or invalid operation. -
Page 19: Settings
Installation specific settings can be saved and restored if altered. Settings can also be reset to factory defaults, all with the push of a button. Setting changes occur once the “OK” button is pushed. Changes will not be saved if the “back” button is pushed. NVX80 Installation Manual... -
Page 20: About
3.10 About Menu Item Description Firmware Version number, Date, Serial number Hardware Version number, ECO number 3.11 Language Menu Item Description English Displays text in English Portuguese Displays text in Portuguese NVX80 Installation Manual... -
Page 21: Oled Display Messages
OLED Display Messages OLED Display Messages The NVX80 features an OLED screen, which displays colorful icons indicating alarm status, alarm type, and notifications. 4.1 SeeTrue Indications Secure Mode For indoor, pet free environments, SeeTrue™ extends the detection of true movement patterns. In addition to the regular indications, SeeTrue™ will indicate detection by the ST1 screen (red text on yellow triangle). -
Page 22: Mw Anti-Mask Indications
The detector waits for 16 seconds for the complementary technology’s detection. If no additional movement is detected during that time, the detector will return to its standby state. PIR Pre-Alarm in Test Mode PIR Pre-Alarm in Operation Mode MW Pre-Alarm in Test Mode NVX80 Installation Manual... -
Page 23: Tamper Indications
Appears when the Wall Tamper screw has been open. This message will also appear after the power up sequence is finished, should the Wall Tamper screw be open during power up. The detector will enter menu mode after the power up sequence is over. NVX80 Installation Manual... -
Page 24: Service Notifications
Input menu. 4.5 Service Notifications The following notifications appear when the functionality of the NVX80 unit is compromised. These indicators can help troubleshoot during installation or during operation. Appears in Operation Mode when the unit’s voltage is below 10v. It may also appear after an alarm or at the end of the power up sequence if the voltage was low. -
Page 25: Alternate Methods Of Configuration
• EVOHD control panel using BabyWare 5.1 Configuration through the Keypad/Touchpad You will need the NVX80 module serial number to configure the module through the keypad. If you don’t NOTE: know the module number you can still configure it through the OLED or BabyWare. - Page 26 Table 2: NVX80 Settings Programming Feature Bits Setting Default Section Show alarm Hide alarm Show Pre-alarm Hide Pre-alarm Show Troubles Hide Troubles Show Anti-mask Hide Anti-mask ** orange 5* green Menu Color *6 yellow 56 blue ** not used (Idle) ...
- Page 27 Table 2: NVX80 Settings Programming Feature Bits Setting Default Section * Trigger off Alarm 1 Trigger on * Trigger off Tamper 2 Trigger on * Trigger off Anti-Mask 3 Trigger on * Trigger off Microwave Anti-mask 008 for Relay 1...
-
Page 28: Configuring Through Babyware
5.2 Configuring through BabyWare 1. Open BabyWare 2. Right click on the NVX80 module. NVX80 Installation Manual... -
Page 29: Firmware Upgrade
Firmware Upgrade To upgrade the NVX80’s firmware you will have to access the unit. You will need: • a PC or laptop with Paradox In-Field Firmware Upgrade Software Installed (either on its own or through BabyWare) • a Paradox 307USB device (shown in Figure 10) •... - Page 30 8. Click the Serial tab. Then select the Transfer Maximum Speed to Automatic. 9. Click Connect. 10. Select the NVX80 from the Select Device window on the left portion of the window. The hardware information is displayed in the right pane.
- Page 31 Green Green Yellow Yellow Blue Blue Brightness - 1 2 3 4 5 + Brightness Display On/Off Version # Legend Firmware Date DEFAULT SETTINGS Serial # About DEFAULT SETTINGS Version # Hardware ECO # English Language Portuguese NVX80 Installation Manual...
- Page 32 Appendix 2: Coverage Beam Patterns NVX80 Installation Manual...
- Page 33 Dual : Cover and Wall RF Immunity 10 V/m up to 2.7 GHz Operating Temperature -35º to 60º C (-31º to 140º F) Bus Connection Paradox EVO Series, 4 wires Certification EN 50131 Grade 3 Class IV Construction Materials ASA UV Resistant Programming...
- Page 34 Appendix 4: Certifications Mark/ Area/Country level/Grade/Class European Economic Area (EEA) European Economic Area (EEA) WEEE Grade 3 EN50131 Certification Body: Applica Test and Certification EN50130-5 Class IV EN45011 System 5 NVX80 Installation Manual...
- Page 35 The whole Paradox team wishes you a successful and easy installation. We hope this product performs to your complete satisfaction. Should you have any questions or comments, please contact us. For support, please contact your local distributor, or dial 1-800-791-1919 (in North America) or +1-450-491-7444 (outside North America), Monday to Friday, from 8:00 a.m.
Need help?
Do you have a question about the NVX80 and is the answer not in the manual?
Questions and answers