Advertisement
Advertisement
Table of Contents

Related Manuals for trentios SIN-TP1/10


Summary of Contents for trentios SIN-TP1/10
- Page 1 SIN-TP1/10,SIN-TP7/14,SIN-TP9/15 INSTRUCTION MANUAL PORTABLE AIR CONDITIONER...
-
Page 2: Very Important
VERY IMPORTANT Please read this instruction guide before install and using your portable air conditioner unit. This instruction manual is the universal-purpose version for the units that you purchase, it might be slightly different from the ones described in the manual, but it does not affect your proper operations and usage. -
Page 3: Unpacking Instructions
CONGRATULATIONS ON YOUR SELECTION OF A QUALITY PORTABLE AIR CONDITIONER PORTABLE AIR CONDITIONER This Air Conditioner has been designed and manufactured to the highest standards of modern engineering. Our product not only provides you a remote control to help user operate all the functions easily and conveniently but also has below benefits: - Moves easily from room to room on easy glide castors - No installation required-just plug into any household... -
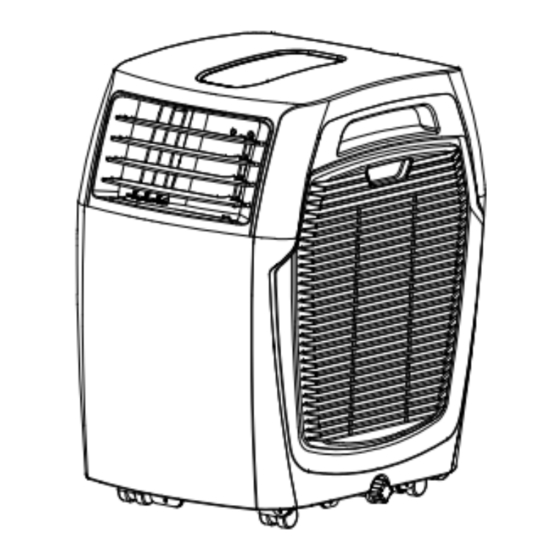
Page 4: Name Of The Parts
NAME OF THE PARTS 1. Control panel 2. Remote control receiver 3. Adjustable air vent 4. Joint tube 5. Exhaust hose 6. Hot air filter 7. Drain hole 8. Hot air outlet 9. Cool air filter... -
Page 5: Control Panel & Description Of Function
CONTROL PANEL & DESCRIPTION OF FUNCTION 1. POWER 11. TIMER INDICATOR 2. TEMP- 12. COOL 3. SLEEP 13. DEHUMIDIFY 4. SPEED 14. HIGH FAN 5. SWING 15. MUDIUM FAN 6. TEMP+ 16. WATER FULL 7. TIMER 17. FAN 8. MODE 18. -
Page 6: Programmable Timer
POWER KEY Press to turn unit "ON" or "OFF". 2. TEMP- (DOWN) During cooling function:This key lowers the preset temperature by 1℃ each time it is pressed and the minimum limit is 16℃. During heating function:This key lowers the preset temperature by 1℃ each time and the minimum limit is 16℃. 3. -
Page 7: Remote Control Function
MODE Press this key to select cooling, fan, dehumidifying or heating. ALARM When the water tank is full,"E2" will be displayed on the display panel. To resume operation, please remove the rubber cap of the drain hose to drain out the water firstly. The E2 warning will disappear after draining, and then you can restart the unit by pressing the POWER key. - Page 8 NOTICE This unit can evaporate the condensation and distribute through the exhaust hose automatically. 1. When the unit is in the cooling function, it does not need the drain pipe installed. Please make sure that the rubber cap is locked on drain hole, when the unit is running.
- Page 9 1. Putting on the hepa filter, the fresh indicator turns on. 2. In fresh function, the cooling and dehumidifying function is invalid. 3. If you need cooling and dehumidifying function, you have to put off the hepa filter. How to put on the hepa filter 1.
-
Page 10: Power Supply
4. Put on the filter frame. Put on the filter . POWER SUPPLY (1) Confirm the correct power. (2) Insert the plug into the outlet firmly In order to prevent any dangerous leakage. (3) Don’t pull power wire by force because it will cause damage to power wire. PLACE FOR USE Because the machine distributes hot air, please don’t place or operate in a narrow place. -
Page 11: Window Kit Install
EXHAUST HOSE INSTALL 1. Circumrotate the exhaust hose according to the direction as the arrowhead ① indicates and then the exhaust hose can be took out from the unit. 2. Circumrotate the exhaust hose according to the direction as the arrowhead ② indicates and then make it connect with the unit. WINDOW KIT INSTALL ... - Page 12 How to enjoy WIFI function?(OPTIONAL) The new mobile air conditioner with Wi-Fi functionality has built in Wi-Fi module and firmware, which support user control via application on your mobile phone (will be called APP in the following chapters). It supports two control modes, local control and remote control. In remote control case, the mobile air conditioner needs to be connected to a router, which has the capability to access the internet.
- Page 13 step 4 step 5 step 6 step 7 step 8 step 9 step 10 step 11...
- Page 14 “setup” icon on the mobile phone. step2) enable Wi-Fi functionality of the mobile phone. step3) search Wi-Fi hot spot name starting with “ ”. trentios step4) connect to the Wi-Fi hot spot starting with “ ”. trentios Note: the Wi-Fi hot spot name starting with “...
- Page 15 step 1 step 2 step 3 step 4 step 5 step 6 step 7 step 8 step 9...
- Page 16 step 10 step 11 step1) long press SPEED 5 seconds to make the air conditioner to enter configuration status. In configuration status, the Wi-Fi led indicator will flash。Press the “setup” icon on the mobile phone. step2) enable Wi-Fi functionality of the mobile phone. Choose your home router and connect your mobile phone to the router.
- Page 17 3. How to delete device on the APP step 1 step 2 step1) on the APPs main interface, choose and long press the device to be deleted. Step 2) choose “YES” to delete device. 4. How to rollback to factory configuration To rollback to configuration of the air conditioner to factory status, please long press the MODE button 5 seconds.
-
Page 18: Troubleshooting
TROUBLE SHOOTING Problem Cause Trouble shooting Electrical short on both Contact an electrician for repair temperature sensor and PCB Indicates water tank full or User needs to pull out the rubber stopper possibly the incorrect wiring of which is located at the bottom of the unit, plug to drain the water away.
Need help?
Do you have a question about the SIN-TP1/10 and is the answer not in the manual?
Questions and answers