Table of Contents
Advertisement
Quick Links
Advertisement
Table of Contents

Related Manuals for Guntermann & Drunck DVIMUX4-PS/2


Summary of Contents for Guntermann & Drunck DVIMUX4-PS/2
- Page 1 G&D DVIMUX4-PS/2 Installation and Operation...
-
Page 2: About This Manual
© Guntermann & Drunck GmbH 2010. All rights reserved. Version 1.70 – 22/10/2010 Firmware: 1.5.3 Guntermann & Drunck GmbH Dortmunder Str. 4a 57234 Wilnsdorf Germany Phone +49 2739 8901-100 +49 2739 8901-120 http://www.GDsys.de sales@GDsys.de i · G&D DVIMUX4-PS/2... -
Page 3: Table Of Contents
Contents Contents Safety instructions .................... 1 The »DVIMUX4-PS/2« KVM switch ............... 2 Package Contents ..................... 2 Installation ....................... 3 Overview of the interfaces .................. 3 Setting up the device ..................3 Connecting the console devices ................4 Connecting the computers .................. 5 Connecting the power supply ................ -
Page 4: Safety Instructions
Operate this device with the provided G&D power pack or with the power pack listed in the manual. ! Operate the device only in designated areas. The devices are designed for indoor use. Avoid exposure to extreme cold, heat or humidity. 1 · G&D DVIMUX4-PS/2... -
Page 5: The »Dvimux4-Ps/2« Kvm Switch
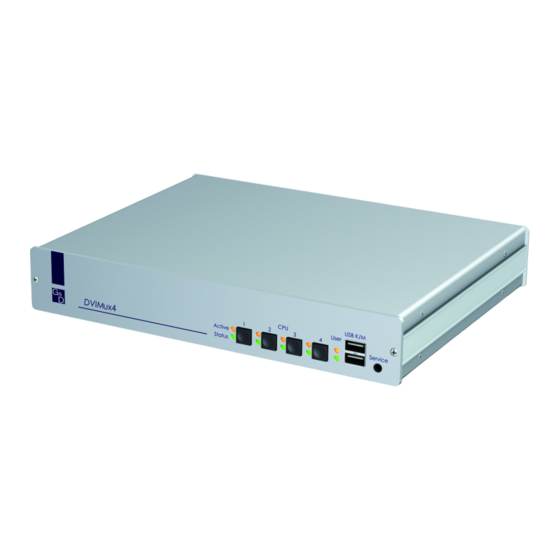
The »DVIMUX4-PS/2« KVM switch The »DVIMUX4-PS/2« KVM switch The DVIMUX4-PS/2 KVM switch enables you to operate up to four computers via one console. The console is provided with a PS/2 keyboard, a PS/2 mouse and a digital and/or analog monitor. The computers connected to the KVM switch are operated from the installed console. -
Page 6: Installation
KVM switch and the computers which are to be connected. 3. Before installing the KVM switch, decide which button on the front panel of the device should be assigned to which computer. 3 · G&D DVIMUX4-PS/2... -
Page 7: Connecting The Console Devices
Plug the monitor’s DVI-I cable to this interface. Monitor 1: NOTE: If you purchased a multi-channel variant of the KVM switch, connect the additional monitors to the (MC2, MC3 and MC4), (MC3 and Monitor 2 Monitor 3 MC4) resp. Monitor 4 (MC4) interfaces. G&D DVIMUX4-PS/2 · 4... -
Page 8: Connecting The Computers
If you purchased a multi-channel variant of the KVM switch, connect the (MC2, MC3 and MC4), (MC3 and MC4) or DVI-I CPU x.2 DVI-I CPU x.3 DVI-I CPU x.4 (MC4) interfaces to the correspending video output of the computer. 5 · G&D DVIMUX4-PS/2... -
Page 9: Connecting The Power Supply
Keyb. Keyb. Mouse Keyb. Mouse Keyb. Mouse Keyb. Mouse Figure 4: Interfaces to connect the power supply Power: Connect the power cable (PowerCable-2 Standard) to a power outlet and the Power socket of the KVM switch. G&D DVIMUX4-PS/2 · 6... -
Page 10: Further Information
Such monitors provide a DVI and a VGA interface. Depending on the input signal, modern monitors usually switch the signal type inde- pendently. Otherwise, the switching from digital to analog signal processing (and vice versa) must take place manually by the user. 7 · G&D DVIMUX4-PS/2... -
Page 11: Start-Up
The setup mode of the KVM switch is active. Status The KVM switch is supplied with the necessary voltage. The KVM switch is turned off or is not supplied with the necessary voltage. If necessary, check the proper connection of the power supply cable. G&D DVIMUX4-PS/2 · 8... -
Page 12: Switching Between The Computers
Switching between the channels takes place if the pressed key combi- nation is released. NOTE: If one of these key combinations interferes with a key combination of an installed application program, the key combination of the KVM switch can be adjusted (see page 18). 9 · G&D DVIMUX4-PS/2... -
Page 13: Switching Via Step Keys
Use the following connection settings for the serial end device to establish a serial connection to the KVM switch. Bits per second: 115.200 | or : 9.600 (see page 26) Data bits: Parity: none Stop bits: Flow control: none G&D DVIMUX4-PS/2 · 10... -
Page 14: Switching Commands
« command to show the currently accessing channel. NOTE: The serial device carries out the command directly after it is sent. A message (see below) informs the serial device concerning the success or failure of the switching of channels. 11 · G&D DVIMUX4-PS/2... - Page 15 The KVM switch confirms the successful execution of a command and otherwise sends a meassage. Message Meaning switching to channel successful invalid channel number (out of range) channel switching failed invalid command invalid value (out of range) RS232 mode enabled switch mode (RS232) enabled G&D DVIMUX4-PS/2 · 12...
-
Page 16: Configuration
Basic operation of the setup mode as well as the setup menu is explained in the fol- lowing pages. All functions that can be configured for the KVM switch are described in detail from page 17 on. 13 · G&D DVIMUX4-PS/2... -
Page 17: Operating The Setup Mode
How to perform a setup function: After enabling the setup mode, press one of the setup keys described on the fol- lowing pages. How to end the setup mode without performing a function: Press to end the setup mode. G&D DVIMUX4-PS/2 · 14... -
Page 18: Operating The Setup Menu
If the KVM switch is started while the connection is being established, the G&D Firmware Update Utility will be displayed briefly before the setup menu opens. This special utility is solely used by the support team. 15 · G&D DVIMUX4-PS/2... -
Page 19: Show System Info
Space key (repeatedly). A menu item that has a sub-dialogue available can be opened by pressing Enter NOTE: The following pages provide detailed information on how to change a cer- tain function. G&D DVIMUX4-PS/2 · 16... -
Page 20: Configuration Settings
4. Press the key to save your settings. Depending on your settings, the active hotkey is converted into a double hotkey (or vice versa): Single Hotkey Double Hotkey Ctrl Ctrl+Shift Alt+Shift Alt Gr Alt Gr+Ctrl Win+Ctrl Shift Shift+Win 17 · G&D DVIMUX4-PS/2... -
Page 21: Changing The Single Hotkey
(repeatedly) to enable a certain hotkey: Space Ctrl enables Ctrl hotkey enables Alt hotkey enables Alt Gr hotkey Alt Gr enables Win hotkey Shift enables Shift hotkey 4. Press the key to save your settings. G&D DVIMUX4-PS/2 · 18... -
Page 22: Changing The Double Hotkey
enables Ctrl+Shift double hotkey Ctrl+Shift Alt+Shift enables Alt+Shift double hotkey enables Alt Gr+Ctrl double hotkey Alt Gr+Ctrl Win+Ctrl enables Win+Ctrl double hotkey enables Shift+Win double hotkey Shift+Win 5. Press the key to save your settings. 19 · G&D DVIMUX4-PS/2... -
Page 23: Changing The Select Keys
enables select keys NUM 1, [...], NUM 3, NUM 4 enables select keys A, B, C, D A ... D F1 ... F4 enables select keys F1, F2, F3, F4 4. Press the key to save your settings. G&D DVIMUX4-PS/2 · 20... -
Page 24: Enabling/Disabling The Hotkey Delay
Arrow Arrow keys to select the Hotkey Delay entry. 3. Press the key (repeatedly) to enable/disable the hotkey delay: Space enables hotkey delay disables hotkey delay 4. Press the key to save your settings. 21 · G&D DVIMUX4-PS/2... -
Page 25: Resetting The Defaults
2. Use the Arrow Arrow keys to select the Set System Defaults entry. 3. Press Enter to reset the default settings. 4. Confirm the pop up security query with . Enter Pressing the key cancels the function. G&D DVIMUX4-PS/2 · 22... -
Page 26: Auto-Accessing The First Channel
Select Channel via Front Button 3. Press the key (repeatedly) to choose one of the following options: Space disables the switching via front button enables the switching via front button 4. Press the key to save your settings. 23 · G&D DVIMUX4-PS/2... -
Page 27: (De)Activating The Switching Via Hotkeys
Select Channel via Hotkey 3. Press the Space key (repeatedly) to choose one of the following options: disables the switching via hotkeys enables the switching via hotkeys 4. Press the key to save your settings. G&D DVIMUX4-PS/2 · 24... -
Page 28: (De)Activating The Switching Via Step Keys
Arrow Arrow Select Channel via Step Key 3. Press the key (repeatedly) to choose between the following options: Space step keys disabled [Step-Keys] step keys enabled 4. Press the key to save your settings. 25 · G&D DVIMUX4-PS/2... -
Page 29: Changing The Bitrate Of The Service Port
3. Press the Space key (repeatedly) to choose between the following bitrates: serial data transmission with 115.200 bit/s 115200 serial data transmission with 9.600 bit/s 9600 4. Press the key to save your settings. G&D DVIMUX4-PS/2 · 26... -
Page 30: Changing The Standard Mode Of The Service Port
(repeatedly) to choose between the following options: Space enables Setup Menu mode when starting KVM extender Setup Menu Switch enables Switch mode when starting KVM extender 4. Press the key to save your settings. 27 · G&D DVIMUX4-PS/2... -
Page 31: Changing The Scan Code Set Of A Ps/2 Keyboard
enables scan code set 3 for PS/2 keyboard inputs 4. Press the key to save your settings. 5. Restart the KVM switch. After the restart, the keyboard is initialised and the selected scan code set does apply. G&D DVIMUX4-PS/2 · 28... -
Page 32: Selecting The Ps/2 Keyboard Type
PS/2 Keyboard Type entry. 3. Press the key (repeatedly) to choose the keyboard type: Space PixelPower (blue) keyboard PixelPower Blue SKIDATA1 keyboard SKIDATA1 Standard standard PS/2 keyboard 4. Press the key to save your settings. 29 · G&D DVIMUX4-PS/2... -
Page 33: Enabling Or Resetting A Ps/2 Mouse
enables the PS/2 mouse of a Linux PC enables the PS/2 wheel mouse of a Linux PC enables the PS/2 wheel mouse with additional keys of a Linux PC resets the PS/2 mouse interface of a Windows PC G&D DVIMUX4-PS/2 · 30... -
Page 34: Order Numbers
A610 0120 CPU-MC4-DVID-DL-PL-2 A610 0124 CPU-MC4-DVID-DL-PL-5 DVIMUX8-PS/2 A610 0136 CPU-MC4-DVIA-PL-2 A210 0082 DVIMUX8-PS/2 A610 0140 CPU-MC4-DVIA-PL-5 A210 0086 DVIMUX8-MC2-PS/2 A610 0128 CPU-MC4-DVID-DL-U-2 A610 0132 CPU-MC4-DVID-DL-U-5 DVIMUX8-USB A610 0112 CPU-MC4-DVIA-U-2 A210 0084 DVIMUX8-USB A610 0113 CPU-MC4-DVIA-U-5 A210 0088 DVIMUX8-MC2-USB 31 · G&D DVIMUX4-PS/2... -
Page 35: Technical Data
Dimensions (W × H × D): 270 × 44 × 210 mm (desktop) 19“ × 1U × 210 mm (rackmount) Weight: approx. 1,6 kg Operation environ- Temperature: +5 to +40 °C ment Humidity: < 80%, non-condensing Conformity CE, RoHs G&D DVIMUX4-PS/2 · 32... - Page 36 Power input: 230mA@240VAC; 530mA@100VAC Power input Standby: 23,0W@240VAC; 23,0W@100VAC Operation: 32,4W@240VAC; 32,6W@100VAC Casing Dimensions (W × H × D): 270 × 132 × 210 mm (desktop) 19“ × 3U × 210 mm (rackmount) Weight: approx. 2,5 kg 33 · G&D DVIMUX4-PS/2...
- Page 37 Notes G&D DVIMUX4-PS/2 · 34...
- Page 38 Notes 35 · G&D DVIMUX4-PS/2...
- Page 39 Notes G&D DVIMUX4-PS/2 · 36...
- Page 40 Guntermann & Drunck GmbH Dortmunder Str. 4a 57234 Wilnsdorf Germany Phone +49 2739 8901-100 +49 2739 8901-120 http://www.GDsys.de sales@GDsys.de...
Need help?
Do you have a question about the DVIMUX4-PS/2 and is the answer not in the manual?
Questions and answers