Table of Contents
Advertisement
Quick Links
Advertisement
Table of Contents

Related Manuals for Imation Nexsan E60


Summary of Contents for Imation Nexsan E60
-
Page 1: Installation Guide
NEXSAN E-SERIES™ Installation Guide For the Nexsan E60™/E60V™/E60VT™ and Nexsan E48™/E48V™/E48VT™ RAID Storage Units Document Number NXS-ES4U-IG Revision 01 NEXSAN 1445 Lawrence Drive, Thousand Oaks, CA 91320 | p. 866.4.NEXSAN | www.nexsan.com... - Page 2 Unauthorized use, duplication, or modification of this document in whole or in part without the written consent of Imation is strictly prohibited. Imation reserves the right to make changes to this manual, as well as the equipment and software described in this manual, at any time without notice.
-
Page 3: Table Of Contents
Front panel Field-replaceable modules Other modules LEDs Other items Rear panel Field-replaceable modules Other modules Connectors LEDs Switches Turbo cards (VT units only) Host port options Drawer interior Field-replaceable modules Other modules Nexsan E60™/Nexsan E48™ Nexsan by Imation Installation Guide www.nexsan.com... - Page 4 Dimensions, Nexsan E48™/E48V™/E48VT™ Power Cooling Materials Environment Chapter 2: Getting Started Taking delivery of the Nexsan E60™/Nexsan E48™ Unpack the Nexsan E60™/Nexsan E48™ Before installation Required tools and equipment Prepare the site Prepare the unit Chapter 3: Installing the Nexsan E60™Nexsan E48™...
-
Page 5: About This Manual
WARNING: Warnings alert the user to items or situations which may result in severe injury or death to the user. Nexsan E60™/Nexsan E48™ Nexsan by Imation Installation Guide www.nexsan.com... -
Page 6: Contacting Nexsan
Contacting service and support Imation's Nexsan Technical Services Group provides worldwide assistance with installation, configuration, software support, warranty and repair for all Nexsan products. A variety of service and support programs are available to provide you with the level of coverage and availability your operation requires. - Page 7 Nexsan E-Series™ Installation Guide for the Nexsan E60X™/E60XV™/Nexsan E48X/™E48XV™ RAID Storage Expansion Units Nexsan E-Series™ FRU Removal and Replacement Guide for the Nexsan E60X™/E60XV™/Nexsan E48X/™E48XV™ RAID Storage Expansion Units Nexsan RAID Storage User Guide Nexsan E-Series™ Snapshots and Replication User Manual Nexsan E60™/Nexsan E48™ Nexsan by Imation Installation Guide www.nexsan.com...
-
Page 8: Safety Notices
Safety notices Safety notices This guide covers the Nexsan E60™/E60V™/E60VT™ and Nexsan E48™/E48V™/E48VT™ digital storage units only. Refer to the relevant product manuals for information on other Nexsan E-Series™ storage or expansion units and other Nexsan products mentioned in this guide. -
Page 9: Revision History
E60™/E60V™/E60VT™ and Nexsan E48™/E48V™/E48VT™ RAID Storage Units. NXS-ES4U-IG Rev. 01, February 2014: Changed formatting throughout to reflect Nexsan as an Imation brand; separated installation content from FRU replacement content into two documents; changed name of document to Nexsan E-Series™ Installation Guide for the Nexsan E60™/E60V™/E60VT™ and Nexsan E48™/E48V™/E48VT™ RAID Storage Units. -
Page 10: Version 2.7, December 2011
18 and page 19; expanded section Attach Communication Cables on page 21; expanded section Power Up the Nexsan E60 on page 22; added caution to page 23 and page 24; added photographs to Disk Drives on page 26 and page 27. -
Page 11: Version 1.9, December, 2010
16; Disk Drawer (internal) LEDs section added to page 18; expanded and clarified descriptions under Rear LEDs on pages 19–20; Disk Drives and Fan Replacement sections added under Physical Components on pages 21–24. Nexsan E60™/Nexsan E48™ Nexsan by Imation Installation Guide... - Page 12 Revision history Nexsan by Imation Nexsan E60™/Nexsan E48™ www.nexsan.com Installation Guide...
-
Page 13: Chapter 1: Overview
Note Unless otherwise specified, “Nexsan E60™/Nexsan E48™” is assumed to refer to all variants (base model, V, and VT) of the Nexsan E60™ and Nexsan E48™ storage systems. Where information applies to only one variant, that variant is specified. This chapter contains the following sections:... -
Page 14: Front Panel
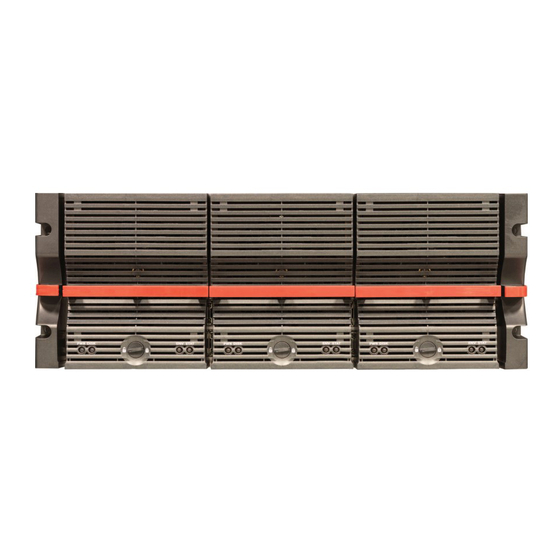
Front panel Front panel Figure 1-1: Nexsan E60™/Nexsan E48™ front panel Modules: LEDs: Other: 1. Drawer Front Assembly 3. Power 7. Drawer Lock 2a. Active Drive Drawer 0 4. Disk 2b. Active Drive Drawer 1 5. Environment 2c. Active Drive Drawer 2 6. -
Page 15: Other Items
The Environmental Information page (under System Information) in the graphical user interface (GUI) displays details (see the Nexsan RAID Storage User Manual). Other items 7. Drawer Lock: Secures the drive drawer in place. When this lock is disengaged, the STAT LED turns amber. Nexsan E60™/Nexsan E48™ Nexsan by Imation Installation Guide www.nexsan.com... -
Page 16: Rear Panel
Rear panel Rear panel Figure 1-2: Nexsan E60™/Nexsan E60V™ and Nexsan E48™/Nexsan E48V™ rear panel (Fibre Channel connections shown) 10 1 1 Field Replaceable Modules: Connectors: LEDs: Switches: 1a. RAID Controller 0 4. Power 10. PSU status 16. SW0 1b. RAID Controller 1 5. -
Page 17: Field-Replaceable Modules
3. Interconnect Service Modules (ISMs) (3). Can only be replaced by a fully-trained Service Engineer. Connectors 4. Power (2): 200–240VAC, 47–63Hz (for Nexsan E60™ units) or 110–240VAC, 47–63Hz (for Nexsan E48™ units). CAUTION: The cordset specification for the Nexsan E60™/Nexsan E48™ in North America is IEC C13 to IEC C14 rated 250V/10A. -
Page 18: Leds
15. iSCSI port LEDs (activity and status): For 1Gb/s and 100Mb/s connections, the left LED illuminates green, and both LEDs flash green when there is activity. For 10Mb/s connections, the left LED remains off, and the right LED flashes green where there is activity. Nexsan by Imation Nexsan E60™/Nexsan E48™ www.nexsan.com Installation Guide... -
Page 19: Switches
Fibre Channel, 10Gb/s iSCSI (10GbE), or SAS-to-Host. Note Because of the presence of the turbo card (see Turbo cards (VT units only) above), Nexsan E60VT™ and Nexsan E48VT™ units can only have one HBA card installed. Nexsan E60™/Nexsan E48™ Nexsan by Imation Installation Guide www.nexsan.com... - Page 20 If both LEDs are flashing yellow, the Fibre Channel connection has been lost. Note For Nexsan E60™/E60V™ and Nexsan E48™/E48V™ units with two HBA cards, the right HBA card's LEDs are inverted. 10Gb iSCSI port LEDs (connection and activity): For each 10Gb iSCSI connection (left and right), the lower LED lights up green when there is a 10GbE connection and the upper LED flashes green when there is activity.
-
Page 21: Drawer Interior
4. Drive Status LEDs Field-replaceable modules 1. Disk Drives: Up to 16 (for Nexsan E48™ units) or 20 (for Nexsan E60™ units) 3.5" disk drives in each drawer. Disk drives can be field-replaced in the event of failure (see the Nexsan E-Series FRU Removal and Replacement Guide for the Nexsan E60™/E60V™/E60VT™... -
Page 22: Physical Characteristics
Rack mount kit weight approx. 2.5 kg (5.5 lbs.) Power Two 1,600W load-sharing, hot-pluggable, redundant PSUs. Nexsan E60™/E60V™/E60VT™ nominal input voltage is 200–240VAC, 47–63Hz. Cordset specification in North America is IEC C13 to IEC C14 rated 250V/10A. Nexsan by Imation Nexsan E60™/Nexsan E48™... -
Page 23: Cooling
Chassis, external: Extruded aluminium and galvanized sheet steel, top and bottom Chassis, internal: Aluminium supports, steel divider plates, and steel sub-assemblies Fascia: ABS (blend) Thermoplastic UL 94 V.0 Environment Ambient operating temperature: 5°C–35°C (41°F–95°F) Minimum drawer operation temperature: 10°C (50°F) Nexsan E60™/Nexsan E48™ Nexsan by Imation Installation Guide www.nexsan.com... - Page 24 Chapter 1: Overview Nexsan by Imation Nexsan E60™/Nexsan E48™ www.nexsan.com Installation Guide...
-
Page 25: Chapter 2: Getting Started
Chapter 2: Getting Started This docuemt is designed to enable the user to install and configure the Nexsan E60™/Nexsan E48™ RAID storage unit quickly and safely. Please read this document carefully and review all of the information in this section before installing the unit. -
Page 26: Taking Delivery Of The Nexsan E60™/Nexsan E48
Taking delivery of the Nexsan E60™/Nexsan E48™ Taking delivery of the Nexsan E60™/Nexsan E48™ Upon receipt of your Nexsan E60™/Nexsan E48™, inspect the packaging for damage that may have been sustained in transit. If there is visible damage on the packaging, contact your shipper before proceeding. - Page 27 (2) chassis rack-mount “ears”, one left and one right four (4) screws for attaching the chassis “ears” to the Nexsan E60™/Nexsan E48™ unit four (4) brackets, four (4) nuts, and four (4) bolts for securing the Nexsan E60™/Nexsan E48™ to the rack...
- Page 28 5. Remove the outer packaging sleeve and the foam lid covering the Nexsan E60™/Nexsan E48™ unit. Figure 2-5: Removing the outer packaging sleeve and foam lid 6. With the help of a second person, carefully lift the Nexsan E60™/Nexsan E48™ unit out of the packaging.
-
Page 29: Before Installation
Ensure that the power drawn by the unit or units does not overload the available electrical supply (see Power on page 10). The Nexsan E60™ is designed to run from a nominal 200–240V supply due to its high peak power loading, and the Nexsan E48™ is designed to run from a nominal 110–240V supply. Cordset specification for the Nexsan E18 in North America is IEC C13 to IEC C14 rated 250V/10A. -
Page 30: Prepare The Unit
Prepare the unit Before installation, prepare the unit. CAUTION: Before opening any of the drive drawers on the Nexsan E60™/Nexsan E48™, be sure that the internal temperature is 10°C (50°F) or above. If the unit has been shipped or stored in very low temperatures, allow the unit to come to room temperature. - Page 31 Close and lock the drawers again when the ears are attached. Note If you are installing more than one Nexsan E60™/Nexsan E48™ unit, keep each unit’s disk drives with the unit they shipped with so as to avoid installing them into the wrong unit (disks are preconfigured for the specific unit at the factory).
- Page 32 Chapter 2: Getting Started Nexsan by Imation Nexsan E60™/Nexsan E48™ www.nexsan.com Installation Guide...
-
Page 33: Chapter 3: Installing The Nexsan E60™Nexsan E48
Chapter Chapter 3: Installing the Nexsan E60™Nexsan E48™ The Nexsan E60™ and Nexsan E48™ come in single-Controller and dual-Controller configurations. These instructions assume a dual-Controller unit installation, but where the steps differ, additional instructions for single-Controller units are provided. This chapter contains the following sections: Prepare the mounting rails Mount the Nexsan E60™/Nexsan E48™... -
Page 34: Prepare The Mounting Rails
To prepare the mounting rails for unit installation: 1. Extend the slides to fit your rack. Note The rails can be adjusted to between 26" (66cm) and 36" (91.4cm). Figure 3-2: Extending the rack-mount rails Nexsan by Imation Nexsan E60™/Nexsan E48™ www.nexsan.com Installation Guide... - Page 35 Chapter 3: Installing the Nexsan E60™Nexsan E48™ 2. Attach the rack nuts to the front of the rack on the left and right sides. The rack nuts should be mounted towards the interior of the rack. Note The rack nuts should be placed 3U apart. Use the rail as a guide for rack nut placement.
- Page 36 Clip the bracket to the appropriate place on the front of the mounting rail. Figure 3-6: Clipping the plastic bracket to the front of the rail Figure 3-7: Rails fronts with all four brackets attached Nexsan by Imation Nexsan E60™/Nexsan E48™ www.nexsan.com Installation Guide...
- Page 37 Chapter 3: Installing the Nexsan E60™Nexsan E48™ 5. Attach the rear slide of the left rail to the rack nuts by sliding the large part of the mounting hole over the rack nut and then pressing outward to seat the nut in the small part of the mounting hole.
-
Page 38: Mount The Nexsan E60™/Nexsan E48
3. With the help of a second person, carefully lift the Nexsan E60™/Nexsan E48™ unit so that the grooves in the side of the chassis line up with the mounting rails on the rack. - Page 39 Chapter 3: Installing the Nexsan E60™Nexsan E48™ 5. Tightly bolt the front of the Nexsan E60™/Nexsan E48™ to the rail fronts. Figure 3-13: Bolting the unit in place, top and bottom Nexsan E60™/Nexsan E48™ Nexsan by Imation Installation Guide www.nexsan.com...
-
Page 40: Restore The Rear Modules
2. Insert the RAID Controller into the slot and carefully slide it back until the spring lock tab clicks into place. Figure 3-15: Sliding the RAID Controller into place 3. Repeat steps 1 and 2 for the second RAID Controller (if present). Nexsan by Imation Nexsan E60™/Nexsan E48™ www.nexsan.com Installation Guide... -
Page 41: Load The Disk Drives
Chapter 3: Installing the Nexsan E60™Nexsan E48™ Load the disk drives CAUTION: Before opening any of the drive drawers on the Nexsan E-Series™ storage unit, be sure that the internal temperature is 10°C (50°F) or above. If the unit has been shipped or stored in very low temperatures, allow the unit to come to room temperature. - Page 42 6. Carefully slide the drawer back into the unit, making sure that it is flush with the rest of the front panel. 7. Turn the drawer lock clockwise to lock the drawer into place. 8. Repeat all previous steps for the middle and right drive drawers. Nexsan by Imation Nexsan E60™/Nexsan E48™ www.nexsan.com Installation Guide...
-
Page 43: Attach Communication Cables
Chapter 3: Installing the Nexsan E60™Nexsan E48™ Attach communication cables Connect all necessary communication cables to the RAID Controller (or Controllers) on the rear of the unit (see Rear panel on page 4). ► To connect communication cables: Connect the unit to your local area network (LAN) by attaching CAT 6 Ethernet cable to the Management (MGMT) port. -
Page 44: Power On The Nexsan E60™/Nexsan E48
CAUTION: The Nexsan E60™/Nexsan E48™ does not have power switches. The only way to apply power to the Nexsan E60™/Nexsan E48™ is to attach the power cords. Do NOT attach the power cords until the unit is fully installed, with all disk drives in place and all connections to the local area network (LAN) and storage area network (SAN) connected. -
Page 45: Set Up The System
Set up the system When the unit has finished booting up, follow the instructions in Chapter 1, Basic Setup of the Nexsan RAID Storage User Guide to get your Nexsan E60™/Nexsan E48™ system configured and running. Note The default IP addresses for the RAID Controllers in a dual-Controller system are 10.11.12.13 and 10.11.12.14. - Page 46 Chapter 3: Installing the Nexsan E60™Nexsan E48™ Nexsan by Imation Nexsan E60™/Nexsan E48™ www.nexsan.com Installation Guide...
-
Page 47: Glossary
Nexsan’s proprietary disk installation scheme component. Only the last component in the wherein drives are loaded into the chassis in chain directly connects to the computing opposite-facing pairs. Disks in each pair rotate Nexsan E60™/Nexsan E48™ Nexsan by Imation Installation Guide www.nexsan.com... - Page 48 A module of Nexsan E-Series expansion units (Nexsan E18X/XV, E48X/XV, and E60X/XV) drawer front assembly In Nexsan E60 and Nexsan E48 storage units, that connects via SAS to a Nexsan storage the ABS thermoplastic and aluminum assembly unit’s RAID Controller.
- Page 49 TCP/IP network. See “interconnect service module”. hot-plug To insert a new piece of hardware into a computerized system while the system is running. See also “hot-swap”. See “local area network”. Nexsan E60™/Nexsan E48™ Nexsan by Imation Installation Guide www.nexsan.com...
- Page 50 Each full- duplex channel, known as a SAS port, transfers rack mount data at 1.5Gb/s, 3Gb/s, or 6Gb/s in each Hardware for attaching devices to a rack. Nexsan by Imation Nexsan E60™/Nexsan E48™ www.nexsan.com Installation Guide...
- Page 51 2^40 (1,099,511,627,776) bytes (often called a “binary terabyte” and abbreviated “TiB”). TCP/IP Transmission Control Protocol/Internet Protocol. The set of communications protocols used for the Internet and other similar networks. Nexsan E60™/Nexsan E48™ Nexsan by Imation Installation Guide www.nexsan.com...
- Page 52 Glossary Nexsan by Imation Nexsan E60™/Nexsan E48™ www.nexsan.com Installation Guide...
- Page 53 Technical Services: 01332 291600, or +44 (0)1332 291600 outside of the UK E-mail: nexsansupport@imation.com E-mail: nexsansupport@imation.com Copyright © 2010–2014 Imation. All Rights Reserved. This product is protected by one or more of the following patents, and other pending patent applications worldwide: United States patents US8,191,841, ®...
Need help?
Do you have a question about the Nexsan E60 and is the answer not in the manual?
Questions and answers