Toshiba RAS-M10GDCV-E Owner's Manual
(multi-split type)
Hide thumbs
Also See for RAS-M10GDCV-E:
- Owner's manual (151 pages) ,
- Installation manual (122 pages) ,
- Service manual (58 pages)
Table of Contents
Advertisement
Available languages
Available languages
AIR CONDITIONER
CLIMATISEUR (TYPE MULTI-SPLIT)
KLIMAGERÄT (MULTI-SPLIT SYSTEM)
CONDIZIONATORE D'ARIA (TIPO MULTIAMBIENTI)
AIRE ACONDICIONADO (TIPO MULTI-SPLIT)
CONDICIONADOR DE AR (TIPO COM MÚLTIPLA DIVISÃO)
ΚΛΙΜ ΣΙΣΙΚΟ (TΤΠΟ MULTI-SPLIT)
Cooling Only Model
Modèle à froid seul
Geräte nur zur Kühlung
Modello solo per raffreddamento
Modelo de refrigeración únicamente
Modelo Apenas para Refrigeração
Μκθ Ϋζκ Φτιβμ απκεζ δ
Heat Pump Model
Modèle à thermopompe
Geräte mit Heizung
Modello con pompa di riscaldamento
Modelo con bomba de calor
Modelo da Bomba de Calor
Μκθ Ϋζκ η
δεΪ
θ ζέα Θ λησ β αμ
OWNER'S MANUAL
MANUEL DU PROPRIETAIRE
BETRIEBSANLEITUNG
MANUALE DEL PROPRIETARIO
MANUAL DEL PROPIETARIO
MANUAL DO USUÁRIO
Ο βΰέ μ Υλά βα
(MULTI-SPLIT TYPE)
Concealed Duct Type
Type à conduits dissimulés
Luftkanal verborgen montiert
Tipo a condotto nascosto
Modelo con conductos ocultos
Tipo com Conduto Embutido
Στπκμ υΰε εαζυηηΫθκυ αΰπΰκτ
Indoor Unit
Unité intérieure
Raumeinheit
Unità interna
Unidad interior
Unidade Interna
π λδεά ΜκθΪ α
RAS-M10GDCV-E
RAS-M13GDCV-E
RAS-M16GDCV-E
RAS-M10GDV-E
RAS-M13GDV-E
RAS-M16GDV-E
Outdoor Unit
Unité extérieure
Außeneinheit
Unità esterna
Unidad exterior
Unidade Externa
ιπ λδεά ΜκθΪ α
RAS-M14GACV-E
RAS-M18GACV-E
RAS-3M23GACV-E
RAS-4M27GACV-E
RAS-M14GAV-E
RAS-M18GAV-E
RAS-3M26GAV-E
RAS-4M27GAV-E
Advertisement
Table of Contents

Related Manuals for Toshiba RAS-M10GDCV-E


Summary of Contents for Toshiba RAS-M10GDCV-E
-
Page 1: Air Conditioner
Unità interna Unità esterna Unidad interior Unidad exterior Unidade Interna Unidade Externa π λδεά ΜκθΪ α ιπ λδεά ΜκθΪ α Cooling Only Model RAS-M10GDCV-E RAS-M14GACV-E RAS-M13GDCV-E RAS-M18GACV-E Modèle à froid seul RAS-M16GDCV-E RAS-3M23GACV-E Geräte nur zur Kühlung RAS-4M27GACV-E Modello solo per raffreddamento Modelo de refrigeración únicamente... -
Page 2: Table Of Contents
CONTENTS/SOMMAIRE ENGLISH ACCESSORIES................1 Thank you very much for purchasing TOSHIBA Air Conditioner. SAFETY PRECAUTIONS............... 1 Please read this owner’s manual carefully before using your Air PARTS NAME ................4 Conditioner. TEMPORARY OPERATION/VOLTAGE SETTING ......5 • Be sure to keep the “Owner’s manual” and “Installation manual”... - Page 3 INHALT/INDICE DEUTSCH ZUBEHÖR ..................1 Wir danken Ihnen, dass Sie sich für ein TOSHIBA Klimagerät SICHERHEITSVORKEHRUNGEN..........1 entschieden haben. TEILEBEZEICHNUNGEN .............. 4 Bitte lesen Sie, bevor Sie Ihr Klimagerät benutzen, diese MANUELLER BETRIEB/ SPANNUNGSEINSTELLUNG ....5 Betriebsanleitung sorgfältig. TEILEBEZEICHNUNG DER FERNBEDIENUNG......6 •...
- Page 4 PROBLEMAS Y CAUSAS (Relacionadas con el control remoto)..................22 PORTUGUÊS ACESSÓRIOS................1 Muito obrigado por adquirir um Condicionador de Ar TOSHIBA. PRECAUÇÕES PARA A SEGURANÇA ........1 Por favor, leia este Manual de Instalação atentamente, antes da NOME DAS PARTES ..............4 instalação do Condicionador de Ar.
- Page 5 ΛΛΗΝΙΚA ΠΑΡΕΛΚΟΜΕΝΑ................1 Σας ευχαριστούμε πολύ που προτιμήσατε για την αγορά σας ΠΡΟΦΥΛΑΞΕΙΣ ΑΣΦΑΛΕΙΑΣ ............1 ένα Κλιματιστικ TOSHIBA. ΟΝΟΜΑ ΤΜΗΜΑΤΩΝ..............4 Παρακαλούμε διαβάστε προσεχτικά τις οδηγίες χρήσης πριν ΠΡΟΣΩΡΙΝΗ ΛΕΙΤΟΥΡΓΙΑ / ΡΥΘΜΙΣΗ ΤΑΣΗΣ ......5 απ τη χρήση του Κλιματιστικού.
-
Page 7: Accessories
ACCESSORIES Remote controller Remote controller holder Batteries (two pcs.) SAFETY PRECAUTIONS This appliance is not intended for use by person (including children) with reduced physical, sensory or mental capabilities, or lack of experience and knowledge, unless they have been given supervision or instruction concerning use of the appliance by a person responsible for their safety. - Page 8 MOVEMENT AND REPAIR WARNINGS • Do not attempt to move or repair the unit by yourself. Do not disassemble the unit. As there is high voltage inside the unit, you may receive an electric shock. • Whenever the air conditioner needs repairs, request repairs from the dealer. If the air conditioner is repaired improperly it can cause an electric shock or fire.
- Page 9 • Remote control batteries - Insert with the polarity signs (+ and –) in the correction orientation. - Do not recharge. - Do not leave batteries in the remote control that have exceeded the recommended usage period displayed on the battery or that are used up.
-
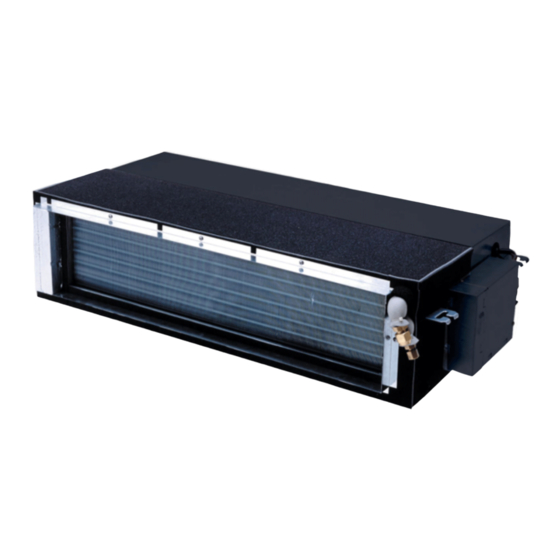
Page 10: Parts Name
PARTS NAME Supply chamber Connecting duct Indoor unit NOTE Parts marked with indicate the locally prepared parts. Supply air grille Air filter Return air grille Receiving section Transmitting section Outdoor unit Remote controller Air inlet (Side and rear) Pipes and electric wires Air outlet... -
Page 11: Temporary Operation/Voltage Setting
TEMPORARY OPERATION/VOLTAGE SETTING TEMPORARY switch (COOL, AUTO) When you can’t use the remote controller temporarily due to missing, etc., temporary operation can be performed on the switch panel. • Setting the TEMPORARY switch to “AUTO” starts the automatic operation, to “COOL” starts the cooling operation (fan speed: LOW), respectively. -
Page 12: Parts Name Of Remote Controller
PARTS NAME OF REMOTE CONTROLLER a START/STOP button CAUTION Push the button to start operation. (A receiving beep is heard.) • When pushing the “SWING”, “FIX” and “FILTER” buttons Push the button again to stop operation. Indoor unit does not operate and the receiving beep sound (A receiving beep is heard.) also not appear. -
Page 13: Names And Functions Of Indications On Remote Controller
NAMES AND FUNCTIONS OF INDICATIONS ON REMOTE CONTROLLER Display All indications, except for clock time indication, are indicated by pushing the START/STOP button. a Transmission mark This transmission mark indicates when the remote controller transmits signals to the indoor unit. b Mode display Indicates the current operation mode. -
Page 14: Preparation And Check Before Use
PREPARATION AND CHECK BEFORE USE Loading the remote controller batteries. a Remove the cover, and insert the batteries. • Slide off the cover while b Push the RESET button. pushing the sides. The clock display flashes. Adjust the clock. • Battery replacement Place back the cover. -
Page 15: Handling The Remote Controller
HANDLING THE REMOTE CONTROLLER CAUTION • The air conditioner will not operate if curtains, doors or other materials are blocking the signals sent from the remote controller to the indoor unit. • Prevent any liquid from falling into the remote controller. Do not spill juice, water or any kinds of liquids. -
Page 16: Automatic Operation
AUTOMATIC OPERATION When you set the air conditioner in AUTO mode, it will automatically select either cooling, heating, or fan only operation depending on the outdoor temperature. (Refer to page 16.) In addition, fan speed is automatically controlled. Start a AUTO button (AUTO) Push AUTO button to start the air conditioner. -
Page 17: Cooling/Heating/Fan Only Operation
COOLING/HEATING/FAN ONLY OPERATION Start a START/STOP button Push this button to start the air conditioner. b Mode select button (MODE) Select Cool , Heat , or Fan only . (For cooling only model) c Temperature button Set the desired temperature. When the air conditioner is in FAN ONLY operation, the temperature display is not indicated. -
Page 18: High Power Operation
HIGH POWER OPERATION High power (Hi POWER) • The High power (High power operation) mode automatically controls room temperature, operation mode so that the room is quickly cooled in summer and warmed in winter. (Refer to page 16.) Setting High power mode a Hi-POWER button Push the Hi-POWER button. - Page 19 Combined timer (Setting both ON and OFF timers simultaneously) OFF timer —> ON timer (Operation —> Stop —> Operation) This feature is useful when you want to stop the air conditioner after you go to sleep, and start it again in the morning when you wake up or you return home.
-
Page 20: Memory/Preset Operation
MEMORY/PRESET OPERATION Memorize the frequently used operation setting by the MEMO button for convenience. Start the air conditioner in the operation mode which you want the remote controller to memorize. Push the button as follows while the air conditioner is in operation. a MEMO button Push this button briefly to standby memorizing the setting. -
Page 21: Auto Restart Function
AUTO RESTART FUNCTION This unit is equipped with an Automatic restarting function which allows the unit to restart and resume the set operating conditions in the event of a supply power shutdown without the use of the remote controller. The operation will resume without warning three minutes after the power is restored. INFORMATION INFORMATION The AUTO RESTART FUNCTION is not set to work on shipment from the factory, and so it is necessary to set it to function as... -
Page 22: How The Air Conditioner Works
HOW THE AIR CONDITIONER WORKS Automatic operation As shown in Figures 1 and 2, Automatic Operation mode selects the operation based on the room temperature data (Ta) when operation begins. Heat pump models Cooling-only models Room temperature when operation begins or Room temperature when operation begins or when selected when selected again again... -
Page 23: Maintenance
HINTS FOR ECONOMICAL OPERATION Clean, please. Maintain room temperature at comfortable level Gee, chilly Clean air filters The clogged air filter impairs the performance of the air Control conditioner. Clean them once two weeks. Never open doors and windows more often than Use the timer necessary effectively. - Page 24 Cleaning of Return grille Preparation: 1. Turn off the air conditioner by the remote controller. 2. Dismount the Return grille. Clean the Return grilles with water: • Wipe down the Return grille with a sponge or towel moistened with a kitchen detergent. (Don’t use any metallic brush for cleaning.) •...
-
Page 25: Air Conditioner Operations And Performance
AIR CONDITIONER OPERATIONS AND PERFORMANCE 3-minutes protection function 3-minutes protection function prevents the air conditioner from starting for about 3 minutes just after the power main switch/circuit breaker is turned on for re-starting the air conditioner. Power failure Power failure during operation will stop the unit completely. •... -
Page 26: Installation
INSTALLATION DANGER Ask the dealer or a special store to install the air conditioner to a new place or move it to another place and to observe the following items. If the air conditioner is imperfectly installed by yourself, it may cause electric shock or fire. Don’t install the air conditioner in the following places •... - Page 27 Before you ask for servicing or repairs, check the following points. Inoperative • The power main switch is turned off. • The circuit breaker is activated to cut off power supply. • The main power fuse has blown out. • Stoppage of electric current. •...
-
Page 28: Troubles And Causes (Concerning Remote Controller)
TROUBLES AND CAUSES (Concerning Remote Controller) Before you ask for servicing or repairs, check the following points: Setting Change is Impossible. Symptoms Causes Description The fan speed can not be • Check whether the MODE indicated When the automatic mode is selected, changed. -
Page 29: Accessories
ACCESSORIES Télécommande Support de la télécommande Pile (deux) MESURES DE SECURITE Cet appareil n’est pas destiné à être utilisé par des personnes (y compris des enfants) à capacités physiques, sensorielles ou mentales réduites, ou manquant d’expérience et de connaissances, à moins qu’elles ne soient supervisées ou que des instructions concernant l’utilisation de l’appareil leur aient été... - Page 30 AVERTISSEMENTS CONCERNANT LE DEPLACEMENT ET LES REPARATIONS • N’essayez pas de déplacer ou de réparer l’appareil vous-même. Ne démontez pas l’appareil. Une haute tension se trouvant à l’intérieur de l’appareil, vous pourriez recevoir une décharge électrique. • Si le climatiseur doit être réparé, demandez au distributeur d’effectuer les réparations. Si le climatiseur n’est pas correctement réparé, il y a un risque de décharge électrique ou d’incendie.
- Page 31 • Piles de la télécommande - Insérez-les avec les signes de polarité (+ et –) dans le sens correct. - Ne les rechargez pas. - Ne laissez pas, dans la télécommande, des piles qui ont dépassé la durée d’utilisation recommandée indiquée sur celles-ci ou qui sont épuisées.
-
Page 32: Nom Des Pieces
NOM DES PIECES Chambre Conduit de raccordement d’alimentation Unité intérieure REMARQUE Les pièces marquées sont préparées sur place. Grille d’alimentation en air Filtre à air Grille de retour de l’air Partie réceptrice Partie émettrice Unité extérieure Télécommande Entrée de l’air (latérale et arrière) Tuyaux et fils électriques Sortie de l’air... -
Page 33: Fonctionnement Temporaire / Reglage De La Tension
FONCTIONNEMENT TEMPORAIRE / REGLAGE DE LA TENSION Interrupteur TEMPORAIRE (TEMPORARY (FROID (COOL), AUTOMATIQUE (AUTO)) Lorsque vous ne pouvez utiliser temporairement la télécommande parce que vous l’avez perdue ou autre, il est possible d’activer le fonctionnement temporaire sur le panneau de commande. •... -
Page 34: Nom Des Pieces De La Telecommande
NOM DES PIECES DE LA TELECOMMANDE a Touche MARCHE/ARRET (START/STOP) k Touche ECONOMIE (ECO) par minuterie Appuyez sur la touche pour mettre le climatiseur en Appuyez sur cette touche pour activer la fonction marche. ECONOMIE par minuterie (DESACTIVATION par (Vous entendrez un bip de réception.) minuterie). -
Page 35: Nom Et Fonctions Des Indications De La Telecommande
NOM ET FONCTIONS DES INDICATIONS DE LA TELECOMMANDE Affichage Toutes les indications, à l’exception de l’heure de l’horloge, s’affichent en appuyant sur la touche MARCHE / ARRET (START/STOP). a Signe de transmission Ce signe de transmission indique que la télécommande transmet les signaux à... -
Page 36: Preparation Et Verification Avant Utilisation
PREPARATION ET VERIFICATION AVANT UTILISATION Insertion des piles dans la télécommande a Retirez le couvercle et insérez les piles. • Faites coulisser le b Appuyez sur la touche REMISE A ZERO couvercle tout en (RESET). appuyant sur les côtés. L’affichage de l’horloge clignote. Réglez l’horloge. -
Page 37: Manipulation De La Telecommande
MANIPULATION DE LA TELECOMMANDE ATTENTION • Le climatiseur ne fonctionnera pas si des rideaux, des portes ou autres bloquent les signaux transmis à l’unité intérieure par la télécommande. • Evitez de faire tomber du liquide dans la télécommande. Ne renversez pas de jus, d’eau ou autres liquides. •... -
Page 38: Fonctionnement Automatique
FONCTIONNEMENT AUTOMATIQUE Lorsque vous réglez le climatiseur en mode AUTOMATIQUE, il sélectionnera automatiquement le refroidissement, le chauffage ou la ventilation seule en fonction de la température de la pièce. (Reportez-vous à la page 16.) En outre, la vitesse de ventilation est commandée automatiquement. Marche a Touche AUTOMATIQUE (AUTO) Appuyez sur la touche AUTOMATIQUE (AUTO) pour mettre le climatiseur en... -
Page 39: Refroidissement / Chauffage / Ventilation Seule
REFROIDISSEMENT / CHAUFFAGE / VENTILATION SEULE Marche a Touche MARCHE/ARRET (START/STOP) Appuyez sur cette touche pour mettre le climatiseur en marche. b Touche de sélection du mode (MODE) Sélectionnez Refroidissement , Chauffage , ou Ventilation seule (pour le modèle à froid seul). c Touche de réglage de la température Réglez la température désirée. -
Page 40: Fonctionnement A Haute Puissance
FONCTIONNEMENT A HAUTE PUISSANCE Haute puissance (Hi-POWER) • Le mode Haute puissance (fonctionnement à haute puissance) commande automatiquement la température de la pièce et le mode de fonctionnement de manière à ce que la pièce soit rapidement refroidie en été et chauffée en hiver. (Reportez-vous à... - Page 41 Minuterie combinée (Réglage simultané de l’ACTIVATION et de la DESACTIVATION par minuterie) DESACTIVATION par minuterie —> ACTIVATION par minuterie (Fonctionnement —> Arrêt —> Fonctionnement) Cette fonction est utile lorsque vous voulez que le climatiseur s’arrête après que vous êtes allé vous couché et qu’il se remette en marche lorsque vous vous réveillez le matin ou lorsque vous rentrez chez vous.
-
Page 42: Memorisation / Programmation
MEMORISATION / PROGRAMMATION Mémorisez les paramètres de fonctionnement fréquemment utilisés avec la touche MEMORISATION (MEMO) est avantageux. Mettez le climatiseur en marche dans le mode de fonctionnement que vous voulez que la télécommande mémorise. Appuyez sur la touche comme indiqué ci-après alors que le climatiseur est en fonction. a Touche MEMORISATION (MEMO) Appuyez brièvement sur cette touche dans l’attente de mémoriser les paramètres. -
Page 43: Fonction De Redemarrage Automatique
FONCTION DE REDEMARRAGE AUTOMATIQUE Cette unité est dotée d’une fonction de redémarrage automatique qui permet à l’unité de se remettre en marche et de rétablir les conditions de fonctionnement définies sans l’emploi de la télécommande en cas de coupure de courant. Elle recommencera à... -
Page 44: Comment Fonctionne Le Climatiseur
COMMENT FONCTIONNE LE CLIMATISEUR Fonctionnement automatique Comme indiqué sur les Figures 1 et 2, le mode de fonctionnement automatique sélectionne le fonctionnement sur la base des données de température de la pièce (Ta) lorsque le climatiseur se met en marche. Modèles pompe à... -
Page 45: Entretien
SUGGESTIONS CONCERNANT LE Nettoyez, s’il vous plaît. FONCTIONNEMENT ECONOMIQUE Mince, quel froid ! Maintenez la température de la pièce à un niveau confortable. Contrôlez Nettoyez les filtres à air. Les filtres à air encrassés réduisent les performances du climatiseur. Utilisez Nettoyez-les tous les quinze jours. - Page 46 Nettoyage de la grille de retour Préparation 1. Désactivez le climatiseur avec la télécommande. 2. Démontez la grille de retour. Nettoyez la grille de retour à l’eau. • Nettoyez la grille de retour avec une éponge ou un chiffon imbibé d’un détergent pour vaisselle. (N’utilisez pas de brosse métallique pour le nettoyage.) •...
-
Page 47: Fonctionnement Et Performances Du Climatiseur
FONCTIONNEMENT ET PERFORMANCES DU CLIMATISEUR Fonction de protection de 3 minutes La fonction de protection de 3 minutes empêche le démarrage du climatiseur pendant les 3 minutes qui suivent la mise sous tension de l’interrupteur général/du disjoncteur pour faire redémarrer le climatiseur. Coupure de courant Une coupure de courant arrêtera complètement l’unité... -
Page 48: Installation
INSTALLATION DANGER Demandez à votre revendeur ou à un magasin spécialisé d’installer le climatiseur ou de le réinstaller ailleurs et d’observer les points ci-après. Si vous installez vous-même le climatiseur de manière imparfaite, une électrocution ou un incendie peuvent avoir lieu. N’installez pas le climatiseur dans les endroits ci-après •... - Page 49 Avant de faire une demande d’entretien ou de réparation, vérifiez les points ci-après. Absence de fonctionnement • L’interrupteur général est hors tension. • Le disjoncteur est entré en fonction pour couper le courant. • Le fusible général a grillé. • Le courant a été coupé. •...
-
Page 50: Problemes Et Causes (Concernant La Télécommande)
PROBLEMES ET CAUSES (concernant la télécommande) Avant de faire une demande d’entretien ou de réparation, vérifiez les points ci-après. Il est impossible de modifier les paramètres. Symptômes Causes Raison et solution La vitesse de ventilation ne • Vérifiez si le MODE affiché Lorsque le mode automatique est peut être modifiée. -
Page 51: Zubehör
ZUBEHÖR Infrarot-Fernbedienung Halterung für Fernbedienung Batterie (zwei) SICHERHEITSVORKEHRUNGEN Das Gerät darf nicht von Personen mit eingeschränkten körperlichen, sensorischen oder geistigen Fähigkeiten verwendet werden. Es darf auch nicht von Personen (einschließlich Kindern) verwendet werden, die unzureichende Erfahrungen bzw. Kenntnisse im Umgang mit diesem Gerät haben, es sei denn die Bedienung erfolgt unter Aufsicht oder Anweisung einer Person, die für deren Sicherheit verantwortlich ist. - Page 52 WARNHINWEISE ZUM BEWEGEN UND REPARATUR DES GERÄTS • Versuchen Sie weder das Gerät zu bewegen, noch selbst zu reparieren. Zerlegen Sie dieses Gerät nicht eigenmächtig. Da im Inneren des Geräts eine hohe Spannung anliegt, besteht die Gefahr eines elektrischen Schlags. •...
- Page 53 • Batterien für die Fernbedienung - Batterien unter Beachtung der Polaritätskennzeichen (+ und –) in der richtigen Lage einlegen. - Batterien nicht wiederaufladen. - Batterien, deren empfohlene Verwendungsdauer (Datum auf der Batterie) überschritten wurde oder die erschöpft sind, nicht in der Fernbedienung lassen.
-
Page 54: Teilebezeichnungen
TEILEBEZEICHNUNGEN Zuluftkammer Lüftungsleitung Raumeinheit HINWEIS Teile, die mit markiert sind, müssen bauseits bereitgestellt werden. Zuluftgitter Luftfilter Umluftgitter Infrarot-Empfänger Infrarot-Sender Außengerät Infrarot-Fernbedienung Lufteinlass (seitlich und hinten) Rohre und Kabel Abluftöffnung... -
Page 55: Manueller Betrieb/ Spannungseinstellung
MANUELLER BETRIEB/ SPANNUNGSEINSTELLUNG MANUELLER WAHLSCHALTER KÜHLEN/AUTO (TEMPORARY (COOL, AUTO)) Steht Ihnen die Fernbedienung nicht zur Verfügung oder ist sie defekt, können Sie die gewünschte Betriebsart manuell auf der Schalttafel auswählen. • Schalten Sie den Wahlschalter (TEMPORARY) auf “AUTO”, arbeitet das Gerät im Automatikmodus, schalten Sie ihn auf “KÜHLEN” (COOL), beginnt das Gerät die Zuluft zu kühlen (Umdrehungsgeschwindigkeit des Ventilators: NIEDRIG (LOW)). -
Page 56: Teilebezeichnung Der Fernbedienung
TEILEBEZEICHNUNG DER FERNBEDIENUNG a START/STOP - Taste l Voreinstellungen (PRESET) - Taste Drücken Sie die Taste, um das Gerät in Betrieb zu Drücken Sie diese Taste, um eine Voreinstellung, die Sie nehmen. mit der MEMO - Taste aufgerufen haben, zu übernehmen. m Zeiteinstellung (TIMER) - Taste (Sie hören einen Bestätigungston.) Drücken Sie die Taste noch einmal, um das Gerät... -
Page 57: Bezeichnungen Und Funktionen Auf Der Fernbedienungs-Anzeige
BEZEICHNUNGEN UND FUNKTIONEN AUF DER FERNBEDIENUNGS-ANZEIGE Anzeige Alle Anzeigen, mit Ausnahme der Uhrzeit, werden durch Drücken der START/STOP - Taste aufgerufen. a Sendesymbol Das Sendesymbol wird angezeigt, wenn die Fernbedienung mit der Raumeinheit kommuniziert. b Betriebsart Hier wird die momentane Betriebsart angezeigt. (AUTO : Automatische Steuerung, A: Automatischer Wechsel, : Kühlen,... -
Page 58: Vorbereitungen Und Tests Vor Der Inbetriebnahme
VORBEREITUNGEN UND TESTS VOR DER INBETRIEBNAHME Einlegen der Batterien in die Fernbedienung: • Schieben Sie den Deckel a Nehmen Sie den Deckel ab und legen Sie die auf, indem Sie ihn seitlich Batterien ein. zusammendrücken. b Drücken Sie die RESET - Taste. Die Zeitanzeige blinkt. -
Page 59: Handhabung Der Fernbedienung
HANDHABUNG DER FERNBEDIENUNG VORSICHT • Das Klimagerät reagiert nicht, wenn Vorhänge, Türen oder andere Gegenstände die Signale der Fernbedienung zur Raumeinheit blockieren. • Achten Sie darauf, dass keine Flüssigkeit in die Fernbedienung eindringt. Schütten Sie keine Säfte, Wasser oder andere Flüssigkeiten über die Fernbedienung. •... -
Page 60: Automatischer Betrieb
AUTOMATISCHER BETRIEB Wurde das Klimagerät auf AUTO geschaltet, wählt es automatisch, abhängig von der Raumtemperatur, ob es kühlt, heizt oder nur lüftet (Ventilatorbetrieb). (Details finden Sie auf Seite 16.) Zusätzlich wird die Ventilatorgeschwindigkeit automatisch geregelt. Start a AUTO - Taste Drücken Sie die AUTO - Taste, um das Klimagerät zu starten. -
Page 61: Betriebsart Heizen / Kühlen / Nur Ventilator
BETRIEBSART HEIZEN / KÜHLEN / NUR VENTILATOR Start a START/STOP - Taste Drücken Sie diese Taste, um das Klimagerät zu starten. b Betriebsart (MODE) - Taste Wählen Sie Kühlen (COOL) , Heizen (HEAT) oder Ventilator (FAN) (Nur für Modell mit Kühlung) c Temperatur - Taste Stellen Sie die gewünschte Temperatur ein. -
Page 62: Höchleistungsbetrieb
HÖCHLEISTUNGSBETRIEB Hochleistungsbetrieb (HI-POWER) - Taste • Beim Hochleistungsbetrieb wird die Raumtemperatur automatisch geregelt, so dass Sie den Raum im Sommer schnell herunterkühlen und im Winter schnell heizen können. (Details finden Sie auf Seite 16.) Einstellen des Hochleistungsbetriebs a Hochleistungsbetrieb (HI-POWER) - Taste Drücken Sie die HI-POWER - Taste. - Page 63 Kombinierte Zeitvorgabe (EIN- (ON) und AUS - (OFF) Schaltzeit gleichzeitig einstellen) AUS (OFF) - Schaltzeit —> EIN (ON) - Schaltzeit (Betrieb —> Stopp —> Betrieb) Diese Funktion ist dann nützlich, wenn Sie beispielsweise das Klimagerät ausschalten wollen, wenn Sie zu Bett gehen und es wieder einschalten soll, wenn Sie morgens aufstehen, oder wenn Sie nach Hause kommen.
-
Page 64: Betriebsart Speicher/Voreinstellung
BETRIEBSART SPEICHER/VOREINSTELLUNG Wenn Sie die MEMO - Taste drücken, können Sie zu Ihrer Bequemlichkeit gespeicherte Einstellungen abrufen. Starten Sie das Klimagerät in der Betriebsart, die die Fernbedienung als Voreinstellung speichern soll. Drücken Sie, während das Klimagerät arbeitet, die Tasten, wie nachfolgend beschrieben. a MEMO Taste Drücken Sie kurz diese Taste, um die Voreinstellungen zu speichern. -
Page 65: Betriebsart Automatischer Neustart
BETRIEBSART AUTOMATISCHER NEUSTART Das Klimagerät ist mit einem automatischen Neustart ausgestattet. Wurde die Stromversorgung abgeschaltet, startet diese Funktion das Gerät in der Betriebsart, die vor dem Stromausfall eingestellt war, automatisch neu, ohne dass hierzu die Fernsteuerung verwendet werden muss. Der Betrieb wird ohne zusätzliche Meldung, drei Minuten nachdem der Strom wieder angeschaltet wurde, neu aufgenommen. INFORMATION Der AUTOMATISCHE NEUSTART wurde im Werk deaktiviert. -
Page 66: Arbeitsweise Des Klimageräts
ARBEITSWEISE DES KLIMAGERÄTS Automatischer Betrieb Wie in den Abbildungen 1 und 2 dargestellt, wird im Automatikbetrieb anhand der Temperaturdaten im Raum (Ta) bei Betriebsbeginn die entsprechende Betriebsart ausgewählt. Modelle mit Wärmepumpe Modelle nur für den Kühlbetrieb Raumtemperatur bei Betriebsbeginn oder Raumtemperatur bei Betriebsbeginn oder nach neuer nach neuer Temperaturwahl Temperaturwahl... -
Page 67: Wartung
HINWEISE ZUM WIRTSCHAFTLICHEN Bitte säubern. BETRIEB DES KLIMAGERÄTS Huch, kühl hier! Regelt Sie die Raumtemperatur auf ein angenehmes Niveau Regeln Säubern Sie die Luftfilter regelmäßig Durch verstopfte Filter sinkt die Leistung des Klimageräts. Reinigen Sie die Filter einmal in zwei Wochen. Verwenden Sie die Zeitvorgaben vernünftig. - Page 68 Reinigung des Umluftgitters Vorbereitung: 1. Schalten Sie das Klimagerät mit der Fernbedienung ab. 2. Demontieren Sie das Umluftgitter. Reinigen Sie das Gitter mit Wasser: • Wischen Sie das Umluftgitter mit einem Schwamm oder angefeuchteten Tuch mit einem Haushaltsreiniger ab. (Verwenden Sie zur Reinigung keine Metallbürste.) •...
-
Page 69: Funktionen Und Leistung Des Klimageräts
FUNKTIONEN UND LEISTUNG DES KLIMAGERÄTS 3-Minuten Schutzfunktion Die 3-Minuten Schutzfunktion verhindert, dass das Klimagerät nach dem Einschalten der Stromversorgung sofort startet. Der Neustart erfolgt mit einer Verzögerung von 3 Minuten. Stromausfall Bei einem Stromausfall schaltet das Klimagerät vollkommen ab. • Liegt die Stromversorgung wieder an, blinkt die Betriebsleuchte der Raumeinheit mit einer Frequenz von 1 Hz. •... -
Page 70: Installation
INSTALLATION GEFAHR Fragen Sie Ihren Fachhändler oder einen Installationsbetrieb, wenn Sie das Klimagerät installieren oder an einem anderen Platz montieren möchten, und beachten Sie folgende Punkte. Wurde das Klimagerät von Ihnen nicht fachgerecht installiert, kann dies zu einem Stromschlag führen oder ein Feuer kann die Folge sein. - Page 71 Bevor Sie jemanden zur Wartung oder Reparatur bestellen, prüfen Sie folgende Punkte: Arbeitet nicht • Der Hauptschalter ist abgeschaltet. • Die Sicherung ist herausgesprungen und hat so die Stromzufuhr unterbrochen. • Die Hauptsicherung ist durchgebrannt. • Stromausfall. • Die Batterien der Fernbedienung sind verbraucht. •...
-
Page 72: Störungen Und Ihre Ursachen (Fernbedienung)
STÖRUNGEN UND IHRE URSACHEN (Fernbedienung) Prüfen Sie die folgenden Punkte, bevor Sie jemanden zur Wartung oder Reparatur bestellen: Änderungen der Einstellungen sind nicht möglich. Symptome Ursachen Gründe und Beseitigung Die Ventilatorgeschwindigkeit • Überprüfen Sie, ob auf dem Display Wurde die Betriebsart AUTO gewählt, kann nicht geändert werden. -
Page 73: Accessori
ACCESSORI Telecomando Supporto del telecomando Batteria (due) PRECAUZIONI PER LA SICUREZZA Questo apparecchio non è progettato per essere utilizzato da persone (inclusi i bambini) con capacità fisiche, sensoriali o mentali ridotte, o con mancanza di esperienza e conoscenza, se non viene fornita la supervisione o l’insegnamento riguardo l’uso dell’apparecchio da una persona responsabile della loro sicurezza. - Page 74 AVVERTENZE RELATIVE ALLA MOVIMENTAZIONE E ALLA RIPARAZIONE • Non tentare di spostare o riparare l’unità per conto proprio. Non smontare l’unità. All’interno all’unità viene utilizzata alta tensione, e l’utente corre il rischio di scosse elettriche. • Ogniqualvolta il condizionatore d’aria necessiti di una riparazione, richiedere l’intervento al rivenditore.
- Page 75 • Non collocare oggetti intorno all’unità esterna e mantenerla pulita dalle foglie secche. Qualora delle foglie secche e altri oggetti si raccolgano intorno all’unità esterna, dei piccoli animali potrebbero essere attirati, penetrare all’interno dell’unità e toccarne i componenti elettrici. Questo potrebbe provocare un guasto dell’unità o un incendio. •...
-
Page 76: Nome Delle Parti
NOME DELLE PARTI Camera di Condotto di collegamento approvvigionamento Unità interna NOTA Le parti contrassegnate con sono parti a fornitura locale. Griglia di Filtro dell’aria approvvigionamento d’aria Griglia di ritorno Sezione ricevente Sezione trasmittente Unità esterna Telecomando Ingresso dell’aria (laterale e posteriore) Tubi e fili elettrici Uscita dell’aria... -
Page 77: Operazioni Temporanee / Impostazione Della Tensione
OPERAZIONI TEMPORANEE / IMPOSTAZIONE DELLA TENSIONE Commutatore TEMPORARY (COOL, AUTO) Quando temporaneamente non è possibile usare il telecomando perché è mancante, ecc., è possibile eseguire operazioni temporanee a partire dal pannello dei commutatori. • Impostando il commutatore TEMPORARY su “AUTO”, si avvia il funzionamento automatico, impostandolo su “COOL” si avvia il funzionamento di raffreddamento (velocità... -
Page 78: Nome Delle Parti Del Telecomando
NOME DELLE PARTI DEL TELECOMANDO a Tasto START/STOP l Tasto PRESET (PREIMPOSTAZIONE) Premere questo tasto per avviare il funzionamento. Premere questo tasto per usare il condizionatore d’aria in (Viene emesso un segnale acustico di conferma). base alle impostazioni memorizzate tramite il tasto MEMO. m TastoTIMER Premere di nuovo questo tasto per arrestare il funzionamento. -
Page 79: Nome E Funzione Delle Indicazioni Visualizzate Sul Telecomando
NOME E FUNZIONE DELLE INDICAZIONI VISUALIZZATE SUL TELECOMANDO Display Tutte le indicazioni, tranne l’indicazione dell’ora dell’orologio, vengono visualizzate premendo il tasto START/STOP. a Simbolo di trasmissione Il simbolo di trasmissione serve per indicare il momento in cui il telecomando trasmette segnali all’unità interna. b Visualizzazione della modalità... -
Page 80: Preparazione E Controllo Prima Dell'uso
PREPARAZIONE E CONTROLLO PRIMA DELL’USO Inserimento delle batterie del telecomando. • Far scivolare via il a Rimuovere il coperchio e inserire le batterie. coperchio spingendone b Premere il tasto RESET. i lati. Il display dell’orologio lampeggia. Regolare l’orologio. • Sostituzione delle Rimettere a posto il coperchio. -
Page 81: Uso Del Telecomando
USO DEL TELECOMANDO AVVERTENZA • Il condizionatore d’aria non funziona se tende, porte o altro materiale bloccano i segnali inviati dal telecomando all’unità interna. • Impedire che sul telecomando cada del liquido. Non versarvi succo, acqua o qualsiasi altro tipo di liquido. •... -
Page 82: Funzionamento Automatico
FUNZIONAMENTO AUTOMATICO Quando si imposta il condizionatore d’aria in modalità AUTO, esso seleziona automaticamente il funzionamento di raffreddamento, riscaldamento o con la sola ventola, in base alla temperatura esterna. (Consultare pagina 16). Inoltre, viene controllata automaticamente la velocità di ventilazione. Avvio a Tasto AUTOMATICO (AUTO) Premere il tasto AUTO per avviare il condizionatore d’aria. -
Page 83: Raffreddamento / Riscaldamento / Funzionamento Con Sola Ventola
RAFFREDDAMENTO / RISCALDAMENTO / FUNZIONAMENTO CON SOLA VENTOLA Avvio a Tasto START/STOP Premere questo tasto per avviare il condizionatore d’aria. b Tasto di selezione della modalità (MODE) Selezionare Raffreddamento , Riscaldamento o Solo ventola . (Per il modello con solo raffreddamento) c Tasto temperatura Impostare la temperatura desiderata. -
Page 84: Funzionamento Ad Alta Potenza
FUNZIONAMENTO AD ALTA POTENZA Alta potenza (Hi POWER) • La modalità Alta potenza (funzionamento ad alta potenza) controlla automaticamente la temperatura della stanza e la modalità di funzionamento, in modo che la stanza venga raffreddata rapidamente in estate e riscaldata rapidamente in inverno. - Page 85 Timer combinato (Impostazione simultanea del timer ON e del timer OFF) Timer OFF —> Timer ON (Funzionamento —> Arresto —> Funzionamento) Questa funzione è utile quando si desidera arrestare il condizionatore d’aria dopo essere andati a dormire e poi riavviarlo al mattino quando ci si risveglia o quando si torna a casa.
-
Page 86: Memoria / Funzionamento Preimpostato
MEMORIA / FUNZIONAMENTO PREIMPOSTATO Memorizzare per convenienza, tramite il tasto MEMO, le impostazioni di funzionamento usate di frequente. Avviare il condizionatore d’aria nella modalità di funzionamento che si desidera venga memorizzata dal telecomando. Mentre il condizionatore d’aria è in funzione, premere il tasto indicato di seguito. a Tasto MEMO Premere questo tasto brevemente per mettere in attesa la memorizzazione delle impostazioni. -
Page 87: Funzione Di Riavvio Automatico
FUNZIONE DI RIAVVIO AUTOMATICO Questa unità è dotata di una funzione di riavvio automatico che consente il riavvio e la ripresa delle condizioni di funzionamento impostate dell’unità, senza il telecomando, nel caso di un’interruzione di corrente. Tre minuti dopo il ripristino dell’alimentazione, viene ripreso il funzionamento senza avvertenza. INFORMATION INFORMAZIONI La FUNZIONE AUTO RESTART (RIAVVIO AUTOMATICO) non è... -
Page 88: Come Funziona Il Condizionatore D'aria
COME FUNZIONA IL CONDIZIONATORE D’ARIA Funzionamento automatico Come mostrato nelle Figure 1 e 2, la modalità di Funzionamento Automatico seleziona le operazioni in base ai dati sulla temperatura dell’ambiente (Ta) all’inizio del funzionamento. Modelli a pompa di calore Modelli di solo raffreddamento Temperatura ambiente all’inizio del Temperatura ambiente all’inizio del funzionamento o a una nuova selezione... -
Page 89: Manutenzione
SUGGERIMENTI PER UN Pulire. FUNZIONAMENTO ECONOMICO Molto freddo Mantenere la temperatura della stanza a un livello Controllo confortevole Pulire i filtri dell’aria. Il filtro dell’aria intasato diminuisce le prestazioni del condizionatore d’aria. Pulire i filtri una volta ogni due Usare il timer in modo efficiente. - Page 90 Pulizia della griglia di ritorno Preparazione: 1. Spegnere il condizionatore d’aria tramite il telecomando. 2. Smontare la griglia di ritorno. Pulire la griglia di ritorno con acqua. • Pulire la griglia di ritorno con una spugna o un asciugamano imbevuti di detergente da cucina. (Per la pulizia, non usare nessuna spazzola metallica).
-
Page 91: Operazioni E Prestazioni Del Condizionatore D'aria
OPERAZIONI E PRESTAZIONI DEL CONDIZIONATORE D’ARIA Funzione di protezione a 3 minuti La funzione di protezione a 3 minuti impedisce che il condizionatore d’aria si avvii per circa 3 minuti subito dopo che si accende l’interruttore principale di alimentazione/l’interruttore del circuito per riavviare il condizionatore stesso. Interruzione di corrente Un’interruzione di corrente durante il funzionamento arresta l’unit. -
Page 92: Installazione
INSTALLAZIONE PERICOLO Chiedere al rivenditore o a un negoziante specializzato di installare il condizionatore d’aria in un nuovo luogo o di spostarlo in un altro luogo e di osservare quanto indicato di seguito. Se il condizionatore d’aria viene installato direttamente dall’utente in modo non corretto, può causare folgorazioni o incendi. Non installare il condizionatore d’aria nei luoghi seguenti •... - Page 93 Prima di richiedere assistenza o riparazione, controllare i punti seguenti. Non funzionante • L’interruttore principale di alimentazione è spento. • L’interruttore del circuito viene attivato per interrompere l’alimentazione. • Il fusibile dell’alimentazione principale è saltato. • Interruzione della corrente elettrica. •...
-
Page 94: Problemi E Cause (Riguardanti Il Telecomando)
PROBLEMI E CAUSE (Riguardanti il telecomando) Prima di richiedere assistenza o riparazioni, controllare i punti seguenti: È impossibile modificare l’impostazione. Sintomi Cause Motivo e rimedio È impossibile modificare la • Controllare se la modalità indicata sul Quando si seleziona la modalità velocità... -
Page 95: Accesorios
ACCESORIOS Control remoto Soporte del control remoto Baterías (dos) PRECAUCIONES SOBRE SEGURIDAD Este aparato no está destinado a ser utilizado por personas (mayores o menores) con capacidades físicas, sensoriales o mentales reducidas, o que carezcan de la suficiente experiencia y conocimiento, a no ser que reciban supervisión o capacitación sobre el manejo del aparato por parte de una persona responsable de su seguridad. - Page 96 ADVERTENCIAS SOBRE EL MOVIMIENTO Y LA REPARACIÓN • No intente mover ni reparar usted la unidad. No desarme la unidad. Debido a que dentro de la unidad hay alta tensión, podría recibir una descarga eléctrica. • Siempre que sea necesario reparar el acondicionador de aire, pida al distribuidor que lo haga. Si el acondicionador de aire no es reparado correctamente, podrá...
- Page 97 • Pilas del mando a distancia - Insértelas con los signos de polaridad (+ y –) orientados correctamente. - No las recargue. - No deje en el mando a distancia pilas que hayan excedido el periodo de utilización recomendado mostrado en las pilas o que estén agotadas.
-
Page 98: Nombre De Los Componentes
NOMBRE DE LOS COMPONENTES Cámara de suministro Conducto de conexión Unidad interior NOTA Los componentes marcados con son los componentes preparados localmente. Rejilla del aire de suministro Filtro de aire Rejilla de retorno Área receptora Área transmisora Unidad exterior Control remoto Entrada de aire (lateral y posterior) Tubos y cables eléctricos... -
Page 99: Funcionamiento Temporal/Ajuste Del Voltaje
FUNCIONAMIENTO TEMPORAL/AJUSTE DEL VOLTAJE Interruptor TEMPORAL (TEMPORARY) (REFRIGERACIÓN (COOL), AUTO) Si no puede utilizar el control remoto temporalmente porque no lo localiza, etc., puede activar un funcionamiento temporal en el panel de mandos. • Si ajusta el interruptor TEMPORAL (TEMPORARY) a AUTO se inicia el funcionamiento automático, si se ajusta a REFRIGERACIÓN (COOL) se inicia el funcionamiento de refrigeración (velocidad del ventilador: BAJO (LOW)). -
Page 100: Descripción De Los Botones Del Control Remoto
DESCRIPCIÓN DE LOS BOTONES DEL CONTROL REMOTO a Botón INICIO/PARADA (START/STOP) m Botón TEMPORIZADOR (TIMER) Pulse el botón para iniciar el funcionamiento. Utilice este botón para cambiar la hora del reloj, del (Se oirá un pitido de confirmación). temporizador de conexión y de desconexión. Pulse el botón de nuevo para detener el funcionamiento. -
Page 101: Nombre Y Funciones De Los Indicadores Del Control Remoto
NOMBRE Y FUNCIONES DE LOS INDICADORES DEL CONTROL REMOTO Pantalla Todos los indicadores, excepto el indicador de hora del reloj, se visualizan en pantalla pulsando el botón INICIO/ PARADA (START/STOP). a Marca de transmisión Esta marca de transmisión indica cuándo el control remoto transmite señales a la unidad interior. -
Page 102: Preparación Y Prueba Antes Del Uso
PREPARACIÓN Y PRUEBA ANTES DEL USO Cargar las baterías del control remoto. • Deslice la cubierta hacia a Retire la cubierta e introduzca las baterías. fuera mientras presiona b Pulse el botón RESTABLECER (RESET). ambos laterales. La pantalla del reloj parpadea. Ajuste el reloj. -
Page 103: Uso Del Control Remoto
USO DEL CONTROL REMOTO PRECAUCIÓN • El aparato de aire acondicionado no funcionará si hay cortinas, puertas u otros objetos bloqueando la señal enviada desde el control remoto a la unidad interior. • Evite que caiga líquido en el interior del control remoto. No derrame zumo, agua u otro tipo de líquido sobre él. -
Page 104: Funcionamiento Automático (Cambio Automático)
FUNCIONAMIENTO AUTOMÁTICO Cuando se ajusta el aparato de aire acondicionado al modo AUTO, éste selecciona automáticamente el funcionamiento de refrigeración, calefacción o sólo ventilador dependiendo de la temperatura exterior. (Consulte la página 16). Asimismo, la velocidad del ventilador se controla automáticamente. Inicio a Botón AUTO (AUTO) Pulse el botón AUTO para activar el acondicionador de aire. -
Page 105: Funcionamiento De Refrigeración/Calefacción/ Sólo Ventilador
FUNCIONAMIENTO DE REFRIGERACIÓN/CALEFACCIÓN/ SÓLO VENTILADOR Inicio a Botón INICIO/PARADA (START/STOP) Pulse este botón para activar el aparato de aire acondicionado. b Selector de modo (MODO/MODE) Seleccione Refrigeración (Cool), Calefacción (Heat) o Sólo ventilador (Fan only). (Para el modelo de sólo refrigeración) c Botón de temperatura Ajuste la temperatura deseada. -
Page 106: Funcionamiento Con Potencia Elevada
FUNCIONAMIENTO CON POTENCIA ELEVADA Potencia elevada (Hi POWER) • El modo de Potencia elevada (funcionamiento con potencia elevada) controla automáticamente la temperatura de la habitación y el modo de funcionamiento para que la habitación se refrigere rápidamente en verano y se caliente en invierno. (Consulte la página 16). - Page 107 Temporizador combinado (ajustar los dos temporizadores de CONEXIÓN y DESCONEXIÓN simultáneamente) Temporizador de DESCONEXIÓN —> Temporizador de CONEXIÓN (Funcionamiento —> Parada —> Funcionamiento) Esta característica es útil cuando desea que el aparato de aire acondicionado se apague después de irse a dormir y se encienda de nuevo por la mañana cuando se levanta o cuando regresa a casa.
-
Page 108: Memoria/Funcionamiento Preseleccionado
MEMORIA/FUNCIONAMIENTO PRESELECCIONADO Memorice un ajuste de funcionamiento que utiliza con frecuencia mediante el botón MEMO para una mayor comodidad. Ponga en marcha el aparato de aire acondicionado en el modo de funcionamiento que desea que memorice el control remoto. Pulse el botón siguiendo las instrucciones mientras el aparato de aire acondicionado está en funcionamiento. a Botón MEMO Pulse este botón brevemente para memorizar el ajuste. -
Page 109: Función De Reinicio Automático
FUNCIÓN DE REINICIO AUTOMÁTICO Esta unidad está equipada con una función de reinicio automático que permite que la unidad se reinicie y reanude las condiciones de funcionamiento definidas en el caso de un corte del suministro eléctrico sin necesidad de utilizar el control remoto. El funcionamiento se reanudará... -
Page 110: Cómo Funciona El Aparato De Aire Acondicionado
CÓMO FUNCIONA EL APARATO DE AIRE ACONDICIONADO Funcionamiento automático Como se muestra en las Figuras 1 y 2, el modo de operación automática seleccionará la operación basándose en los datos de la temperatura de la habitación (Ta) cuando comience la operación. Modelos con bomba de calor Modelos con sólo enfriamiento Temperatura de la habitación cuando comienza... -
Page 111: Mantenimiento
SUGERENCIAS PARA UN FUNCIONA- Hay que limpiar. MIENTO ECONÓMICO Hace frío Mantenga la temperatura ambiente a un nivel agra- dable Control Limpie los filtros de aire Un filtro de aire obstruido impide un buen rendimiento del aparato de aire acondicionado. Utilice el Límpielos una vez cada dos semanas. - Page 112 Limpieza de la rejilla de retorno Preparación: 1. Apague el aparato de aire acondicionado con el control remoto. 2. Desmonte la rejilla de retorno. Limpie las rejillas de retorno con agua: • Frote la rejilla de retorno con una esponja o toalla humedecida con un detergente de cocina. (No utilice ningún cepillo metálico para la limpieza).
-
Page 113: Funciones Y Rendimiento Del Aparato De Aire Acondicionado
FUNCIONES Y RENDIMIENTO DEL APARATO DE AIRE ACONDICIONADO Función de protección de 3 minutos La función de protección de 3 minutos evita que el aparato de aire acondicionado se ponga en marcha durante 3 minutos justo antes de que el interruptor de suministro eléctrico/magnetotérmico se active para reiniciar el aparato de aire acondicionado. Corte del suministro eléctrico Un corte del suministro eléctrico durante el funcionamiento detendrá... -
Page 114: Instalación
INSTALACIÓN PELIGR Solicite a su distribuidor o a un establecimiento especializado que instale el aparato de aire acondicionado en una nueva ubicación o que lo traslade a otra diferente y tenga en cuenta las siguientes consideraciones. Si usted mismo instala el aparato de aire acondicionado de manera incorrecta, podría producirse una descarga eléctrica o incendio. - Page 115 Antes de solicitar una revisión o reparación, revise los siguientes puntos. Inoperativo • El interruptor de suministro eléctrico está desconectado. • El magnetotérmico se ha disparado para cortar el suministro eléctrico. • El fusible del suministro eléctrico se ha fundido. •...
-
Page 116: Problemas Y Causas (Relacionadas Con El Control Remoto)
PROBLEMAS Y CAUSAS (Relacionadas con el control remoto) Antes de solicitar una revisión o reparación, compruebe los siguientes puntos: No se puede cambiar el ajuste. Síntomas Causas Motivo y posición La velocidad del ventilador no • Compruebe si el MODO indicado en Cuando se selecciona el modo puede modificarse. -
Page 117: Acessórios
ACESSÓRIOS Sensor do controle remoto Suporte do controle remoto Baterias (duas) PRECAUÇÕES PARA A SEGURANÇA Este aparelho não se destina a ser utilizado por pessoas (incluindo crianças) com diminuições, físicas, mentais ou sensoriais ou sem experiência e conhecimentos, para o efeito, excepto no caso de lhes serem dadas instruções relativas à utilização do aparelho ou serem supervisionadas por uma pessoa responsável pela sua segurança. - Page 118 AVISOS ACERCA DA MUDANÇA E REPARAÇÃO • Não mova nem repare a unidade por iniciativa própria. Não desmonte a unidade. Como existe elevada tensão dentro da unidade, pode receber um choque eléctrico. • Sempre que o ar condicionado necessitar de reparação, solicite as reparações ao revendedor. Se o ar condicionado não for correctamente reparado, pode provocar um choque eléctrico ou incêndio.
- Page 119 • Pilhas do telecomando - Introduza as pilhas com os sinais de polaridade (+ e –) na direcção correcta. - Não as recarregue. - Se as pilhas estiverem gastas ou já tiverem ultrapassado o período de utilização recomendado indicado na pilha não as deixe dentro do telecomando.
-
Page 120: Nome Das Partes
NOME DAS PARTES Câmara de Conduto de ligação alimentação Unidade interna OBSERVAÇÃO As partes marcadas com indicam as partes preparadas no local. Grade do ar de alimentação Filtro de ar Grade de retorno Seção de recebimento Seção de transmissão Unidade Externa Sensor do controle remoto Entrada de ar (Lateral e... -
Page 121: Operação Temporária/Ajuste De Voltagem
OPERAÇÃO TEMPORÁRIA/AJUSTE DE VOLTAGEM Interruptor TEMPORÁRIO (TEMPORARY) (FRIO, AUTOMÁTICO) Quando você pode't usar o controle remoto temporariamente devido a faltas, etc., a operação temporária pode ser realizada no painel de comando. • Ajuste o interruptor TEMPORÁRIO (TEMPORARY) para “iniciar de modo AUTOMÁTICO” a operação automática, para “FRIO” para iniciar a operação de refrigeração (Velocidade do ventilador: BAIXA), respectivamente. -
Page 122: Nomes Das Partes Do Controle Remoto
NOMES DAS PARTES DO CONTROLE REMOTO a Botão INICIAR/PARAR (START/STOP) m Botão REGULADOR (TIMER) Pressione o botão para iniciar a operação. Use este botão para mudar as horas do relógio, LIGAR (Será ouvido um bip de recepção.) regulador e DESLIGAR regulador. Pressione novamente o botão para parar a operação. -
Page 123: Nome E Funções Das Indicações No Controle Remoto
NOME E FUNÇÕES DAS INDICAÇÕES NO CONTROLE REMOTO Visualização Todas as indicações, exceto a indicação da hora do relógio, são indicadas pressionando o botão INICIAR/PARAR (START/ STOP). a Sinal de transmissão Este sinal de transmissão indica quando o controle remotor transmite os sinais para a unidade interna. b Visualização do modo Indica o modo de operação atual. -
Page 124: Preparação E Verificação Antes Do Uso
PREPARAÇÃO E VERIFICAÇÃO ANTES DO USO Coloque as baterias do controle remoto. a Retire a tampa e coloque as baterias. • Deslize a tampa b Pressione o botão REINICIALIZAR enquanto pressiona os (RESET). lados. A visualização RELÓGIO (CLOCK) irá piscar. Ajuste o relógio. -
Page 125: Manuseio Do Controle Remoto
MANUSEIO DO CONTROLE REMOTO CUIDADO • O condicionador de ar não irá operar se cortinas, portas ou outros materiais estiverem bloqueando os sinais enviados do controle remoto para a unidade interna. • Evite que qualquer líquido entre no controle remoto. Não derrame sucos, água ou qualquer tipo de líquido. -
Page 126: Operação Automática
OPERAÇÃO AUTOMÁTICA Quando você ajusta o condicionador de ar no modo AUTOMÁTICO, automaticamente ele irá selecionar refrigeração, aquecimento ou apenas ventilador, dependendo da temperatura externa. (Consultar a página 16.) E mais, a velocidade do ventilador é controlada automaticamente. Início de funcionamento a Botão AUTOMÁTICO (AUTO) Pressione o botão AUTOMÁTICO (AUTO) para iniciar o funcionamento do condicionador de ar. -
Page 127: Operação De Refrigeração / Aquecimento / Apenas Ventilador
OPERAÇÃO DE REFRIGERAÇÃO / AQUECIMENTO / APENAS VENTILADOR Início de funcionamento a Botão INÍCIO/PARADA (START/STOP) Pressione este botão para iniciar o funcionamento do condicionador de ar. b Botão de seleção de modo (MODE) Selecione Frio , Calor , ou apenas Ventilador . -
Page 128: Operação De Alta Potência
OPERAÇÃO DE ALTA POTÊNCIA Alta potência (Hi POWER) • O modo de alta potência (operação de alta potência) controla automaticamente a temperatura da sala, o modo de operação de modo que a sala é rapidamente esfriada no verão e aquecida no inverno. (Consultar a página 16.) Ajuste do modo de Alta potência a Botão de Alta POTÊNCIA (Hi-POWER) Pressione o botão de Alta POTÊNCIA (Hi-POWER). - Page 129 Regulador combinado (Ajusta ambos LIGAR e DESLIGAR reguladores simultaneamente) DESLIGAR regulador —> LIGAR regulador (Operação —> de parada —> Operação) Esta característica é útil para quando você deseja parar o condicionador de ar após ir dormir e para reiniciar novamente pela manhã quando acordar ou voltar para casa.
-
Page 130: Operação Memória / Pré-Ajuste
OPERAÇÃO MEMÓRIA / PRÉ-AJUSTE Memorize a operação usada freqüentemente, ajustando o botão MEMÓRIA (MEMO) de acordo com a conveniência. Inicie o funcionamento do condicionador de ar no modo da operação que deseja que o controle remoto memorize. Pressione o botão como descrito a seguir, enquanto o condicionador de ar estiver em operação. a Botão MEMÓRIA (MEMO) Pressione este botão brevemente para a memorização do ajuste em espera. -
Page 131: Função De Reinício Automático
FUNÇÃO DE REINÍCIO AUTOMÁTICO Esta unidade é equipada com a função de reinício Automático a qual permite a unidade reiniciar e retomar as condições da operação ajustada no caso de uma interrupção da força de alimentação, sem o uso do controle remoto. A operação será... -
Page 132: Como O Condicionar De Ar Funciona
COMO O CONDICIONAR DE AR FUNCIONA Operação automática O modo de operação automática selecciona a operação com base nos dados da temperatura ambiente (Ta) quando liga o ar condicionado como se mostra nas figuras 1 e 2. Modelos com bomba de calor Modelos só... -
Page 133: Manutenção
SUGESTÕES PARA UMA OPERAÇÃO Limpe, por favor. ECONÔMICA Gee, gélido Mantenha a temperatura da sala em um nível satisfatório Controle Limpe os filtros de ar O filtro de ar obstruído danifica o condicionador de ar. Limpe-os a cada duas semanas. Use o regulador eficientemente. - Page 134 Limpeza da grade de retorno Preparação: 1. Desligue o condicionador de ar com o controle remoto. 2. Desmonte a grade de Retorno. Limpe a grade de Retorno com água: • Limpar profundamente a grade de Retorno com uma esponja ou uma toalha umedecida com um detergente de cozinha. (Não use nenhuma escova metálica para limpeza.) •...
-
Page 135: Operações Do Condicionador De Ar Edesempenho
OPERAÇÕES DO CONDICIONADOR DE AR E DESEMPENHO Função de proteção de 3 minutos A função de proteção de 3 minutos evita que o condicionador de ar inicie o funcionamento por aproximadamente 3 minutos, logo depois que o interruptor de força principal/disjuntor é ligado para reiniciar o funcionamento do condicionador de ar. Falha de força A falha de força durante a operação irá... -
Page 136: Espaço Da Instalação
ESPAÇO DA INSTALAÇÃO PERIGO Pergunte ao representante ou em uma loja especial para instalar o condicionador de ar em um novo lugar ou mude-o para outro local e observe os itens seguintes. Se o condicionador de ar for instalado incorretamente por você mesmo, ele poderá provocar choques elétricos ou um incêndio. Não instale o condicionador de ar nos seguintes locais •... - Page 137 Antes de solicitar um serviço de manutenção ou de reparos, verifique os seguintes itens. Inativo • O interruptor principal de força está desligado. • O disjuntor é ativado para desligar a alimentação de força. • O fusível de força principal está queimado. •...
-
Page 138: Problemas E Causas (Relativos Ao Controle Remoto)
PROBLEMAS E CAUSAS (Relativos ao Controle Remoto) 1Antes de solicitar um serviço de manutenção ou de reparos, verifique os seguintes itens. A Mudança do Ajuste é Impossível. Sintomas Causas Motivo e Disposição A velocidade do ventilador não • Verifique se o MODO indicado na Quando é... - Page 139 Π Ρ ΛΚΟΜ Ν Σβζ ξ δλδ άλδκ Ϊ β βζ ξ δλδ βλέκυ Μπα αλέα ( τκ) ΠΡΟΦΤΛ Ξ Ι Φ Λ Ι υ ε υά αυ ά θ πλκκλέα αδ ΰδα ξλά β απσ Ϊ κηα ( υηπ λδζαηίαθκηΫθπθ παδ δυθ) η η δπηΫθ μ πηα δεΫμ, αδ γβ δεΫμ ά δαθκβ...
- Page 140 ΠΡΟ Ι ΟΠΟΙΗ Ι Μ Σ ΚΙΝΗΗ Κ Ι ΠΙΚ ΤΗ • Μβθ πδξ δλά θα η αεδθά κτ θα πδ ε υΪ β ηκθΪ α ησθκδ αμ. Μβθ απκ υθαληκζκΰ έ β ηκθΪ α. π δ ά υπΪλξ δ υοβζά Ϊ β κ...
- Page 141 ΰτλπ απσ αυ άθ. θ ηαα υ κτθ π ηΫθα φτζζα ά Ϊζζα αθ δε έη θα ΰτλπ απσ βθ ιπ λδεά ηκθΪ α, ηπκλ έ θα πζβ δΪ κυθ ηδελΪ αυα, θα ηπκυθ κ π λδεσ βμ ηκθΪ αμ εαδ θα αΰΰέικυθ α βζ ε λδεΪ ηΫλβ. υ σ ηπκλ έ θα πλκεαζΫ δ...
- Page 142 ΟΝΟΜ ΣΜΗΜ ΣΩΝ ΘΪζαηκμ λκφκ κ έαμ ΰπΰσμ τθ βμ π λδεά ηκθΪ α ΗΜ ΙΩΗ Σα ηάηα α πκυ έθαδ βη δπηΫθα η έθαδ ε έθα πκυ πλκηβγ τκθ αδ απσ βθ κπδεά αΰκλΪ. Γλέζδα παλκξάμ αΫλα ΓΦέζ λκ αΫλα Γλέζδα...
- Page 143 ΠΡΟΩΡΙΝΗ Λ ΙΣΟΤΡΓΙ / ΡΤΘΜΙΗ Σ Η δαεσπ βμ TEMPORARY (=ΠΡΟΩΡΙΝΗ) (COOL, AUTO) (=ΦΤΞΗ, ΤΣΟΜ ΣΗ) θ πλκ πλδθΪ θ ηπκλ έ θα ξλβ δηκπκδά κ βζ ξ δλδ άλδκ π δ ά θ κ ίλέ ε αδ, εζπ, ηπκλ έ θα...
- Page 144 ΟΝΟΜ Ι ΣΜΗΜ ΣΩΝ ΣΟΤ ΣΗΛ Υ ΙΡΙΣΗΡΙΟΤ a Κκυηπέ START/STOP ( ΚΚΙΝΗΗ/ Ι ΚΟΠΗ) l Κκυηπέ ΠΡΟΚ ΘΟΡΙΜΟΤ Πα ά κ εκυηπέ ΰδα θα ι εδθά δ β ζ δ κυλΰέα. Πα ά κ εκυηπέ αυ σ ΰδα θα ζ δ κυλΰά δ...
- Page 145 ΟΝΟΜ Κ Ι Λ ΙΣΟΤΡΓΙ ΣΩΝ Ν ΙΞ ΩΝ ΣΟΤ ΣΗΛ Υ ΙΡΙΣΗΡΙΟΤ Έθ διβ Όζ μ κδ θ έι δμ, ε σμ απσ αυ άθ βμ υλαμ, ηφαθέακθ αδ αφκτ πδΫ κ εκυηπέ START/STOP. a άηα επκηπάμ Σκ άηα επκηπάμ ηφαθέα...
- Page 146 ΠΡΟ ΣΟΙΜ Ι Κ Ι Λ ΓΥΟ ΠΡΙΝ ΠΟ ΣΗ ΥΡΗΗ ΣκπκγΫ β β ηπα αλδυθ κ βζ ξ δλδ άλδκ. • Σλαίάι κ εΪζυηηα φαδλΫ κ εαπΪεδ εαδ κπκγ ά δμ θυ πδΫα δμ πζ υλΫμ. ηπα αλέ μ. Πα...
- Page 147 Υ ΙΡΙΜΟ ΣΟΤ ΣΗΛ Υ ΙΡΙΣΗΡΙΟΤ ΠΡΟΟΥΗ • Σκ εζδηα δ δεσ γα ζ δ κυλΰά δ αθ εκυλ έθ μ, πσλ μ ά Ϊζζα υζδεΪ ηπκ έακυθ βθ απκ κζά πθ βηΪ πθ κυ βζ ξ δλδ βλέκυ πλκμ βθ π...
- Page 148 ΤΣΟΜ ΣΗ Λ ΙΣΟΤΡΓΙ Ό αθ λυγηέα κ εζδηα δ δεσ κθ λσπκ ζ δ κυλΰέαμ AUTO ( ΤΣΟΜ ΣΟ), αυ σ δαζΫΰ δ αυ σηα α οτιβ, γΫληαθ β ά ζ δ κυλΰέα ησθκ κυ αθ ηδ άλα αθΪζκΰα η βθ...
- Page 149 ΦΤΞΗ / Θ ΡΜ ΝΗ / Λ ΙΣΟΤΡΓΙ ΜΟΝΟ Ν ΜΙΣΗΡ εεέθβ β a Κκυηπέ START/STOP ( ΚΚΙΝΗΗ/ Ι ΚΟΠΗ) Πα ά κ εκυηπέ αυ σ ΰδα θα γ έ ζ δ κυλΰέα κ εζδηα δ δεσ. b Κκυηπέ πδζκΰάμ λσπκυ ζ δ κυλΰέαμ (MODE) δαζΫι...
- Page 150 Λ ΙΣΟΤΡΓΙ ΤΦΗΛΗ ΙΥΤΟ Τοβζά Ι ξτμ (Hi-POWER) • Ο λσπκμ ζ δ κυλΰέαμ High power (Λ δ κυλΰέα Τοβζάμ Ι ξτκμ) ζΫΰξ δ αυ σηα α β γ ληκελα έα κυ πηα έκυ, κθ λσπκ ζ δ κυλΰέαμ κτ πμ υ κ...
- Page 151 υθ υα ηΫθκμ ξλκθκ δαεσπ βμ (Ρτγηδ β εαδ πθ τκ ξλκθκ δαεκπ υθ ON εαδ OFF υΰξλσθπμ) Υλκθκ δαεσπ βμ OFF — > Xλκθκ δαεσπ βμ ON (ζ δ κυλΰέα — > δαεκπά — > Λ δ κυλΰέα) ζ δ κυλΰέα αυ ά έθαδ ξλά δηβ σ αθ γΫζ θα...
- Page 152 Λ ΙΣΟΤΡΓΙ ΜΝΗΜΗ / ΠΡΟΚ ΘΟΡΙΜΟΤ πκηθβηκθ τ β υξθΪ ξλβ δηκπκδκτη θβ λτγηδ β ζ δ κυλΰέαμ η κ εκυηπέ Μ ΜΟ (ΜΝ Μ ) ΰδα β δεά αμ δ υεσζυθ β. ΘΫ ζ δ κυλΰέα κ εζδηα δ δεσ σπκδκθ...
- Page 153 Λ ΙΣΟΤΡΓΙ ΤΣΟΜ ΣΗ Π Ν ΚΚΙΝΗΗ ηκθΪ α αυ ά έθαδ ικπζδ ηΫθβ η ζ δ κυλΰέα υ σηα βμ παθ εεέθβ βμ β κπκέα πδ λΫπ δ β ηκθΪ α θα παθα γ έ ζ δ κυλΰέα εαδ θα αθαε ά δ...
- Page 154 ΠΩ Λ ΙΣΟΤΡΓ Ι ΣΟ ΚΛΙΜ ΣΙΣΙΚΟ υ σηα β ζ δ κυλΰέα Όππμ φαέθ αδ δμ δεσθ μ 1 εαδ 2, β αυ σηα β γΫ β ζ δ κυλΰέαμ πδζΫΰ δ β ζ δ κυλΰέα η ίΪ β β γ ληκελα έα πηα έκυ (Ta) σ αθ αλξέα...
- Page 155 ΤΜ ΟΤΛ ΓΙ ΟΙΚΟΝΟΜΙΚΗ Λ ΙΣΟΤΡΓΙ Καγαλέ παλαεαζυ. δα βλ έ β γ ληκελα έα κυ πηα έκυ υξΪλδ κ Μπλ, ελτκ πέπ κ ζ ΰξκμ Καγαλέ α φέζ λα αΫλα Σα ηπκυεπηΫθα φέζ λα αΫλα ια γ θκτθ βθ απσ κ β κυ εζδηα...
- Page 156 Καγαλδ ησμ βμ ΰλέζδαμ παθαφκλΪμ Πλκ κδηα έα: 1. Κζ έ κ εζδηα δ δεσ η κ βζ ξ δλδ άλδκ. φαδλΫ β ΰλέζδα παθαφκλΪμ. Καγαλέ δμ ΰλέζδ μ παθαφκλΪμ η θ λσ. • εκυπέ βθ ΰλέζδα παθαφκλΪμ η Ϋθα φκυΰΰΪλδ ά ηδα π Ϋ...
- Page 157 Λ ΙΣΟΤΡΓΙ ΚΛΙΜ ΣΙΣΙΚΟΤ Κ Ι ΠΟ ΟΗ 3-ζ π β ζ δ κυλΰέα πλκ α έαμ 3-ζ π β ζ δ κυλΰέα πλκ α έαμ ηπκ έα δ κ εζδηα δ δεσ απσ κ θα ι εδθά δ ΰδα 3 ζ π Ϊ αφκτ θ λΰκπκδβγ έ κ ετλδκμ δαεσπ βμ δ...
- Page 158 ΓΚ Σ Σ Η ΚΙΝ ΤΝΟ π υγυθγ έ κθ αθ δπλσ ππκ ά δ δεσ εα Ϊ βηα ΰδα βθ ΰεα Ϊ α β κυ εζδηα δ δεκτ θΫκ ηΫλκμ ά β η αφκλΪ κυ Ϊζζκ ξυλκ εαδ βλ έ α...
- Page 159 Πλκ κτ αβ ά πδ ε υά ά πδ δσλγπ β, ζΫΰι α παλαεΪ π βη έα. ζ δ κυλΰ έ • Ο ετλδκμ δαεσπ βμ δ ξτκμ έθαδ εζ δ σμ. • Ο δαεσπ βμ ευεζυηα κμ Ϋξ δ θ λΰκπκδβγ έ ΰδα θα δαεσπ δ βθ παλκξά δ ξτκμ. ετλδα...
- Page 160 ΠΡΟ ΛΗΜ Σ Κ Ι ΙΣΙ (ξ δεΪ η κ Σβζ ξ δλδ άλδκ) Πλκ κτ αβ ά πδ ε υά ά πδ δσλγπ β, ζΫΰι α παλαεΪ π βη έα: τθα β β ζζαΰά Ρτγηδ βμ. υηπ υηα α έ...
- Page 164 (Name of the manufacturer) TOSHIBA CARRIER CORPORATION (Address, city, country) 336 Tadehara, Fuji-shi, Shizuoka-ken, 416-8521 Japan (Name of the Importer / Distributor in EU) Toshiba Carrier UK Ltd. (Address, city, country) Porsham Close, Belliver Industrial Estate, PLYMOUTH, Devon, PL6 7DB. United Kingdom E075003446-d...