Table of Contents
Advertisement
IMPORTANT SAFETY INFORMATION: Always read this manual first
before attempting to install or use this device. For your safety, always
comply with all warnings and safety instructions contained in this
manual to prevent personal injury or property damage.
To view the full line of Dimplex products, please visit
www.dimplex.com
Owner's Manual
Model
CX-WIFI
6700530100
7214350100R03
Advertisement
Table of Contents

Related Manuals for Dimplex CX-WIFI 6700530100


Summary of Contents for Dimplex CX-WIFI 6700530100
- Page 1 For your safety, always comply with all warnings and safety instructions contained in this manual to prevent personal injury or property damage. To view the full line of Dimplex products, please visit www.dimplex.com 7214350100R03...
-
Page 2: Table Of Contents
CAUTION: Procedures and techniques which, if not carefully followed, will result in damage to the equipment. WARNING: Procedures and techniques which, if not carefully followed, will expose the user to the risk of fire, serious injury, or death. www.dimplex.com... -
Page 3: Welcome & Congratulations
Welcome & Congratulations Thank you and congratulations for choosing to purchase a Multi-zone Wi-Fi Programmable CONNEX™ Controller from Dimplex. Please carefully read and save these instructions. CAUTION: Read all instructions and warnings carefully before starting installation. Failure to follow these instructions may result in a possible electric shock, fire hazard and will void the warranty. -
Page 4: Important Instructions
This device complies with Industry Canada licence-exempt RSS standard(s). Operation is subject to the following two conditions: (1) this device may not cause interference, and (2) this device www.dimplex.com... -
Page 5: Product Overview
Product Overview The CONNEX™ Wi-Fi Controller By having a wireless controller, is a Dimplex exclusive, allowing the components within a zone the user to operate the CON- do not have to be located in the Multi-zone controller and same area of the house, as with... - Page 6 ! NOTE: You do not need to have settings for all events. An event can be skipped by entering --:-- for the time entry. (Increase www.dimplex.com...
-
Page 7: Installation
4. Install the power cord to the 50 ft (15 m). unit in the provided USB con- nection. The Multi-zone Wi-Fi Control- ler can control multiple Dimplex 5. Route the wire in the track CONNEX heaters outside of Figure 1... - Page 8 3. Remove the support stand and installation, and replace the compartment cover from the compartment cover. unit. (Figure 1 & 2) ! NOTE: There is a plastic tab 4. Install the power cord to the www.dimplex.com...
- Page 9 Installation which is associated to a back-up battery to assist with the syn- chronization of the heaters. It is recommended that the tab remain in place until the time of synchro- nization. (Figure 3) 6. Using the Wall Mounting Bracket, mark and drill the holes for the wall anchors.
-
Page 10: Initial Setup
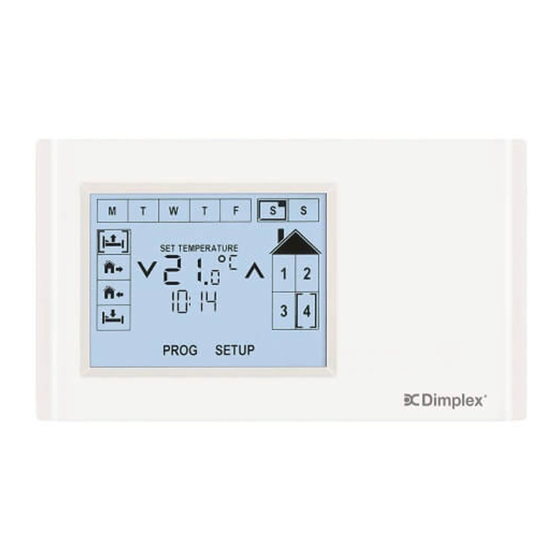
A. Day Icons I. Program Icon B. Event Icons J. Hold Icon C. Zone Icons K. Setup Icon D. Synchronization Icon L. Go Back Icon E. Low Battery Icon M. Temperature Display F. Lock Icon N. Time Display G. Check Icon www.dimplex.com... - Page 11 Initial Setup Once the App has been installed, 3. The default type of clock is the program will step through the a 12hr. The clock can be account setup, connection to the changed to a 24hr by press- local router with an active internet ing the icon.
- Page 12 The controller features CON- , a wireless technology 2. All four (4) zone icons will that works with Dimplex CON- begin to flash. enabled heaters to provide 3. Select the zone that the spe- simple whole home connectivity cific heater will be associated and comfort.
-
Page 13: Program Schedule Setup
Program Schedule Setup Program Setup "Quick Set" . The zone icons will begin to flash. The program function guides the ! NOTE: At any time, pressing user through the setup for each of the time settings (Wake, Away, icon will return to the previ- Home and Sleep), based on the ous step. -
Page 14: Factory Reset
Reset the controller back to the Factory settings. 1. Press and hold the icon for 10 seconds. 2. Follow the prompts to con- firm the day, time, and unit of measurement. www.dimplex.com... -
Page 15: General Functions
General Functions preference is adjusted, then the CAUTION: Always press the synchronization and lock func- icons with a blunt object. Sharp tions are no longer available until objects like pen and pencil points the changes have been accepted may damage the touch screen. or reset (the icon has been During regular operation you can... - Page 16 I.e. temperature setpoint display for 3 2:12pm will change to 14:12. seconds, and it will change to the As soon as any adjustment is www.dimplex.com...
- Page 17 The controller features CON- sequence and adjusting the set , a wireless technology point. that works with Dimplex CON- CAUTION: The adjusted enabled heaters to provide simple whole home connectivity heater will only retain the new set and comfort.
-
Page 18: Operation
Zone, press the corresponding 1. Temporary or icon to display the setting and 2. Indefinite set time. The setting will remain Temporary Temperature Changes displayed for 5 seconds, before If the temperature in a particular reverting back to the regular oper- www.dimplex.com... - Page 19 Operation zone or multiple zones needs to needed. be adjusted for the remainder of 5. Press the icon to save the the current event a Temporary changes and revert back to Temperature Change can be operation mode. done. ! NOTE: To exit the hold mode, 1.
-
Page 20: Maintenance
2. Access the battery by remov- ing the 6 screws that attach the back cover to the unit. 3. Replace the battery. ! NOTE: Ensure that the bat- tery is installed under the bottom battery prongs. www.dimplex.com... -
Page 21: Warranty
Dimplex authorized service center, and we shall repair or replace, at our option, at no charge to you with return freight paid be Dimplex. It is agreed that such repair or replacement is the exclusive remedy available from Dimplex and that DIMPLEX IS NOT... -
Page 22: Reference Tables
Zone 1 21.0C, 6:00AM --.-C, --:--AM --.-C, --:--PM 18.0C, 11:00PM Zone 2 21.0C, 6:00AM --.-C, --:--AM --.-C, --:--PM 18.0C, 11:00PM Zone 3 21.0C, 6:00AM --.-C, --:--AM --.-C, --:--PM 18.0C, 11:00PM Zone 4 21.0C, 6:00AM --.-C, --:--AM --.-C, --:--PM 18.0C, 11:00PM www.dimplex.com... - Page 23 Reference Tables Sample Settings Zone 1: Bedroom 1, 2, 3 Zone 3: Kitchen Zone 2: Bathroom 1, 2 Zone 4: Living Room Wake Leave Home Sleep Monday Zone 1 21.0C, 6:00AM 17.0C, 8:00AM 21.0C, 9:00PM 18.0C, 11:00PM Zone 2 21.0C, 6:00AM 17.0C, 8:00AM 21.0C, 8:00PM 18.0C, 10:00PM Zone 3 21.0C, 8:00AM 17.0C, 9:00AM 21.0C, 5:00PM...
-
Page 24: User Settings
Zone 3 Zone 4 Thursday Zone 1 Zone 2 Zone 3 Zone 4 Friday Zone 1 Zone 2 Zone 3 Zone 4 Saturday Zone 1 Zone 2 Zone 3 Zone 4 Sunday Zone 1 Zone 2 Zone 3 Zone 4 www.dimplex.com... - Page 25 Dimplex North America Limited 1367 Industrial Road Cambridge ON Canada N1R 7G8 © 2015 Dimplex North America Limited...
Need help?
Do you have a question about the CX-WIFI 6700530100 and is the answer not in the manual?
Questions and answers