Table of Contents
Advertisement
Advertisement
Table of Contents

Summary of Contents for BeneCheck Plus series
-
Page 2: Table Of Contents
TABLE OF CONTENTS Chapter 1 BeneCheck PLUS Multi-Monitoring System Introduction.......................1-2 Contents of the Kit..................3-4 Labelling and Informations................5 System Components Meter.........................6-7 Test Strips......................8-9 Code Strip......................10 Chapter 2 Setting-up the Meter Installing/Replacing the Batteries..........11-12 Set the Year/Month/Day/Hour/Minute..........12 Set the Year/Month/Day..............13 Set the Hour/Minute................14 Coding the Meter..................15-17... - Page 3 Chapter 3 How to Perform a Test Before Testing.....................22-24 Testing procedures for Blood Glucose..........25 Testing procedures for Blood Uric Acid..........26 Testing procedures for Blood Total Cholesterol....26-27 Care after the Test..................28 Chapter 4 Meter Memory Function................29-30 Chapter 5 How to Set the Measurement Units............31-32 Chapter 6 Storage and Handling of Meter and Strips..........33 Chapter 7...
-
Page 4: Chapter 1 Benecheck Plus Multi-Monitoring System
10, 15 and 30-40 seconds respectively. Intended Use : The BeneCheck PLUS Multi-Monitoring System is designed to measure the blood glucose, uric acid or total cholesterol levels in whole blood. The test strips are for self-testing outside the body (in vitro diagnostic use). It should be used only for testing glucose, uric acid or total cholesterol with fresh capillary finger blood samples. - Page 5 Total Cholesterol NIST SRM 911b Abell/Kendall Please read the entire USER’S MANUAL carefully before using the BeneCheck PLUS Multi-Monitoring system to test your blood glucose, uric acid or total cholesterol levels. This USER’S MANUAL guides you through the operation procedures with illustrated directions and help you find the required information.
-
Page 6: Contents Of The Kit
1.2 Contents of the Kit Please check the whole package for the BeneCheck PLUS Multi-Monitoring System. The system includes the following items : Item No. Description Quantity PD-G001-1 BeneCheck PLUS Meter PD-A041 BeneCheck PLUS Glucose Test Strip x (10pcs/vial) PD-D001... - Page 7 ) Optional : ( not included in the standard kit package, please contact your local distributor for ordering. ) BeneCheck PLUS Glucose Test Strip BKP-G-S001 BeneCheck PLUS Uric Acid Test Strip BKP-U-S001 BeneCheck PLUS Total Cholesterol Test Strip BKP-C-S001...
-
Page 8: Labelling And Informations
1.3 Labelling and Information Do not re-use Use by Keep dry Read instructions Caution, consult Keep away from sunlight accompanying documents Operation temperature EU Representative limitation Storage temperature Catalogue number limitation (Product number) CE certification In-vitro diagnostic Manufactured by Lot number... -
Page 9: System Components Meter
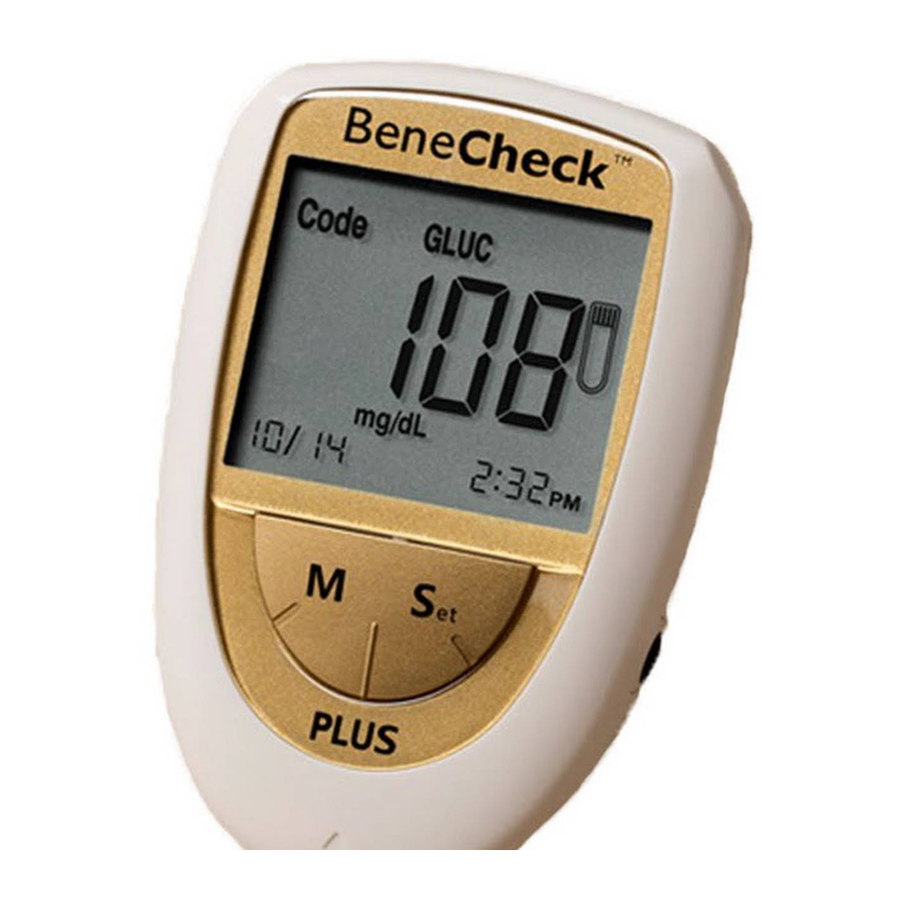
1.4 System Components Meter (Front Side) LCD Screen : For display of operating information and test results. Left “M” Button : For memory mode operation. Right “Set” Button : For on/off and setup mode operation. Test Port : Where you insert the test strip for testing. -
Page 10: Meter
Pull right ward to remove For covering the battery. the cover when replacing battery Battery Socket : For holding a 3V-lithium battery Battery : BeneCheck PLUS Multi-Monitoring System 3V lithium battery (CR2032) Battery : One CR2032 Tag : Display information about the meter. -
Page 11: Test Strips
Test Strip Glucose & Uric Acid Strip Electronic Contact Bar : Insert Electronic Contact Bar of the test strip into the Test Port of the meter to activate it. Sample Inlet : The inlet where the whole blood or control solution is drawn in. -
Page 12: Test Strips
Total Cholesterol Strip Reaction Zone : Electronic Contact Bar : Reaction zone of Insert Electronic Contact Bar of the Total Cholesterol test strip into the Test Port of the meter to activate it. Sample Inlet : The inlet where the whole blood or control solution is drawn in. -
Page 13: Code Strip
Code Strip ( Front View ) Contact Bar : Insert this end into the Test Port of the meter. Code Number Test Mode Test Mode : GLUC - Glucose UA - Uric Acid CHOL - Total Cholesterol... -
Page 14: Chapter 2 Setting-Up The Meter
Chapter 2 Setting-up the Meter 2.1 Installing/Replacing the Battery Battery is loaded inside the meter. Use only 3V lithium battery. Do not use or replace the battery with different types of battery which will damage the electronics of meter. Instructions : Hold the meter with one hand, slightly pull right the back cover to remove the back cover. -
Page 15: Set The Year/Month/Day/Hour/Minute
Place back the battery cover onto the meter. 2.2 Set the Year/Month/Day/Hour/Minute Press and hold the “Set” button for over two seconds, the meter will sound one beep and enter the setting mode. Please follow the directions below to set the meter. -
Page 16: Set The Year/Month/Day
Set the Year 1. When the meter enter setting mode, the first item on the screen such as “2008” will blink on screen, which means Year. 2. Click the left “M” button to advance one year until you get a correct year number. -
Page 17: Set The Hour/Minute
Set the Hour 1. Click left “M” button until the correct hour appears. 2. Click the right “Set” button, and the minute segment will start blinking. Set the Minute 1. Click left “M” button until the correct minute appears. 2. Click the right “Set” button then measurement unit segment starts blinking. -
Page 18: Coding The Meter
The BeneCheck PLUS meter should be coded before testing with BeneCheck PLUS test strips for the first time, or every time a new box of BeneCheck PLUS test strips are used. There are three kinds of test strips which can be used with BeneCheck PLUS meter. - Page 19 Insert a code strip into the test port of the meter. Wait for the code number to appear on the screen. Make sure the code number on the screen is the same as the code number on the code strip, and the test mode is also the same as marked on the test vial.
- Page 20 For Total Cholesterol Test Mode Following the same procedures of 1 to 3 described in glucose test mode . Make sure to check the code number and test mode on the code strip is the same as the code number and test mode on the total cholesterol test strip vial.
-
Page 21: Control Test
2.4 Control Test The purpose of control solution is used to check the performance of the BeneCheck PLUS System. The system and strips perform adequately if the control test result falls within the indicated control range listed on the test strip vial. - Page 22 Directions : Insert a test strip into test port, the meter will turn on automatically. The code number and test mode will be shown on the screen. Be careful to make sure the code number and test mode is the same as the code number marked on test strip vial.
- Page 23 Touch the sample inlet of the glucose, uric acid or total cholesterol test strip to the drop of control solution until the meter sounds a “beep”. The screen will display a countdown from 10 seconds for glucose test strip, 15 seconds uric acid test strip, and 26 seconds for total cholesterol test strip.
-
Page 24: Control Test
● Newly opened vials of control solution and test strips must be marked with an opening date. ● Do not use BeneCheck PLUS Multi-Monitoring System to do any test until you can get the control test result to fall within the control range listed on the test strip vial. -
Page 25: Chapter 3 How To Perform A Test
Materials required to perform a blood glucose, uric acid or total cholesterol test include : ● BeneCheck PLUS Meter ● BeneCheck PLUS Glucose, Uric Acid or Total Cholesterol Test Strip ● Lancing Device ● Lancet ● Tissue or cotton ball with 75% ethanol for wiping blood sampling area, or washed with soap and water before and after test for disinfection. - Page 26 In order to keep the test strips in dry preservation, please put the lid immediately on the vial after you take test strip out. Fully insert the contact bar of the test strip into the test port of the meter. The meter will turn on automatically with test mode display and code number appear on the Screen.
- Page 27 Note : ● One measurement must be performed within 3 minutes, otherwise the meter turn off automatically. Please, remove and re-insert the test strip to do the measurement again. ● Do not reuse test strips. Warning Error message “E-U” will display on the screen, if a used test strip is inserted.
-
Page 28: Testing Procedures For Blood Glucose
Insert the BeneCheck PLUS Glucose Test Strip and take a blood sample according to the instructions for lancing device in the system. Touch the sample Inlet of the strip to the drop of blood sample until the meter sounds a “beep”, which means the sample has drawn into strip successfully. -
Page 29: Testing Procedures For Blood Uric Acid
3.3 Testing procedure for Uric Acid 1. Insert the BeneCheck PLUS Uric Acid Test Strip and take a blood sample according to the instructions for lancing device in the system. 2. Touch the sample inlet of the strip to the drop of blood sample until the meter sounds a “beep”... - Page 30 Note : ● The BeneCheck PLUS Multi-Monitoring System includes glucose, uric acid and total cholesterol test that are all plasma calibrated. The user does not have to convert it into plasma result. ● Use the strips before the expired date, the strips can only be used within 3 months remaining shelf life after the first opening of the vial.
-
Page 31: Care After The Test
3.5 Care after the Test Directions : 1. Improper usage of the meter, such as dropping, bumping or other violent impact may cause the meter damaged. 2. Please keep meter away by interferences of magnetic, electromagnetic, and radioactive. Warning : ●... -
Page 32: Chapter 4 Meter Memory Function
Chapter 4 Meter Memory Function The BeneCheck PLUS Meter automatically stores up to 460 test results, which includes all the blood glucose 360, uric acid 50 and total cholesterol 50 test results and control test results. It also provides you with 7-, 14-, 21- and 28-day averages of the blood glucose test results. - Page 33 4. Followed by 14, 21 and 28-day average when press the left “M” button repeatedly. 5. After the 28day-average, the latest stored result M01 appears on the screen. The memory number increases progressively each time the button is pressed untill M360. 6.
-
Page 34: Chapter 5 How To Set The Measurement Units
Chapter 5 How to Set the Measurement Units Directions : 1. Make sure that no test strip is inserted in the meter. 2. Press and hold the “Set” button for over 2 seconds, the meter will sound beep (Fig. 1). The sequence of the setup mode is indicated as below :... - Page 35 3. Click the right "Set" button for six times, and a blinking "mg/dL" will display on the screen. 4. Pressing the “M” button will switch the unit of measure between "mg/dL" and "mmol/L" (See Fig.3&4) 5. Click the right “Set” button once again the meter will turn off. Note : ●...
-
Page 36: Chapter 6 Storage And Handling Of Meter And Strips
Chapter 6 Storage and Handling of Meter and Strips The performance of test strips may be affected by improper storage and handling. Please store the test strips and meter carefully according to the specifications listed in Chapter 9. Note: ● Store the meter, code strip, test strips and control solution at 10-30°C. ●... -
Page 37: Chapter 7 Icon And Alert Tones
Chapter 7 Icon and Alert Tones Memory Number lcon 7.1 lcon on the Screen mode icon Code Number lcon The vivid and clear information icons on the Strip Loading lcon Result Area Screen are helpful and convenient, the icon Blood Loading lcon design are easy to understand. -
Page 38: Chapter 8 Error Message And Trouble Shooting
Chapter 8 Error Message and Trouble Shooting Message Cause Solution There will be a problem Repeat the test with a new test with the test strip. strip. If the problem persists, please contact the dealer for service. The power of the battery Replace the battery at once. - Page 39 Message Cause Solution E-t & The temperature is below Repeat the test after the meter Temperature or above the system and the test strip have reached at Icon Sign operating range. temperature within the operating range. I t c o u l d b e c a u s e d b y Repeat the test with a new test strip.
-
Page 40: Chapter 9 Specifications
Chapter 9 Specifications System Accuracy : ± 20% at Glucose level ≥75 mg/dL (4.17mmol/L) ± 20% at Uric Acid ≥ 5 mg/dL (0.30 mmol/L) ± 20% at Total Cholesterol ≥ 150 mg/dL Principle : Glucose & Total Cholesterol - Electrochemical Biosensor ,Uric Acid - Electrochemical Sensor Calibration : Plasma-equivalent... - Page 41 Operation Temperature : 10 - 40ºC (50 - 104ºF) Relative Humidity : Less than 95% Memory : 460 test results (360 for Glucose, 50 for Uric Acid, 50 for Total Cholesterol) Battery Type : One 3V (CR2032) lithium battery Battery Life : Approximately 1,000 tests Dimensions : 86*57*17 mm (Length, Width, Height)
-
Page 42: Chapter 10 Limitations
BeneCheck PLUS Multi-Monitoring System : 1. For In-vitro diagnostic use only (External use only). 2. BeneCheck PLUS Test Strip is designed for one-time use only. Do not reuse. 3. Do not perform the test while a mobile phone is used beside; prevent the... - Page 43 ● Use only fresh capillary finger whole blood. Do not use serum or plasma. ● BeneCheck PLUS Glucose Test Strips may be used at altitude up to 10,000 feet without an effect on test results.
- Page 44 ● BeneCheck PLUS Glucose Test Strips are plasma calibrated, testing with serum or plasma sample will give falsely high results. ● BeneCheck PLUS Glucose Test Strips have not been validated for testing with...
- Page 45 3000 mg/dL (34.88 mmoL/L) do not affect the results. Grossly lipemic patient samples have not been tested and are not recommended for testing with the BeneCheck Plus Glucose Test Strips. ● Critically ill patients should not be tested with blood glucose meters.
- Page 46 Hct level. ● Use only fresh capillary finger whole blood. Do not use serum or plasma. ● BeneCheck PLUS Uric Acid Test Strips may be used at altitude up to 10,000 feet without an effect on test results.
- Page 47 (with or without ketosis), hypertension, the test results may be falsely low. ● BeneCheck PLUS Uric Acid Test Strips are plasma calibrated, test with serum or plasma sample will give falsely high results.
- Page 48 Hct level. ● Use only fresh capillary finger whole blood. Do not use serum or plasma. ● BeneCheck PLUS Total Cholesterol Test Strips may be used at altitude up to 8,000 feet without an effect on test results.
- Page 49 (with or without ketosis), hypertension, the test results may be falsely low. ● BeneCheck PLUS Total Cholesterol Test Strips are plasma calibrated, tests with serum or plasma sample will give falsely high results.
Need help?
Do you have a question about the Plus series and is the answer not in the manual?
Questions and answers