
Subscribe to Our Youtube Channel
Related Manuals for EuroLite AKKU UP-4 HCL Spot WDMX


Summary of Contents for EuroLite AKKU UP-4 HCL Spot WDMX
- Page 1 BEDIENUNGSANLEITUNG USER MANUAL AKKU UP-4 HCL Spot WDMX Für weiteren Gebrauch aufbewahren! © Copyright Keep this manual for future needs! Nachdruck verboten! Reproduction prohibited!
-
Page 2: Table Of Contents
POWER SUPPLY ............................30 Mains operation ............................30 Rechargeable Battery Operation ......................... 31 OPERATION ..............................31 Control Board ............................... 32 EUROLITE IR-7 remote control ........................33 DMX-controlled operation ..........................34 Wireless DMX .............................. 34 Addressing ..............................34 DMX Protocol ............................... 35 CLEANING AND MAINTENANCE ......................... -
Page 3: Einführung
- sich die letzte Version der Anleitung im Internet herunter laden EINFÜHRUNG Wir freuen uns, dass Sie sich für einen EUROLITE AKKU UP-4 HCL Spot WDMX entschieden haben. Wenn Sie nachfolgende Hinweise beachten, sind wir sicher, dass Sie lange Zeit Freude an Ihrem Kauf haben werden. - Page 4 Bitte überprüfen Sie vor der ersten Inbetriebnahme, ob kein offensichtlicher Transportschaden vorliegt. Sollten Sie Schäden an der Netzleitung oder am Gehäuse entdecken, nehmen Sie das Gerät nicht in Betrieb und setzen sich bitte mit Ihrem Fachhändler in Verbindung. Der Aufbau entspricht der Schutzklasse I. Der Netzstecker darf nur an eine Schutzkontakt-Steckdose angeschlossen werden, deren Spannung und Frequenz mit dem Typenschild des Gerätes genau übereinstimmt.
-
Page 5: Bestimmungsgemäße Verwendung
Hinweise zu Akkus und Batterien Die angegebene Akkulaufzeit hängt stark vom Betriebsmodus und der Umgebungstemperatur ab. Bei Kälte reduziert sich die Laufzeit deutlich. Laden Sie den Akku vor dem ersten Einsatz vollständig auf. Akkumulatoren und Batterien sind Sondermüll und müssen als solche entsorgt werden. Soll das Gerät entsorgt werden, muss zuerst der Akkumulator entnommen werden. -
Page 6: Gerätebeschreibung
• Betrieb über Netzanschluss oder eingebautem Lithium-Ionen-Akku mit bis zu 8,5 Stunden Betriebszeit • Integrierte Ladeautomatik mit Ladeanzeige • Steuerbar über EUROLITE IR-7 Fernbedienung, im Lieferumfang enthalten • Mit integriertem Klappfuß, für angewinkeltes Aufstellen • DMX-gesteuerter Betrieb oder Standalone-Betrieb mit Master-/Slave-Funktion möglich •... -
Page 7: Geräteübersicht
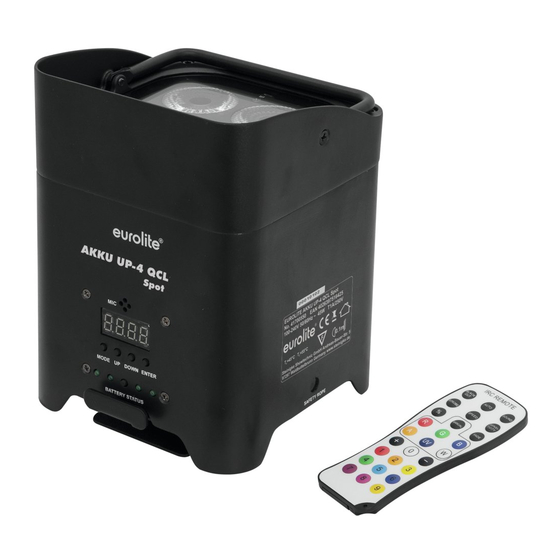
Geräteübersicht (1) LED (2) Mikrofon (3) Display (4) Fangseilloch (5) Steuereinheit (6) Ladeanzeige (7) Mode-Taste (8) Up-Taste (9) Down-Taste (10) Function-Taste (WDMX (11) Enter-Taste (12) Fixierung Klappfuß (13) Tragegriff (14) Infrarotsensor für die Fernbedienung (15) Gewinde für Montage (16) Klappfuß (17) 3-poliger DMX-Eingang (18) 3-poliger DMX-Ausgang (19) Netzschalter... -
Page 8: Installation
INSTALLATION Montage BRANDGEFAHR! Achten Sie bei der Installation des Gerätes bitte darauf, dass sich im Abstand von mind. 0,5 m keine leicht entflammbaren Materialien (Deko, etc.) befinden. Das Gerät kann sowohl hängend als auch stehend installiert werden. Hängende Installation LEBENSGEFAHR! Bei der Installation sind insbesondere die Bestimmungen der BGV C1 und EN 60598-2-17 zu beachten! Die Installation darf nur vom autorisierten Fachhandel ausgeführt werden! Die Aufhängevorrichtungen des Gerätes muss so gebaut und bemessen sein, dass sie 1 Stunde lang ohne... - Page 9 Vergewissern Sie sich vor der Montage, dass die Montagefläche mindestens die 10-fache Punktbelastung des Eigengewichtes des Gerätes aushalten kann. BRANDGEFAHR! Achten Sie bei der Installation des Gerätes bitte darauf, dass sich im Abstand von mind. 0,5 m keine leicht entflammbaren Materialien (Deko, etc.) befinden. ACHTUNG! Montieren Sie das Gerät ausschließlich über einen geeigneten Haken.
-
Page 10: Anschluss An Den Dmx-512 Controller / Verbindung Gerät - Gerät
Anschluss an den DMX-512 Controller / Verbindung Gerät – Gerät Achten Sie darauf, dass die Adern der Datenleitung an keiner Stelle miteinander in Kontakt treten. Die Geräte werden ansonsten nicht bzw. nicht korrekt funktionieren. Beachten Sie, dass die Startadresse abhängig vom verwendeten Controller ist. Unbedingt Bedienungsanleitung des verwendeten Controllers beachten. -
Page 11: Master/Slave-Betrieb
Master/Slave-Betrieb Im Master/Slave-Betrieb lassen sich mehrere Geräte synchronisieren, die dann von einem Master-Gerät gesteuert werden. An der Rückseite des Gerätes befinden sich eine XLR-Einbaubuchse und ein XLR-Einbaustecker, über die sich mehrere Geräte miteinander verbinden lassen. Wählen Sie das Gerät aus, das zur Steuerung der Effekte dienen soll. Dieses Gerät arbeitet dann als Master-Gerät und steuert alle weiteren Slave-Geräte, die über ein DMX-Kabel mit dem Master-Gerät verbunden werden. -
Page 12: Akkubetrieb
ENTER, UP, DOWN auswählen. Das Gerät hat zwei Betriebsarten. Es kann entweder im Standalone-Modus über das Control Board und die EUROLITE IR-7 Fernbedienung oder im DMX-gesteuerten Modus über einen handelsüblichen DMX-Controller betrieben werden. Bitte beachten Sie weitere Hinweise unter Control Board. -
Page 13: Control Board
Control Board Das Control Board bietet mehrere Möglichkeiten: so lassen sich z. B. die DMX-Startadresse eingeben, das vorprogrammierte Programm abspielen oder der DMX-Kanal Modus auswählen. Durch Drücken der Mode-Taste können Sie sich im Hauptmenü bewegen. Durch Drücken der Up/Down-Taste können Sie die Auswahl verändern. Bestätigen Sie jede Änderung durch Drücken der Enter-Taste. -
Page 14: Fernbedienung Eurolite Ir-7
Fernbedienung EUROLITE IR-7 Das Gerät muss für die Ansteuerung per Fernbedienung aktiviert werden. Wählen Sie dazu im Menüpunkt IR Setup die Einstellung On. Halten Sie beim Betätigen einer Taste die Fernbedienung immer in Richtung des Sensors auf der Gerätevorderseite. Zwischen der Fernbedienung und dem Sensor muss Sichtverbindung bestehen. -
Page 15: Dmx-Gesteuerter Betrieb
CH anzeigt. Drücken Sie die ENTER-Taste und das Display zeigt d001 an. Sie können nun die gewünschte Adresse über die UP- oder DOWN-Taste auswählen. Bitte drücken Sie noch einmal die ENTER-Taste zur Bestätigung. Nachdem Sie die Startadresse definiert haben, können Sie den AKKU UP-4 HCL Spot WDMX über Ihren Controller ansteuern. 15/40... -
Page 16: Dmx-Protokoll
Bitte beachten Sie: Über das Display des Gerätes wird der Status der DMX-Verbindung angezeigt: Schalten Sie das Gerät ein. Das Gerät prüft, ob DMX-512 Daten empfangen werden oder nicht. Wenn Daten empfangen werden, erscheint „d.001“ mit der definierten Startadresse auf dem Display. Werden keine Daten empfangen, erscheint „d001“... - Page 17 8-Kanal-Modus Steuerkanal 1 - Rot Decimal Hexad. Percentage S/F Eigenschaft 0 255 00 FF 0% 100% Rot (0=aus, 255=100% rot) Steuerkanal 2 - Grün Decimal Hexad. Percentage S/F Eigenschaft 0 255 00 FF 0% 100% Grün (0=aus, 255=100% grün) Steuerkanal 3 - Blau Decimal Hexad.
- Page 18 12-Kanal-Modus Steuerkanal 1 - Dimmer Decimal Hexad. Percentage S/F Eigenschaft 0 255 00 FF 0% 100% Allmähliche Einstellung der Dimmerintensität von 0 bis 100 % Steuerkanal 2 - Rot Decimal Hexad. Percentage S/F Eigenschaft 0 255 00 FF 0% 100% Rot (0=aus, 255=100% rot) Steuerkanal 3 - Grün Decimal Hexad.
- Page 19 111 130 6F 82 44% 51% ROT 100% / GRÜN 0% / BLAU abnehmend 131 150 83 96 51% 59% ROT 100% / GRÜN zunehmend / BLAU zunehmend 151 170 97 AA 59% 67% ROT abnehmend / GRÜN abnehmend / BLAU 100% 171 200 AB C8 67% 78% ROT 100% / GRÜN 100% / BLAU 100% / WEIß...
-
Page 20: Reinigung Und Wartung
REINIGUNG UND WARTUNG Der Unternehmer hat dafür zu sorgen, dass sicherheitstechnische und maschinentechnische Einrichtungen mindestens alle vier Jahre durch einen Sachverständigen im Umfang der Abnahmeprüfung geprüft werden. Der Unternehmer hat dafür zu sorgen, dass sicherheitstechnische und maschinentechnische Einrichtungen mindestens einmal jährlich durch einen Sachkundigen geprüft werden. Dabei muss unter anderem auf folgende Punkte besonders geachtet werden: 1) Alle Schrauben, mit denen das Gerät oder Geräteteile montiert sind, müssen fest sitzen und dürfen nicht korrodiert sein. -
Page 21: Technische Daten
TECHNISCHE DATEN Spannungsversorgung: 100-240 V AC, 50/60 Hz ~ für Netzbetrieb Gesamtanschlusswert: 37 W Akkutyp: Li-ion 14,8 V, 6600 mAh (97,68 Wh) Akkubetriebsdauer: 8,5 Stunden Akkuladezeit: 4,5 Stunden Batterie Fernbedienung: CR2025 Knopfzelle 3 V DMX-Steuerkanäle: 6/8/12 DMX512-Anschluss: 3-pol. XLR Musiksteuerung: über eingebautes Mikrofon Drahtlose Signalübertragung: 2,4 GHz (ISM) -
Page 22: Konformität
KONFORMITÄT Bitte beachten Sie: Technische Änderungen ohne vorherige Ankündigung und Irrtum vorbehalten. 19.05.2015 © 22/40 00088947.DOC, Version 1.1... -
Page 23: Introduction
- download the latest version of the user manual from the Internet INTRODUCTION Thank you for having chosen a EUROLITE AKKU UP-4 HCL Spot WDMX. If you follow the instructions given in this manual, we are sure that you will enjoy this device for a long period of time. - Page 24 This device falls under protection-class I. The power plug must only be plugged into a protection class I outlet. The voltage and frequency must exactly be the same as stated on the device. Wrong voltages or power outlets can lead to the destruction of the device and to mortal electrical shock. Always plug in the power plug last.
-
Page 25: Operating Determinations
Regarding Rechargeable batteries and Batteries The given battery run time depends largely on the operating mode and ambient temperature. Low temperatures will reduce the run time considerably. Before using the device for the first time, completely charge the battery. Rechargeable batteries/batteries are hazardous waste which needs to be disposed of appropriately. If the device is to be disposed, the batteries have to be removed first. -
Page 26: Description Of The Device
• Integrated automatic charging of the battery with indicator • Controllable via EUROLITE IR-7 remote control; included in delivery • With integrated folding foot for angled placement by floor installation • DMX-controlled operation or stand-alone operation with Master/Slave function •... -
Page 27: Overview
Overview (1) LED (2) Microphone (3) Display (4) Safety bond hole (5) Control Board (6) Charge indicator (7) Mode button (8) Up button (9) Down button (10) Function button (WDMX) (11) Enter button (12) Fixation folding foot (13) Carrying handle (14) Infrared sensor for the remote control (15) Mounting thread... -
Page 28: Installation
INSTALLATION Rigging DANGER OF FIRE! When installing the device, make sure there is no highly-inflammable material (decoration articles, etc.) within a distance of min. 0.5 m. The device can be installed on the ground or on the wall or ceiling. Hanging installation The installation of the device has to be built and constructed in a way that it can hold 10 times the weight for 1 hour without any harming deformation. -
Page 29: Dmx-512 Connection / Connection Between Fixtures
Use 1 appropriate clamp to rig the fixture on the truss. Make sure that the device is fixed properly! Ensure that the structure (truss) to which you are attaching the fixtures is secure. The device can be placed directly on the stage floor or rigged in any orientation on a truss without altering its operation characteristics. -
Page 30: Master/Slave Operation
Occupation of the XLR-connection: If you are using controllers with this occupation, you can connect the DMX-output of the controller directly with the DMX-input of the first fixture in the DMX-chain. If you wish to connect DMX-controllers with other XLR-outputs, you need to use adapter-cables. Building a serial DMX-chain: Connect the DMX-output of the first fixture in the DMX-chain with the DMX-input of the next fixture. -
Page 31: Rechargeable Battery Operation
The device has two operating modes. It can be operated in stand-alone mode via the control board and the EUROLITE IR-7 remote control or in DMX-controlled mode via a standard DMX controller. Please refer to the instructions under Control Board. -
Page 32: Control Board
Control Board The Control Board offers several features: you can simply set the starting address, run the pre-programmed program or select a DMX channel mode. Browse through the menu by pressing Mode. You can change the selection by pressing Up or Down. Press Enter in order to confirm. You can leave every mode by pressing Mode. -
Page 33: Eurolite Ir-7 Remote Control
EUROLITE IR-7 remote control The device must be activated for remote control. For this, set menu item IR Setup to When actuating a button, always hold the remote control in the direction of the sensor. There must be visual connection between the remote control and the sensor. -
Page 34: Dmx-Controlled Operation
AKKU UP-4 HCL Spot WDMX will respond to the controller. If you set, for example, the address in the 12 channel mode to channel 13, the AKKU UP-4 HCL Spot WDMX will use the channel 13 to 24 for control. -
Page 35: Dmx Protocol
Note: The modes of DMX512 data are shown via the display of the device: After switching on, the device will automatically detect whether DMX 512 data is received or not. If the data is received, the display will show "d.001" with the actually set address. If there is no data received at the DMX-input, the display will show "d001"... - Page 36 8 channel mode Control-channel 1 - Red Decimal Hexad. Percentage S/F Feature 0 255 00 FF 0% 100% Red (0=off, 255=100% red) Control-channel 2 - Green Decimal Hexad. Percentage S/F Feature 0 255 00 FF 0% 100% Green (0=off, 255=100% green) Control-channel 3 - Blue Decimal Hexad.
- Page 37 12 channel mode Control-channel 1 - Dimmer Decimal Hexad. Percentage S/F Feature 0 255 00 FF 0% 100% Gradual adjustment of the dimmer intensity from 0 to 100 % Control-channel 2 - Red Decimal Hexad. Percentage S/F Feature 0 255 00 FF 0% 100% Red (0=off, 255=100% red) Control-channel 3 - Green...
- Page 38 111 130 6F 82 44% 51% RED 100% / GREEN 0% / BLUE decreasing 131 150 83 96 51% 59% RED 100% / GREEN increasing / BLUE increasing 151 170 97 AA 59% 67% RED decreasing / GREEN decreasing / BLUE 100% 171 200 AB C8 67% 78% RED 100% / GREEN 100% / BLUE 100% / WHITE 100%...
-
Page 39: Cleaning And Maintenance
CLEANING AND MAINTENANCE The operator has to make sure that safety-relating and machine-technical installations are inspected by an expert after every four years in the course of an acceptance test. The operator has to make sure that safety-relating and machine-technical installations are inspected by a skilled person once a year. -
Page 40: Technical Specifications
TECHNICAL SPECIFICATIONS Power supply: 100-240 V AC, 50/60 Hz ~ for mains operation Power consumption: 37 W Battery pack type: Li-ion 14.8 V, 6600 mAh (97.68 Wh) Battery operation: 8.5 hours Recharging time: 4.5 hours Battery remote control: CR2025 button cell 3 V DMX control channels: 6/8/12 DMX512 connection:...
Need help?
Do you have a question about the AKKU UP-4 HCL Spot WDMX and is the answer not in the manual?
Questions and answers