Table of Contents
Advertisement
Quick Links
C h a p t e r
1
System Board
1.1
Features
The AOpen DX2G Plus is a dual-processor system that supports two
Intel Pentium II/III Xeon processors running at 400/450/500/550 MHz
with possible higher frequencies supported in the future. It integrates
the latest multi-processor and I/O technology in the industry to provide
the best performance for workstation users.
AOpen DX2G Plus has been designed to support Intel
latest and
highest performance processor, the Pentium II/III Xeon. Like its
predecessors, the Pentium Pro and Pentium II/III processors, the
Pentium II/III Xeon processor implements a Dynamic Execution micro-
architecture - a unique combination of multiple branch prediction, data
flow analysis, and speculative execution.
This means that the
Pentium II/III Xeon can deliver higher performance than the Pentium
processor while maintaining binary compatibility with all previous Intel
Architecture processors. Other than that, the Pentium II/III Xeon
processor is available in 512K, 1MB, and 2MB L2 cache options with
the introduction of the Slot 2 socket. Unlike Pentium II/III processors,
which access the L2 cache at half the processor core speed, the
Pentium II/III Xeon processors access the L2 cache at full processor
core speed. DX2G Plus has the design to leverage this benefit to
process workstation applications with large data sets.
AOpen DX2G Plus System Board
1-1
Advertisement
Table of Contents

Related Manuals for AOpen DX2G Plus


Summary of Contents for AOpen DX2G Plus
- Page 1 L2 cache at half the processor core speed, the Pentium II/III Xeon processors access the L2 cache at full processor core speed. DX2G Plus has the design to leverage this benefit to process workstation applications with large data sets.
- Page 2 It also provides 72-bit PC-100 ECC SDRAM DIMM support to expand both memory bandwidth and data correction to the limit. With four DIMM sockets, DX2G Plus supports up to 2GB system memory which is enough for almost all workstation applications and even more than most Unix workstations.
- Page 3 Plug-and-Play feature. This feature saves the user from configuration troubles, thus making the system more user-friendly. For the default configuration, DX2G Plus is bundled with AOpen Bonus Pack which includes on board Lan and SCSI drivers, LDCM Utility, Anti-Virus and detail manual.
-
Page 4: Major Components
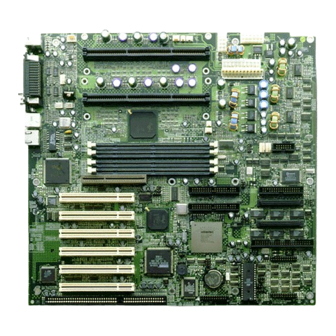
Major Components AOpen DX2G Plus has the following major features: • Supports dual Intel Pentium II/III Xeon processors running at 400/450/500/550 MHz (and possible higher frequencies) with an integrated 512K, 1MB or 2MB L2 write-back cache • Four DIMM sockets that accept 16-, 32-, 64- 128-, 256 and 512MB DIMMs with a maximum of 2048 MB system memory •... - Page 5 Intel 443GX system controller Buzzer AT power connector Adaptec 7896 SCSI controller ATX power connector Battery Acer H90 / IDM(W) power Feature Connector (supports Intel connectors SMM cards) Slot-2 CPU sockets System BIOS Figure 1-1 System Board Layout AOpen DX2G Plus System Board...
-
Page 6: Jumper And Connector Locations
Jumpers and Connectors 1.4.1 Jumper and Connector Locations Figure 1-2 shows the jumper and connector locations on the system board. Figure 1-2 System Board Jumper and Connector Locations Jumpers are prefixed P” . Connectors are prefixed N” . The blackened pin of a jumper or connector represents pin 1. -
Page 7: Jumper Settings
Function BIOS Logo 1-2 * Logo Password Security Check password 2-3* Bypass password Boot Block Mode 1-2* Disabled Enabled Sound Output 1-2* Buzzer Speaker AlertPack Select 1-2/4-5 AlertPack and LM80 2-3/5-6* LM80 Only * Default AOpen DX2G Plus System Board... -
Page 8: Connector Functions
CN17 Cabinet Fan Connector CN18 Cabinet Fan Connector CN20 2 Color Power LED Connector CN22 Redundant Power Status Connector (not used by AOpen DX2G Plus) CN23 CPU1 Temperature Connector CN24 CPU2 Temperature Connector CN26 PC-PCI Connector (for Audio Card) CN27... - Page 9 Connector Functions Connector Function CN32 SCSI Channel 1 Wide Connector CN33 SCSI Channel 1 Narrow Connector CN34 RDM LED Connector (not used by AOpen DX2G Plus) CN35 External Speaker Connector CN36 Hard Disk LED Connector CN37 Hard Disk LED Connector...
-
Page 10: Esd Precautions
ESD Precautions Always observe following electrostatic discharge (ESD) precautions before installing a system component: Do not remove a component from its antistatic packaging until you are ready to install it. Wear a wrist grounding strap before handling electronic components. Wrist grounding straps are available at most electronic component stores. - Page 11 Inserting the joint bar into the Retention Mechanisms 2. Insert both retention mechanisms into the Slot 2 sockets. Make sure that the shafts of the retention mechanisms with a O sign are facing the external ports of the system board. AOpen DX2G Plus System Board 1-11...
- Page 12 3. Align the metal brace beneath the system board along the Slot 2 retention holes and secure the retention mechanisms with eight screws: six screws (see figure below) to secure the retention mechanisms and two screws afterwards, when fitting the system board to the housing.
- Page 13 Installing an Intel Pentium II/III Xeon processor Follow these steps to install a Pentium II/III Xeon processor: 1. Attach the fansink module to the Pentium II/III Xeon processor and secure it with four screws. Figure 1-5 Installing a Fansink AOpen DX2G Plus System Board 1-13...
- Page 14 2. Insert the Pentium II/III Xeon processor into an empty Slot 2 socket. Figure 1-6 Installing a Pentium II/III Xeon Processor 3. Carefully press down the Pentium II/III Xeon processor until it is properly inserted into the socket. 1-14 System Guide...
- Page 15 OO side onto the retention mechanism. Make sure both sides are securel clipped. 1.6.3 Removing an Intel Pentium II/III Xeon processor Follow these steps to remove a Pentium II/III Xeon processor: AOpen DX2G Plus System Board 1-15...
- Page 16 1. Unclip the retention mechanism cover. Figure 1-8 Removing a Retention Mechanism Cover 2. Flip up both plastic ears of the Pentium II/III Xeon processor. This procedure detaches the processor from the socket. Figure 1-9 Removing a Pentium II/III Xeon Processor 3.
- Page 17 Installing a Terminator Board 3. Use the retention mechanism cover to secure the terminator board by pressing it down until it locks onto the retention mechanism. See figure 1-7 for an illustration of this step. AOpen DX2G Plus System Board 1-17...
- Page 18 The retention mechanism cover only fits one way. Both the shafts of the retention mechanism and the retention mechanism cover have a O and a OO indicator. Match the O on the cover with the O on the retention mechanism first, then hook them together and insert the OO side onto the retention mechanism, make sure both sides are securely clipped.
-
Page 19: Memory Upgrade
DIMMs for a maximum of 2048-MB system memory. The SDRAM DIMMs should work under 3.3 volts only; 5-volt memory devices are not supported. AOpen DX2G Plus supports both 100MHz standard and registered SDRAM. However, they cannot be used at the same time in a system. -
Page 20: Installing A Dimm
Table 1-3 Memory Configurations DIMM1 DIMM2 DIMM3 DIMM4 Total Memory 64 MB 64 MB 64 MB 192 MB 64 MB 64 MB 64 MB 64 MB 256 MB 128 MB 128 MB 128 MB 128 MB 256 MB 128 MB 128 MB 128 MB 384 MB... -
Page 21: Removing A Dimm
DIMM. Place your forefingers on the top of the DIMM before you press the holding clips to gently disengage the DIMM from the socket. Figure 1-12 Removing a DIMM AOpen DX2G Plus System Board 1-21... -
Page 22: Reconfiguring The System
1.7.4 Reconfiguring the System Reconfigure the system after installing or removing DIMMs. Follow these steps to reconfigure the system: Reboot the system. A memory error message appears, indicating that the total memory does not match the value stored in CMOS. Press Press twice to exit Setup and reboot the system. -
Page 23: Installing Expansion Cards
Installing ISA Cards Both PnP and non-PnP ISA cards require specific IRQs. When installing ISA cards, make sure that the IRQs required by these cards are not previously assigned to PCI devices to avoid resource conflicts. AOpen DX2G Plus System Board 1-23... -
Page 24: Installing An Agp Card
Follow these steps when installing ISA cards: Install non-PnP ISA cards. Turn on the system. Use the operating system to manually assign the appropriate IRQs to the cards. This ensures that BIOS will not use the resources assigned to the non-PnP ISA cards. BIOS detects and configures only PnP cards. - Page 25 2. Insert an AGP card into the slot. Make sure that the card is properly seated. Figure 1-15 Installing an AGP Card When you turn on the system, BIOS automatically detects and assigns resources to the AGP device. AOpen DX2G Plus System Board 1-25...
- Page 26 LDCM Intel® LANDesk® Client Manager Version 3.3 is an application that simplifies local and network management of mobile and desktop client systems. It monitors PC health to provide local and remote alerts. It gives local and remote views of hardware and software component, even via dial-up.
-
Page 27: Software Error Messages
Table 1-4 lists possible system error messages. Table 1-4 System Error Messages Message Action CMOS Battery Bad Replace the lithium battery or contact your dealer. CMOS Checksum Error Run Setup Press during POST to enter the BIOS Setup screen. AOpen DX2G Plus System Board 1-27... - Page 28 Table 1-4 System Error Messages Message Action CPU BIOS Update Code Contact your dealer. Mismatch Diskette Drive Controller Error Check and connect the floppy or Not Installed Floppy Disk cable on both floppy drive and Controller Error system board end. Diskette Drive Error Check the CMOS settings in Setup...
- Page 29 Memory Error at: Check DIMMs on the system MMMM:SSSS:OOO board. Contact your dealer. (W:XXXX, R:YYYY) where: M: MB, S: Segment, O: Offset, X/Y: write/read pattern Press during POST to enter the BIOS Setup screen. AOpen DX2G Plus System Board 1-29...
- Page 30 Table 1-4 System Error Messages Message Action Memory Resource Conflict(s) Check ISA add-on card. Memory Size Mismatch Check the memory size based on the system specifications. Run CPU Clock Mismatch Setup . If the message reappears, ask for technical assistance. NVRAM Checksum Error Contact your dealer.
-
Page 31: Correcting Error Conditions
If you are sure that your configuration values are correct and your battery is in good condition, the problem may lie in a damaged or defective chip. In either case, contact an authorized service center for assistance. AOpen DX2G Plus System Board 1-31...
Need help?
Do you have a question about the DX2G Plus and is the answer not in the manual?
Questions and answers