Thrustmaster Hotas Warthog Hardware User Manual
Hide thumbs
Also See for Hotas Warthog:
- Hardware user manual (146 pages) ,
- Hardware user manual (18 pages) ,
- Manual (62 pages)
Table of Contents
Advertisement
Available languages
Available languages
Quick Links
Advertisement
Table of Contents

Related Manuals for Thrustmaster Hotas Warthog


Summary of Contents for Thrustmaster Hotas Warthog
- Page 2 Compatible: PC Hardware User Manual 1/18...
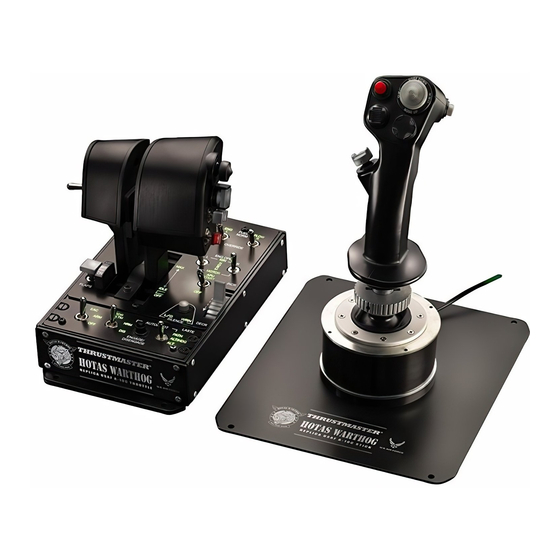
- Page 3 U.S. Air Force A-10C attack aircraft HOTAS™(**) (Hands On Throttle And Stick) replica joystick pack, including: 1 Replica JOYSTICK • Innovative new H.E.A.R.T HallEffect AccuRate Technology(*): - 3D magnetic sensors (Hall Effect) on the stick - 16-bit resolution (65536 x 65536 values) - 5 coil spring system(*) •...
- Page 4 Dual Replica THROTTLES • Innovative new H.E.A.R.T HallEffect AccuRate Technology(*): - 3D magnetic sensors (Hall Effect) on the 2 throttles - 14-bit resolution (16384 values) on each throttle • USB connection with upgradeable firmware • Dual throttles, featuring: - metal hand rest - locking system - adjustable friction system - realistic IDLE detent with “Pull &...
- Page 5 CONFIGURATION OF BUTTONS AND AXES On the JOYSTICK: 4/18...
- Page 6 On the THROTTLE: 5/18...
-
Page 7: On The Control Panel
On the CONTROL PANEL: 6/18... - Page 8 “A-10C” AIRCRAFT FUNCTIONS On the JOYSTICK: 7/18...
- Page 9 On the THROTTLE: 8/18...
- Page 10 On the CONTROL PANEL: 9/18...
- Page 11 REALISTIC IDLE AND AFTERBURNER DETENTS The HOTAS Warthog’s throttle features realistic systems for IDLE and AFTERBURNER detents (the AFTERBURNER system is disengageable). IDLE: When set to IDLE: to cut off the aircraft’s motors (in compatible games), raise the throttle levers slightly (in order to get over the stop) and put the throttle levers into the OFF position.
- Page 12 AFTERBURNER: When the AFTERBURNER module stop is in place, raise the throttle levers slightly (in order to get over the stop) and push them forward. INSTALLING/UNINSTALLING THE AFTERBURNER STOP: (By default, the AFTERBURNER module stop is not installed). - Using the included Allen Key, unscrew the 2 screws as shown below, and take out the removable bar located between the 2 throttle levers.
- Page 13 - Take out the AFTERBURNER module, located underneath the removable bar: (In this position, the AFTERBURNER stop is disabled) 12/18...
- Page 14 - Turn the module upside down and put it back in its place: (In this position, the AFTERBURNER stop is now enabled) - Put the removable bar back between the 2 throttle levers, then replace and re-tighten the 2 screws. IMPORTANT NOTE: In order to avoid any possible damage to the AFTERBURNER module, you must never use the throttle levers without the removable bar properly installed (using the 2 screws) between the 2 throttle levers.
- Page 15 ATTACHING/SEPARATING THE 2 THROTTLE LEVERS To attach the throttle levers together: To detach the throttle levers from one another: 14/18...
- Page 16 INSTALLING THE JOYSTICK IN A COCKPIT OR OTHER FIXED SUPPORT To attach the joystick in a cockpit: - Unscrew the 4 screws located underneath the joystick’s metal base plate, and remove the metal base plate. - Use the 4 screw threads located on the underside of the joystick to attach the joystick directly to your fixed support.
-
Page 17: Important Notes
- You can use the white mark, found on the wheel, to help count your turns, if necessary. BACKWARDS-COMPATIBILITY The new “HOTAS Warthog” handle is backwards-compatible with the base of the “HOTAS Cougar” (and vice versa). Only the CMS push button (button 19) will be non-functional, as it was not originally featured on the HOTAS Cougar. - Page 18 In the countries of the European Union, this corresponds to a period of two (2) years from delivery of the Thrustmaster product. In other countries, the warranty period corresponds to the time limit to bring an...
-
Page 19: Fcc Statement
COPYRIGHT © 2015 Guillemot Corporation S.A. All rights reserved. Thrustmaster® is a registered trademark of Guillemot Corporation S.A. All other trademarks are the property of their respective owners. Illustrations not binding. Contents, designs and specifications are subject to change without notice and may vary from one country to another. - Page 20 Compatible : PC Manuel de l'utilisateur Hardware 1/18...
- Page 21 Ensemble de Joystick HOTAS™(**) (Hands On Throttle And Stick), réplique de l’avion d’attaque A-10C de l’U.S. Air Force, comprenant : 1 JOYSTICK (réplique) • Nouvelle technologie H.E.A.R.T HallEffect AccuRate Technology(*) : - capteurs magnétiques 3D (Hall Effect) sur le manche - résolution de 16 bits (65536 x 65536 valeurs) - système de 5 ressorts hélicoïdaux(*) •...
- Page 22 DOUBLE MANETTE DES GAZ (répliques) • Nouvelle technologie H.E.A.R.T HallEffect AccuRate Technology(*) : - capteurs magnétiques 3D (Hall Effect) sur les 2 manettes des gaz - résolution de 14 bits (16384 valeurs) sur chaque manette des gaz • Connectique USB avec possibilité de mise à jour du firmware •...
- Page 23 CONFIGURATION DES BOUTONS ET DES AXES Sur le Joystick : 4/18...
- Page 24 Sur les MANETTES DES GAZ (THROTTLE) : 5/18...
- Page 25 Sur le PANNEAU DE CONTRÔLE : 6/18...
- Page 26 FONCTIONNALITÉS SUR L’AVION « A-10C » Sur le JOYSTICK : 7/18...
- Page 27 Sur les MANETTES DES GAZ (THROTTLE) : 8/18...
- Page 28 Sur le PANNEAU DE CONTRÔLE : 9/18...
- Page 29 DÉTENTE IDLE ET AFTERBURNER RÉALISTE Les manettes des gaz du « Hotas Warthog » possèdent un système de détente IDLE et AFTERBURNER réaliste (système débrayable pour l’Afterburner). IDLE : Après avoir positionné les manettes des gaz sur IDLE pour couper les moteurs de l’avion (dans les jeux compatibles), soulevez-les (afin de dépasser la butée), puis ramenez-les en...
- Page 30 AFTERBURNER: Lorsque la butée du module Afterburner est mise en place, soulevez les manettes des gaz (afin de dépasser la butée), puis poussez les. INSTALLER / DÉSINSTALLER LA BUTÉE AFTERBURNER : (Par défaut, la butée du module AFTERBURNER n’est pas installée). - À...
- Page 31 - Retirez le module Afterburner situé sous la barre amovible : (dans cette position, la butée AFTERBURNER est désactivée) 12/18...
- Page 32 - Retournez le module et repositionnez-le dans son emplacement : (dans cette position, la butée AFTERBURNER est désormais activée) - Repositionnez la barre amovible entre les 2 manettes des gaz, puis revissez les 2 vis. IMPORTANT : Afin de ne pas endommager le module Afterburner, ne jamais utiliser les manettes des gaz sans que la barre amovible ne soit préalablement vissée entre les 2 manettes.
- Page 33 ATTACHER / SÉPARER LES 2 MANETTES DES GAZ Pour solidariser les 2 manettes : Pour désolidariser les 2 manettes : 14/18...
- Page 34 INSTALLATION DU JOYSTICK SUR UN COCKPIT OU AUTRE SUPPORT FIXE Pour fixer le joystick dans un cockpit : - Dévissez les 4 vis situées sous la plaque en métal du joystick - Utilisez les 4 « pas de vis » prévus à cet effet pour fixer le manche directement sur votre support fixe.
-
Page 35: Remarques Importantes
- La marque blanche, située sur la molette, vous permettra de compter les tours, si nécessaire. RÉTROCOMPATIBILITÉ Le nouveau manche du « Hotas Warthog » est rétro-compatible avec la base du « Hotas Cougar » (et inversement). Seul le bouton-poussoir du CMS (bouton 19) ne sera pas fonctionnel, car non présent à... - Page 36 Dans les pays de l’Union Européenne, ce délai est de deux (2) ans à compter de la délivrance du produit Thrustmaster. Dans les autres pays, la durée de la période de garantie correspond au délai pour intenter une action en conformité...
-
Page 37: Support Technique
à un défaut matériel ou à un vice de fabrication du produit (y compris, mais non limitativement, tout dommage causé directement ou indirectement par tout logiciel, ou par une combinaison du produit Thrustmaster avec tout élément inadapté, notamment alimentations électriques, batteries, chargeurs, ou tous autres éléments non-fournis par Guillemot pour ce produit). - Page 38 Kompatibel: PC Hardware-Benutzerhandbuch 1/18...
- Page 39 U.S. Air Force A-10C Schlachtflugzeug HOTAS™(**) (Hands On Throttle And Stick) Replik Joystick-Pack, mit: 1 Replik-JOYSTICK • Innovative, neue H.E.A.R.T HallEffect AccuRate Technology(*): - 3D Magnetsensoren (Hall Effect) am Stick - 16-bit Auflösung (65536 x 65536 Werte) - 5 Spriraldruckfedersystem(*) •...
- Page 40 Zwei Replik-GASHEBEL • Innovative, neue H.E.A.R.T HallEffect AccuRate Technology(*): - 3D Magnetsensoren (Hall Effect) an den beiden Gashebeln - 14-bit Auflösung (16384 Werte) an jeden Gashebel • USB-Anschluss mit erweiterungsfähiger USB Firmware • Zwei Gashebel mit: - Handauflage aus Metall - Schließsystem - einstellbares Spannungssystem - realistische IDLE Arretierung mit “Pull &...
- Page 41 KONFIGURATION DER BUTTONS UND ACHSEN Am JOYSTICK: 4/18...
- Page 42 Am GASHEBEL: 5/18...
- Page 43 Auf der BEDIENUNGSEINHEIT: 6/18...
- Page 44 “A-10C” FLUGZEUGFUNKTIONEN Am JOYSTICK: 7/18...
- Page 45 Am GASHEBEL: 8/18...
- Page 46 Auf der BEDIENUNGSEINHEIT: 9/18...
- Page 47 REALISTISCHE IDLE- UND AFTERBURNER-ARRETIERUNG Die Gashebel des HOTAS Warthogs verfügen über ein realistisches System zur IDLE- (LEERLAUF-) und AFTERBURNER- (NACHBRENNER-) Arretierung (das AFTERBURNER- System ist abschaltbar). IDLE: Wenn auf IDLE gesetzt: Um die Motoren des Flugzeugs abzustellen (in kompatiblen Spielen), heben Sie die Gashebel etwas an (um über Stop zu kommen) und stellen die Gashebel auf die OFF-Position.
- Page 48 AFTERBURNER: Wenn das AFTERBURNER-Stopmodul etabliert ist, heben Sie die Gashebel etwas an (um über Stop zu kommen) und drücken diese nach vorne. MONTIEREN/DEMONTIEREN DES AFTERBURNER-STOPS: (Werksseitig ist das AFTERBURNER-Stopmodul nicht montiert). - Benutzen Sie den beigefügten Inbusschlüssel, um die beiden Schrauben, wie untenstehend gezeigt, zu lösen und entfernen den herausnehmbaren Riegel zwischen den beiden Gashebeln.
- Page 49 - Herausnehmen des AFTERBURNER-Moduls, zu finden unter dem herausnehmbaren Riegel: (In dieser Position ist der AFTERBURNER-Stop deaktiviert) 12/18...
- Page 50 - Drehen Sie das Modul um und stecken dieses wieder an seinen Platz: (In dieser Position ist der AFTERBURNER-Stop nun aktiviert) - Stecken Sie den herausnehmbaren Riegel wieder zwischen die beiden Gashebel und drehen die beiden Schrauben fest. WICHTIGE ANMERKUNG: Um eine mögliche Beschädigung des AFTERBURNER-Moduls zu vermeiden, sollten Sie die Gashebel nicht ohne den ordnungsgemäß...
- Page 51 ZUSAMMENFÜGEN/SEPARIEREN DER BEIDEN GASHEBEL Um die beiden Gashebel zusammenzufügen: Um die beiden Gashebel voneinander zu separieren: 14/18...
- Page 52 EINBAU DES JOYSTICKS IN EIN COCKPIT ODER AUF EINER ANDEREN HALTERUNG Um den Joystick in ein Cockpit einzubauen: - Lösen Sie die vier Schrauben unter der Metallbasis des Joysticks und entfernen die metallene Basisplatte. - Nutzen Sie die vier Schraubgewinde unten am Joystick, um diesen auf Ihre Halterung zu montieren.
-
Page 53: Wichtige Anmerkungen
- Sie können die weiße Markierung auf dem Rad dazu nutzen, um Ihre Drehungen gegebenenfalls zu zählen. ABWÄRTSKOMPATIBILITÄT Der neue “HOTAS Warthog-” Griff ist abwärtskompatibel mit der Basis des “HOTAS Cougar” (und umgekehrt). Nur der CMS Druckbutton (Button 19) funktioniert nicht, da dieser ursprünglich nicht auf dem HOTAS Cougar vorhanden ist. - Page 54 Gewährleistungsfrist ist, die mit der Frist für eine Mängelrüge bezüglich des Produktes übereinstimmt. In den Ländern der Europäischen Union entspricht diese einem Zeitraum von zwei (2) Jahren ab Kaufdatum des Thrustmaster Produktes. In anderen Ländern entspricht die Gewährleistungsfrist der zeitlichen Begrenzung für eine Mängelrüge bezüglich des Thrustmaster Produktes in Übereinstimmung mit anwendbarem Recht des Landes, in dem der Kunde zum Zeitpunkt des...
-
Page 55: Hinweise Zum Umweltschutz
Herstellungsfehler in Bezug auf das Produkt beruhen (einschließlich, aber nicht beschränkt auf, etwaige Schäden, die direkt oder indirekt durch Software oder durch die Kombination der Thrustmaster Produkte mit ungeeigneten Elementen, insbesondere Netzteile, Akkus, Ladegeräte, oder andere Elemente, die von Guillemot für dieses Produkt nicht geliefert wurden), ab. - Page 56 Compatibel met: pc Hardwarehandleiding 1/18...
- Page 57 U.S. Air Force A-10C aanvalstoestel HOTAS™(**) (Hands On Throttle And Stick) replica- joystick-bundel, met de volgende inhoud: 1 Replica-JOYSTICK • Innovatieve nieuwe H.E.A.R.T HallEffect AccuRate Technology(*): - 3D magnetische sensoren (Hall Effect) op de stick - 16-bits resolutie (65536 x 65536 waarden) - 5-springveerssysteem(*) •...
- Page 58 DUBBELE Replica-THROTTLES • Innovatieve nieuwe H.E.A.R.T HallEffect AccuRate Technology(*): - 3D magnetische sensoren (Hall Effect) op de 2 throttles - 14-bits resolutie (16384 waarden) op elke throttle • USB-aansluiting met up te graden firmware • Dubbele throttles, met: - metalen handsteun - vergrendelingssysteem - instelbaar frictiesysteem - realistische IDLE-positie met “Pull &...
- Page 59 CONFIGURATIE VAN KNOPPEN EN ASSEN Op de JOYSTICK: 4/18...
- Page 60 Op de THROTTLE: 5/18...
- Page 61 Op het BEDIENINGSPANEEL: 6/18...
- Page 62 "A-10C"-TOESTELFUNCTIES Op de JOYSTICK: 7/18...
- Page 63 Op de THROTTLE: 8/18...
- Page 64 Op het BEDIENINGSPANEEL: 9/18...
- Page 65 REALISTISCHE STANDEN VOOR IDLE EN AFTERBURNER De throttle van de HOTAS Warthog heeft realistische systemen voor de standen IDLE (stationair) en AFTERBURNER (het AFTERBURNER-systeem is afkoppelbaar). IDLE: In de stand IDLE: om te motoren van het toestel af te zetten (in games waarin dit mogelijk is), trekt u de throttle-hendels iets omhoog over de vergrendeling heen en zet u de throttle- hendels in de stand OFF.
- Page 66 AFTERBURNER: Als de vergendeling van de AFTERBURNER-module aanwezig is, trekt u de throttle-hendels iets omhoog over de vergrendeling heen en drukt u de hendels naar voren. DE AFTERBURNER-VERGRENDELING (DE)MONTEREN: (De AFTERBURNER-vergrendeling is standaard niet gemonteerd). - Draai de 2 bouten los met de meegeleverde imbussleutel zoals hieronder afgebeeld. Verwijder vervolgens het plaatje tussen de 2 throttle-hendels.
- Page 67 - Haal de AFTERBURNER-module weg die zich onder het verwijderbare plaatje bevindt. (In deze stand is de AFTERBURNER-vergrendeling UITgeschakeld) 12/18...
- Page 68 - Draair de module op zijn kop en plaats hem weer terug: (In deze stand is de AFTERBURNER-vergrendeling INgeschakeld) - Plaats het verwijderbare plaatje terug tussen de 2 throttle-hendels en zet de 2 imbusbouten weer vast. BELANGRIJKE OPMERKING: Om mogelijke schade aan de AFTERBURNER-module te vermijden, mag u de throttle-hendels nooit gebruiken als het verwijderbare plaatje niet correct met de 2 imbusbouten tussen de 2 throttle-hendels is gemonteerd.
- Page 69 DE 2 THROTTLE-HENDELS SAMENVOEGEN/SCHEIDEN De throttle-hendels samenvoegen: De throttle-hendels scheiden: 14/18...
- Page 70 DE JOYSTICK IN EEN COCKPIT OF OP ANDERE VASTE STEUN INSTALLEREN De joystick in een cockpit monteren: - Draai de 4 bouten onderop de metalen onderplaat van de joystick los en verwijder de metalen onderplaat. - Gebruik de 4 schroefdraden onderop de joystick om de joystick direct op een vaste steun te bevestigen.
-
Page 71: Belangrijke Opmerkingen
COMPATIBILITEIT MET EERDERE PRODUCTEN: De nieuwe “HOTAS Warthog”-greep is compatibel met de voet van de “HOTAS Cougar” (en vice versa). Alleen de CMS-drukknop (knop 19) zal niet werken omdat deze functie niet aanwezig was op de HOTAS Cougar. - Page 72 Thrustmaster-product te claimen zoals wettelijk is vastgelegd in het land waarin de koper woonachtig was op de datum van aankoop van het Thrustmaster-product. Indien een dergelijk claimrecht niet wettelijk is vastgelegd in het betreffende land, geldt een garantieperiode van één (1) jaar vanaf datum aankoop van het Thrustmaster-product.
-
Page 73: Technische Ondersteuning
(inclusief maar niet beperkt tot enige schade direct of indirect veroorzaakt door enige software, of door het combineren van het Thrustmaster-product met enig ongeschikt element waaronder in het bijzonder voedingsadapters, oplaadbare batterijen, opladers of enig ander element niet geleverd door Guillemot voor dit product). - Page 74 Compatibile: PC Manuale d’uso hardware 1/18...
- Page 75 Kit joystick HOTAS™(**) (Hands On Throttle And Stick), replica dell’aereo da attacco U.S. Air Force A-10C, comprendente: 1 JOYSTICK (replica) • Nuova e innovativa H.E.A.R.T HallEffect AccuRate Technology(*): - Sensori magnetici 3D (Hall Effect) nella leva - Risoluzione a 16-bit (65536 x 65536 valori) - Sistema a 5 molle elicoidali(*) •...
- Page 76 DOPPIA MANETTA (replica) • Nuova e innovativa H.E.A.R.T HallEffect AccuRate Technology(*): - Sensori magnetici 3D (Hall Effect) nelle 2 manetta - Risoluzione a 14-bit (16384 valori) per ciascuna manetta • Connessione USB con firmware aggiornabile • Doppia manetta, dotata di: - zona in metallo per il riposo della mano - sistema di bloccaggio - sistema a resistenza regolabile...
- Page 77 CONFIGURAZIONE DI PULSANTI E ASSI Sul JOYSTICK: 4/18...
- Page 78 Sulla MANETTA: 5/18...
- Page 79 Sul PANNELLO DI CONTROLLO: 6/18...
- Page 80 COMANDI AEREO “A-10C” Sul JOYSTICK: 7/18...
- Page 81 Sulla MANETTA: 8/18...
- Page 82 Sul PANNELLO DI CONTROLLO: 9/18...
- Page 83 REALISTICHE POSIZIONI IDLE E AFTERBURNER La manetta di HOTAS Warthog è dotata di un realistico sistema per le posizioni IDLE (STALLO) e AFTERBURNER (POSTBRUCIATORI) (il sistema AFTERBURNER è sganciabile). IDLE: A manetta impostata su IDLE: per spegnere i motori dell’aereo (nei giochi compatibili), solleva leggermente le leve della manetta (per portarle al di sopra della tacca) e porta le leve della manetta in posizione OFF.
- Page 84 AFTERBURNER: Quando il modulo di blocco AFTERBURNER è installato, solleva leggermente le leve della manetta (per portarle al di sopra della tacca) e spingile quindi in avanti. INSTALLARE/DISINSTALLARE IL BLOCCO AFTERBURNER: (Per default, il modulo di blocco AFTERBURNER non è installato). - Utilizzando l’acclusa chiave Allen, svita le 2 viti così...
- Page 85 - Sfila il modulo AFTERBURNER, posto al di sotto della barra rimuovibile: (In questa posizione, il blocco AFTERBURNER è disabilitato) 12/18...
- Page 86 - Ribalta il modulo a faccia in giù e reinseriscilo in posizione: (In questa posizione, il blocco AFTERBURNER è ora attivo) - Reinserisci la barra rimuovibile tra le 2 leve della manetta, dopodiché inserisci e stringi nuovamente le 2 viti. NOTA IMPORTANTE: Per evitare qualsiasi potenziale danno al modulo AFTERBURNER, non utilizzare mai le leve della manetta senza che la barra rimuovibile sia correttamente installata tra le 2 leve stesse (tramite le 2 apposite viti).
- Page 87 INSERIRE/SEPARARE LE 2 LEVE DELLA MANETTA Per vincolare tra loro le leve della manetta: Per sganciare tra loro le leve della manetta: 14/18...
- Page 88 INSTALLARE IL JOYSTICK IN UN ABITACOLO O IN UN ALTRO SUPPORTO FISSO Per attaccare il joystick ad un abitacolo: - Svita le 4 viti poste al di sotto della placca metallica presente nella base del joystick, rimuovendo poi la stessa placca metallica. - Tramite le apposite 4 guide per viti poste nella parte inferiore del joystick, fissa il joystick direttamente al tuo supporto rigido.
- Page 89 - Se lo desideri, per aiutarti a contare i giri, puoi sfruttare la tacca bianca presente sulla rotella. RETRO-COMPATIBILITÀ La nuova leva di “HOTAS Warthog” è retro-compatibile con la base di “HOTAS Cougar” (e viceversa). Solo il pulsante a pressione CMS (pulsante 19) risulterà non funzionante, in quanto non originariamente presente su HOTAS Cougar.
- Page 90 Nei paesi della Comunità Europea, tale periodo equivale a due (2) anni a partire dalla consegna del prodotto Thrustmaster. In altri paesi, la durata della garanzia corrisponde al limite temporale stabilito per la presentazione di un reclamo riguardante la conformità del prodotto Thrustmaster in base alle leggi applicabili nel paese in cui il consumatore risiedeva alla data di acquisto del prodotto Thrustmaster (qualora nel paese in questione non esistesse alcuna norma a riguardo, il periodo di garanzia corrisponderà...
-
Page 91: Raccomandazioni Sulla Tutela Dell'ambiente
(compresi, ma non i soli, potenziali danni causati direttamente o indirettamente da un qualunque software, oppure dall’uso del prodotto Thrustmaster in combinazione con elementi inadatti, tra cui, in particolare, batterie ricaricabili, caricatori o qualsiasi altro elemento non fornito da Guillemot per questo prodotto). - Page 92 Compatible: PC Manual del usuario del hardware 1/18...
- Page 93 Pack de joystick réplica HOTAS™(**) (Hands On Throttle And Stick) del avión de ataque U.S. Air Force A-10C, que incluye: 1 JOYSTICK (réplica) • Nueva e innovadora tecnología H.E.A.R.T HallEffect AccuRate Technology(*): - sensores magnéticos 3D (Hall Effect) en la palanca - resolución de 16 bits (65536 x 65536 valores) - sistema con 5 muelles de bobina(*) •...
- Page 94 MANDOS DE POTENCIA DUALES (réplica) • Nueva e innovadora tecnología H.E.A.R.T HallEffect AccuRate Technology(*): - sensores magnéticos 3D (Hall Effect) en los 2 mandos de potencia - resolución de 14 bits (16384 valores) en cada mando de potencia • Conexión USB con firmware actualizable •...
- Page 95 CONFIGURACIÓN DE LOS BOTONES Y LOS EJES En el JOYSTICK: 4/18...
- Page 96 En el MANDO DE POTENCIA: 5/18...
-
Page 97: En El Panel De Control
En el PANEL DE CONTROL: 6/18... - Page 98 FUNCIONES DEL AVIÓN “A-10C” En el JOYSTICK: 7/18...
- Page 99 En el MANDO DE POTENCIA: 8/18...
- Page 100 En el PANEL DE CONTROL: 9/18...
- Page 101 DETENTORES REALISTAS DE IDLE Y AFTERBURNER El mando de potencia del HOTAS Warthog incorpora sistemas realistas de RALENTÍ y POSTCOMBUSTIÓN (el sistema de POSTCOMBUSTIÓN es desconectable). IDLE: Cuando se pone en IDLE: para cortar los motores del avión (en juegos compatibles), levanta ligeramente las palancas de potencia (para superar la parada) y pon las palancas de potencia en la posición OFF.
- Page 102 AFTERBURNER: Cuando esté colocado el tope del módulo de AFTERBURNER, levanta ligeramente las palancas de potencia (para superar la parada) y empújalas hacia delante. INSTALACIÓN/DESINSTALACIÓN DEL TOPE DE AFTERBURNER: (De forma predeterminada, el tope del módulo de AFTERBURNER no está instalado). - Utilizando la llave Allen incluida, desatornilla los 2 tornillos según se muestra a continuación y quita la barra desmontable situada entre las 2 palancas de potencia.
- Page 103 - Quita el módulo de AFTERBURNER, situado debajo de la barra desmontable: (En esta posición, el tope de AFTERBURNER está deshabilitado) 12/18...
- Page 104 - Dale la vuelta al módulo y vuélvelo a colocar en su sitio: (En esta posición, el tope de AFTERBURNER está habilitado) - Coloca la barra desmontable entre las 2 palancas de potencia y, a continuación, vuelve a colocar y apretar los 2 tornillos. NOTA IMPORTANTE: Para evitar dañar el módulo de AFTERBURNER, nunca debes utilizar las palancas de potencia sin tener instalada correctamente la barra desmontable (utilizando los 2 tornillos) entre las 2 palancas de potencia.
- Page 105 UNIR/SEPARAR LAS 2 PALANCAS DE POTENCIA Para unir las palancas de potencia: Para separar las palancas de potencia: 14/18...
- Page 106 INSTALACIÓN DEL JOYSTICK EN UNA CABINA O EN OTRO SOPORTE FIJO Para colocar el joystick en una cabina: - Desatornilla los 4 tornillos situados debajo de la placa de la base metálica y quítala. - Utiliza las 4 roscas de tornillo situadas en la cara inferior del joystick para sujetar el joystick directamente al soporte fijo.
-
Page 107: Notas Importantes
- Si es necesario, puedes utilizar la marca blanca que hay en la rueda para contar los giros. COMPATIBILIDAD HACIA ATRÁS La nueva palanca “HOTAS Warthog” es compatible hacia atrás con la base del “HOTAS Cougar” (y viceversa). Lo único que no funcionará será el botón pulsador CMS (botón 19), puesto que no aparecía originalmente en el HOTAS Cougar. - Page 108 En los países de la Unión Europea, esto corresponde a un período de dos (2) años a partir de la entrega del producto de Thrustmaster. En otros países, el período de garantía corresponde al límite de tiempo para interponer una acción legal referida a la conformidad en relación con este...
-
Page 109: Recomendación De Protección Ambiental
(incluyendo, pero no de forma exclusiva, los daños causados de forma directa o indirecta por cualquier software, o por combinar el producto de Thrustmaster con cualquier elemento no adecuado, incluyendo en particular fuentes de alimentación, baterías recargables, cargadores o cualquier otro elemento no suministrado por Guillemot para este producto). - Page 110 Compatível: PC Manual do Utilizador do Hardware 1/18...
- Page 111 Réplica do sistema de controlo de voo HOTAS™(**) (Hands On Throttle And Stick) do avião de ataque A-10C da U.S. Air Force, que inclui: 1 Réplica da MANCHE • Nova e inovadora H.E.A.R.T HallEffect AccuRate Technology(*): - Sensores magnéticos 3D (Hall Effect) na coluna - Resolução de 16 bits (65.536 x 65.536 valores) - Sistema de 5 molas helicoidais(*) •...
- Page 112 Réplicas das MANETES DUPLAS • Nova e inovadora H.E.A.R.T HallEffect AccuRate Technology(*): - Sensores magnéticos 3D (Hall Effect) nas 2 manetes - Resolução de 14 bits (16.384 valores) em cada manete • Ligação USB com firmware actualizável • Manetes duplas, com: - descanso de metal para a mão - sistema de bloqueio - sistema de fricção ajustável...
- Page 113 CONFIGURAÇÃO DOS BOTÕES E EIXOS No JOYSTICK: 4/18...
- Page 114 Na MANETE: 5/18...
- Page 115 No PAINEL DE CONTROLO: 6/18...
- Page 116 FUNÇÕES DO AVIÃO “A-10C” No JOYSTICK: 7/18...
- Page 117 Na MANETE: 8/18...
- Page 118 No PAINEL DE CONTROLO: 9/18...
- Page 119 DETENTORES IDLE E AFTERBURNER REALISTAS A manete do HOTAS Warthog possui sistemas realistas para detentores IDLE (RALENTI) e AFTERBURNER (PÓS-COMBUSTOR) (o sistema AFTERBURNER pode ser desactivado). IDLE: Com IDLE seleccionado: para desligar os motores do avião (em jogos compatíveis), suba ligeiramente as alavancas da manete (a fim de compensar a paragem dos motores) e coloque-as na posição OFF.
- Page 120 AFTERBURNER: Com o retentor do módulo AFTERBURNER instalado, suba ligeiramente as alavancas da manete (a fim de compensar a paragem dos motores) e empurre-as para a frente. INSTALAR/DESINSTALAR O RETENTOR DO MÓDULO AFTERBURNER: (Por predefinição, o retentor do módulo AFTERBURNER não está instalado). - Com a chave Allen incluída, desaperte os 2 parafusos conforme se mostra abaixo e retire a barra amovível situada entre as 2 alavancas da manete.
- Page 121 - Retire o módulo AFTERBURNER, situado por baixo da barra amovível: (Nesta posição, o retentor do módulo AFTERBURNER está desactivado) 12/18...
- Page 122 - Vire o módulo ao contrário e volte a colocá-lo no sítio: (Nesta posição, o retentor do módulo AFTERBURNER está activado) - Coloque a barra amovível entre as 2 alavancas da manete e reaperte os 2 parafusos. NOTA IMPORTANTE: Para evitar quaisquer danos eventuais no módulo AFTERBURNER, nunca utilize as alavancas da manete sem a barra amovível devidamente instalada (com os 2 parafusos) entre as mesmas.
- Page 123 UNIR/SEPARAR AS 2 ALAVANCAS DA MANETE Para unir as alavancas da manete: Para separar as alavancas da manete: 14/18...
- Page 124 INSTALAR O JOYSTICK NUM COCKPIT OU NOUTRO SUPORTE FIXO Para ligar o joystick a um cockpit: - Desaperte os 4 parafusos situados por baixo da base de metal do joystick e retire esta. - Utilize as 4 roscas situadas na parte inferior do joystick para prender o joystick directamente ao suporte fixo.
- Page 125 - Se necessário, utilize a marca branca existente na roda para o ajudar a contar as voltas. RETROCOMPATIBILIDADE O novo manípulo “HOTAS Warthog” é retrocompatível com a base do “HOTAS Cougar” (e vice-versa). Apenas o botão de pressão CMS (botão 19) não funciona, uma vez que não fazia parte originalmente do HOTAS Cougar.
-
Page 126: Informações Sobre A Garantia Para O Consumidor
Thrustmaster de acordo com a legislação em vigor do país no qual o consumidor residia à data de compra do produto Thrustmaster (se a dita ação não existir no país correspondente, então o período de garantia será de um (1) ano a partir da data de compra original do produto Thrustmaster. -
Page 127: Recomendações De Protecção Ambiental
(incluindo, mas sem limitação, quaisquer danos causados direta ou indiretamente por qualquer software ou por combinar o produto Thrustmaster com qualquer elemento inadequado, incluindo, em particular, fontes de alimentação, baterias recarregáveis, carregadores ou quaisquer outros elementos não fornecidos pela Guillemot para este produto). - Page 128 Совместимый c ПК Руководство пользователя по техническому обеспечению 1/18...
- Page 129 В комплект реплики джойстика авиасимулятора HOTAS™(**) (Hands On Throttle And Stick) штурмовика U.S. Air Force A-10C входит: 1 ДЖОЙСТИК-реплика • Инновационная технология H.E.A.R.T HallEffect AccuRate Technology(*): - трехмерные магнитные сенсоры (Hall Effect), расположенные на рукоятке - решение в 16 бит (значения 65536 x 65536) - система...
- Page 130 2 реплики РЫЧАГОВ УПРАВЛЕНИЯ ДВИГАТЕЛЕМ • Инновационная технология H.E.A.R.T HallEffect AccuRate Technology(*): - трехмерные магнитные сенсоры (Hall Effect), расположенные на 2 рычагах управления двигателем - решение в 14 бит (значения 16384) для каждого рычага управления двигателем • USB-подключение к расширяемому аппаратно-программному обеспечению •...
- Page 131 КОНФИГУРАЦИЯ КНОПОК И ОСЕЙ На ДЖОЙСТИКЕ: 4/18...
- Page 132 На РЫЧАГЕ УПРАВЛЕНИЯ ДВИГАТЕЛЕМ: 5/18...
- Page 133 На ПАНЕЛИ УПРАВЛЕНИЯ: 6/18...
- Page 134 ФУНКЦИИ ШТУРМОВИКА "А-10С" На ДЖОЙСТИКЕ: 7/18...
- Page 135 На РЫЧАГЕ УПРАВЛЕНИЯ ДВИГАТЕЛЕМ: 8/18...
- Page 136 На ПАНЕЛИ УПРАВЛЕНИЯ: 9/18...
- Page 137 РЕАЛИСТИЧНЫЕ СТОПОРЫ IDLE (РЕЖИМ ХОЛОСТОГО ХОДА) И AFTERBURNER (ФОРСАЖНЫЙ РЕЖИМ) Рычаг управления двигателем на джойстике от HOTAS Warthog оснащен реалистичными системами стопоров IDLE и AFTERBURNER (система AFTERBURNER отсоединяема). IDLE: Чтобы перейти в режим IDLE: выключите двигатели (в комбинированных играх), приподнимите рычаги управления двигателем (чтобы избежать остановки) и...
- Page 138 AFTERBURNER: Если стопор AFTERBURNER на месте, приподнимите рычаги управления двигателем (чтобы избежать остановки) и передвиньте их вперед. УСТАНОВКА И ДЕУСТАНОВКА СТОПОРА AFTERBURNER: (по умолчанию стопор AFTERBURNER не установлен). - C помощью шестигранного ключа отвинтите 2 болта, как показано на рисунке, и выньте...
- Page 139 - Выньте AFTERBURNER, который расположен под извлекаемой панелью. (В этой позиции стопор AFTERBURNER не работает) 12/18...
- Page 140 - Переверните AFTERBURNER и вставьте его обратно: (В этой позиции стопор AFTERBURNER не работает) - Вставьте извлекаемую панель обратно между 2-мя рычагами управления двигателем и привинтите болты. ПРИМЕЧАНИЕ. Чтобы не повредить AFTERBURNER, не используйте рычаги управления двигателем, если извлекаемая панель должным образом не установлена (не...
- Page 141 ПОДСОЕДИНЕНИЕ И ОТСОЕДИНЕНИЕ РЫЧАГОВ УПРАВЛЕНИЯ ДВИГАТЕЛЕМ Чтобы соединить рычаги управления двигателем: Чтобы рассоединить рычаги управления двигателем: 14/18...
- Page 142 УСТАНОВКА ДЖОЙСТИКА В КАБИНЕ ПИЛОТА ИЛИ ДРУГОЙ КОНСТРУКЦИИ Чтобы закрепить джойстик в кабине пилота: - отвинтите 4 болта, которые расположены в нижней части металлической подставки джойстика, и выньте ее; - прикрепите джойстик к конструкции с помощью 4-х винтовых резьб, находящихся на его...
- Page 143 десяти полных оборотов колесиком. - Белая пометка на колесике поможет считать обороты. ОБРАТНОЕ КОМБИНИРОВАНИЕ Новая рукоятка "HOTAS Warthog" комбинируется с панелью "HOTAS Warthog" (и наоборот). Нефункционирующей будет только кнопка CMS (кнопка 19), поскольку изначально на панели HOTAS Cougar ее не было.
- Page 144 Корпорация Guillemot Corporation S.A., зарегистрированная по адресу Place du Granier, B.P. 97143, 35571 Chantepie, Франция, (далее — «Guillemot») гарантирует своим клиентам во всем мире, что в данном изделии Thrustmaster не будет выявлено никаких дефектов материалов и производства в течение гарантийного периода, который равен сроку...
-
Page 145: Авторское Право
дочерние предприятия отказываются от любой ответственности за любой ущерб, не связанный с дефектами материалов или изготовления, в отношении данного изделия (включая, помимо прочего, любой ущерб, вызванный прямо или опосредованно любым программным обеспечением или использованием изделия Thrustmaster с любыми неподходящими элементами, в частности — блоками питания, аккумуляторами, зарядными устройствами и любыми...
Need help?
Do you have a question about the Hotas Warthog and is the answer not in the manual?
Questions and answers