Table of Contents
Advertisement
Available languages
Available languages
Automatic Battery Charger
Cargador de Baterías Automático
Chargeur de batterie automatique
OWNERS MANUAL
MANUAL DEL USUARIO
GUIDE D'UTILISATION
PLEASE SAVE THIS OWNERS MANUAL AND READ BEFORE EACH USE.
This manual will explain how to use the charger safely and effectively. Please
read and follow these instructions and precautions carefully.
POR FAVOR CONSERVE ESTE MANUAL DEL USUARIO Y LEALO ANTES
DE CADA USO. En este manual le explica cómo utilizar el cargador de manera
segura y confiable. Por favor, lea y siga las siguientes instrucciones y precauciones.
ESSAYER DE GARDER LE MANUEL D'INSTRUCTIONS ET LE LIRE AVANT
CHAQUE UTILISATION. Ce manuel explique comment utiliser l'unité d'une
façon sûre et efficace. S'il vous plaît lisez et suivez ces instructions et précautions.
Model
Modelo
Modèle
SP6
®
0099001574-00
Advertisement
Table of Contents

Related Manuals for Schumacher SP6


Summary of Contents for Schumacher SP6
- Page 1 Model Modelo Modèle ® Automatic Battery Charger Cargador de Baterías Automático Chargeur de batterie automatique OWNERS MANUAL MANUAL DEL USUARIO GUIDE D’UTILISATION PLEASE SAVE THIS OWNERS MANUAL AND READ BEFORE EACH USE. This manual will explain how to use the charger safely and effectively. Please read and follow these instructions and precautions carefully.
-
Page 2: Important Safety Instructions
1.1 SAVE THESE INSTRUCTIONS – This manual contains important safety and operating instructions. 1.2 Do not expose the charger to rain or snow. 1.3 Use of an attachment not recommended or sold by Schumacher Electric ® Corporation may result in a risk of fire, electric shock or injury to persons. -
Page 3: Personal Safety Precautions
PERSONAL SAFETY PRECAUTIONS 2.1 Consider having someone close enough by to come to your aid when you work near a lead-acid battery. 2.2 Have plenty of fresh water and soap nearby in case battery acid contacts skin, clothing, or eyes. 2.3 Wear complete eye protection and clothing protection. -
Page 4: Charger Location
CHARGER LOCATION 4.1 Locate charger as far away from battery as DC cables permit. 4.2 Never place charger directly above battery being charged; gases from battery will corrode and damage charger. 4.3 Never allow battery acid to drip on charger when reading electrolyte specific gravity or filling battery. -
Page 5: Follow These Steps When Battery Is Outside Vehicle
FOLLOW THESE STEPS WHEN BATTERY IS OUTSIDE VEHICLE A SPARK NEAR THE BATTERY MAY CAUSE A BATTERY EXPLOSION. TO REDUCE THE RISK OF A SPARK NEAR THE BATTERY: 7.1 Check polarity of battery posts. POSITIVE (POS, P, +) battery post usually has a larger diameter than NEGATIVE (NEG, N, –) post. -
Page 6: Control Panel
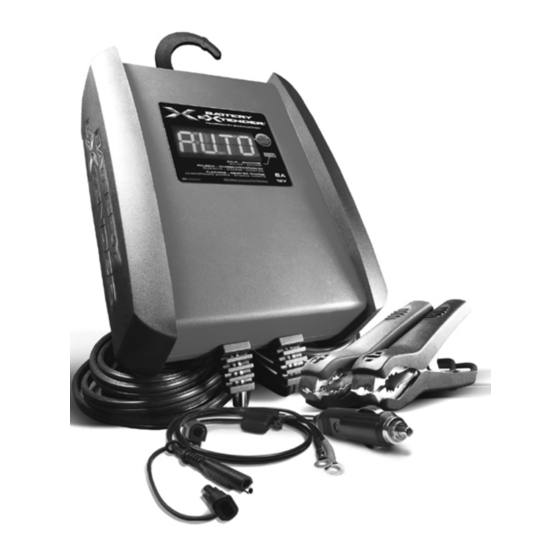
ASSEMBLY INSTRUCTIONS 9.1 Remove all cord wraps and uncoil the cables prior to using the battery charger. 10. FEATURES 1. Digital display 2. Hook attachment 3. Battery type button 4. Charging status LED indicator 5. AC Power cord 6. Ring terminal quick-connect 7. - Page 7 12. OPERATING INSTRUCTIONS IMPORTANT: Do not start the vehicle with the charger connected to the AC outlet, or it may damage the charger and your vehicle. NOTE: This charger is equipped with an auto-start feature. Current will not be supplied to the battery clamps until a battery is properly connected. The clamps will not spark if touched together.
- Page 8 8. When charging is complete, disconnect the charger from the AC power, disconnect the negative clamp, and finally the positive clamp. 9. A marine (boat) battery must be removed and charged on shore. USING THE QUICK-CONNECT CABLE CONNECTORS Connect any of the three output cable assemblies to the charger in seconds. IMPORTANT: Never connect the clamp and ring terminal connectors together for use in other applications, such as external battery or other power source charging, or to extend the output cable length, as reverse polarity and/or...
- Page 9 4. Plug the charger power cord into a grounded 120V AC electrical wall outlet. 5. If the vehicle’s ignition key has to be on in order for the accessory outlet to supply/receive power, turn the key, without starting the engine. 6.
-
Page 10: Display Messages
MAINTAINING A BATTERY This unit maintains 12 volt batteries, keeping them at full charge. It can charge small batteries and maintain both small and large batteries. If you are maintaining a fully charged large battery, you are properly utilizing the battery charger. However, if you use this battery charger to charge a large battery, such as a marine deep-cycle battery, that was not fully charged, you may lose some of the battery’s capacity. -
Page 11: Maintenance And Care
FULLY CHARGED AUTO MAINTAINING (Green LED pulsing) – Plugged into the AC outlet and correctly connected to a fully charged battery. CHARGE ABORTED-BAD BATTERY (Green LED flashing) – Circumstances that could cause an Abort situation during charging: • The battery is severely sulfated or has a shorted cell and can’t reach a full charge. •... -
Page 12: Specifications
PROBLEM POSSIBLE CAUSE REASON/SOLUTION The charger will not AC outlet is dead. Check for open fuse or circuit turn on when properly breaker supplying AC outlet. connected. Poor electrical connection. Check power cord and extension cord for loose fitting plug. Green LED is solid The charger needs to check the The Green LED will be solid... -
Page 13: Before Returning For Repairs
Manufacturer does not provide any warranty for any accessories used with this product that are not manufactured by Schumacher Electric Corporation and approved for use with this product. This Limited Warranty is void if the product is misused, subjected to careless handling, repaired, or modified by anyone other than Manufacturer or if this unit is resold through an unauthorized retailer. - Page 14 THE MANUFACTURER NEITHER ASSUMES OR AUTHORIZES ANYONE TO ASSUME OR MAKE ANY OTHER OBLIGATION TOWARDS THE PRODUCT OTHER THAN THIS WARRANTY. Schumacher and the Schumacher logo are registered ® trademarks of Schumacher Electric Corporation. Battery Extender is a trademark of Auto Meter Products, Inc.
-
Page 15: Instrucciones Importantes De Seguridad
1.2 No exponga el cargador a la lluvia o a la nieve. 1.3 El uso de un accesorio no recomendado o suministrado por Schumacher ® Electric Corporation puede provocar riesgo de incendio, descarga eléctrica o lesiones a personas. -
Page 16: Precauciones De Seguridad Personal
b. Para reducir el riesgo de explosión de una batería, siga estas instrucciones y aquellas publicadas por el fabricante de la batería y por el fabricante de cualquier equipo que intente utilizar en la proximidad de la batería. Revise las pautas de precaución en estos productos y en el motor. -
Page 17: Preparación Para La Carga
PREPARACIÓN PARA LA CARGA 3.1 Si resulta necesario extraer la batería del vehículo para cargarla, siempre retire el terminal con descarga a tierra en primer lugar. Asegúrese de que todos los accesorios en el vehículo se encuentren apagados para evitar la formación de arcos eléctricos. 3.2 Asegúrese de que el área que rodea a la batería se encuentre bien ventilada mientras se carga la batería. -
Page 18: Siga Estos Pasos Cuando La Batería Esté Colocada En El Vehículo
SIGA ESTOS PASOS CUANDO LA BATERÍA ESTÉ COLOCADA EN EL VEHÍCULO UNA CHISPA PROVOCADA CERCA DE LA BATERÍA PUEDE CAUSAR LA EXPLOSIÓN DE LA BATERÍA. PARA REDUCIR EL RIESGO DE PROVOCAR CHISPAS CERCA DE LA BATERÍA: 6.1 Ubique los cables de C.A. y C.C. para reducir el riesgo de daños a la cubierta, a la puerta y a las piezas móviles o calientes del motor. -
Page 19: Siga Estos Pasos Cuando La Batería Se Encuentre Fuera Del Vehículo
SIGA ESTOS PASOS CUANDO LA BATERÍA SE ENCUENTRE FUERA DEL VEHÍCULO UNA CHISPA PROVOCADA CERCA DE LA BATERÍA PUEDE CAUSAR LA EXPLOSIÓN DE LA BATERÍA. PARA REDUCIR EL RIESGO DE PROVOCAR CHISPAS CERCA DE LA BATERÍA: 7.1 Verifique la polaridad de los bornes de la batería. El borne POSITIVO (POS, P, +) de la batería generalmente posee un diámetro mayor al borne NEGATIVO (NEG, N, -). -
Page 20: Instrucciones De Montaje
8.3 USO DE UN CABLE DE EXTENSIÓN El uso de una extensión no se recomienda. Si debe usar una extensión, siga estas pautas: • Las clavijas del enchufe del cable de extensión debe ser el mismo número, tamaño y forma que las del enchufe del cargador. •... -
Page 21: Panel De Control
11. PANEL DE CONTROL PANTALLA DIGITAL La pantalla digital indica la condición de la batería y el cargador. Vea la sección Muestra de Mensajes para obtener una lista completa de los mensajes. NOTA: Durante la carga, la pantalla entra en el modo de suspensión y no se mostrará... - Page 22 9. Cuando se inicia el cargador, el LED VERDE será sólido y la pantalla mostrará ANALYZING BATTERY mientras el cargador determina si la batería está correctamente conectado y el estado de la batería. 10. Monitorear el progreso de la carga pulsando el botón de pantalla de la parte delantera de la unidad.
- Page 23 3. Después de realizar una buena conexión a la batería, conecte el cable de alimentación del cargador en una toma de corriente de 120V CA eléctrica de pared. 4. Seleccione el tipo de batería. 5. Cuando la carga esté completa, desconecte el cable de CA de la red de alimentación, retire la pinza negativa y finalmente la pinza positiva.
- Page 24 TIEMPOS DE CARGA CCA = Amperaje de arranque en frío RC = Capacidad de reserva Ah = Amp/hora TIEMPO DE CARGA TAMAÑO/ÍNDICE DE LA BATERÍA (6A) BATERÍAS PEQUEÑAS 6-12 Ah ¾-1¼ h 12-32 Ah 1¼-3¼ h Motocicleta, tractor de jardín, etc. 200-315 CCA 40-60 RC 3¼-4¾...
-
Page 25: Muestra De Mensajes
MANTENIENDO UNA BATERÍA Esta unidad mantiene las baterías de 12 voltios, manteniéndolas a carga completa. Puede cargar baterías pequeñas y mantener pequeñas y grandes. Si usted está manteniendo una batería grande completamente cargada, quiere decir que usted está utilizando correctamente el cargador de batería. Sin embargo, si usted utilizara este cargador de batería para cargar una batería grande, tal como una batería marina de ciclo profundo, que no fue cargada completamente, usted puede perder algo de la capacidad de la batería. -
Page 26: Mantenimiento Y Cuidado
CONNECT CLAMPS TO LEAD ACID BATTERY (no luz LED) – Conectado a la toma de CA, y se selecciona el tipo de baterías de plomo-ácido, sin las pinzas conectadas a la batería. WARNING CLAMPS REVERSED (no luz LED) – Conectado a la toma de CA y las pinzas conectadas en forma inversa a una batería. -
Page 27: Localización Y Solución De Problemas
15. LOCALIZACIÓN Y SOLUCIÓN DE PROBLEMAS PROBLEMA POSIBLE CAUSA SOLUCIÓN Las pinzas de la batería Este cargador está equipado con un No hay problema; es una no hacen corto al auto-rectificador. Este no permitirá condición normal. juntarse una con otra. paso de corriente si las pinzas de la batería no están conectadas en forma correcta. -
Page 28: Especificaciones
LIMITADA AL COMPRADOR MINORISTA ORIGINAL DE ESTE PRODUCTO. LA PRESENTE GARANTÍA LIMITADA NO PUEDE TRANSFERIRSE NI CEDERSE. Schumacher Electric Corporation (el “Fabricante”) otorga garantía por este cargador de batería por un plazo de cinco (5) años contados a partir de la fecha de compra por menor por la existencia de cualquier material o de mano de obra defectuosos que pudieran surgir por su uso y cuidado normal. - Page 29 ésta se pueda reparar o reemplazar. El Fabricante no presta garantía por lo accesorios utilizados con este producto que no sean los fabricados por Schumacher Electric Corporation y que no estén aprobados para su uso con este producto. La presente Garantía Limitada será...
-
Page 30: Consignes De Sécurité Importantes
1.2 Ne pas exposer le chargeur à la pluie ou la neige. 1.3 N’utilisez que les accessoires recommandés. L’utilisation d’accessoires non recommandés ou vendus par Schumacher Electric Corporation peut engendrer ® un risque d’incendie, un choc électrique ou des blessures. -
Page 31: Mesures De Sécurité Personnelle
1.11 Conformément à la Proposition 65 de Californie, ce produit contient des produits chimiques qui de l’avis de l’État de la Californie causent du cancer, des malformations congénitales ou d’autres problèmes pour la reproduction. Lavez- vous les mains après toute manipulation. 1.12 Ne le laissez pas a la portée des enfants. -
Page 32: Préparation Pour Le Chargement
PRÉPARATION POUR LE CHARGEMENT 3.1 S’il est nécessaire de retirer la batterie du véhicule pour la charger, toujours débrancher la borne de mise à la masse en premier. S’assurer que le courant aux accessoires du véhicule est coupé afin d’éviter la formation d’un arc. 3.2 Assurez-vous que la zone autour de la batterie est bien ventilée quand la batterie est en chargement. -
Page 33: Précautions Sur La Connexion C.c
PRÉCAUTIONS SUR LA CONNEXION C.C. 5.1 Mettre les interrupteurs du chargeur hors circuit et retirer le cordon c.a. de la prise avant de mettre et d’enlever les pinces du cordon C.C. s’assurer que les pinces ne se touchent pas. 5.2 Attachez les pinces à la batterie et au chassis, comme indiqué dans les sections 6 et 7. -
Page 34: Étapes À Suivre Quand La Batterie Est Installée Hors Du Véhicule
ÉTAPES À SUIVRE QUAND LA BATTERIE EST INSTALLÉE HORS DU VÉHICULE UNE ÉTINCELLE PRÈS DE BATTERIE PEUT CAUSER SON EXPLOSION. POUR RÉDUIRE LES RISQUES D’ÉTINCELLE PRÈS DE LA BATTERIE : 7.1 Vérifier la polarité des bornes de la batterie. Le diamètre de la borne POSITIVE (POS, P, +) est généralement supérieur à... - Page 35 8.3 UTILISEZ UNE RALLONGE L’utilisation d’une rallonge n’est pas recommandée. Si vous devez utiliser une rallonge, suivez ces directives : • Les broches de la fiche de la rallonge doit être le même nombre, la taille et forme que celles de la fiche du chargeur. •...
-
Page 36: Panneau De Contrôle
11. PANNEAU DE CONTRÔLE AFFICHAGE NUMÉRIQUE L’affichage numérique indique l’état de la batterie et le chargeur. Voir la section Affichage des Messages pour la liste complète des messages. REMARQUE : Pendant le chargement, l’affichage passera en mode de maintien et ne va pas afficher tous les messages. Pour rétablir l’affichage, appuyez sur le bouton d’affichage. - Page 37 8. Sélectionnez le type de batterie. 9. Lorsque le chargeur commence, la lumière VERTE sera solide, et l’écran affiche ANALYZING BATTERY pendant que le chargeur détermine que la batterie est correctement connecté et l’état de la batterie. 10. Surveillez la progression de la charge en appuyant sur le bouton d’affichage sur la face avant de l’appareil.
- Page 38 3. Après une bonne connexion électrique est à la batterie, branchez le cordon d’alimentation dans une mise à la terre 120 V CA prise électrique. 4. Sélectionnez le type de batterie. 5. Lorsque la charge est terminée, débranchez le cordon d’alimentation de réseau d’alimentation, retirer la pince négative, et enfin la pince positive.
- Page 39 TEMPS DE CHARGEMENT CCA = Intensité du courant électrique au démarrage à froid (Icedf) RC = Coefficient de capacité de réserve (CR) Ah = Ampère-heure TEMPS DE TAILLE DE LA BATTERIE / CHARGEMENT (6A) CARACTÉRISTIQUES (6A) PETITES BATTERIES 6-12 Ah ¾-1¼...
-
Page 40: Affichage Des Messages
LE MAINTIEN D’UNE BATTERIE L’unité maintient les batteries de 12 volts, et de les garde à pleine charge. Si vous êtes entrain de maintenir une grande batterie entièrement chargée, vous utiliser correctement le chargeur. Toutefois, si vous utilisez le chargeur de batterie pour charger une batterie grande, comme une batterie à... -
Page 41: Maintenance Et Entretien
CONNECT CLAMPS TO LEAD ACID BATTERY (LED éteint) – Branchée sur une prise CA, et le type de batterie au plomb-acide est choisi, sans relier les pinces a la batterie. WARNING CLAMPS REVERSED (LED éteint) – Branché sur la prise secteur et les pinces sont connectés vers l’arrière pour une batterie. - Page 42 15. TABLEAU DE DÉPANNAGE PROBLÈME CAUSE POSSIBLE RAISON / SOLUTION Les cosses de batterie Le chargeur est équipé avec une Aucun problème; c’est une ne donne pas des caractéristique d’auto-début. Il ne condition normale. étincelles quand touché fournira pas de courant aux clips de ensemble.
-
Page 43: Spécifications
L’ACHETEUR D’ORIGINE DU PRODUIT. CETTE GARANTIE LIMITÉE N’EST NI TRANSFÉRABLE NI CESSIBLE. Schumacher Electric Corporation (le « fabricant ») garantit ce chargeur de batterie pour cinq (5) ans, à partir de la date d’achat, contre les défauts de matériaux ou de fabrication qui peuvent survenir dans des conditions normales d’utilisation et d’entretien. - Page 44 Le fabricant ne fournit aucune garantie sur les accessoires utilisés avec ce produit qui ne sont pas fabriqués par Schumacher Electric Corporation et approuvés pour être utilisés avec ce produit. Cette garantie limitée est annulée si le produit est sujet à...
-
Page 45: Warranty Card
WARRANTY CARD SAVE ON POSTAGE! ACTIVATE YOUR WARRANTY ONLINE – THE QUICK AND EASY WAY! Go to www.batterychargers.com to register your product online. (No internet access? Send in the completed warranty card.) • 45 •... -
Page 46: Tarjeta De Garantía
TARJETA DE GARANTÍA ¡AHORRE EN EL ENVÍO! ¡ACTIVE SU GARANTÍA EN LÍNEA – LA FORMA MAS RÁPIDA Y FÁCIL! Visite nuestra página en www.batterychargers.com para registrar su producto en línea. (¿No tiene acceso al internet? Llene la tarjeta de garantía y envíela.) •... -
Page 47: Carte De Garantie
CARTE DE GARANTIE PAS BESOIN DE VOIE POSTAL ! ACTIVEZ VOTRE GARANTIE SUR INTERNET – LA VOIE PLUS RAPIDE ET FACILE! Aller sur www.batterychargers.com pour enregistrer votre produit en ligne. (Pas d’accès internet? Envoyer la carte de garantie par poste.) •...
Need help?
Do you have a question about the SP6 and is the answer not in the manual?
Questions and answers