
Subscribe to Our Youtube Channel
Related Manuals for Magic Chef MCKC490B2


Summary of Contents for Magic Chef MCKC490B2
- Page 1 4.9 Cu. Ft. Beer Keg Cooler User's Manual Model MCKC490B2/S2 PLEASE READ THIS MANUAL CAREFULLY BEFORE USING YOUR Keg Cooler AND KEEP IT FOR FUTURE REFERENCE .
- Page 2 Product Registration Thank you for purchasing a Magic Chef® product. The first step to protect your new product is to complete the product registration on our website: www.mcappliance.com/register. The benefits of registering your product include the following: Registering your product will allow us to contact you regarding a safety notification or product update.
-
Page 3: Table Of Contents
NAME OF THE PARTS ......................IMPORTANT SATETY INSTR U CTIONS................5-6 ..............BEFORE USING YOUR BEER DISPENSER INSTALLATION OF YOUR BEER DISPENSER .............. ELECTRICAL CONNECTION....................7 INSTALLATION INSTRUCTIONS FOR BEER KEG.............. 8-11 DISPENSING OF BEER ......................SETTING THE TEMPERATURE .................................... -
Page 4: Name Of The Parts
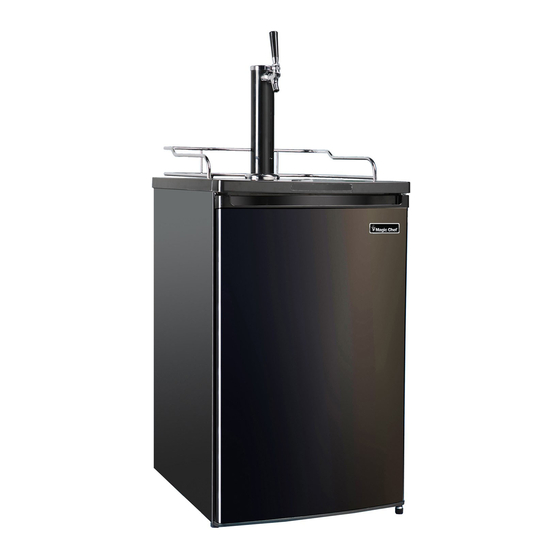
NAMES OF THE PARTS MODEL NO.: MCKC490B2 /MCKC490S2 Beer Tower Plastic Gasket Safety Guard Rail Drip Tray Adjustable Thermostat Regulator Gas Cylinder Gas Cylinder Support Evaporator Reversible Door Beer Keg (not included) Metal Plate Metal Gasket(2) Castors with Lock (4) -
Page 5: Important Satety Instr U Ctions
IMPORTANT SAFETY INSTRUCTIONS To reduce the risk of fire, electrical shock, or injury follow these basic precautions when using your beer keg cooler WARNING----Keep ventilation openings, in the appliance enclosure or in the built-in structure, clear of obstruction. WARNING----Do not use mechanical devices or other means to accelerate the defrosting process, other than those recommended by the manufacturer. -
Page 8: Installation Instructions For Beer Keg
INSTALLATION INSTRUCTIONS FOR BEER KEG Keg Installation Sketch · Install the four castors with lock provided into the unit’s bottom (four screw holes pre-supplied) The two metal gaskets are usded to the front two Castors. Figure (1) before installation. Figure (II) is the final version. - Page 9 Installation Of CO Cylinder Support Install the metal support provided onto the 4 studs located on the exterior back wall. Align the holes in the support with the studs and push down firmly. (See Figure 1) Installation Of CO Cylinder ...
- Page 10 bottom cabinet. (See Figure 6) Grasp the keg handles and slide it all the way into the cabinet. Fig. 4 Fig. 5 Fig. 6 Installation Of The Keg Coupler Insert the keg coupler provided into the locking neck of the beer keg and turn it clockwise to lock into position, making sure the keg coupler is in the closed position.
-
Page 12: Automatic Defrostng
COLDER WARMER... -
Page 13: Changing The Reversible Door
CHANGING THE REVERSIBLE DOOR This Beer Dispenser has the capability of either opening the door from the left or right side. The unit is delivered to you with the door opening from the left side. Should you desire to reverse the opening direction, please follow below instructions. -
Page 14: Cleaning Your Beer Dispenser
CARE AND MAINTENANCE Cleaning Your Beer Dispenser Turn the temperature control to "OFF", unplug the Beer Dispenser, and remove the contents. Wash the inside surfaces with a warm water and baking soda solution. The solution should be about 2 tablespoons of baking soda to a quart of water. -
Page 15: Limited Warrant
Some states prohibit the exclusion or limitation of incidental or consequential damages, or limitations on implied warranties. This warranty gives you specific legal rights, and you may also have other rights which vary from state to state. Model Parts & Labor Compressor (Parts Only) Type of Service MCKC490B2 One Year Five Years Carry In One Year Five Years... - Page 16 CNA International, Inc. d/b/a MC Appliance Corporation. All rights reserved. Magic Chef® logo is a registered trademark of CNA International, Inc. Printed in China www.mcappliance.com...
Need help?
Do you have a question about the MCKC490B2 and is the answer not in the manual?
Questions and answers