
Related Manuals for AEG 66331 K-MN


Summary of Contents for AEG 66331 K-MN
- Page 1 66331 K-MN User Manual Ceramic glass hob Notice d’utilisation Table de cuisson Gebruiksaanwijzing vitrocéramique Glaskeramische kookplaat...
- Page 2 Dear Customer Thank you for choosing one of our high-quality products. With this appliance you will experience the perfect combination of functional design and cutting edge technology. Convince yourself that our appliances are engineered to deliver the best per- formance and control - indeed we are setting the highest standards of excel- lence.
-
Page 3: Table Of Contents
Contents Safety instructions Description of the Appliance Cooking surface layout Control panel layout Touch Control sensor fields Residual heat indicator Operating the appliance Switching the appliance on and off Setting the heat setting Switching the outside ring on and off Locking/unlocking the control panel Switching the STOP+GO function on and off Using the automatic warm-up function... -
Page 4: Safety Instructions
Safety instructions Operating Instructions 1 Safety instructions Please comply with these instructions. If you do not, any damage resulting is not covered by the warranty. Correct use • This appliance is not intended for use by children or other persons whose physical, sensory or mental capabilities or lack of experience and knowledge prevents them from using the appliance safely without supervision or instruc- tion by a responsible person to ensure that they can use the appliance safely. -
Page 5: Safety During Use
Safety instructions Safety during use • Overheated fats and oils can ignite very quickly. Warning! Fire hazard! • There is the risk of burns from the appliance if used carelessly. • Remove stickers and film from the glass ceramic. • Cables from electrical appliances must not touch the hot surface of the appli- ance or hot cookware. -
Page 6: Description Of The Appliance
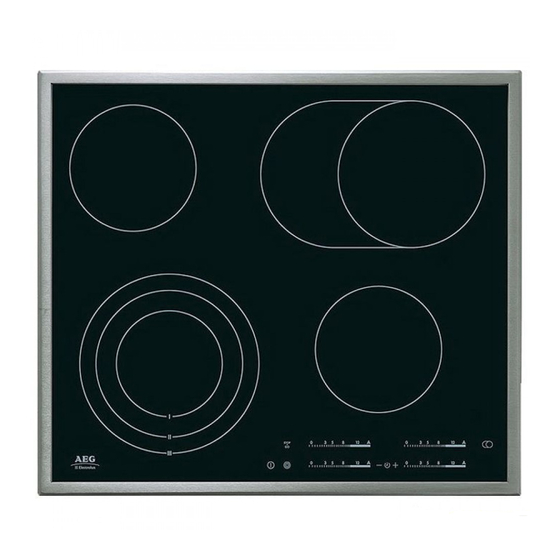
Description of the Appliance Description of the Appliance Cooking surface layout Single cooking zone Multi-purpose zone 1200 W 1500/2400 Triple cooking zone Control panel Single cooking zone 800/1600/2300 W 1200 W Control panel layout Multi-purpose zone Cooking zone indicators Child lock with switch with pilot light Timer function pilot light... -
Page 7: Touch Control Sensor Fields
Description of the Appliance Touch Control sensor fields The appliance is operated using Touch Control sensor fields. Functions are con- trolled by touching sensor fields and confirmed by displays and acoustic signals. Touch the sensor fields from above, without covering other sensor fields. Sensor field Function On / Off... -
Page 8: Residual Heat Indicator
Description of the Appliance Displays Display Description Cooking zone is switched off Keep Warm setting STOP+GO function / Keep Warm setting is set Heat settings Heat setting is set Automatic warm up func- Automatic warm-up function is acti- tion vated Fault Malfunction has occurred Residual heat... -
Page 9: Operating The Appliance
Operating the appliance Operating the appliance Switching the appliance on and off Control panel Display Pilot light Switch on Touch for 1 second lights up Switch off Touch for 1 second / none goes out After switching on, within approx. 10 seconds a heat setting or a function must be set, otherwise the appliance automatically switches itself off. -
Page 10: Switching The Outside Ring On And Off
Operating the appliance Switching the outside ring on and off By switching the outside rings on or off, the effective heating surface can be matched to the size of the cookware. Before an outside ring can be switched on, the inside ring must be switched on. Triple ring cooking Sensor field Pilot light... -
Page 11: Switching The Stop+Go Function On And Off
Operating the appliance Switching the STOP+GO function on and off The STOP+GO function simultaneously switches all cooking zones that are switched on to the keep warm setting and then back to the heat setting that was previously set. Control panel Display To switch on Touch To switch off Touch... -
Page 12: Using The Automatic Warm-Up Function
Operating the appliance Using the automatic warm-up function All cooking zones are equipped with an automatic warm-up function. When set- ting a heat setting using the automatic warm-up function, the cooking zone switches to full power for a certain amount of time and then automatically switches back to the heat setting set. -
Page 13: Using The Child Safety Device
Operating the appliance Using the child safety device The child safety device prevents unintentional use of the appliance. Switching on the child safety device Step Control panel Display/Signal Switch on appliance. (Do not set a heat setting.) Touch for 4 seconds The child safety device is switched on. -
Page 14: Using The Timer
Operating the appliance Using the timer Function Condition Outcome after the time has elapsed Automatic cut-out a heat setting is set acoustic signal flashes Cooking zone switches Countdown timer cooking zones not in use acoustic signal flashes If a heat setting is set on this cooking zone in addition to a countdown timer, the cooking zone is switched off after the time set has elapsed. -
Page 15: Setting The Time
Operating the appliance Setting the time Step Control panel Indicator Select TIMER cook- Pilot light for the cooking zone selected ing zone flashes Touch minutes After a few seconds the pilot light flashes more slowly. The time is set. The time counts down. Switching off the timer function Step Control panel... -
Page 16: Displaying The Time Remaining For A Cooking Zone
Operating the appliance Displaying the time remaining for a cooking zone Step Control panel field Display TIMER Select cook- Pilot light of the cooking zone selected ing zone flashes faster The time remaining is displayed After a few seconds the pilot light flashes more slowly. Switching off the acoustic signal Step Control panel field... -
Page 17: Automatic Switch Off
Operating the appliance Automatic switch off Cooking surface • If after switching on the cooking surface, a heat setting is not set for a cook- ing zone within approx. 10 seconds, the cooking surface automatically switch- es itself off. • If one or more sensor fields are covered by objects (a pan, cloths, etc.) for longer than approx. -
Page 18: Tips On Cooking And Frying
Tips on Cooking and Frying Tips on Cooking and Frying Information on acrylamides According to the latest scientific knowledge, intensive browning of food, espe- cially in products containing starch, can constitute a health risk due to acryla- mides. Therefore we recommend cooking at the lowest possible temperatures and not browning foods too much. -
Page 19: Examples Of Cooking Applications
Tips on Cooking and Frying Examples of cooking applications The information given in the following table is for guidance only. Heat Cooking- Cooking suitable for Tips/Hints setting process time Residual heat, Off position Keeping Keeping cooked foods warm as required Cover food warm Hollandaise sauce,... -
Page 20: Cleaning And Care
Cleaning and Care Cleaning and Care Take care! Risk of burns from residual heat. Warning! Sharp objects and abrasive cleaning materials will damage the appli- ance. Clean with water and washing up liquid. Warning! Residues from cleaning agents will damage the appliance. Remove residues with water and washing up liquid. -
Page 21: What To Do If
What to do if … What to do if … Problem Possible cause Remedy The cooking zones will not More than 10 seconds have Switch the appliance on again. switch on or are not function- passed since the appliance was switched on The child safety device is Deactivate the child safety de-... - Page 22 What to do if … If you are unable to remedy the problem by following the above sugges- tions, please contact your dealer or the Customer Care Department. Warning! Repairs to the appliance are only to be carried out by qualified service engineers.
-
Page 23: Disposal
Disposal Disposal Packaging material The packaging materials are environmentally friendly and can be recycled. The plastic components are identified by markings, e.g. >PE<, >PS<, etc. Please dis- pose of the packaging materials in the appropriate container at the community waste disposal facilities. Old appliance The symbol on the product or on its packaging indicates that this product... -
Page 24: Installation Instructions
Installation Instructions Installation Instructions Safety instructions Warning! This must be read! The laws, ordinances, directives and standards in force in the country of use are to be followed (safety regulations, proper recycling in accordance with the regu- lations, etc.) Installation may only be carried out by a qualified electrician. The minimum distances to other appliances and units are to be observed. - Page 25 Installation Instructions Risk of injury from electrical current. • Loose and inappropriate plug and socket connections can make the terminal overheat. • Have the clamping connections correctly installed by a qualified electrician. • Use strain relief clamp on cable. • In the event of single-phase or two-phase connection, the appropriate mains cable of type H05BB-F Tmax 90°C(or higher) must be used.
-
Page 26: Guarantee/Customer Service
Guarantee/Customer Service Guarantee/Customer Service European Guarantee This appliance is guaranteed by Electrolux in each of the countries listed at the back of this user manual, for the period specified in the appliance guarantee or otherwise by law. If you move from one of these coun- tries to another of the countries listed below the appliance guarantee will move with you subject to the fol- lowing qualifications: The appliance guarantee starts from the date you first purchased the appliance which will be evidenced... -
Page 27: Service
Service Service In the event of technical faults, please first check whether you can remedy the problem yourself with the help of the operating instructions (section “What to do if…”). If you were not able to remedy the problem yourself, please contact the Cus- tomer Care Department or one of our service partners. - Page 28 Chère cliente, cher client Nous vous remercions d'avoir choisi un de nos produits. Tout au long de son utilisation, vous ferez l'expérience d'une combinaison par- faite entre design fonctionnel et technologie d'avant-garde. Sa fabrication est basée sur les standards les plus élevés de l'excellence. Votre appareil a été...
- Page 29 Sommaire Avertissements importants Description de l'appareil Equipement du plan de cuisson Bandeau de commande Touche sensitive “Touch Control” Voyants Indicateur de chaleur résiduelle Utilisation de l’appareil Mettre l’appareil sous/hors tension Sélectionner le niveau de cuisson Activer et désactiver les zones de cuisson extérieures Verrouiller/déverrouiller le bandeau de commande Activer et désactiver la fonction de maintien au chaud Utilisation de la commande de démarrage automatique de la cuisson...
-
Page 30: Avertissements Importants
Avertissements importants Notice d'utilisation 1 Avertissements importants Pour ne pas perdre le bénéfice de la garantie en cas de panne, veuillez observer ces recommandations. Utilisation réglementaire • Les personnes (y compris les enfants) qui, en raison de leurs capacités physi- ques, sensorielles ou mentales, de leur inexpérience ou de leur méconnaissan- ce, ne sont pas en mesure d’utiliser l’appareil en toute sécurité, doivent uniquement se servir de l’appareil sous la surveillance ou avec les instructions... - Page 31 Avertissements importants Précautions d’utilisation. • La graisse et l’huile trop chaudes sont facilement inflammables. Attention! Danger d’incendie! • Attention aux risques de brûlures lors de l’utilisation de l’appareil. • Retirer les étiquettes et les films protecteurs de la vitrocéramique. • S’assurer que les câbles d’appareils électriques n’entrent pas en contact avec les surfaces brûlantes de l’appareil ou les récipients brûlants.
-
Page 32: Description De L'appareil
Description de l'appareil Description de l'appareil Equipement du plan de cuisson Zone de cuisson Zone de rôtissage 1200 W 1500/2400 Zone de cuisson à triple zone Bandeau de Zone de cuisson 800/1600/2300 W commande 1200 W Bandeau de commande Sécurité enfants Mise en fonctionnement Indicateurs zones de cuisson avec voyant de... -
Page 33: Touche Sensitive "Touch Control
Description de l'appareil Touche sensitive “Touch Control” Les touches sensitives Touch Control permettent de commander l’appareil. Une pression sur les touches sensitives permet d’activer les fonctions et le fonction- nement de ces dernières est confirmé par des voyants ou par des signaux sono- res. -
Page 34: Voyants
Description de l'appareil Voyants Voyant Description La zone de cuisson est désactivée Position de maintien au Fonction STOP+GO / La position de chaud maintien au chaud est réglée. Niveau de cuisson Le niveau de cuisson est réglé. Commande de démarrage La commande de démarrage automa- automatique de la cuisson tique de la cuisson est activée... -
Page 35: Utilisation De L'appareil
Utilisation de l’appareil Utilisation de l’appareil Mettre l’appareil sous/hors tension Bandeau de commande Affichage Voyant de contrôle Activer Appuyez sur pendant s’allume 1 seconde Désactiver Appuyez sur pendant / aucun s’éteint 1 seconde Après la mise sous tension, il est nécessaire d’activer un niveau de cuisson ou une fonction dans les 10 secondes environ qui suivent dans le cas contraire l’ap- pareil se déconnecte automatiquement. -
Page 36: Activer Et Désactiver Les Zones De Cuisson Extérieures
Utilisation de l’appareil Activer et désactiver les zones de cuisson extérieures La possibilité de pouvoir activer ou désactiver les zones de cuisson extérieures permet d’adapter la superficie de cuisson à la dimension du récipient de cuisson. Avant d’activer la zone de cuisson extérieure, activez d’abord la zone de cuisson correspondante. -
Page 37: Activer Et Désactiver La Fonction De Maintien Au Chaud
Utilisation de l’appareil Activer et désactiver la fonction de maintien au chaud La fonction STOP+GO permet de mettre simultanément toutes les zones de cuis- son actives en position de maintien au chaud puis de réactiver le niveau de cuis- son sur lequel elles se trouvaient au préalable. Bandeau de commande Activer L’affichage... -
Page 38: Utilisation De La Commande De Démarrage Automatique De La Cuisson
Utilisation de l’appareil Utilisation de la commande de démarrage automatique de la cuisson Tous les foyers sont équipés du démarrage automatique de la cuisson. La cuisson automatique s'effectue en deux temps : le démarrage de la cuisson automatique se fait à pleine puissance. Sa durée varie en fonction du niveau de cuisson sélec- tionné... -
Page 39: Utilisation De La Sécurité Enfants
Utilisation de l’appareil Utilisation de la sécurité enfants La sécurité enfants évite toute activation non souhaitée de l’appareil. Activer la sécurité enfants Étape Bandeau de commande Affichage/signal Mettre l’appareil en fonctionne- ment (ne pas sélectionner de niveau de cuisson) Appuyer sur pendant 4 secondes. -
Page 40: Utilisation Du Minuteur
Utilisation de l’appareil Utilisation du minuteur Fonction Condition de mise en Résultat après oeuvre écoulement du délai Désactivation d’une zone de cuisson le signal sonore automatique sélectionnée clignote La zone de cuisson se désactive Minuteur pour zones de cuisson non le signal sonore utilisées clignote... - Page 41 Utilisation de l’appareil Régler l’heure Etape Bandeau de Voyant commande TIMER Sélectionner Le voyant de contrôle de la zone de cuis- une zone de cuisson son sélectionnée clignote effleurer à minutes Au bout de quelques secondes, le voyant de contrôle clignote plus lentement. Le temps est à...
- Page 42 Utilisation de l’appareil Affichage du temps restant d’une zone de cuisson Etape Bandeau de comman- Affichage TIMER sélection Le voyant de contrôle de la zone de cuis- d’une zone de cuisson son sélectionnée clignote plus rapidement Le temps restant s’affiche Après quelques secondes, le clignotement du voyant de contrôle ralentit Désactivation du signal sonore Etape...
-
Page 43: Arrêt Automatique
Utilisation de l’appareil Arrêt automatique Table de cuisson • Si, après activation de la table de cuisson, une zone de cuisson ou un niveau de cuisson n’est pas sélectionné dans les 10 secondes environ qui suivent, la table de cuisson se désactive automatiquement. •... -
Page 44: Conseils De Cuisson
Conseils de cuisson Conseils de cuisson Plats de cuisson • Le type de fond des plats de cuisson détermine ou non leur bonne qualité. Le fond doit être aussi plat et épais que possible. • Les plats de cuisson avec fond en émail, en aluminium ou en cuivre peuvent laisser des traces sur les plaques en vitrocéramique difficilement nettoyables ou même impossibles à... -
Page 45: Exemples D'utilisation Pour La Cuisson
Conseils de cuisson Exemples d’utilisation pour la cuisson Les valeurs indiquées dans le tableau suivant sont indicatives. Niveau Type de adapté à Durée Remarques/conseils cuisson cuisson Chaleur restante, en position Conserver Conserver des plats cuits au si nécessai- les recouvrir au chaud : chaud de la sauce hollandaise,... -
Page 46: Nettoyage Et Entretien
Nettoyage et entretien Nettoyage et entretien Attention ! Risque de brûlure dû à la chaleur résiduelle. Attention ! Les produits de nettoyage agressifs ou abrasifs endommagent l’ap- pareil. Nettoyez l’appareil avec de l’eau et de la lessive. Attention ! Les restes de produits de nettoyage endommagent l’appareil. Net- toyez les restes avec de l’eau et un produit de nettoyage. -
Page 47: Que Faire Si
Que faire si … Que faire si … Symptôme Cause possible Solution Il est impossible d’activer les Plus de 10 minutes se sont Remettez l’appareil sous ten- zones de cuisson ou ces der- écoulées depuis que l’appareil sion. nières ne fonctionnent pas est sous tension La sécurité... - Page 48 Que faire si … Symptôme Cause possible Solution Affichage de et d’un chiffre Erreur du système électroni- Débranchez l’appareil pendant quelques minutes (enlevez le fusible de l’installation domes- tique). s’affiche de nouveau après avoir rebranché l’appa- reil, contactez le service après- vente Si les indications ci-dessus ne vous permettent pas de remédier au pro- blème, veuillez vous adresser au service après-vente de votre magasin...
-
Page 49: Protection De L'environnement
Protection de l’environnement Protection de l’environnement Elimination du matériel d’emballage Les matériaux d’emballage sont écologiques et recyclables. Les matières plasti- ques portent un signe distinctif, par ex. >PE<, >PS<, etc. Déposez les matériaux d’emballage en fonction de leur signe distinctif dans les containeurs prévus à cet effet (renseignez-vous auprès des services de votre commune). -
Page 50: Instructions D'installation
Instructions d'installation Instructions d'installation Conseils de sécurité Attention! A lire impérativement! L’utilisateur est tenu de respecter la législation, la réglementation, les directives et les normes en vigueur dans le pays de destination de l’appareil (dispositions réglementaires en matière de sécurité, de recyclage, etc.) Le montage doit être exclusivement effectué... - Page 51 Instructions d'installation Dommages matériels par courant électrique. • Des connecteurs à fiche mal fixés ou non conformes peuvent provoquer une surchauffe de la borne. • Fixer les raccords boulonnés de manière adéquate. • Procéder à la décharge de traction des câbles. •...
-
Page 52: Garantie/Si Vous Devez Nous Contacter
Garantie/Si vous devez nous contacter Garantie/Si vous devez nous contacter Garantie France Conformément à la Législation en vigueur, votre Vendeur est tenu, lors de l'acte d'achat de votre appareil, de vous communiquer par écrit les conditions de garantie et sa mise en œuvre appliquées sur celui-ci. Sous son entière initiative et responsabilité, votre Vendeur répondra à... -
Page 53: Service Après-Vente
Service après-vente Service après-vente En cas d’anomalie de fonctionnemet vérifiez d’abord si vous ne pouvez pas re- médier vous-même au dysfonctionnement à l’aide de la notice d’utilisation (chapitre “Que faire, si...“). Si vous ne parvenez pas à remédier au dysfonctionnement, veuillez contacter votre vendeur ou à... - Page 54 Geachte mevrouw, heer Hartelijk dank voor het kiezen van een van onze kwaliteitsproducten. U heeft een goede keuze gemaakt. Zo kunt u dankzij de combinatie van functioneel de- sign en hoogwaardige technologie rekenen op optimale prestaties en bedie- ningsgemak. En onze zorg voor het milieu, komt o.a. tot uitdrukking in het energiebesparend functioneren van dit apparaat.
- Page 55 Inhoud Veiligheidsvoorschriften Beschrijving van het apparaat Uitrusting kookplaat Uitrusting bedieningsveld Touch-control-sensorvelden Indicaties Restwarmte-indicatie Bediening van het apparaat Apparaat in- en uitschakelen Kookstand instellen Buitenste verwarmingskringen in- en uitschakelen Bedieningsveld vergrendelen / ontgrendelen STOP+GO-functie in- en uitschakelen Automatisch kooksysteem gebruiken Kinderbeveiliging gebruiken Timer gebruiken Schakelt automatisch uit Tips voor koken en braden...
-
Page 56: Veiligheidsvoorschriften
Veiligheidsvoorschriften Gebruiksaanwijzing 1 Veiligheidsvoorschriften Neem deze aanwijzingen in acht, omdat anders bij eventuele schade het recht op garantie vervalt. Gebruik volgens de voorschriften • Personen (waaronder begrepen kinderen) die op grond van hun fysieke, senso- rische of verstandelijke vermogens, dan wel op grond van onervarenheid of onkunde niet in staat zijn het apparaat veilig te gebruiken, dienen dit apparaat niet zonder het toezicht of zonder de instructies van een verantwoordelijke persoon te gebruiken. - Page 57 Veiligheidsvoorschriften Veiligheid tijdens het gebruik • Oververhitte vetten en oliën vatten zeer snel vlam Let op! Brandgevaar! • Wanneer u onoplettend bent tijdens het werken met het apparaat, bestaat er risico op verbranding. • Verwijder stickers en folies van het glaskeramiek. •...
-
Page 58: Beschrijving Van Het Apparaat
Beschrijving van het apparaat Beschrijving van het apparaat Uitrusting kookplaat Eénkringskookzone Braadzone 1200 W 1500/2400 Bedieningsveld Driekringskookzone Eénkringskookzone 800/1600/2300 W 1200 W Uitrusting bedieningsveld Inschakelen braadzone Kookzone-indicatie Kinderbeveiliging met met controlelampjes Timer-functie controlelampje Automatisch STOP+GO Timer-indicatie Indicatie kookstand kooksysteem met controlelampje Kookstandkeuze Kookstandkeuze Inschakelen driekringskookzone met... -
Page 59: Touch-Control-Sensorvelden
Beschrijving van het apparaat Touch-control-sensorvelden Het apparaat wordt bediend door middel van touch-control-sensorvelden. Func- ties worden door het aanraken van de sensorvelden gestuurd en door indicaties en akoestische signalen bevestigd. De sensorvelden moeten van bovenaf worden aangeraakt, zonder andere sen- sorvelden te bedekken. -
Page 60: Indicaties
Beschrijving van het apparaat Indicaties Indicatie Beschrijving Kookzone is uitgeschakeld Warmhoudstand STOP+GO-functie / warmhoudstand is ingesteld Kookstanden Kookstand is ingesteld Automatisch kooksysteem Automatische kooksysteem is actief Fout Er is een storing opgetreden Restwarmte Kookzone is nog warm Kinderbeveiliging Kinderbeveiliging is ingeschakeld automatische uitschakeling Uitschakeling is actief Restwarmte-indicatie Waarschuwing! Verbrandingsgevaar door restwarmte. -
Page 61: Bediening Van Het Apparaat
Bediening van het apparaat Bediening van het apparaat Apparaat in- en uitschakelen Bedieningsveld Indicatie Controlelampje Inschakelen 1 seconde aanraken brandt Uitschakelen 1 seconde aanraken / geen gaat uit Na het inschakelen moet binnen ca. 10 seconden een kookstand of een functie worden ingesteld, anders schakelt het apparaat automatisch uit. -
Page 62: Bedieningsveld Vergrendelen / Ontgrendelen
Bediening van het apparaat Bedieningsveld vergrendelen / ontgrendelen Het bedieningsveld kan met uitzondering van het sensorveld ”Aan/Uit“ op ieder gewenst moment worden vergrendeld, bijv. om het wijzigen van de instellingen als gevolg van het met een lap afnemen, te voorkomen. Bedieningsveld Indicatie Inschakelen... -
Page 63: Automatisch Kooksysteem Gebruiken
Bediening van het apparaat Automatisch kooksysteem gebruiken Alle kookzones zijn met een automatische aankookfunctie uitgerust. Bij het in- stellen van een kookstand met de automatische aankookfunctie, wordt de kook- zone gedurende een bepaalde tijd van het volledige vermogen voorzien en schakelt dan automatisch weer terug naar de ingestelde kookstand. -
Page 64: Kinderbeveiliging Gebruiken
Bediening van het apparaat Kinderbeveiliging gebruiken De kinderbeveiliging voorkomt ongewenst gebruik van het apparaat. Kinderbeveiliging inschakelen Stap Bedieningsveld Indicatie/signaal Apparaat inschakelen (geen kook- stand instellen) 4 seconden aanraken De kinderbeveiliging is ingeschakeld. Kinderbeveiliging tijdelijk uitschakelen De kinderbeveiliging kan op deze wijze eenmalig worden uitgeschakeld; bij het volgende gebruik is de beveiliging weer actief. -
Page 65: Timer Gebruiken
Bediening van het apparaat Timer gebruiken Functie Vereisten Resultaat na verloop van de tijd Automatische bij een ingestelde akoestisch signaal uitschakeling kookstand knippert kookzone wordt uitgeschakeld Kookwekker bij niet gebruikte akoestisch signaal kookzones knippert Als additioneel bij een ingestelde kookwekker bij deze kookzone een kookstand wordt ingesteld, dan wordt de kookzone na afloop van de ingestelde tijd uitge- schakeld. - Page 66 Bediening van het apparaat Tijd instellen Stap Bedieningsveld Indicatie TIMER Kookzone Controlelampje van de gekozen kookzone kiezen knippert aanraken minuten Na een aantal seconden knippert het controlelampje langzamer. De tijd is ingesteld. De tijd telt terug. Timerfunctie uitschakelen Stap Bedieningsveld Indicatie TIMER Kookzone Controlelampje van de gekozen kookzone...
- Page 67 Bediening van het apparaat Resterende tijd van een kookzone aangeven Stap Bedieningsveld Indicatie TIMER kookzone Controlelampje van de geselecteerde selecteren kookzone knippert sneller Resterende tijd wordt aangegeven Na een aantal seconden knippert het controlelampje langzamer. Akoestisch signaal uitschakelen Stap Bedieningsveld Akoestisch signaal TIMER aanraken Akoestische uitschakeling.
-
Page 68: Schakelt Automatisch Uit
Bediening van het apparaat Schakelt automatisch uit Kookplaat • Als na het inschakelen van de kookplaat niet binnen ca. 10 seconden bij een kookzone een kookstand wordt ingesteld, schakelt de kookplaat automatisch uit. • Als een of meerdere sensorvelden langer dan circa 10 seconden door voorwer- pen (pan, vatdoek enz.) worden bedekt, krijgt u een signaal te horen en wordt de kookzone automatisch uitgeschakeld. -
Page 69: Tips Voor Koken En Braden
Tips voor koken en braden Tips voor koken en braden Aanwijzing met betrekking tot acrylamide Volgens de laatste wetenschappelijke inzichten kan een intensieve bruining van levensmiddelen, met name bij zetmeelhoudende producten, een gevaar voor de gezondheid door acrylamide veroorzaken. Om die reden adviseren wij levens- middelen zoveel mogelijk bij lage temperaturen te bereiden en de gerechten niet te veel te bruinen. -
Page 70: Toepassingsvoorbeelden Voor Het Koken
Tips voor koken en braden Toepassingsvoorbeelden voor het koken De gegevens in de volgende tabel dienen slechts als richtlijn. Kook- Kookproces Geschikt voor Duur Aanwijzingen/tips stand nawarmte, uit-stand Warm Warm houden van gare ge- Naar behoef- Afdekken houden rechten Hollandaisesaus, Smelten smelten van boter, 5-25 min. -
Page 71: Reiniging En Onderhoud
Reiniging en onderhoud Reiniging en onderhoud Voorzichtig! Verbrandingsgevaar door restwarmte. Let op! Bijtende en schurende schoonmaakmiddelen beschadigen het apparaat. Schoonmaken met water en handafwasmiddel. Let op! Resten van schoonmaakmiddelen beschadigen het apparaat. Verwijder resten met water en handafwasmiddel. Reinig het apparaat na ieder gebruik 1. -
Page 72: Wat Is Er Aan De Hand Als
Wat is er aan de hand als … Wat is er aan de hand als … Storing Mogelijke oorzaak Oplossing De kookzones kunnen niet in- Na het inschakelen van het Apparaat nogmaals inschake- geschakeld worden of functio- apparaat zijn meer dan 10 se- neren niet conden verstreken De kinderbeveiliging is inge-... - Page 73 Wat is er aan de hand als … Wanneer u de storing niet kunt verhelpen met de hierboven gegeven aanwijzingen, neem dan contact op met uw vakhandel of met onze servi- ce-afdeling. Waarschuwing! Reparaties aan het apparaat mogen alleen door vakmensen worden uitgevoerd.
-
Page 74: Afvalverwerking
Afvalverwerking Afvalverwerking Verpakkingsmateriaal De verpakkingsmaterialen zijn niet schadelijk voor het milieu en herbruikbaar. De kunststoffen hebben de volgende aanduidingen, bijv. >PE<, >PS<, enz. Verwijder de verpakkingsmaterialen in overeenstemming met de aanduiding bij de ge- meentelijke inzamelplaatsen in de daarvoor bestemde containers. Oud apparaat verwijderen Het symbool op het product of op de verpakking wijst erop dat dit product... -
Page 75: Montageaanwijzing
Montageaanwijzing Montageaanwijzing Veiligheidsaanwijzingen Let op! Lees deze informatie! De in het land van gebruik geldende wetgeving, verordeningen, richtlijnen en normen dienen te worden nageleefd (veiligheidsvoorschriften, vakkundige recy- cling volgens de voorschriften, enz.). De montage mag slechts door een gekwalificeerd technicus worden uitgevoerd. De minimumafstanden tot andere apparaten en meubelen dienen in acht te worden genomen. - Page 76 Montageaanwijzing Schade door elektrische stroom. • Losse en verkeerde stekkerverbindingen kunnen de klemmen oververhitten. • Klemverbindingen vakkundig uitvoeren. • Kabels voorzien van trekontlasting. • Bij een aansluiting met 1- of met 2-fasen dient steeds de juiste en passende netaansluitng van het type H05BB-F Tmax 90°C (of hoger) te worden ingezet. •...
-
Page 77: Garantie/Adres Service-Afdeling
Garantie/Adres service-afdeling Garantie/Adres service-afdeling Nederland Onze producten worden met de grootst mogelijke zorgvuldigheid geproduceerd. Desondanks kan het voorko- men dat er een defect optreedt. Onze servicedienst zal dit op verzoek herstellen, zowel binnen als buiten de garantietermijn. De levensduur van het product wordt daardoor niet negatief beïnvloed. Onderstaande garantievoorwaarden zijn gestoeld op de EU Richtlijn 99/44/EG en het Burgerlijk Wetboek. - Page 78 Garantie/Adres service-afdeling Reparatievoorwaarden Onze reparatievoorwaarden zijn conform de afspraak tussen de Consumentenbond en Vlehan*. Art. 1 Aan de consument zal na een melding van een storing zo mogelijk direct, doch uiterlijk binnen één werkdag worden medegedeeld op welke dag het bezoek van de technicus zal plaatsvinden. De reparatie zal als regel binnen zeven werkdagen na de melding zijn uitgevoerd.
-
Page 79: Adres Service-Afdeling
Adres service-afdeling Adres service-afdeling Nederland AEG fabrieksservice Postbus 120 2400 AC Alphen aan den Rijn Service-informatielijn tel. 0172-468 300 (voor bezoek servicetechnicus en onderdelen) Consumentenbelangen tel. 0172-468 172 (voor algemene, product- of gebruiksinformatie) www.aeg.nl... - Page 80 Adres service-afdeling Europese Garantie Dit apparaat wordt door Electrolux in elk van de achter in deze handleiding genoemde landen gedurende de in het bij het apparaat behorende garantiebewijs genoemde periode of anderszins bij de wet gegarandeerd. Als u van een van deze landen verhuist naar een ander van de hieronder genoemde landen, verhuist de ga- rantie op het apparaat met u mee.
-
Page 81: Service
Service Service Controleer bij technische storingen eerst of u met behulp van de gebruiksaan- wijzing (hoofdstuk „Wat te moet doen als…“) het probleem zelf kunt oplossen. Wanneer u het probleem niet kunt oplossen, neemt u contact op met onze servi- ce-afdeling. -
Page 82: Assembly
Assembly / Montage / Montage Assembly / Montage / Montage... - Page 83 Assembly / Montage / Montage...
- Page 84 Assembly / Montage / Montage...
-
Page 85: Rating Plate
Rating Plate / Plaque signalétique / Typeplaatje 66331K-MN 949 592 894 55HAD56AO 230 V 50 Hz 7,1 kW AEG-ELECTROLUX... - Page 86 www.electrolux.com Albania +35 5 4 261 450 Rr. Pjeter Bogdani Nr. 7 Tirane Belgique/België/ +32 2 363 04 44 Bergensesteenweg 719, 1502 Lembeek Belgien Èeská republika +420 2 61 12 61 12 Budìjovická 3, Praha 4, 140 21 Danmark +45 70 11 74 00 Sjællandsgade 2, 7000 Fredericia Deutschland +49 180 32 26 622...
- Page 87 Electrolux Service, S:t Göransgatan 143, Sverige +46 (0)771 76 76 76 S-105 45 Stockholm Tarlabaþý caddesi no : 35 Taksim Türkiye +90 21 22 93 10 25 Istanbul 129090 Ìîñêâà, Îëèìïèéñêèé Ðîññèÿ +7 495 937 7837 ïðîñïåêò, 16, ÁÖ „Îëèìïèê“ 04074 Êè¿â, âóë.Àâòîçàâîäñüêà, Óêðà¿íà...
- Page 88 www.aeg-electrolux.co.uk...
Need help?
Do you have a question about the 66331 K-MN and is the answer not in the manual?
Questions and answers