Table of Contents
Advertisement
Quick Links
Download this manual
See also:
User Manual
Advertisement
Table of Contents

Related Manuals for TRENDnet TV-NVR104K


Summary of Contents for TRENDnet TV-NVR104K
- Page 1 Ÿ4-Channel HD PoE NVR Kit Quick Installation Guide TV-NVR104K Quick Installation Guide (1) Ÿ TV-NVR104K (V1)/01.09.2015...
-
Page 2: Before You Start
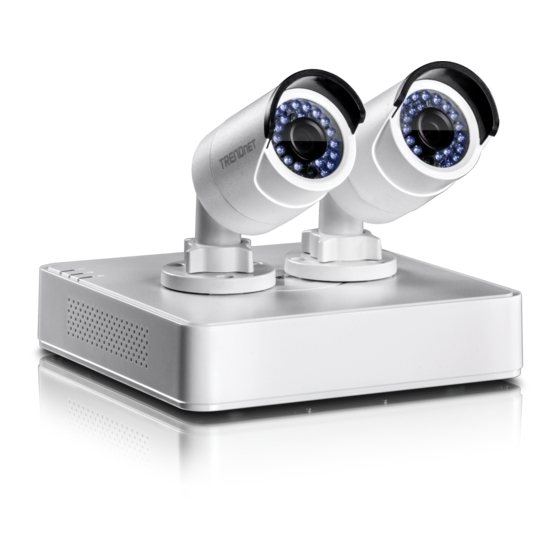
1. Before You Start Package Contents Ÿ TV-NVR104 Network Video Recorder with pre-installed 1TB HDD Ÿ 2 x TV-IP320PI 720p outdoor camera Ÿ 2 x 100 ft. Ethernet cable Ÿ 1 x 6 ft. Ethernet cable Ÿ 1 x 6 ft. HDMI cable Ÿ... -
Page 3: Hardware Installation
2. Hardware Installation (Included (Included TV-IP320PI) TV-IP320PI) Optional Network (Included (Included connection* network cable) network cable) (Not included) (Sold separately) (Included mouse) (Included HDMI cable) (Not included) USB Flash device (Sold separately) (Sold separately) (sold separately) Note: The following installation steps support a stand along setup WITHOUT a wired connection to a network. If it is desired to setup the NVR with a wired network connection (for remote access to NVR), proceed to the User's Guide for the appropriate setup steps (do not continue with this quick setup). -
Page 4: Camera Installation
2.1 Camera Installation Ÿ Using one of the included network cables, connect the TV-IP320PI cameras to any of the PoE network ports on the TV-NVR104. The TV-NVR104 provides power to the TV-IP320PI cameras. PoE network (Included Ethernet cable) port PoE network (Included Ethernet cable) port 2.2 Connect the Power... -
Page 5: Connect The Monitor
2.3 Connect the Monitor Connect a monitor to either the HDMI or VGA port. HDMI Not included Included VGA cable HDMI cable Display Display (Sold separately) (Sold separately) -
Page 6: Connect The Mouse
2.4 Connect the Mouse Connect the included mouse to one of the USB ports. HDMI The hardware setup is complete. - Page 7 3. Soft Keyboard Instructions 1. Click to change the keyboard style. List of keyboard styles: Lower case text Upper case text Numeric keyboard Special characters 2. Click to enter special characters. 3. Click to choose different symbols. 4. Click to convert between upper and lowercase.
-
Page 8: System Setup
4. System Setup 1. Setup wizard will start after the TV-NVR104 is powered up. Click Next. Start wizard when device starts? Exit Next 2. Enter the default admin password of admin. 3. Enter a new admin password. 4. Enter the new password again in the Confirm field. 5. - Page 9 7. Click the selection list to the right of Date Format to choose a format. MM-DD-YYYY YYYY-MM-DD MM-DD-YYYY Time Zone (GMT-08:00) Pacific Time (U.S. & Cananda) DD-MM-YYYY Date Format MM-DD-YYYY System Date 11-10-2014 System Time 16:41:08 Previous Next Exit 8. Click the selection list to the right of System Date. Time Zone (GMT-08:00) Pacific Time (U.S.
-
Page 10: Start Recording
12. Click the selection list to the right of System Time and then enter the time using a 24-hour format. Time Zone (GMT-08:00) Pacific Time (U.S. & Cananda) Date Format MM-DD-YYYY System Date 11-10-2014 System Time 16:41:08 Previous Next Exit 13. -
Page 11: Instant Playback
6. Instant Playback 1. In Live View, click on the display you want to playback. 2. Click or playback the last 5 minutes of recording. Please see the User's Guide for more advanced video playback features. - Page 12 4-Channel HD PoE NVR Kit Trade Name: TRENDnet TRENDnet hereby declare that the product is in compliance with the essential requirements and other relevant provisions under our sole responsibility. Safety EN 60950-1: 2006 + A11: 2009: +A1: 2010 + A12: 2011 + A2: 2013 EN 55022: 2010 + AC: 2011 Class A EN 50130-4:2011...
- Page 13 Informations générales GPL/LGPL Ce produit TRENDnet comprend un logiciel libre gratuit par des programmeurs tiers. Ces codes sont sujet à la GNU General Public License ("GPL" Licence publique générale GNU) ou à la GNU Lesser General Public License ("LGPL" Licence publique générale limitée GNU). Ces codes sont distribués SANS GARANTIE et sont sujets aux droits d'auteurs des programmeurs.
- Page 14 Garantie Limitée TRENDnet garantit ses produits contre les défauts matériels et de fabrication, dans des conditions normales d’utilisation et de service, pour les durées suivantes, à compter de la date de leur achat. Limitée: 2 ans de garantie limitée (Si applicable: 1 an de garantie sur l’adaptateur secteur, l’alimentation en énergie et les composants du ventilateur de refroidissement.) Visitez TRENDnet.com pour lire la politique complète de garantie, les droits et les restrictions s’appliquant à...
Need help?
Do you have a question about the TV-NVR104K and is the answer not in the manual?
Questions and answers