Sign In
Upload
Manuals
Brands
Roland Manuals
Electronic Keyboard
AT900 Music Atelier
Roland AT900 Music Atelier Manuals
Manuals and User Guides for Roland AT900 Music Atelier. We have
3
Roland AT900 Music Atelier manuals available for free PDF download: Owner's Manual, Midi Implementation Manual, Manual
Roland AT900 Music Atelier Owner's Manual (300 pages)
Roland Electronic Keyboard User Manual
Brand:
Roland
| Category:
Musical Instrument
| Size: 44.05 MB
Table of Contents
Important Safety Instructions
4
Using the Unit Safely
5
Important Notes
8
Main Features
10
Usb Memory
11
Conventions Used in this Manual
12
Table of Contents
13
Contents
13
Panel Descriptions
20
Upper Orchestral Part
20
Before You Start Playing
22
Attaching the Pedalboard (AT-900)
22
Attaching the Pedalboard (AT-900C)
22
Setting up the Music Rest
23
Connecting the Speaker Cable (AT-900C)
24
Opening/Closing the Lid (AT-900)
24
About the Adjuster (AT-900)
25
Connecting the Power Cord
25
Turning the Power on and off
26
Turning on the Power
26
Turning off the Power
26
Using Headphones
27
Using a Microphone
27
Using the Code Hook
28
About the Hole of the Atelier's Cabinet
28
About the Bench (AT-900)
29
Restoring All the Factory Default Settings
29
Using the External Memory
31
Connecting the USB Memory
31
Connecting the Floppy Disk Drive
31
Using a CD
32
Connecting a CD Drive
32
About the Display
33
Understanding the Main and Related Screens
33
Convenient Functions
37
Listening to the Demo Songs
37
Choose a Keyword for Quick Registration Selection
39
Music Assistant Function
41
Music Assistant Search
43
About the Quick Guide Function
45
About the Index Menu
46
Settings for Easy Performance
48
Selecting and Playing Sounds
49
Selecting Voices
49
About the Voices and Parts
49
Functions of the Upper/Lower/Pedal Bass Sound Select Buttons
50
Selecting the Upper and Lower Voices
51
Selecting Pedal Bass Voice
52
Selecting solo Voice
53
Solo Part
53
Selecting a Voice Using the [Others] Button
54
Creating Organ Sounds (Vintage Organ)
56
Solo Part
56
Playing a Vintage Organ Voice
58
Solo Part
58
Realistically Expressing an Acoustic Instrument Performance (Articulation Voice)
63
Selecting a Articulation Voice
64
Solo Part
64
Performing with an Articulation Voice
66
Using Aftertouch or the Expression Pedal
66
Solo Part
66
Making the Ideal Settings for Playing an Articulation Voice
67
Tips for Performing with an Articulation Voice
68
Performing with an Active Expression Voice
71
Solo Part
71
Performing with a Human Voice
72
Adjust the Volume Balance
74
Solo Part
74
Transpose the Pitch in Octave Units (Octave Shift)
76
Solo Part
76
Playing Drum Sounds or Sound Effects from the Entire Lower Keyboard (Drums/Sfx)
78
Changing Drums/Sfx Sets
79
Playing a Lower Voice with Percussion Instrument Sounds and a Voice Phrase (Manual Percussion)
80
Changing the Manual Percussion Sets
81
Sustaining Notes in the Lower Part (Lower Hold)
82
Using Rhythm Performance
83
Selecting a Rhythm
83
Using Rhythms Stored in User Memory
84
Rhythm Search
85
Playing Rhythm
87
Starting at the Press of a Button
87
Starting the Rhythm Automatically When You Play the Lower Keyboard or Pedalboard (Sync Start)
88
Stopping the Rhythm
89
Changing a Rhythm's Tempo
89
Playing the Count Sound at the End of the Intro
90
Playing Rhythm and Automatic Accompaniment
90
Adding Variety to the Rhythm or Automatic Accompaniment
91
Changing the Arrangement of the Rhythm and Accompaniment (Variation)
91
Playing Chords with Simple Fingering (Chord Intelligence)
92
Leading Bass Function
94
A Simple Way to Make Automatic Accompaniment Settings (One Touch Program)
96
Using a Rhythm from a USB Memory
98
Reviewing the Rhythms on USB Memory
98
Copying Rhythms
99
Changing the Order of the Saved Rhythms
102
Renaming a Saved Rhythm
104
Deleting Saved Rhythm
106
Using the Registration Buttons
108
Storing Registrations
109
Write] Button → P
109
Recalling a Registration
110
How to Recall a Registration (DELAYED)
110
How to Recall a Registration (INSTANT)
110
Changing the Timing of Recalling Registrations
111
Automatically Registering When You Switch Panel Settings
112
Assigning a Name to a Registration Set
113
Saving Registration Sets
115
Loading Previously Saved Registration Sets into the ATELIER
118
Loading a Set of Registrations
118
Loading an Individual Registration
119
Recalling the Order that the Registrations Are Saved (Load Next)
122
Load Next] Button → P
122
Deleting a Set of Registrations
124
Changing the Name or Order of Registration
126
Creating a Folder
127
Copying Registrations
129
Using the Performance Functions
132
Transposing to a Different Key (Key Transpose)
132
Adjusting the Brightness of the Sound
133
Adding Decay to the Sound (Damper Pedal)
133
Using the Pitch Bend/Vibrato Lever
134
Using the Foot Switches
135
Changing the Function of the Foot Switch
136
Using the Foot Switch to Switch Registrations
137
Adjusting the Overall Volume Using an Expression Pedal
138
Adjusting the Depth of the Expression Pedal
139
Applying Various Effects to the Sound
140
Adding Harmony to a Melody (Harmony Intelligence)
140
Changing the Harmony Intelligence Type
141
Adding Modulation to the Sound (Rotary Effect)
143
Making Fine Adjustments to the Rotary Effect Speed (Rotary Speed)
144
Changing the Brightness of the Rotary Effect (Rotary Color)
145
Adding Richness to the Sound (Chorus Effect)
146
Adding Resonance to the Sound (Sustain Effect)
148
Solo Part
148
Changing the Sustain Length
150
Adding Reverberation to the Sound (Reverb Effect)
151
Changing the Reverb Type
152
Changing the Wall Type
153
Changing the Depth of the Reverb
154
Using the D Beam Controller for Additional Enjoyment
156
Modifying the Sound
156
Moving Your Hand above the D Beam Controller to Produce a Sound Effect
157
Using the Lower Keyboard Effectively
158
Making Effective Use of the Lower Keyboard
158
Playing the solo Voice on the Lower Keyboard (solo [To Lower] Button)
160
Changing How the solo Voice Responds
161
Layering the solo Voice and Lower Voice
161
Changing the solo Split Point
162
Using the Lower Keyboard to Play the Bass Voice ([Bass Split] Button)
163
Changing the Bass Split Point
164
Using the Lower Keyboard to Play the Bass Voice (Pedal [To Lower] Button)
165
Recording/Playing Back What You Play
166
What Is a Track Button
167
Displaying the Track Buttons
168
Playing Back Performance Songs Stored on USB Memory and SMF Music Files
169
Silencing a Specific Track (Track Mute)
170
Muting Individual Tracks of Performance Data
172
Viewing a Notation
173
Changing the Notation Settings
174
Recording a Performance
176
Playing Back a Performance Song
177
Add a Count Sound to Match the Timing (Count In)
177
Recording each Part Separately
178
Re-Recording
179
Erasing a Performance Song (Song Clear)
180
Changing the Name of a Performance Song (Rename)
180
Saving Performance Songs
182
Loading Performance Songs into the ATELIER
183
Deleting Performance Songs Stored on "Favorites" or the USB Memory
184
Layering a New Recording Onto SMF Music Files
185
Using Song with a Different Tempo than that of the Performance Song
186
Re-Recording Part of Your Performance (Punch-In Recording)
187
Recording and Layering Drum Parts (Loop Recording)
188
Starting Recording at the Right Moment (Count-In Recording)
189
Copying Performance Song
190
Creating a Folder in USB Memory
191
Editing Your Musical Performance Data
192
Deleting a Specific Measure (Delete Measure)
192
Delete the Recording from a Track (Delete Track)
193
Erase Recording (Erase Event)
195
Copying Measures (Copy)
197
Correct Timing Inaccuracies (Quantize)
198
Creating Original Accompaniment Rhythms
200
Preparations for Creating User Rhythms
201
Displaying the Rhythm Customize Screen
201
Selecting the Division
202
Loading the Rhythm
203
Making the Division Settings
204
Creating the User Rhythm
205
Editing the Rhythm
205
Changing and Deleting the Instruments Used
208
Deleting Rhythms You Have Created
209
Saving the User Rhythm
209
Changing the Name of a User Rhythm (Rename)
209
Saving User Rhythms to the User Memory or USB Memory
210
Various Other Settings
211
Adjusting How the Instrument Responds
211
Turning Aftertouch On/Off
211
Adjusting the Depth of Aftertouch
211
Adjusting the Initial Touch Sensitivity
212
Changing the Pedalboard Polyphony
212
Performance Function Settings
213
Selecting the Keyboard Affected by the Damper Pedal
213
Changing the Function of the Expression Pedal
213
Choosing the Keyboard for Which Pitch Bend and Vibrato will Apply
214
Changing the Pitch Bend Range
215
Adjusting the Sensitivity of the D Beam Controller
215
Rhythm Settings
216
Turning Chord Hold On/Off
216
Changing the Intro Countdown Sound (Count down Sound)
216
Preventing Rhythm Tempos from Switching Automatically
217
Changing the Operation of the Fill in Button and Intro/Ending Buttons
217
Registration Settings
219
Changing the Timing at Which Arranger Settings Are Recalled
219
Changing the Timing at Which Transposition Settings Are Recalled
219
Composer Settings
220
Switching the Display of Lyrics on or off
220
Changing the Key When Playing Back Songs (Play Transpose)
220
Changing the Metronome Setting
221
Adjusting the Metronome Volume
221
Changing the Sound of the Metronome
222
Setting the Beat
222
Other Settings
223
Adjust the Standard Pitch (Master Tune)
223
Adjusting the MIC Echo
223
Enabling Transmission of PC Numbers
224
Setting the PC Number
224
MIDI in Mode
225
Selecting the MIDI Transmit Channel
225
Adjusting the Brightness of the Display
226
Eliminating the Bouncing Ball from the Main Screen
227
Switching the Background of the Main Screen
227
Changing the External Memory Setting
228
Turning the Remote Function On/Off
228
Changing the Functions of the Remote Control's Buttons
229
Using the V-LINK Function
229
Repositioning the Touch Screen
231
Restoring the User Memory to the Original Factory Settings
232
Restoring All Settings Other than the User Memory to the Original Factory Settings
233
Formatting a USB Memory (Format)
234
Displaying a Graphic at Power-Up
234
Deleting an Image Stored in Internal Memory
236
Copying Data from a Floppy Disk to USB Memory
237
Video-Related Settings
238
Specifying the Television Format
238
Selecting the Aspect Ratio of the Video Output
239
Selecting the Type of Slide Show
240
Selecting the Interval at Which Images will Change
241
Connecting with External Device
242
Name and Functions of Jack and Connectors
242
Connecting to Audio Equipment
243
Connecting an Amp to Produce Sound (AT-900C)
244
Connecting a Computer
244
Making the Settings for the USB Driver
245
Connecting MIDI Devices
246
Connecting an External Display or Television
247
Connecting a Television
248
Changing the Settings When External Speakers Are Connected
249
Switching the Aux out On/Off
249
Switching the Aux out Mode
249
Using the Remote
253
Installing Batteries in the Remote
253
Using the Remote
254
Remote Control Buttons
255
Enjoying Music and Video
257
Performing with a Background Image from a Video Camera
258
Performing with a Background Image from a DVD Player
260
Enjoying Powerful Sound and Big-Screen Playback from Your Portable Audio/Video Player
262
Freely Switching between Images
264
Enjoying VIMA TUNES Songs
265
Listening to a VIMA TUNES Song
265
Displaying a Slide Show While the Song Plays
267
Performing with Sounds that Match the Song (Recommended Tones)
269
Listening to Songs from Music CD
270
Enjoying Karaoke with a Music CD (Center Cancel)
271
Appendices
272
Troubleshooting
272
Error Message
278
Chord List
279
Glossary
281
Music Files that the ATELIER Can Use
282
The ATELIER Allows You to Use the Following Music Files
282
About the ATELIER Sound Generator
282
Settings that Are Stored after the Power Is Turned off
283
Settings that Are Stored in the Registration Buttons
283
Settings that Are Stored in the Individual Registration Buttons
283
MIDI Implementation Chart
284
Demo Song List
285
Short Cut List
288
Main Specifications
289
Index
292
Advertisement
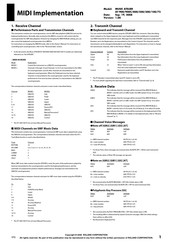
Roland AT900 Music Atelier Midi Implementation Manual (32 pages)
MUSIC ATELIER
Brand:
Roland
| Category:
Electronic Keyboard
| Size: 1 MB
Table of Contents
Table of Contents
1
Receive Channel
1
Control Change
2
Explanation
3
Active Sensing
4
Channel Mode Messages
4
System Exclusive Message
5
Data Transmission
7
Program Change
8
Mode
9
Pitch Bend Range
9
System Exclusive Messages
9
System Realtime Message
9
Accomp
11
Mode
11
Solo
11
Manual Percussion
13
Decimal and Hexadecimal Table
18
Examples of Actual MIDI Messages
18
Supplementary Material
18
About Tuning
19
Tone List
20
Roland AT900 Music Atelier Manual (20 pages)
Organ
Brand:
Roland
| Category:
Musical Instrument
| Size: 0.54 MB
Table of Contents
Table of Contents
2
Synth
4
Digi
4
Jazz
4
Power
4
Slow
4
F.chorus
4
Pedal
4
Brass
5
Wood Winds
5
Orch.brs
5
Alto Sax
5
Trumpet
5
Rock
6
Jazz
6
Manual
10
Aex Orch
5
Wood
10
Jazz
12
Ballad
18
Advertisement
Advertisement
Related Products
Roland AT15 Music Atelier
Roland AT900C Music Atelier
Roland Music ATELIER AT300
Roland Music ATELIER AT100
Roland Music ATELIER AT75
Roland Music ATELIER AT500
Roland MUSIC ATELIER Series
Roland A-90EX
Roland cakewalk A-500PRO
Roland cakewalk A-800PRO
Roland Categories
Musical Instrument
Synthesizer
Recording Equipment
Drums
Electronic Keyboard
More Roland Manuals
Login
Sign In
OR
Sign in with Facebook
Sign in with Google
Upload manual
Upload from disk
Upload from URL