Sign In
Upload
Manuals
Brands
NETGEAR Manuals
Switch
M4250-26G4XF-PoE+
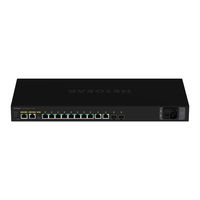
NETGEAR M4250-26G4XF-PoE+ Manuals
Manuals and User Guides for NETGEAR M4250-26G4XF-PoE+. We have
3
NETGEAR M4250-26G4XF-PoE+ manuals available for free PDF download: User Manual, Hardware Installation Manual, Configuration
NETGEAR M4250-26G4XF-PoE+ User Manual (100 pages)
Fully Managed Switches
Brand:
NETGEAR
| Category:
Switch
| Size: 0.54 MB
Table of Contents
Comments
2
Table of Contents
3
Chapter 1 Getting Started with the AV UI
8
Supported Switches
9
Available Publications
9
AV Local Browser UI Overview
9
Use a Web Browser to Log in to the AV UI
10
Log in to the AV UI Using the Management Interface Default IP Address
10
Log in to the AV UI over the OOB Port
11
Log in to the AV UI with a Known IP Address
12
Save the Running Configuration to the Startup Configuration
12
Register Your Switch
12
Chapter 2 Audio-Video Profile Templates and Network Profiles
14
Overview of Preconfigured AV Profile Templates
15
About Audio Video Bridging
16
About PTP Residency Time Stamping
17
Network Profiles
18
Change the Default VLAN Profile
18
Use an AV Profile Template to Configure and Assign a Network Profile
19
Change a Network Profile
21
Remove a Network Profile
22
Custom AV Profile Templates
23
Create a Custom AV Profile Template
23
Change a Custom AV Profile Template
25
Remove a Custom AV Profile Template
27
Auto-Trunk Overview
27
Configure PTP Residency Time Stamping
29
Enable or Disable Auto-Trunks
29
Configure the IGMP Querier for a Network Profile
30
Chapter 3 Link Aggregation
33
Auto-LAG Overview
34
Enable or Disable Auto-Lags
35
Configure the Hash Mode for Auto-Lags
36
Create a LAG
37
Change a LAG
38
Remove a LAG
39
Chapter 4 Multicast
41
Configure the Multicast Mode for One or more Ports
42
Add or Remove Blocked Multicast Address Ranges
43
Display the Multicast Groups in Your Network
44
Chapter 5 Power over Ethernet
46
Manage Poe Interface Settings
47
Disable Poe for One or more Interfaces
50
Poe Schedules
51
Create a Poe Schedule
51
Change a Poe Schedule
54
Remove a Poe Schedule
54
Display the Total Poe Consumption for the Switch
55
Port Configuration
56
Chapter 6 Port Configuration
56
Administratively Enable or Disable One or more Interfaces
57
Add a Description to One or more Interfaces
58
Set the Frame Size for One or more Interfaces
58
Configure Flow Control for One or more Interfaces
59
Display Detailed Information about the Physical Ports and Lags.61
61
Chapter 7 Security
62
Port Authentication
63
Manage Port Authentication for Individual Ports
63
Manage 802.1X Authentication
64
Remove Port Authentication from Individual Ports
65
RADIUS Servers
66
Configure the Basic Settings for a RADIUS Server
66
Remove a RADIUS Server
67
Chapter 8 Manage and Monitor the Switch
69
Licenses
70
Add a License Online
70
Add a License Offline
71
Delete a License
72
Update the Firmware
72
Startup Configuration
73
Save the Running Configuration
73
Download the Running Configuration
74
Restore the Configuration
75
Date and Time Settings
75
Manually Set the Date and Time
76
Configure One or more SNTP Servers
76
Add a System Name
77
Management Interface IP Address
78
Set a Fixed IP Address for the Management Interface
78
And Enable the DHCP Client for the Management Interface
79
OOB Port IP Address
80
Set a Fixed IP Address for the OOB Port
80
Enable the DHCP Client for the OOB Port
81
Restart the Switch from the AV UI
84
Reset the Switch to Factory Default Settings
84
Manually Control the Fans
85
Display the Status of the Ports and Switch
86
Display the Neighboring Devices
90
Chapter 9 Diagnostics and Troubleshooting
91
Manage the Switch Log, Console Log, and Command Log
92
Display or Download the Message Log
93
Display or Clear the Port Statistics
94
Send a Ping, Traceroute, or DNS Lookup Request to an IP Address or Host Name
96
Perform a Cable Test
97
Configure Port Mirroring
98
Access the CLI through the Terminal in the AV UI
99
Download Diagnostics Files for Technical Support
100
Advertisement
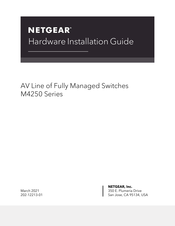
NETGEAR M4250-26G4XF-PoE+ Hardware Installation Manual (61 pages)
AV Line of Fully Managed Switches
Brand:
NETGEAR
| Category:
Switch
| Size: 1.61 MB
Table of Contents
Table of Contents
3
Chapter 1 Introduction
5
Overview
6
Features
7
Safety Instructions and Warnings
9
Chapter 2 Hardware Overview
12
Hardware Descriptions of the 8-Port Poe+ and Poe++ Models
13
Front Panel of the 8-Port Poe+ and Poe++ Models
13
Back Panel of the 8-Port Poe+ and Poe++ Models
14
Leds of the 8-Port Poe+ and Poe++ Models
16
Hardware Descriptions of the 24-Port Poe+ and Poe++ Models
18
Front Panel of the 24-Port Poe+ and Poe++ Models
18
Back Panel of the 24-Port Poe+ and Poe++ Models
19
Leds of the 24-Port Poe+ and Poe++ Models
21
Hardware Descriptions of the 40-Port Poe+ and Poe++ Models
23
Front Panel of the 40-Port Poe+ and Poe++ Models
23
Back Panel of the 40-Port Poe+ and Poe++ Models
24
Leds of the 40-Port Poe+ and Poe++ Models
26
Hardware Descriptions of the LED Tiles Model with 2.5 Gbps Ports
28
Front Panel of the LED Tiles Model
28
Back Panel of the LED Tiles Model
28
Leds of the LED Tiles Model
29
Hardware Descriptions of the Aggregation Model with Multiple 10G SFP+ Fiber Ports
30
Front Panel of the Aggregation Model
30
Back Panel of the Aggregation Model
31
Leds of the Aggregation Model
32
Switch Hardware Interfaces
33
1GBASE-T RJ-45 and 2.5GBASE-T RJ-45 Copper Ports
33
Poe Port Capacities and Budgets
33
Transceiver Modules and Cables for SFP and SFP+ Fiber Ports.35
35
Cables and Speed
36
Dual-Function Reset Button
36
USB 2.0 Port
37
Out-Of-Band 1G Ethernet Port
37
RJ-45 RS-232 Console Port
37
USB Type-C Console Port
38
Fans
38
Fans for the 8-Port Poe+ and Poe++ Models
39
Fans for the 24-Port Poe+ and Poe++ Models
41
Fans for the 40-Port Poe+ and Poe++ Models
43
Fans for the LED Tiles Model and the Aggregation Model
45
Chapter 3 Installation
47
Step 1: Prepare the Site
48
Step 2: Protect against Electrostatic Discharge
49
Step 3: Unpack the Switch
49
Step 4: Mount or Place the Switch
51
Mount the Switch in a Rack
51
Place the Switch on a Flat Surface
53
Optional Step 5: Install SFP or SFP+ Transceiver Modules
53
Step 6: Connect Devices to the Switch
54
Step 7: Check the Installation
55
Step 8: Apply AC Power and Check the Leds
55
Optional Step 9: Connect a Console to the Switch
56
Chapter 4 Troubleshooting
58
Troubleshooting Chart
59
Poe Troubleshooting Suggestions
60
Additional Troubleshooting Suggestions
61
NETGEAR M4250-26G4XF-PoE+ Configuration (10 pages)
Brand:
NETGEAR
| Category:
Switch
| Size: 1.63 MB
Table of Contents
Default Configuration
3
Switch Connectivity
3
Ethernet Connection
3
Console Connection
4
Supported Topologies
9
Further Reading
10
Advertisement
Advertisement
Related Products
NETGEAR M4250-26G4F-PoE+
NETGEAR M4250 Series
NETGEAR M4250-10G2F-PoE+
NETGEAR M4250-10G2XF-PoE+
NETGEAR M4250-10G2XF-PoE++
NETGEAR M4250-12M2XF
NETGEAR M4250-16XF
NETGEAR M4250-40G8F-PoE+
NETGEAR M4250-40G8XF-PoE+
NETGEAR M4200 Series
NETGEAR Categories
Wireless Router
Switch
Network Router
Adapter
Wireless Access Point
More NETGEAR Manuals
Login
Sign In
OR
Sign in with Facebook
Sign in with Google
Upload manual
Upload from disk
Upload from URL