Alde Compact 3000 92X Service Manual
Hide thumbs
Also See for Compact 3000 92X:
- Installation instructions manual (16 pages) ,
- Manual (29 pages)
Table of Contents
Advertisement
Advertisement
Table of Contents

Related Manuals for Alde Compact 3000 92X


Summary of Contents for Alde Compact 3000 92X
- Page 1 Service Manual Compact 3000, 92X 93X 94X –...
- Page 2 This service handbook is intended to assist with servicing and fault-finding in caravans and motor caravans equipped with the Alde Compact 3000 92x-94x. The handbook may also be of assistance in ordering spare parts. It also provides general information on how Alde central heating systems are designed, and how they operate.
-
Page 3: Table Of Contents
CONTENTS Page Chap Page Chap About the Alde central heating system Replacing a burner (new model) Care of the heating system Replacing the spark electrode About the Compact 3000 Replacing the flame sensor Technical data Replacing the solenoid valve Fault-finding... - Page 4 To make refilling and bleeding easier, we recommend using contamination. This will prevent the growth of bacteria in the Alde filling pump which quickly both fills and bleeds the the system. The glycol mixture should be changed every system automatically.
-
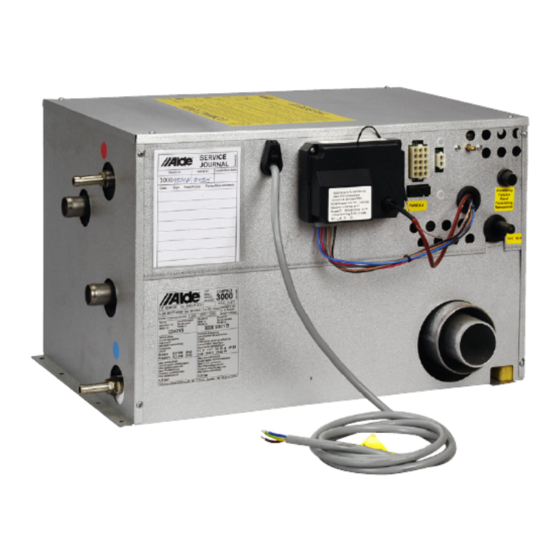
Page 5: 2:0 About The Compact 3000 11 4:5
ABOUT THE COMPACT 3000 How the boiler works. The set-up of the boiler When the room thermostat calls for heat, i.e. the temperature in the vehicle is lower than the set room The boiler consists of three eccentrically-fitted pipes. The temperature, the circulation pump starts. -
Page 6: 3:0 Faultfinding
BE AWARE OF THE RISKS OF 230 V DURING ALL SERVICE WORK FAULTFINDING Fig 1. THE ELECTRICAL HEATING CARTRIDGE DOES NOT WORK Cause: - Check that the changeover switches on the control panel are in the correct positions (see operating instruction for boiler). -
Page 7: 3:2 The Lpg Boiler Do Not Start 15 4:9
THE LPG BOILER DOES NOT START When the overheating protection device has been reset, Initial check: there should be a 12-volt input on one flat-pin connector, - Disconnect the ignition cable from the electronics box and a 12-volt output on the other (see fig. 2 A), otherwise and start the boiler. -
Page 8: Ignition Spark Is Generated But The Boiler
- Remove the nozzle and blow the nozzle and gas pipe - Check that there is voltage (12 V) on flat-pin terminal clean. 12 (grey cable, low temperature) and terminal 22 (blue - Check the wiring contact points again. cable, high temperature) see fig. 2. If there is no voltage - Check that the exhaust cowl and the intake/exhaust on terminals 12 and 22, but there is voltage on terminal hoses are free from objects that may obstruct the air... -
Page 9: 3:4 The Lpg Boiler Starts And Switches Off
THE LPG BOILER STARTS AND SWITCHES OFF AT SHORT INTERVALS Cause: - Check that the flue is free from objects that may obstruct the air circulation. - Voltage to boiler too low (< 12 V). - Check that the gas pressure to the boiler is correct - Poor contact point in the wiring (earth fault). -
Page 10: 10 4:0 Replacing Components 22 7:0
Always switch off 12 V DC and 230 V ~ power supply and turn the main gas cock to "off" position before starting any servicing. The seals (marked in red) must NOT be broken unless special permission has been obtained from Alde. REPLACING THE PRINTED CIRCUIT... -
Page 11: Replacing The Spark Electrode
REPLACING THE BURNER NB! Items 9-12 shall be ignored on boilers with manu- Applies to boiler models 3000 927 and later. If the burner is replaced, burner 3000 516 should be installed. facturing no 3000 9xx B and on boilers where burner 3000 516 is installed. -
Page 12: Replacing The Solenoid Valve
REPLACING THE SOLENOID VALVE 3. Using two spanners, slacken the nuts on the incoming For boilers with serial no. from 04445 and upwards. gas pipe (fig. 15 A) and the gas pipe to the burner (fig. 1. Remove the cover and end plate on the boiler. 15 B), and remove the rubber cap from the soft start 2. -
Page 13: 4:7:1 Replacing A 1 Kw Heating Cartridge
4:7:1 REPLACING THE 1 KW HEATING CARTRIDGE NB! Check that the rubber plug is fully inserted and 1. Switch off 230 V power supply push the lower edge of the heating cartridge while tigh- tening the nut. Tighten the nut to 4 Nm. 2. -
Page 14: 4:7:2 Replacing A 2 Kw Heating Cartridge
4:7:2 REPLACING THE 2 KW HEATING CARTRIDGE 1. Switch off 230 V power supply 2. Drain the glycol mixture from the heating system. 3. Remove the cover and end plate. 4. Remove the burner together with the solenoid valve (fig. 21). -
Page 15: Replacing The Operating Thermostat
REPLACING THE OPERATING REPLACING THE OVERHEATING THERMOSTAT PROTECTION DEVICE 1. Remove the cover on the boiler. 1. Remove the cover on the boiler. 2. Remove the locking clip (fig. 24 A). Remove the split pin 2. Remove the locking clip (fig. 24 A). Remove the split pin (fig. -
Page 16: 4:10 Replacing The Pressure Switch
4:10 REPLACING THE PRESSURE SWITCH SAFETY CHECK 1. Remove the cover and end-plate from the boiler. The safety check must be carried out after every service. 2. Detach the blue, white and red cables on the pressure Check: switch. • That the intake/exhaust hoses and flue are tight and 3. -
Page 17: Wiring Diagram With Control Panel 3000 266
WIRING DIAGRAM WITH CONTROL PANEL 3000 266... -
Page 18: Wiring Diagram With Control Panel 3000 380
WIRING DIAGRAM WITH CONTROL PANEL 3000 380... - Page 19 WIRING DIAGRAM WITH CONTROL PANEL 3000 465 WIRING DIAGRAM WITH CONTROL PANEL 3000 465 (WITH AUXILIARY FUNCTIONS)
- Page 20 WIRING DIAGRAM WITH CONTROL PANEL 3000 565 (WITH AUXILIARY FUNCTIONS)
-
Page 21: Circuit Diagram 12V And 230 V
CIRCUIT DIAGRAM 12V AND 230 V ~ FLOW CHART 230 V ~... -
Page 22: Exploded Diagram
EXPLODED DIAGRAM... -
Page 23: Article Numbers For Exploded Diagram
ARTICLE NUMBERS FOR EXLODED DIAGRAM 1. 3000 133 Metal cover 29. 3000 407 Ignition kit compl. 2. 2900 258 Self-tapping screw B6 x 9.5 30. 3000 516 Burner compl. 3. 3000 195 Fan compl. (for 921) 31. 3000 127 ”SIT” pressure switch 3000 452 Fan compl. - Page 24 GUIDE FOR FAULT FINDING ON COMPACT 3000 Guide for faultfinding on Compact 3000 Neither electricity Only gas not Red light- Is the fan nor gas working working emitting diode lit working Voltage Is the pump Only electricity Is the fan Voltage 8.8-9.2 V working not working...
-
Page 25: Spare Parts
SPARE PARTS 1. 3000 452 Fan complete (9 V for 3000 92x-93x) 1. 3000 289 Solenoid compl. inc. soft start valve 2. 3000 409 Fan complete (9 V for 3000 94x) 2. 3000 168 Soft start valve. Packed in cardboard box with Allen key for impeller 3000 516 Burner set including throttle plate... - Page 26 SPARE PARTS 1. 3000 333 Printed circuit board (92x-94x with 3 kW 1. 3000 365 Operating thermostat ”lmit” including heating cartridge retaining clip 2. 3000 334 Printed circuit board (92x-94x with 2 kW 2. 3000 362 Overheating protection device ”lmit” heating cartridge compl.
- Page 28 Alde International Systems AB Wrangels allé 90 • Box 11066 • S-291 11 Färlöv • Sweden Tel +46 (0)44 712 70 • Fax +46 (0)44 718 48 • www.alde.se • info@alde.se...