Table of Contents
Advertisement
Quick Links
2005 Cadillac STS Navigation System
Overview ........................................................ 1-1
Overview
.................................................. 1-2
Features and Controls ..................................... 2-1
Features and Controls
Navigation Audio System ................................ 3-1
Navigation Audio System
Voice Recognition ........................................... 4-1
Voice Recognition
................................ 2-2
............................ 3-2
...................................... 4-2
Vehicle Customization ..................................... 5-1
Vehicle Customization
Phone ............................................................ 6-1
Phone
...................................................... 6-2
Index ................................................................ 1
M
................................. 5-2
Advertisement
Table of Contents

Related Manuals for Cadillac 2005 STS Navigation System


Summary of Contents for Cadillac 2005 STS Navigation System
- Page 1 2005 Cadillac STS Navigation System Overview ............1-1 Vehicle Customization ........5-1 Overview Vehicle Customization ..........1-2 ......... 5-2 Features and Controls ........2-1 Phone ............6-1 Features and Controls Phone ........ 2-2 ............6-2 Navigation Audio System ........ 3-1 Index ..............
- Page 2 Operation is subject to the following two conditions: GENERAL MOTORS, GM, the GM Emblem, CADILLAC, (1) this device may not cause harmful interference, the CADILLAC Crest & Wreath and the name STS are (2) this device must accept any interference received, registered trademarks of General Motors Corporation.
- Page 3 Section 1 Overview Overview ............1-2 Navigation System Overview ......1-2 Getting Started ..........1-3...
- Page 4 Overview Navigation System Overview...
-
Page 5: Getting Started
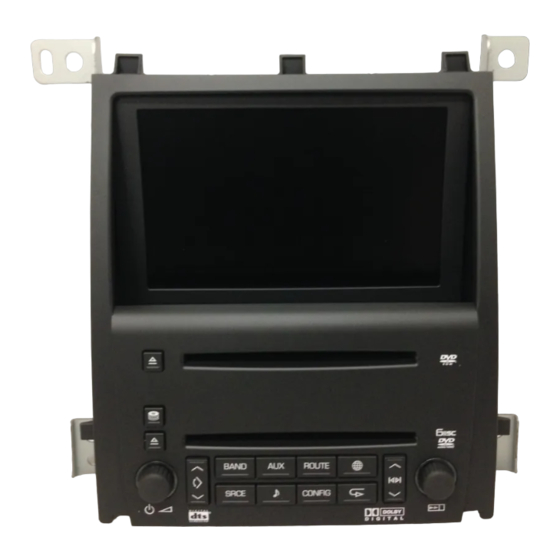
A. Display Screen. M. Seek/Scan Key (up/down). See Six-Disc CD/DVD Changer on page 3-12 for more information. B. Map DVD Eject Key. See “Hard Keys” under Using the Navigation System on page 2-2 for more N. BAND Key. See Six-Disc CD/DVD Changer on information. - Page 6 The information in the system may not always be When getting started you may set the navigation system complete. Road conditions such as prohibited turns, to your preference using various options. To do so, detours, and construction zones, change frequently. It is reference the following topics: important to consider whether you can follow the •...
-
Page 7: Table Of Contents
Section 2 Features and Controls Features and Controls ........2-2 Configure Menu ..........2-49 Using the Navigation System ......2-2 Global Positioning System (GPS) ....2-59 Enter Destination ..........2-6 Vehicle Positioning ........2-60 Stored Locations ...........2-28 Problems with Route Guidance .......2-61 Maps ............2-41 If the System Needs Service ......2-62 Symbols ............2-43 Ordering Map DVDs ........2-62 Keyless Access System .........2-47... -
Page 8: Using The Navigation System
Features and Controls (CD/DVD Eject): Press the eject key next to the CD/DVD changer loading slot to begin ejecting DVDs or CDs. See Six-Disc CD/DVD Changer on page 3-12 Using the Navigation System for more information. This section presents basic information you will need to (Power/Volume): Press the power/volume knob know to operate the navigation system. - Page 9 Alpha-Numeric Keypad (Audio): Press the audio key to access the Audio Adjust screen, where you can adjust your base, Letters of the alphabet, symbols, punctuation, and mid, fade, balance and DSP settings. See Navigation numbers, when available to you, will be displayed on Audio System on page 3-2.
- Page 10 To make your name selections easier, the system will only allow you to select a character which can follow the last one entered. For example, if you enter Z, you would not be allowed to follow it with T. The system will highlight the available characters and darken the unavailable characters.
- Page 11 Touch-Sensitive Buttons Touch-sensitive screen buttons are located on the screen. When you have successfully selected a screen button, a beep will sound. These buttons will be highlighted when a feature is available and dim when they are unavailable. There are also some toggle screen buttons that will be light blue when active and dark blue when inactive.
-
Page 12: Enter Destination
Enter Destination Press the ROUTE key to access the Destination Entry screen. From this screen, you can choose from several options to plan a route by entering destination points. If you need to see a list of states included in the highlighted region, or to change the region, touch REGION from the DESTINATION ENTRY screen. - Page 13 To enter a destination, choose from one of the following (Address): Touch this screen button to access the destination entry methods: ADDRESS screen. At this point you can choose to enter the address one of three ways, either house Address number first, street first or city first.
-
Page 14: Getting Started
To use the street name first destination entry method, Using the 5 Nearest Cities choice, the system will do the following: display the 5 cities nearest your current position. Using the Input City Name choice will allow you to 1. Select the Street screen button from the address input the city name with the alpha keypad. - Page 15 Point of Interest (POI) Then, to use this destination entry method by inputting the name, do the following: The Point of Interest (POI) destination entry method 1. Use the alpha keypad to enter the POI name. allows you to choose a destination from the POI list. Touch Sym.
- Page 16 To use this destination entry method by selecting a To use this destination entry method by selecting a city, category, do the following: do the following: 1. Select the city screen button, then choose from Any 1. Touch the Category screen button from the POINT City, 5 Nearest Cities, Input City Name or from the OF INTEREST screen to view a list of POI Last 5 Cities list.
- Page 17 Then, to use this destination entry method, do the following: The map destination entry method allows you to choose 1. Touch the map for the desired area you wish to set a destination by scrolling on the map. as your destination. 2.
- Page 18 Intersection To enter a destination using the intersection entry method, do the following: The intersection destination entry method allows you to 1. Enter the first of two streets in the intersection. The set two intersecting streets as your destination. List option may become available. 2.
-
Page 19: Phone Number
Phone Number Then, to use this destination entry method, do the following: The phone number destination entry method allows you 1. Input the area code and phone number of a POI to choose a destination by entering a phone number using the numeric keypad. - Page 20 Freeway Entrance/Exit Then, to use this destination entry method, do the following: The freeway entrance/exit destination entry method 1. Touch the Freeway screen button and enter the allows you to choose a destination by entering a freeway freeway name. Be sure to use abbreviations, entrance or exit point.
- Page 21 Emergency Then, to use this destination entry method, do the following: The emergency destination entry method allows you to 1. Choose a category. enter a destination by choosing from three categories: Police Station, Hospital, or Dealer. 2. Choose a destination point from the list. Touch Name Sort to sort the list by name, or Dist Sort to sort the list by distance from the vehicle’s current position.
-
Page 22: Previous Destination
Memory Points Previous Destination The memory points destination entry method allows you The previous destination entry method allows you to to choose a destination from a list of points that you choose a destination from a list of previous destination have previously stored. - Page 23 Coordinates Then, to use the previous destination entry method, do the following: The coordinates destination entry method allows you to 1. Choose a previous destination from the list. Use the choose a destination by entering latitude and longitude arrow to the right of the destination to view the coordinates.
-
Page 24: Voice Recognition
Preset Destination Then, to use this destination entry method, do the following: The preset destination entry method allows you to set a 1. Touch N or S next to LAT. to enter the direction of destination by choosing from one of five previously the latitude coordinate. -
Page 25: Voice Recognition
Then, to use this destination entry method, do the (Home): Touch this screen button to set your following: destination as home. 1. Select the desired preset destination from the To use this destination entry method, do the following: DESTINATION ENTRY screen. The screen 1. -
Page 26: Getting Started On Your Route
Getting Started on Your Route Route Preference: Touch this screen button to access the ROUTE PREFERENCES screen and adjust the route Once you have entered a destination, you can perform preferences. The current setting is displayed in the Route one of the following options: Preference section of the Map screen. - Page 27 Nav. (Navigation) Menu From this screen you can touch the menu screen button to access the Nav. (Navigation) menu. From this screen you can select Guide to start your route guidance or select 3routes if available to select between Quick, Normal or Short route options. You can also select the Chg.
- Page 28 Change Route From this menu, you can choose Change Route or Memory Points. Selecting Change Route from the Nav. Menu will take you to the ROUTE OPTIONS menu. The availability of these buttons depends on if a route is planned or if you are driving a route.
- Page 29 Search Conditn (Search Condition): This Detour: From this screen, you can choose to detour option will take you to the SEARCH CONDITION screen. 1 mile, 3 miles, or 5 miles around a the current route. You may also choose to detour the whole route if necessary.
- Page 30 Route Pref. (Route Preferences): This feature will (Allow Toll Road): This feature allows the system take you to the ROUTE PREFERENCES screen. to use toll roads when calculating a route. (Allow Ferry): This feature allows the system to use ferries when calculating a route. Dest.
- Page 31 Display route: From this screen, you can view the Route Preview: From this screen, you can entire route and choose to view a Turn List. From preview the entire route in either direction, as well as the Turn List you can select the Avoid screen button if edit the route.
- Page 32 From this screen, you can add a waypoint or POI to the (Pause): Touch this screen button to pause the current route. route preview. (Scroll to Destination): Touch this screen button to scroll to the destination, next waypoint or next POI depending on the mode selected.
- Page 33 Three Routes To access this screen, touch the Chg. Route button on the map screen while planning a destination. Touch Info on the three routes screen to access the INFO FOR 3 ROUTES screen. From this screen, you can view the following information for the different planned routes: When applicable, the system will calculate up to three (Estimated Travel Time): This icon shows the...
-
Page 34: Stored Locations
Stored Locations (Toll Road): This icon shows the route’s toll road distance information. Memory Points (Freeway Travel): This icon shows the route’s Choosing Memory Points from the Nav. Menu will take freeway distance information. you to the STORED LOCATIONS screen. From this screen, you can access the following options: (Ferry): This icon shows the route’s ferry distance information. - Page 35 This feature will allow you to make changes to a specific stored point, such as changing the name, moving it to a different folder/category, storing the point as a name tag, modifying the position of the stored point, changing the icon and changing the phone number.
- Page 36 To move the memory point from one folder/category to another: 1. Select one of the folders/categories listed. 2. Select the memory point that you wish to edit. 3. Touch the Category screen button from the EDIT MEMORY POINT screen. 4. Touch the new folder/category button you want to move the memory point to.
- Page 37 Once a nametag is stored, you can choose to whether 4. Select the desired icon. There are two pages of to have the name show. You can also select the icons, a page of icons that have sounds associated Del Nametag screen button to delete the nametag. with them, and a no icon button to choose from.
- Page 38 To change the name of the folder/category: 1. Select the desired folder/category from the MEMORY POINTS screen. 2. Select the Edit Category screen button. 4. The Navigation System will show the map screen with the position address and a pop-up confirmation message.
- Page 39 To change the name of the point to be avoided: 1. Touch the Avoid Area screen button from the MEMORY POINTS screen. 2. Touch the Edit screen button from the AVOID AREA screen. 3. Select the point to be changed. To store a point to be avoided while planning a route: 1.
- Page 40 6. Touch the OK screen button to save your changes. To delete a point to be avoided: 7. Select the Show Name On screen button if you 1. Touch the Avoid Area screen button from the would like the name of the point to appear on the MEMORY POINTS screen.
- Page 41 4. A map screen will appear with the way point marked. Dest. & Way Pt.: This feature allows you to store up to five waypoints to the current route. 5. Select the (Way point) symbol on the map screen to save the way point. 6.
- Page 42 To change the order of the route: To change the location of a way point: 1. Touch the Dest. & Way Point screen button from 1. Touch the Dest. & Way Point screen button from the MEMORY POINTS screen. the MEMORY POINTS screen. 2.
- Page 43 To delete all of the way points on your route: 1. Touch the Dest. & Way Point screen button from the MEMORY POINTS screen. 2. Touch the Del.All screen button from the DEST. & WAY POINT screen. 3. The Navigation System will display the map screen with a pop-up confirmation message.
- Page 44 To edit your home destination, do the following: To delete a specific destination from your previous destinations list, do the following: 1. From a map screen, touch the Menu screen button. 1. From a map screen, touch the Menu screen button. The NAV.
- Page 45 Storing a Preset Destination To store a preset destination, do the following: 1. From a map screen, touch the Menu screen button. The NAV. (Navigation) MENU will be displayed. 2. Press the Memory Points screen button. 3. Choose the Preset Dests. screen button. 4.
- Page 46 To change the position of a preset destination, do the To add or change the phone number of a preset following: destination, do the following: 1. From a map screen, touch the Menu screen button. 1. From a map screen, touch the Menu screen button. The NAV.
-
Page 47: Maps
Maps Once the map DVD is inserted correctly, you will have the following two choices: This section includes basic information that you need to Agree: Touch this screen button to proceed to the know about the map database. navigation system. Regional Maps (Language): Touch this screen button to change The maps are stored on a DVD. - Page 48 Map Scales If scrolling while your vehicle is in PARK (P), the system will scroll initially at a slower rate. It will increase if To view a larger or smaller you continue touching the map screen. scale of the map, touch If scrolling while your vehicle is in motion, you have one the map scale arrows.
-
Page 49: Symbols
Symbols The distance to destination symbol indicates the distance to your final The following symbols are the most common symbols destination. It only appears that will appear on a map screen. when time is not available (Current Position): Your vehicle is shown as this or when you are scrolling on the map without a symbol. - Page 50 The straight line to The heading up symbol distance symbol shows the indicates the map with the straight-line distance to vehicle travel direction your destination. up, known as Heading Up mode. The shaded triangle indicates the North direction. While in Heading Up mode, the direction your vehicle is traveling will always be at the top of the map screen.
- Page 51 This symbol indicates the (Dual View): Touch this symbol to change the position of the next guidance window to dual map mode when under Route guidance maneuver. Guidance. This mode will show two map screens and each can have a different scale level and different POIs.
- Page 52 (Next Turn): Touch this symbol to change guidance (Destination): Touch this symbol to set the current mode to display mode guidance on the map screen when route as the final destination. under Route Guidance. This mode allows you to see (Waypoint): Touch this symbol to enter a waypoint more of the map screen and displays a small guidance window with the direction and distance of the upcoming...
-
Page 53: Keyless Access System
Auto Reroute Keyless Access System When your destination is set and you are off the When you start your vehicle, you will see Driver 1 or planned route, the system will automatically plan a new Driver 2 displayed on the cluster. If personalization route and begin to reroute. -
Page 54: Onstar ® System
® OnStar System (Place/End Call): Touch this screen button to place your phone call. While in a call this button will be red and can then be used to end your call. Tone Send: Touch this screen button send touch tone data. -
Page 55: Configure Menu
® Using the OnStar Screen to Make a Configure Menu Phone Call ® To make a phone call using the OnStar screen do the following: 1. Press the AUX hard key. ® 2. Touch the OnStar screen button. 3. Enter the phone number using the numeric keypad. 4. - Page 56 ® Bluetooth Auto Store: Touch this button to turn the Auto Store on for the current audio source selected. When on, this ® button will appear on the main audio screen. This button (Bluetooth ): Touch this screen button to access the is not available when in XM™...
- Page 57 Subtitle Language: Select this button to view a list of languages to choose for subtitles. The list of languages will depend on the languages supported by the inserted disc. Select the language desired. Menu Language: Select this button to view a list of languages to choose for the DVD menu text.
-
Page 58: Navigation Set Up
Navigation Set Up From this menu, several options are available for adjustment: (Navigation Set Up): Touch this screen button to 2D/3D View: This option allows you to change access the NAVIGATION SET UP screen. the view of the map screen and the guidance screen between a 2-dimensional and 3-dimensional view. - Page 59 Quick POI Selection: This option allows you to set six Point of Interest (POI) categories that you can select from while driving. To select from these categories while driving, touch anywhere on the map or press the POI screen button on the map screen. 3.
- Page 60 To remove the POI icons from the map screen, do the To correct the position of your vehicle on the map (if following: your vehicle has been shipped, for example) or to change to the current position, touch the 1. Touch the Quick POI Selection screen key. Position/Direction screen key.
- Page 61 From this screen, you can adjust the following: Notify traffic restriction: This option instructs the system to notify you when the current route has traffic restrictions. Arrival Time (Time of Arrival): This option will display the estimated time of arrival to your destination. Arrival Time (Time to Destination): This option will display how much time remains to reach your destination.
- Page 62 Vehicle Vehicle: Touch this screen button to access the vehicle information menu. From this menu, you can adjust such options as the language, personal settings, and memory options. See Personalization on page 5-2 for more information on these features. > Volume: This option allows you to adjust the volume of voice guidance prompts and the voice recognition system.
- Page 63 Clock AM: Touch this screen button when setting the time in AM. (Clock Adjust): Touch this screen button to access PM: Touch this screen button when setting the the Clock Adjust screen and adjust several time features. time in PM. PST, MST, CST, EST: Touch one of these screen buttons to choose between Pacific Standard Time (PST), Mountain Standard Time (MST), Central Standard...
- Page 64 Screen Appearance Color Mode: This option allows you to adjust your screen mode between Auto, Day, and Night. Day mode will change the navigation system screen to a lighter (Screen Appearance): Touch this screen button to background for better viewing in the daytime. Night access the appearance screen menu.
-
Page 65: Global Positioning System (Gps)
Global Positioning System (GPS) This system may not be available/or interference may occur if the following happens: The Navigation System determines the position of your • Signal obstructions caused by tall buildings, large vehicle by using satellite signals, various vehicle trucks, tunnels, signals and map data. -
Page 66: Vehicle Positioning
Vehicle Positioning • The vehicle is entering and/or exiting a parking lot, garage or a lot with a roof. At times, the position of the vehicle on the map may be • The GPS signal is not received. inaccurate due to one or more of the following reasons: •... -
Page 67: Problems With Route Guidance
Problems with Route Guidance • Automatic rerouting may display a route returning to the set waypoint if you are heading for a destination Inappropriate route guidance may occur under one or without passing through a set waypoint. more of the following conditions: •... -
Page 68: If The System Needs Service
If the System Needs Service Database Coverage Explanations If your system needs service and you have followed the The United States, excluding Alaska and Hawaii, and steps listed here and still are experiencing problems, portions of Canada are contained on one DVD disc. The see your dealer for assistance. - Page 69 Section 3 Navigation Audio System Navigation Audio System ........3-2 Six-Disc CD/DVD Changer ......3-12 Radio Personalization ........3-23...
-
Page 70: Playing The Radio
Navigation Audio System Playing the Radio Notice: Before adding any sound equipment to (Power/Volume): Press this knob to turn the your vehicle, like a tape player, CB radio, mobile audio system on and off. Turn the knob to the right telephone, or two-way radio, make sure that it can to increase or to the left to decrease the volume to the be added by checking with your dealer. -
Page 71: Finding A Station
Finding a Station To scan preset stations, touch and hold Scan for two seconds. Touch Scan again to stop scanning. While in A.B.C mode, the system will change bands and screens to the current band. If available on your vehicle, you can also use the 1 - 6 (preset seek) steering wheel control to seek through your preset stations. -
Page 72: Preset Station Menu
A.B.C: This button allows you to scroll through the 3. Tune in the desired station by using the 7 preset lists. The list names are A - G. Each list can SEEK/SCAN hard key. store 6 presets. The presets within each list can be 4. - Page 73 Audio Adjust Mid (Mid-range): Touch the plus (+) or minus (−) sign next to this symbol to increase or decrease the mid-range. Touch the center position to adjust the (Audio Adjust): Touch this hard key to access the setting to the center. AUDIO ADJUST menu and to adjust the tone, Digital Signal Processing (DSP), fade, and balance for all (Bass): Touch the plus (+) or minus (−) sign next to...
- Page 74 Adjusting the Speakers Your system is designed to automatically store the audio adjustment settings. If you want to program them The Digital Signal Processing (DSP) feature is used to yourself, use the following procedure: provide a choice of five different listening experiences. 1.
- Page 75 Radio Data System (RDS) XM™ Satellite Radio Service The audio system has a Radio Data System (RDS). XM™ is a satellite radio service that is based in RDS features are available for use only on FM stations the 48 contiguous United States. XM™ offers that broadcast RDS information.
- Page 76 Category: Select the Category button to search for a Group Name Category station using a category. The categories are displayed on Rock the preset area. Use the arrows to the left of the category Classic Rock button to scroll through the available categories. The Adult Hits current category name is displayed in the middle of the Top 40...
- Page 77 To select a category, do the following: 3. The Navigation System will display the available category on the presets. 1. Select the XM™ audio source. 4. Use the left and right arrows to scroll through the 2. Select the Category screen button. presets or use the seek up/down hard key to go to 3.
- Page 78 XM Radio Messages Radio Display Message Condition Action Required XM Updating Updating encryption code The encryption code in your receiver is being updated, and no action is required. This process should take no longer than 30 seconds. No XM signal Loss of signal Your system is functioning correctly, but you are in a location that is blocking the XM signal.
- Page 79 Radio Display Message Condition Action Required No CAT Info Category Name No category information is available at this time on this not available channel. Your system is working properly. Not Found No channel available for There are no channels available for the category you the chosen category selected.
- Page 80 Six-Disc CD/DVD Changer (Load): To load a disc(s) into the DVD changer, press the DVD changer load hard key and follow This system has the ability to play different types of the screen message displayed. media formats. The system can play DVD - Video, DVD - Video (DTS), DVD - Audio, CD - Digital Then, do the following: Audio (CD - DA), CD-DA (DTS), CD - Text, CD - Extra,...
- Page 81 Playing an Audio CD To eject a disc(s) from the CD/DVD changer, do the following: 1. Press the eject hard key. 2. Touch the available slot from the bottom of the screen, numbered 1 through 6, that you wish to eject. 3.
- Page 82 The following features are also available from this screen: RND (Disc Random): This symbol will appear at the top of the CD/DVD changer screen when playing all Play: Touch one of the available screen buttons tracks and discs with the same type of media in 1 through 6 to begin playing that disc automatically.
- Page 83 « ª The following features are also available from this (Seek Up/Down): Press the up arrow hard key screen: to seek to the next selection on a disc. If playing the last track of the disc, pressing the up arrow will seek to Play: Touch one of the available screen buttons the first track of the next disc.
- Page 84 (Random): Touch this screen button to hear the (Repeat): Touch this screen button to repeat the tracks in the current folder in random, rather than track on the selected disc. Touch this screen button sequential, order. Touch this screen button a second again to repeat all tracks within the current folder.
- Page 85 « ª (Seek Up/Down): Press the up arrow hard key to seek to the next selection on a disc. If playing the last track of the disc, pressing the up arrow will seek to the first track of the next disc. Press the down arrow hard key to seek to the previous selection on a disc.
- Page 86 Playing an Audio or Video DVD (Page Up): Touch the page up symbol to scroll up through the pages of an audio DVD. The function of this screen button depends on the disc inserted. (Page Down): Touch the page down symbol to scroll down through the pages of an audio DVD.
- Page 87 Scan: Touch Scan to hear the first 10 seconds of each (DVD Repeat): This symbol will appear at the top track on the selected disc. of the DVD changer screen when the repeat feature is turned on. The system will repeat the current track. SCAN (Disc/Track Scan): This symbol will appear «...
- Page 88 More Audio and DVD Options See the following option for more cursor information: Audio DVD screen shown, Video DVD screen similar (Cursor Arrows): Touch these cursor Once you touch Display from the main audio DVD screen buttons when you need to scroll through a list of menu, you have access to the following options: DVD items, such as track names, menu options, or scene selection.
- Page 89 DVD Menu: Touch this screen button to access the Subtitle: Touch this screen button to play back the video DVD menu. video with subtitles. This may not be available on all DVDs. Depending on the type of DVD you are using, While watching a video DVD or playing an audio DVD, this screen button may or may not be available.
- Page 90 Screen Adjust: Touch this screen button to access the Tint: Touch the plus (+) or minus (−) signs next to this audio/video DVD screen adjust menu. symbol to increase or decrease the screen tint. From this screen, you will have the following options: (Color Symbol): Touch the R for red or G for green next to this symbol to increase or adjust the color of the screen.
-
Page 91: Radio Personalization
Six-Disc DVD Changer Errors Radio Personalization Although the DVD or CD you are playing meets With this feature, you can recall the latest audio system regulation requirements, there are circumstances that settings as adjusted the last time your vehicle was may cause the disc to not play correctly in your system. - Page 92 NOTES 3-24...
- Page 93 Section 4 Voice Recognition Voice Recognition ..........4-2...
- Page 94 Voice Recognition 2. Clearly state one of the commands listed on the following pages. When the system recognizes the command, it will either perform the function, ask you The navigation system’s voice recognition allows for to confirm your choice by clearly stating “yes or hands-free operation of navigation, phone, audio system, no”, or issue an error message such as “System ®...
- Page 95 Voice Recognition Help Help commands can be displayed on the screen while you are stopped. When the vehicle is moving, the system will let you know that this command is not available while driving. To enter the help screens, clearly state one of the help commands.
- Page 96 DVD: Touch this screen button to display the list of DVD commands. Heater: Touch this screen button to display the list of climate control commands. Disp. (Display): Touch this screen button to display the list of display commands. Phone: Touch this screen button to display the list of phone commands.
-
Page 97: Voice Recognition Commands
Voice Recognition Commands Display [set] language French: This command instructs the system to change the display (instrument The following list shows all of the voice commands panel cluster, HUD, and Navigation System display), available for the navigation system with a brief Navigation System voice prompt and voice recognition description of each. - Page 98 Display [set] language Italian: This command Display Help: This command instructs the system to instructs the system to change the display (instrument offer assistance with the previously listed display panel cluster, HUD, and Navigation System display), commands. The Navigation System will display the Navigation System voice prompt and voice recognition commands on the screen.
-
Page 99: Map Commands
Map Commands Navigation [change to] North Up [mode], navigation [show] North Up [mode]: These commands instruct The following are map commands you can access by the system to switch the map to North Up mode. These clearly stating the commands exactly as they are written: commands are available while the map screen is displayed. - Page 100 Point of Interest (POI) Commands Navigation right map [change map] direction: This command instructs the system to change the direction of The following is a list of POI commands. State the the map to heading up or north up depending on the commands exactly as they are written to receive previous setting.
- Page 101 Entertainment Locations Financial Locations • • Navigation Amusement Park Navigation ATM • • Navigation Casino Navigation Bank • • Navigation Cinema Navigation Other Financial Services • Navigation Golf Course Governmental Offices • • Navigation Historical Monument Navigation Town Center • •...
- Page 102 • Personal Services Navigation Italian Restaurant • Navigation Beauty and Barber Shops • Navigation Italian Food • Navigation Dry Cleaning • Navigation Japanese Restaurant • Navigation Health and Fitness Club • Navigation Japanese Food • Navigation Business Facility • Navigation Mexican Restaurant •...
- Page 103 Transportation Navigation [go] home, navigation [select] home: These commands instruct the system to set the • Navigation Airport home preset as the destination. • Navigation Bus Station Navigation [go to] starting point, navigation • Navigation Campground [previous] starting point: These commands instruct •...
- Page 104 Nametag Commands Guidance Commands The following are nametag commands you can access by The following are guidance commands you can access clearly stating the commands exactly as they are written. by clearly stating the commands exactly as they are You may have up to 10 nametag entries for phone book written: entries and 10 nametag entries for destinations.
- Page 105 Navigation delete next waypoint, navigation cancel Navigation short: This command instructs the system next waypoint: These commands instruct the to use the short search planning method condition. system to cancel the next waypoint from the route. The The system will request that you confirm. After system will request that you confirm.
- Page 106 Radio Commands Radio [band] [select] AM, radio [band] [select] FM, radio [band] [select] XM, radio [band] [select] The following are radio commands you can access by satellite, radio [band] [select] WX, radio [band] clearly stating the commands exactly as they are written. [select] weather band: These commands instruct the The commands are only available when you are in system to go to either the AM, FM, XM (if equipped),...
- Page 107 Radio [select] center point [mode], radio [select] talk CD [set] fade front, CD [set] fade rear: These [mode], radio [select] rear seat [mode], radio commands instruct the system to increase the fade to [select] driver [mode], radio [select] normal [mode]: the maximum setting front or rear.
- Page 108 CD eject [disc], CD eject [disc] (one, two, etc.): DVD [set] balance center, DVD [set] balance middle, These commands instruct the system to eject one disc, DVD [set] fade center, DVD [set] fade middle: These or a specific numbered disc. commands instruct the system to set the fade and balance to the center and middle.
-
Page 109: Climate Control Commands
DVD [select] center point [mode], DVD [select] talk Heater/heat/AC/air conditioning [set] temperature [mode], DVD [select] rear seat [mode], DVD (number): This command instructs the system to [select] driver [mode], DVD [select] normal [mode]: set the heater or air conditioning to a specific These commands instruct the system to switch temperature. - Page 110 Personalization Commands Select driver exit: This command instructs the system to select the exit position for the currently chosen driver. The following are personalization commands you can access by clearly stating the commands exactly as they Driver help: This command instructs the system to are written.
- Page 111 ® Phone Commands OnStar Command ® These commands will only function if a Bluetooth OnStar: This command instructs the system to connect phone has been paired with the navigation system, is ® ® to OnStar . You will enter the OnStar voice recognition available in the vehicle, and is on.
- Page 112 NOTES 4-20...
- Page 113 Section 5 Vehicle Customization Vehicle Customization ........5-2 Personalization ..........5-2...
- Page 114 Vehicle Customization Language Personalization Your vehicle is equipped with personalization that allows you to program certain features to a preferred setting for up to two people. Features such as driver position, door lock personalization, passenger window personalization, chime personalization, driver information center, remote lock and unlock confirmation, suspension system configuration, and remote start climate control settings can be personalized.
- Page 115 Entering the Personalization Menu To change the language, do the following: 1. Select the CONFIG hard key. 2. Touch the Vehicle screen button. 3. Select the globe screen button or choose the desired language. 4. Your choice will be stored automatically. If you become stuck in a language that you do not understand, do the following: 1.
- Page 116 5. Access the Personal Menu Setting by pressing the Feature Default Mode Personal Settings screen button. Lights flash at UNLOCK on 6. The appropriate driver information should be Lights flash at LOCK on highlighted. If you wish to change driver numbers, touch the appropriate screen button, either Driver 1 Exterior lighting at UNLOCK on or Driver 2.
- Page 117 Lock/Unlock The following choices are available: Automatic Door Unlock If you turn this feature on, you may choose one of the following options: DRIVER unlock at OFF: This feature allows the driver’s door to automatically unlock when the ignition is turned off.
- Page 118 Keyless Access Unlock You may also choose to activate one or both of the following two options: When this is selected, the keyless access system will automatically unlock the door based on the position Keyless Access All Doors lock 5 sec after Last door of the transmitter.
- Page 119 Lights/Horn Lights flash at UNLOCK: This feature allows the exterior lamps to flash when the keyless access transmitter is used to unlock the vehicle. All doors must be closed for this feature to work, and the lamps will not flash if the parking lamps or headlamps are on.
- Page 120 Exterior Lighting at UNLOCK: This feature turns on Twilight Delay: If this feature is activated, you can the exterior lamps when the keyless access transmitter choose the delay time that your exterior vehicle lights is used to unlock the vehicle. The lamps will remain will stay on when you exit the vehicle.
- Page 121 Occupant Information Chime Volume: You can choose a normal or high volume level for the vehicle chime setting. The chime volume cannot be turned off. Suspension: If your vehicle has this feature, you can select between performance or touring modes. Performance mode is used where road conditions or personal preference demand more control.
- Page 122 Occupant Position REMOTE recall memory: When on, the previously programmed seat and mirror positions will be recalled when you press the unlock button on the keyless access transmitter. Auto EXIT Seat Recall: When on, your previously programmed exit seat position is recalled when vehicle is turned off, the shift lever is in PARK (P), and the driver door is opened.
- Page 123 Remote Start You may choose any or all of the following items: 1. The Remote Start screen button must be highlighted for the remote start feature to be activated. 2. Once the remote start feature is activated, you can choose any or all of the features shown. Climate Control: If this feature is active, the climate control system will engage when the vehicle is started using the remote start feature.
- Page 124 Memory Entering the Memory Menu If your vehicle has the memory feature, you can To enter the memory programming mode, use the program and recall memory settings for the following following procedure: features for up to two drivers: 1. Be sure the ignition is either on, in accessory mode, •...
- Page 125 Recall Driver Settings: Touch this screen button to Store Driver Settings: This feature allows you to store have your previously stored seat, steering column, the seat, steering column, and outside mirrors outside mirror, climate control and radio positions positions. recalled. To store driver settings, using the Navigation System, To recall driver settings using the Navigation System, use the following procedure:...
- Page 126 Store Exit Settings: This feature allows you to store If the vehicle is in PARK (P), a beep will sound and your exit positions for the seat and steering column. previously saved exit position will then be recalled. If the vehicle is not in PARK (P), three beeps will To store exit settings using the Navigation System, use sound and your previously saved exit position will not the following procedure:...
- Page 127 Section 6 Phone Phone .............6-2 ® Bluetooth Phone ...........6-2...
-
Page 128: Bluetooth Phone
Phone ® Bluetooth Phone ® ® Your vehicle is equipped with Bluetooth . Bluetooth a wireless communication system that allows you to ® use a Bluetooth compatible phone in a hands-free mode. You may also set up a phone directory for use in your vehicle. - Page 129 Default: This screen button will set the highlighted (Cancel): Touch this screen button to return to the device to be the default. This will underline the default BLUETOOTH PHONE screen. device in the list. Registered Device: Touch this screen button to display Search: This screen button will begin the system’s ®...
- Page 130 Screen Explanation (Delete): Touch this screen button to delete numbers after they have been entered. Touch and release to delete numbers one-by-one or hold it down to delete all numbers. Switch Call: Use this screen button to switch calls during a call-waiting situation. Hands Free: Choose this screen button to use the phone like a speaker phone.
-
Page 131: Phone Book Screen
® Using Your Bluetooth Phone Once your phone has been set up, you are ready to begin using it. 1. Press the AUX hard key to enter the BLUETOOTH PHONE screen. ® 2. Touch the Bluetooth screen button ( 3. Use the keypad to dial the number you wish to call. 4. - Page 132 To add a new phone book entry, do the following: (OnStar): Touch this screen button to use the ® ® OnStar system to place a phone call. See OnStar 1. Touch the New screen button. System on page 2-48 for more information. 2.
- Page 133 Last 10 Calls Screen (Cancel): Touch this screen button to return to the BLUETOOTH PHONE screen. This screen shows either the last 10 calls that have been ® placed or the last 10 calls received by your Bluetooth (Back): This screen button will return the screen to system.
- Page 134 NOTES...
- Page 135 Audio System ..........3-2 Getting Started Getting Started, Navigation ......1-3 Global Positioning System (GPS) ...... 2-59 ® Bluetooth , Phone ..........6-2 Keyless Access System ........2-47 Six-Disc CD Changer ........3-12 Maps ............2-41 Database Coverage Explanations ...... 2-62 DVD, Six-Disc Changer ........
- Page 136 ® Phone, Bluetooth ..........6-2 Six-Disc CD/DVD Changer ....... 3-12 Problems with Route Guidance ......2-61 Stored Locations ..........2-28 Symbols ............2-43 System Needs Service, If ......... 2-62 System Overview Overview, Navigation System ......1-2 Radio ............. 3-2 Radio Personalization ........3-23 Remote, Keyless Access System .......