Panasonic CF-Y7 series Operating Instructions Manual
Personal computer
Hide thumbs
Also See for CF-Y7 series:
- Operating instructions manual (44 pages) ,
- Read me first (192 pages) ,
- Supplementary manual (20 pages)
Table of Contents
Advertisement
Quick Links
For further information about the com-
puter, you can refer to the on-screen
manual.
To access the on-screen manual
page 16 "On-screen Manual"
Please read these instructions carefully before using this product and save this manual for future use.
OPERATING INSTRUCTIONS
Contents
Getting Started
.................................................2
..............................................3
Useful Information
Appendix
............................................36
Personal Computer
CF-Y7
Model No.
.......................................9
.....................................11
.......................................16
.............................18
......................................22
..................24
...........................25
....................................26
...................................32
..............35
series
.......28
Advertisement
Table of Contents

Related Manuals for Panasonic CF-Y7 series


Summary of Contents for Panasonic CF-Y7 series
-
Page 1: Table Of Contents
OPERATING INSTRUCTIONS Personal Computer CF-Y7 series Model No. Contents Getting Started ..........2 Introduction ..........3 Read Me First ........9 Description of Parts ........11 First-time Operation Useful Information ........16 On-screen Manual ......18 Handling and Maintenance ........22 Expanding Memory ....24 Hard Disk Backup/Restore Function ......25 Hard Disk Data Erase Utility ........26... -
Page 2: Introduction
Introduction Thank you for purchasing this Panasonic computer. For optimum performance and safety, please read these instruc- tions carefully. Terms and illustrations in these instructions Conditions that may result in minor or moderate injury. CAUTION Useful and helpful information. NOTE Enter : Press [Enter] key. -
Page 3: Read Me First
Contact and Pursuant to at the directive 2004/108/EC, article 9(2) Panasonic Testing Centre Panasonic Service Europe, a division of Panasonic Marketing Europe GmbH Winsbergring 15, 22525 Hamburg, Germany Network connection. The terminal equipment is intended for connection to the following public network;... - Page 4 If you lose the fuse cover the plug must not be used until a replacement cover is obtained. A replacement fuse cover can be purchased from your local Panasonic Dealer. IF THE FITTED MOULDED PLUG IS UNSUITABLE FOR THE SOCKET OUTLET IN YOUR HOME THEN THE FUSE SHOULD BE REMOVED AND THE PLUG CUT OFF AND DISPOSED OF SAFELY.
- Page 5 CD/DVD Drive Caution CAUTION! THIS PRODUCT UTILIZES A LASER. USE OF CONTROLS, ADJUSTMENTS OR PERFORMANCE OF PROCEDURES OTHER THAN THOSE SPECIFIED HEREIN MAY RESULT IN HAZARDOUS RADIATION EXPOSURE. DO NOT OPEN COVERS AND DO NOT REPAIR YOURSELF. REFER SERVICING TO QUALIFIED PERSONNEL. 12-E-1 12-1-1 Information to the User...
- Page 6 Do not touch involved with ensuring human life or safety. Panasonic the pins and circuit boards inside, and do not allow foreign cannot be held responsible in any way for any damages matter to enter inside.
- Page 7 Using an AC adaptor other than the one supplied Do Not Connect a Telephone Line, or a Network Cable (attached to your product or supplied by Panasonic) may Other Than the One Specified, into the LAN Port result in a fire.
- Page 8 Read Me First The battery pack is not charged when the computer is first purchased. Be sure to charge it before using it for the first time. When the AC adaptor is connected to the computer, charging begins automatically. Should the battery leak and the fluid get into your eyes, do not rub your eyes.
-
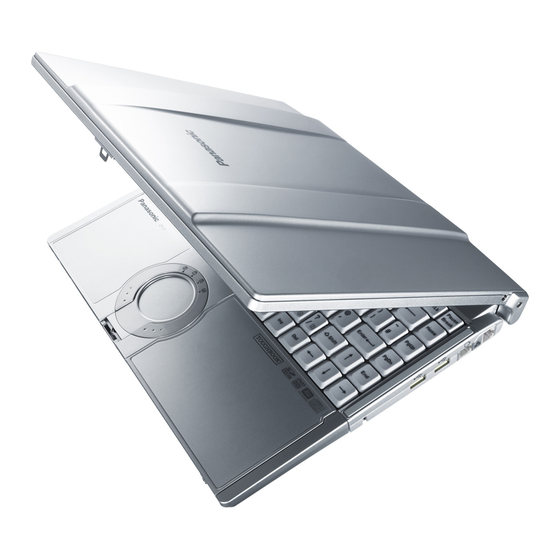
Page 9: Description Of Parts
Description of Parts A :Speakers I : CD/DVD Drive Power/Open Switch • Slide the switch to the right to open the disc cover. B :Function Key • Slide the switch to the left to turn on/off the drive Reference Manual “Key Combinations” power. - Page 10 Description of Parts EXT. A :DC-IN Jack I : Wireless LAN Antenna B :Ventilation Hole <Only for model with wireless LAN> C :External Display Port Reference Manual “Wireless LAN” If the Mini Port Replicator is connected to the com- J : Touch Pad puter, connect the external display to the external dis- play port on the Mini Port Replicator.
-
Page 11: First-Time Operation
First-time Operation Preparation A Check and identify the supplied accessories. If you do not find the described accessories, contact your technical support office. • AC Adaptor ..1 • AC Cord ..1 •... -
Page 12: Turn On The Computer
First-time Operation Turn on the computer. Slide and hold the power switch for approximately one second until the power indicator lights. It takes approximately 10 minutes until the Windows setup screen appears. Do not touch the keys and touch pad until it appears. CAUTION Do not slide the power switch repeatedly. - Page 13 <For MUI OS model> Install Adobe Reader. NOTE Install Adobe Reader to read the Important Tips and the Reference Manual. (Start) and input the following in [Start Search], then press Enter. Click Arabic: [c:\util\reader\ar\setup.exe] Bulgarian: [c:\util\reader\bg\setup.exe] Chinese (Simplified): [c:\util\reader\sc\setup.exe] Chinese (Traditional): [c:\util\reader\tc\setup.exe] Croatian: [c:\util\reader\yx\setup.exe] Czech: [c:\util\reader\cs\setup.exe] Danish: [c:\util\reader\da\setup.exe]...
- Page 14 First-time Operation To conserve power, the following power saving methods are set at the time of purchase. (When AC adaptor is connected) • The screen automatically turns off after 15 minutes of inactivity. • The computer automatically enters sleep after 20 minutes of inactivity. Refer to Reference Manual “Sleep or Hibernation Functions”...
- Page 15 Regarding Windows Vista You can select the Classic view of Control Panel or the Classic Start menu. You can also change the way a user logs on or off. This manual explains using the Windows Vista default setting (not Classic view or Classic Start menu etc.). User Account Control User Account Control is a new security component of Windows Vista to stop unauthorized changes to your computer.
-
Page 16: On-Screen Manual
On-screen Manual You can access the following manuals on the computer screen after completing the “First-time Operation”. When you access the on-screen manual for the first time, the License Agreement of the Adobe Reader may be dis- played. Read it carefully and select [Accept] to proceed. Reference Manual The Reference Manual contains the practical information to help you fully enjoy the computer’s performance. - Page 17 The Hard Disk Handling will provide you with the helpful information on how to use the hard disk. To access the Hard Disk Handling: Click (Start) - [All Programs] - [Panasonic] - [On-Line Manuals] - [Hard Disk Handling]. Supplementary Instructions of Bluetooth <Only for model with Bluetooth>...
-
Page 18: Handling And Maintenance
Handling and Maintenance Operation Environment Place the computer on a flat stable surface. Do not place the computer upright. If the computer is exposed to an extremely strong impact, it may become inoperable. Temperature: Operation: 5 °C to 35 °C Storage: -20°C to 60 °C Humidity: Operation: 30% to 80% RH (No condensation) - Page 19 Note that this service is only available in certain regions. http://www.absolute.com Turn on or restart the computer, and press while [Panasonic] boot screen is dis- played. The Setup Utility starts up. If the password is requested, enter the Supervisor Password.
- Page 20 Handling and Maintenance CAUTION Do not use benzene, thinner, or rubbing alcohol since it may adversely affect the surface causing discoloration, etc. Do not use commercially-available household cleaners and cosmetics, as they may contain components harmful to the surface. Do not apply water or detergent directly to the computer, since liquid may enter inside of the computer and cause malfunction or damage.
- Page 21 Keeping the computer level, move the computer to a dry place. If the computer is placed back on the wet surface, water may seep inside the computer from the bottom. Insert the tip of a ball-point pen or other object into the emer- gency hole on the bottom of the computer, and move it in the direction of the arrow to open the disc cover.
-
Page 22: Expanding Memory
Expanding Memory Use RAM modules that comply with the specifications below. Using any other module may cause malfunction or result in computer failure. RAM module specifications: DDR2 SDRAM, 172 pins, Micro DIMM, 1.8 V, PC2-4200 CAUTION Use recommended RAM module products. Do not use non-recommended RAM modules. Non-recommended RAM modules may not operate properly, and may cause damage to your computer. - Page 23 Insert the RAM module parallel to the slot firmly until the gold terminals are invisible. If it is hard to insert the RAM module, do not try forcibly but check the mod- ule’s direction. Press the RAM module down until the right and left hooks (D) lock into place.
-
Page 24: Hard Disk Backup/Restore Function
At the confirmation message, select [Yes] and press Enter. The computer will restart. C When [Panasonic] boot screen disappears, press and hold F8. If [Advanced Boot Options] screen is not displayed, the recovery partition may be damaged. In this case, restore the hard disk using Product Recovery DVD-ROM. -
Page 25: Hard Disk Data Erase Utility
Hard Disk Data Erase Utility When disposing the computer or transferring the ownership, erase all hard disk data in order to avoid data leakage. Even if you erase the data or initialize the hard disk using normal Windows commands, the data can be read with some special software. -
Page 26: Reinstalling Software
B Press F10. At the confirmation message, select [Yes] and press Enter. The computer will restart. C Press F2 while [Panasonic] boot screen is displayed. D Set the Product Recovery DVD-ROM. Press At the confirmation message, select [Yes] and press Enter. - Page 27 Remove the Product Recovery DVD-ROM, and then click [OK] to turn off the computer. Turn on the computer, and press while [Panasonic] boot screen is displayed. The Setup Utility starts up. If the password is requested, enter the Supervisor Password.
-
Page 28: Troubleshooting
If the power indicator is lit, slide the power switch for four seconds or longer to turn off, then turn on again. Using the following procedure, start up in Safe Mode, and check the error details. A Turn on the computer, and when the [Panasonic] boot screen disappears (after enter- F8 . ing the password... - Page 29 Starting Up and Sleep and Hibernation Mode “Remove disks or other A floppy disk is in the floppy disk drive and it does not contain system startup informa- tion. Remove the floppy disk and press any key. media. Press any key to the USB port .
- Page 30 Troubleshooting (Basic)/Error Code/Message Display The external display does If the external display does not support the power saving function, it may not work nor- mally when the computer enters the power saving mode. Turn off the external display. not work normally. The sidebar gadgets are not Log off and log on Windows, and display the sidebar again.
- Page 31 If a device is connected to the USB port, disconnect the device, or set [Legacy USB Support] to [Disable] in the [Advanced] menu of the Setup Utility. To start the Setup Utility A Restart the computer. B Press F2 while [Panasonic] boot screen is displayed.
-
Page 32: Hardware Diagnostics
During the diagnostic check, do not remove the AC adaptor, or attach any peripheral devices. Turn on or restart the computer, and press while [Panasonic] boot screen is displayed. The Setup Utility starts up. If the password is requested, enter the Supervisor Password. - Page 33 A Press F10 at step 5. At the confirmation message, select [Yes] and press Enter. B Press Ctrl + F7 while [Panasonic] boot screen is displayed. When all the hardware has been checked, confirm the diagnostic check results. If the display is red and the message “Check Result TEST FAILED” is displayed, you can assume that there is a problem with the computer’s hardware.
- Page 34 Hardware Diagnostics NOTE When you set [DVD Drive Power] to [On] in the [Main] menu of Setup Utility, you will hear operation sound from CD/ DVD drive soon after the computer starts the startup procedure. To avoid the sound when the computer is starting up, set [DVD Drive Power] to [Off].
-
Page 35: Limited Use License Agreement
LIMITED USE LICENSE AGREEMENT ® THE SOFTWARE PROGRAM(S) (“PROGRAMS”) FURNISHED WITH THIS PANASONIC PRODUCT (“PRODUCT”) ARE LICENSED ONLY TO THE END-USER (“YOU”), AND MAY BE USED BY YOU ONLY IN ACCORDANCE WITH THE LICENSE TERMS DESCRIBED BELOW. YOUR USE OF THE PROGRAMS SHALL BE CONCLUSIVELY DEEMED TO CONSTITUTE YOUR ACCEPTANCE OF THE TERMS OF THIS LICENSE. -
Page 36: Specifications
Specifications This page provides the specifications for the basic model CF-Y7DWAYZJE/CF-Y7DWAZFJE. The model number is dif- ferent according to the unit configuration. To check CPU speed, memory size and the hard disk drive (HDD) size: Start the Setup Utility ( Reference Manual “Setup Utility”) and select [Information] menu. - Page 37 Model No. CF-Y7DWAYZJE CF-Y7DWAZFJE Power Supply AC adaptor or Battery pack Input: 100 V - 240 V AC, 50 Hz/60 Hz AC Adaptor Output: 16 V DC, 3.75 A Battery Pack Li-ion 10.65 V, 5.7 Ah Approx. 5.5 hours (Economy Mode (ECO) Approx.
- Page 38 This slot is compatible with High-Speed Mode. Operation has If there are two or more “setup” files, right-click the file been tested and confirmed using Panasonic SD/SDHC whose [Type] is [Application]. Memory Cards with a capacity of up to 32 GB.
- Page 39 MEMO...
- Page 40 Their standards and logos are uniform among participating nations. 22-E-1 Importer’s name & address pursuant to the EU GPSD directive 2001/95/EC/Art.5 Panasonic Computer Products Europe, Panasonic Marketing Europe GmbH Hagenauer Straße 43 65203 Wiesbaden Germany...