Table of Contents
Advertisement
Macchina Professionale per Caffè Espresso
Professional Espresso Coffee Machine
Machina profesionnel à Cafè Expresso
Beruflich Espressomaschine
Máquina Profesional para Café Exprés
Professionele machine voor espressokoffie
Máquina profissional para café expresso
Modello * Model * Modèle * Modell *
Modelo * Modellen * Modelos
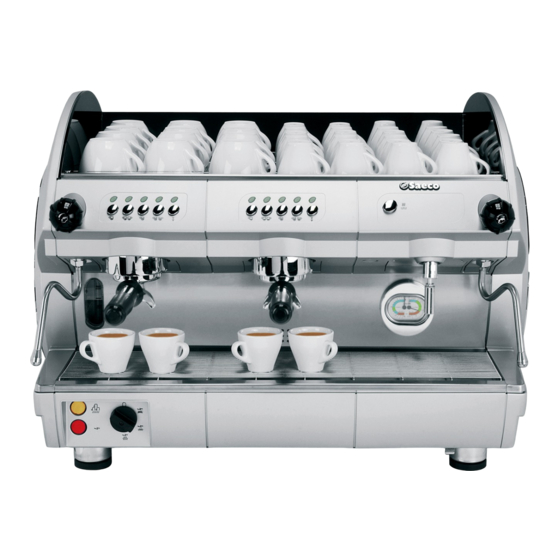
AROMA SM / SE
Advertisement
Table of Contents

Related Manuals for Saeco AROMA SM


Summary of Contents for Saeco AROMA SM
- Page 1 Professional Espresso Coffee Machine Machina profesionnel à Cafè Expresso Beruflich Espressomaschine Máquina Profesional para Café Exprés Professionele machine voor espressokoffie Máquina profissional para café expresso Modello * Model * Modèle * Modell * Modelo * Modellen * Modelos AROMA SM / SE...
- Page 4 Gentile cliente, la ringraziamo per la fiducia accordataci con l’acquisto di un nostro prodotto. Se Lei avrà la costanza di seguire attentamente le indicazioni contenute nel presente manuale, siamo certi che potrà apprezzare nel tempo e con soddisfazione la qualità della nostra macchina.
- Page 5 Prima della messa in funzione, leggere attentamente il manuale di istruzioni Carefully read the following instruction booklet before starting up the machine. Lesen Sie vor der Inbetriebnahme aufmerksam die Bedienungsanleitung. Avant la mise en service, lire attentivement le manuel d’instructions. Antes de la puesta en funcionamiento, hay que leer atentamente el manual de instrucciones Lees de handleiding aandachtig door, alvorens tot de inwerkingstelling over te gaan.
-
Page 6: Table Of Contents
English INDEX INDEX ......................1- INSTRUCTIONS BOOKLET CONSERVATION AND USE ....................2- ENVISAGED MAChINE USE ......34 3 - SAFETY ADVICE ..........35 4 - TEChNICAL FEATURES ........36 5 - INSTALLATION ..........37 Water connection ........37 Electrical connection ......37 6 - START UP ............38 Long coffee gigleuri .......38... -
Page 7: 1- Instructions Booklet Conservation
English 1 - INSTRUCTIONS BOOKLET 2. ENVISAGED MACHINE USE CONSERVATION The present instructions booklet has been prepared for the The machine must be operated by a single operator only. machine user, the owner and the installation technician and must be always available for reference purposes. The authorized operator must have firstly read and fully un- derstood all the instructions contained in the present booklet The manual is destined for the user, the maintenance tech-... -
Page 8: Safety Advice
English Prolonged machine standstill at temperatures of under 0°C 3 - SAFETY ADVICE (zero degrees centigrade), may cause serious damage or breakage to the boiler piping: it is therefore necessary to completely empty the water circuit before every prolonged standstill. The removal of guard and/or safety elements fitted on the machine is forbidden. -
Page 9: Technical Features
English 4 - TECHNICAL FEATURES fig. 1 2 groups 3 groups Dimensions Weight Boiler capacity Boiler resistance absorbed power 230-240/400-415 V 3 N ~ 4760 5950 ECO Max boiler resistance absorbed power 230-240/400-415 V 3 N ~ 3170 3950 Pump motor Overall absorbed power 230-240/400-415 V 3 N ~ 5200... -
Page 10: Installation
English INSTALLATION Important: The machine must be supplied with water of over 8°F hardness. The installation of a water softener is recommended for the machine water supply. Check that the water mains to which connection is to be made supplies drinking water. Connect purifier (E) to the water mains (A). -
Page 11: Start Up
English Once the water, gas and electrical connections have been - START UP made, proceed to start up the machine. Open the mains water supply tap (A) (fig 2). Close the protection switch (D) (fig 2). Position the machine main switch (8) to position machine on indicator will come on (3). -
Page 12: Pressure Switch Adjustment
Switch on the unit switch (AROMA SM) or the unit control keyboard (AROMA SE) (16) and read the pressure on the WGANF08/002/B pump pressure gauge (10). -
Page 13: Replacement Of The Thermostat To Reduce The Coffee Dispensing Group Temperature
English 6.5 Replacement of the thermostat to reduce the coffee dispensing group temperature. Remove cup heating bowl (1). Disconnect group thermostat (2) (Code WGADM1561 – T 103°C) and replace it with the lower temperature thermostat ( Code WGADM2067 - T 93°C), included in the machine equipment. 6.6 Spouts included in the supply. -
Page 14: Coffee Measure Programming
English Keyboard symbols: T1 – single espresso coffee T2 – double espresso coffee T3 – single long coffee T4 – double long coffee T5 – Programming/continuos T6 – Cappuccino T7 – Milk T8 – Tea (hot water) 7.1 Coffee measure programming The measured amounts of coffee may be mo- dified (by means of volumetric checking) and memorized as follows:... - Page 15 English Press the key corresponding to the measure to be programmed (key T1 for example) within 30 seconds (program- ming time-out). The led relative to T5 will remain on, on all keyboards and the led relative to the measure being programmed will also come on (on all the keyboards).
-
Page 16: Tea Measure Programming (Hot Water)
English 7.2 Tea measure programming (hot water) It is possible to modify the timed tea measures according to the following sequence: Press key T5 of coffee unit 1 and keep pressed down for over 5 seconds and check that all the keyboard led indicators come on. -
Page 17: Coffee Delivery
English 7.3 Coffee delivery On pressing the corresponding key T1- T2-T3 or T4, the corresponding delivery solenoid valves are activated for the time necessary to obtain the required amount of product as previously programmed (volumetric check). The LED relative to the selected measure remains on for the entire coffee delivery time. -
Page 18: Special Functions
English 7.5 Special functions MIxed tea (hot water) On the engagement of this function the It is possible to engage or deactivate water delivered is mixed with cold water certain special functions such as PRE- IN- on entry in the boiler thereby ensuring FUSION, MIXED TEA and WASHING constant delivery at a temperature of ALARM which we shall describe below:... -
Page 19: Tea Delivery
English Engagement/deactivation Start the machine by pressing the main switch keeping key T5 of unit 1 pressed and wait for the led relative to key T5 to begin flashing. Press keys T1-T2 and T3 in order to en- gage or deactivate the PRE-INFUSION, MIXED TEA and WASHING ALARM functions. -
Page 20: Cappuccino And Milk Function
English 7.7 Cappuccino and milk function It is possible to set the CAPPUCCINO and MILK function on keys T6 and T7 on group 2,3, or 4. IMPORTANT : The function can be set on only one keyboard at a time, on unit 2, 3 or 4. -
Page 21: Cappuccino Delivery And Programming
English 7.8 Cappuccino delivery and programming When engaged key T6 will determine the activation of the solenoid valve and pump according to the value set during programming. To programme the cappuccino function, proceed in the same way as for coffee with the only difference being that at the end of the volumetric delivery of the coffee, the timed milk delivery BEGINS... -
Page 22: With Display
English 7 . 1 0 F u r t h e r f u n c t i o n s o n machines equipped with display Langauge selection In order to select the consultation language, on switching on, press key T4 and keep pressed. - Page 23 English Consumption reading It is possible to read the consumptions that have been made following the instructions indicated below. Press key T5 (of 1 unit only) and keep pressed for over 10 seconds. The display will show the dispensing operations under- taken : press key T5 again to escape from this condition.
- Page 24 English After visualization of the data of the last coffee unit also, on pressing key T1 it is possible to obtain a reading of the number of TEA dispensing operations made. To cancel the totals of the individual con- sumptions (but not the “total cumulative” data), press keys T3 and T4 of unit 1 for 3 seconds in the condition in which “CU- MULATIVE TOTAL”...
-
Page 25: Alarm Condition
English 7.11 Alarm condition Boiler (filling) level time out This alarm condition occurs whenever the water level is too low or the level probe remains uncovered. In such a case the key- board leds flash and an alarm message appears on the display. The filling stage is automatically engaged and to cancel the alarm conditions switch the machine off and then on again. -
Page 26: Purifier Regeneration
English PURIFIER REGENERATION WATER INLET WATER OUTPUT INLET TAP LEVER OUTPUT TAP LEVER DEPRESSURIZER PIPE REGENERATION TUBE COVER KNOB IMPORTANT : Regenerate the purifier at the inter- vals listed below: hARDNESS °F 8 LITRE PURIFIER 12 LITRE PURIFIER From 00 to 20 regeneration after 1100 l. -
Page 27: Maintenance And Useful Advice
English 9 - MAINTENANCE AND It is a good idea to rinse the filters (C) and filter holders (D) every day in hot water, or even better, place them in USEFUL ADVICE hot water and allow to soak for the whole night in order to dissolve any greasy coffee deposits. -
Page 28: Trouble Shooting
English 10 - TROUBLE SHOOTING PROBLEM CAUSE REMEDY Machine switch off 1. Mains switch off 1. position the machine switch to position ON 2. Machine switch off 2. position the machine switch to position 1 3. Incorrect electrical mains connection 3. - Page 30 COLLEGAMENTO ELETTRICO CONEXIÓN ELÉCTRICA Antes de efectuar la conexión de la máquina con la red Prima di effettuare l’allaccciamento della macchina alla eléctrica, verifiquen el tipo de conexión indicado el la placa rete elettrica, verificare il tipo di collegamento indicato sulla presente sobre el cable de alimentación.
- Page 31 V240 - 230 3~ Collegamento a TRIANGOLO Per modificare il collegamento da stella a triangolo, occorre intervenire sul cavo alimentazione, sulla morsettiera alimenta- zione (A) e sulla morsettiera di derivazione (B), modificando le connessioni indicate nello schema qui a fianco. Delta connection To change the connection from a star connection to a delta connection, modify the connections shown in the...
- Page 32 Collegamento MONOFASE con V240 - 230 ~ cavo alimentazione tripolare Per modificare il collegamento da trifase a stella a monofase, occorre cambiare il cavo alimentazione e sostituirlo con un cavo tripolare tipo H07RN-F 3x4 mm (SJO 3x10 AWG per macchine mercato USA). Intervenire sulla morsettiera alimentazione (A) aggiungendo 2 ponticelli (C) forniti con il materiale a corredo e modificare le connessioni sia sulla morsettiera (A) che sulla morsettiera (B) come indicato nello...