
Related Manuals for Kenmore 385.166551


Summary of Contents for Kenmore 385.166551
- Page 1 SERGER Owner's Manual OVERLOCK Manual de Instrucciones SURJETEUSE Manuel d'instructions Model, Modelo, Modele 385.16655100 791-820-007 Sears, ® Roebuck and Co., Hoffman Estates, IL 60179 U.S.A. www.sears°com...
- Page 2 IMPORTANT CAUTION Your Serger is designed and constructed only for HOUSEHOLD use. Before using this Serger, read this manual and follow all Safety Rules and Operating Instructions. DAN G E R- To reduce the risk of electric shock which will result in death or serious injury: 1.
- Page 3 INSTRUCCIONES ATENCION Esta Overlock est_ diseSada y construida s61o para use domestico. Antes de usar esta m_quina de coser, lea este manual y todas las reglas de seguridad e instrucciones operativas. PELIGRO Para reducir el riesgo de descargas electricas, que pueden provocar heddas graves e inctuso la muerte: Esta maquina nunca debe dejarse desatendida cuando esta conectada.
- Page 4 IMPORTANTES CONSIGNES DE S¢:CURIT¢:CONSERVEZ CES CONSIGNES ATTENTION Votre surjeteuse a et6 congue et construite pour un usage menager uniquement. Avant d'utiliser cette machine a coudre, veuillez lire ce manuel et suivre toutes les regles de s6curit6 et les consignes d'utilisation. ",._ e=r- I 1__ Pour r6duire le risque d'_lectrocution pouvant entrafner la mort ou des blessures graves: Une machine ne devrait jamais _tre laiss6e sans surveillance Iorsqu'elle est branchee.
- Page 5 i FULL FIVE YEARWARRANTY ON MECHANICAL i For five years from the data of purchase, Sears will, free of charge, repair defects in material and workmanship : which appear in the mechanical components i FULL TWO YEARWARRANTY ON ELECTRICAL ; For two years from the date of purchase, Sears will, free of charge, repair defects in material or workmanship i appear in the electrical equipment ;...
- Page 6 Item Sewing speed Stitch length (feed amount) Differential feed ratio Overedge stitch width Needle bar stroke Presser foot rise Needle Number of threads Machine dimensions Weight Articulo Vetocidad de costura Longitud de puntada (cantidad de alimentaci6n Relaci6n de avarice diferencial Ancho de puntada de sobrehilado Carrera de la barra de agujas Elevaci6n del prensatelas...
-
Page 7: Table Of Contents
SECTION I. NAME OF PARTS ... Tote Bags ... Locate and Identify the parts ... Attaching the waste catcher ... Storing the accessory holder ... Standard accessories Available Accessories and Attachments ... 6 SECTION I1. GETTING READYTO Plug in the machine and switch on the power ... 8 Operating Instructions ... - Page 8 SECCI(_N I. NOMBRE DE LAS PARTES ... 3 Bolsa de mano ... Localice e identifique las partes ... Colocaci6n del cotector de recortes de desperdicio ... 5 C6mo guardar la caja de accesodos ... Accesorios estandar ... Accesorios y refacciones disponibles ... SECCI_N II.
- Page 9 PARTIE L IDENTIFICATION DES PI#CES DE LA MACHINE ... 3 Sac de transport ... Identificatin et emplacement des pieces ... Installation du ramasse-chutes ... Rangement du porte-accessoires ... Les accessoires standards ... Accesoires et pibces disponibles ... PARTIE I1.PRCPAREZ-VOUS A COUDRE ... 9 Branchement et raise sous tension de la machine ...
-
Page 10: Section I. Name Of Parts
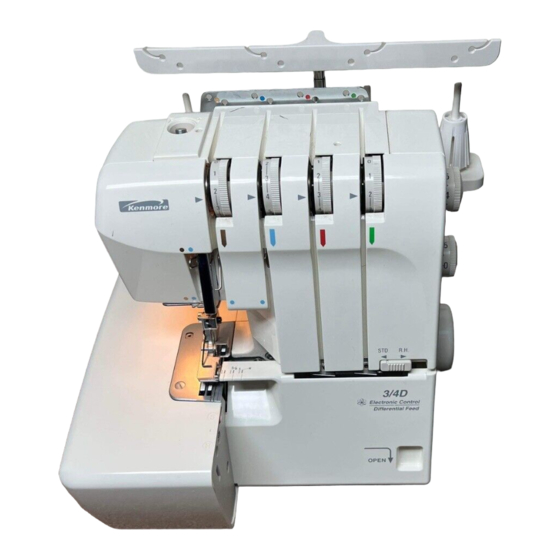
SECTION I. NAME OF PARTS Tote Bag (RSOS # 97603) Tote bags are available through the RSOS (Retail Special Order System) catalog at your nearest Sears retail store. Locate and identify the parts (_ Lower looper thread tension dial Upper looper thread tension dial Right needle thread tension dial Left needle thread tension dial (_ Pressure adjusting screw... -
Page 11: Secci
SECCI6N I. NOMBRE DE LAS PARTES Bolsa de mano Usted encontrar_ bolsas de mano en el cat,logo en las tiendas Sears. identifique las partes Localice _ Selector de tensi6n del hilo del ojo-guia inferior C2_ S elector de tensi6n del hilo del ojo-guia superior C3_ S elector de tensi6n del hilo de la aguja derecha _ Selector de tensi6n del hilo de la aguja izquierda C5_ T ornillo de ajuste de presi6n... -
Page 12: Attaching The Waste Catcher
Attaching the waste catcher Waste catcher Storing the accessory holder Insert the accessory holder into the waste catcher. Waste catcher Accessory holder Standard accessories Screwdrivers Tweezers Nets Set of needles Spool caps Lint brush Needle threader ® ® ®... -
Page 13: Colocaci6N Del Cotector De Recortes De Desperdicio
Colocacibn del colector de recortes _ Colector de recortes Cbmo guardar la caja de accesorios Introduzca la caja de accesorios en el colector de recortes. C2_ Celector de recortes _3_Caja de acceserios Accesorios est_ndar _4_Destornilladeres _5_Pinzas C6_ Redes _7_Juege de agujas _8_Tapas de carrete _9_Cepillo para pelusa _0_Enhebrador de agujas... -
Page 14: Available Accessories And Attachments
Available Accessories and Attachments To order parts and accessories listed below, call: 1-800-366-PART (1-800-366-7278 6 am - 11 pm, CST, 7 days a week When ordering parts and accessories, provide information: 1. Part Number 2. Part Name 3. Model Number of Machine Ref. -
Page 15: Accesorios Y Refacciones Disponibles
Accesorios y refacciones disponibles Para ordenar las partes y accesorios listados abajo, llame al: l_800-366-PART (1-800-366-7278) de 6 AM a 11 PM, hora del centro, los siete dias de la semana AI ordenar partes y accesorios, proporcione la siguiente informacien: 1, NDmero de parte 2, Nombre de la parte 3, Modelo de la m_quina... -
Page 16: Section I1. Getting Readyto Sew
SECTION II. GETTING Plug in the machine and switch on the power (_ Power supply plug Outlet Plug connector Power switch (_) Machine plug NOTE Before inserting the plug into your machine, be sure the power switch (_ is OFE Insert the machine plug (_ into the three-prong plug connector _, as shown. -
Page 17: Secci_N Ii. Prepare La Maquina Para Coser
SECCI6N II. PREPARE PARA COSER Enchufe la mbquina y enci_ndala Enchufe para la fuente de energia C2_ Toma de corriente C3_ Conector de clavija _4_Interruptor de encendido _5_Enchufe de la m_quina NOTA Antes de introducir el enchufe en la m_quina, aseg6rese de que el interruptor de encendido _4_est6 en la posici6n de apagado ("... -
Page 18: How To Turn Handwheet
How to turn handwheel Always turn handwheel toward you. (_ Handwheel Opening and closing the side cover (_ Side cover • TO open Push the side cover (_ to the left. • To close Push the side cover (_ to the right and slightly toward the machine body. -
Page 19: C6Mo Girar Et Volante De Mano
Cbmo girar el volante de mano Gire siempre el volante de mano hacia usted, d_ Volante de mano Apertura y cierre de la tapa lateral _ Tapa lateral • Para abrirla Empuje la tapa lateral d_ hacia la izquierda. • Para cerrarla Empuje la tapa lateral 0_ hacia la derecha y ligeramente hacia el cuerpo de la m_quina. -
Page 20: Positioning The Telescoping Thread Guide Bar
Positioning the telescoping (_ Thread guide Telescoping thread guide bar Stoppers Spool pin Pull the telescoping thread guide bar _ up as far as it will Turn the thread guide bar _ until it clicks into position. Thread guides _ should stop directly above the spool pins (_. -
Page 21: Posicionamiento De La Barra Telesc6Pica De Los Gula-Hilos
Posicionamiento de la barra telescbpica guia-hilos Guia-hilo C2_ Barra telesc6pica de los guia-hilos C3_ Topes _4_Portacarretes Fll Suba la barra telesc6pica de los guia-hilos C2_ hasta el tope, L2 Gire la barra de los guia-hilos _2_hasta que se acople en su sitio con un chasquido, Los guia-hilos 0_ deben quedar directamente sobre los portacarretes NOTA... -
Page 22: Adjustment Of Stitch Length
Adjustment of stitch length (_ Setting mark Stitch length dial To select stitch length, turn the dial _. The larger the number, the longer the stitch. The stitch length can be adjusted from approximately 5/128" to 25/128" (1 to 5 mm). Position "R"... -
Page 23: Ajuste De La Iongitud De Puntada
Ajuste de la Iongitud de puntada _ Mama de colocaci6n _2_Selector de Iongitud de puntada Para seleccionar la Iongitud de puntada, gire el selector C2_. Cuanto mayor sea el n6mero, m_s larga ser_ la puntada. La Iongitud de puntada se puede ajustar desde 1 hasta 5 mm (aprox. -
Page 24: Changing The Needle
Then loosen the needle clamp screw for the needle which you are going to remove. NOTE Your Serger uses standard Kenmore sewing needles (HA-1 SP, #11, #14). No special needles are required. Do not use any needle which is bent or blunt. -
Page 25: Cambio De La Aguja
L3 Desserrez la vis du serre-aiguille enlever. REMARQUE Votre surjeteuse utilise les aiguilles _ coudre Kenmore standards (HA-1 SP, #1 1 et #14). Aucune aiguille sp6ciale n'est requise. Ne vous servez jamais d'une aiguille tordue ou 6mouss6e. Ne vous servez jamais d'une aiguille tordue ou 6mouss6e. -
Page 26: Removing The Presser Foot
Removing the presser foot (_ Presser foot lifter Needle Lever Foot holder Turn off the power switch and unplug the machine. Raise the needle and presser foot. Press the lever _ located on the back of the foot holder _. The presser foot witl drop off. -
Page 27: Extracci6N Del Prensatelas
Extraccibn del prensatelas _0 Palanca elevadora del prensatelas Aguja _3_Palanca Soporte del prensatelas I1 Apague el interruptor de encendido y desenchufe la m_quina. 12 Suba la aguja y el prensatelas. 131Oprima la palanca (3) ubicada en la parte posterior del soporte del prensatelas _. -
Page 28: Adjustment Of Cutting Width
Adjustment of cutting width When cutting width is too narrow or too wide for seam width, adjust as follows. Turn off the power switch and unplug the machine. Open the looper and side covers. Turn the cutting width adjusting dial to get desired position of lower knife. -
Page 29: Ajuste Del Ancho De Corte
Ajuste del ancho de corte Cuando el ancho de corte sea demasiado estrecho o demasiado ancho respecto al ancho de la costura, aj_stelo como se indica a continuaci6n, I1 Apague el interruptor de encendido y desenchufe la m_quina. [2 Abra la tapa de los ojos-guia y la tapa lateral. [31 Gire el selector de ajuste del ancho de corte para obtener la posici6n deseada de la cuchilla inferior. -
Page 30: Adjustment Of Needle Plate Setting Knob (Changing To Standard Serging Or Rolled Hemming)
Adjustment of needle plate setting knob (Changing to standard serging hemming) Chaining finger Guide line Cutting width adjusting dial Needle plate setting knob Upper knife The needle plate setting knob is connected with the chaining finger. The chaining finger will slide to the right side of the needle position when you set the needle plate setting knob at "S"... -
Page 31: Ajuste Del Bot6N De Posici6N De La Placa De Agujas (Combio A Surjete Estandar O Dobladillo Enrollado)
Ajuste del botbn de posicibn (cambio a surjete estbndar o dobladillo Dedo de encadenamiento C2_ Linea de guia C3_ Selector de ajuste del ancho de corte _4_Bot6n de posici6n de la placa de agujas (5_Cuchilla superior La perilla de ajuste de la placa de aguja est_ conectada al dedo de encadenamiento. -
Page 32: Setting The Lower Looper Pre-Tension Setting Slider
Setting the lower looper pre-tension slider Standard serging (STD.) (_ Lower looper pre-tension setting slider Standard serging with 3 or 4 threads Rolled hemming (R.H.) Rolled hemming with 3 threads setting __iiiii_1_ __ iiiiii ! STD. R.H. <_ I:> STD. R.H. -
Page 33: Ajuste Del Dispositivo Deslizante De Pretensi6N
Ajuste del dispositivo deslizante Surjete estdndar (STD.) d_ Corredera de ajuste de pretensi6n del ojo-guia inferior Surjete est_ndar con 3 o 4 hilos Dobladillo enrollado (R.H.) Dobladillo enrollado con 3 hilos de pretensibn R_glage du dispositif de pr_-tension Surjet normal d_ Dispositif de glissement de pr6-tension du boucleur inf6rieur Surjet normal _ 3 ou 4 ills Ourlet... -
Page 34: Initial Set-Up
Needle thread Presser foot _Needle plate For your convenience, your Kenmore Serger has been pre-threaded for initial set-up. If this initial set-up does not succeed, and for detailed instructions on basic Serger threading, see Rethreading the Serger, page 30-44, and/or consult the Quick Reference Chart. -
Page 35: Preparaci6N Inicial
(8_ Fil d'aiguille (9_ Pied presseur _0_Plaque d'aiguille Pour plus de facilit6, votre surjeteuse Kenmore a fait I'objet d'un pr6-enfilage initial. Si ce pr6-enfilage ne r6ussit pas, et si vous d6sirez obtenir de plus amples renseignements base de votre surjeteuse, veuillez vous reporter _ la section sur I'enfilage aux pages 3145 ou consulter le tableau de reference rapide. -
Page 36: Rethreading A Broken Thread
Rethreading a broken thread If one of the threads breaks: Turn off the power switch and unplug the machine. Raise the presser foot and pull the thread chain out to the back of the presser foot, and cut the chain to separate each of the threads. -
Page 37: Reenhebrado De Un Hito Rote
Reenhebrado de un hilo roto Si se rompe uno de los hilos: Apague el interruptor y desconecte la m_quina. [11 Levante el prensatelas, hale la cadena de hilos hacia la parte de atr_s del prensatelas y corte la cadena para separar los hilos. -
Page 38: Rethreading The Serger
Rethreading the Serger Threading the lower looper Open the looper cover. Place the spool of thread on the right side spool pin. • Lower looper threading points are marked in green. • A convenient threading chart is placed on the machine body which is located inside the looper cover. -
Page 39: Reenhebrado De La Serger
Reenhebrado de la Serger Enhebrado de! ojo-guia inferior Abra la tapa de los ojos-guiaL Coloque el carrete de hilo en el portacarretes derecho, • Los puntos de enhebrado para el ojo-guia inferior est_n marcados en verde. • En el cuerpo de la m_quina, dentro de la cubierta de los ojos- guia. - Page 40 Insert thread between the tension discs. Hold the thread at both ends and tug gently to ensure the thread is correctly inserted between the tension discs.(If the presser foot lifter is raised, the thread easily inserts between the tension discs.) Lower looper thread tension dial Thread guide plate (_ Looper thread guide...
- Page 41 L3Inserte h iloentre losdiscos d etensi6n. Sujete e lhiloenambos e xtremos ytiresuavemente asegurarse deque elhilo est6 correctamente losdiscos d etensi6n. (Sielprensatelas introduce f_cilmente entre losdiscos d etensi6n.) _3_ S elector detensi6n d elhilo delojo-guia i nferior _4_ P laca delosguia-hilo _5_ G uia-hilo del o jo-guia C6_ Guia-hilo del o jo-guia i nferior 1 _7_ P alanca elevadora del h ilodel o jo-guia i nferior...
-
Page 42: How To Thread Wolly Nylon / Polyester Thread
How to thread woolly nylon/polyester (_ Lower looper Ordinary thread Woolly nylon/polyester thread This is one of the easiest ways to pass woolly nylon/polyester thread through the lower looper. Use the same method for the upper looper. thread... -
Page 43: Como Engebrar Hilo De Nylon / Poli6Ster Lanoso
Como enhebrar hilo de nylon o poli_ster Ojo-guia inferior C2_ Hilo ordinario _3_Hilo de nylon o poli6ster lanoso I_sta es una de las maneras m_ls f_ciles de pasar hilo de nylon o poli6ster lanoso a trav6s del ojo-guia inferior, Emplee el mismo m6todo para el ojo-gufa superior. lanoso Enfllage du fU de nylon/polyester... -
Page 44: Threading The Upper Looper
Threading the upper looper Place the spool of thread on the spool pin second from the right. Upper looper threading points are marked in red. A convenient threading chart is placed on the machine body which is located inside the looper cover. (_ Thread guide Thread guide plate Upper looper thread tension dial... -
Page 45: Enhebrado Det Ojo-Guia Superior
Enhebrado del ojo-guia superior Coloque el carrete de hilo en el segundo portacarretes derecha. Los puntos a enhebrar para el ojo-guia superior est_n marcados en rojo. En el cuerpo de la m_quina, dentro de la cubierta de los ojos- guia, hay un pr_ctico diagrama de enhebrado. Guia-hilo C2_ Placa del guia-hilo C3_ Selector de tensi6n del ojo-gufa superior... -
Page 46: To Rethread The Upper Looper
Hook the thread through the slot CB_, a nd then pass the thread through the thread guide plate and the looper thread guide. Thread guide plate (_ Looper thread guide Pass the thread through the hook on the front of the looper thread take-up lever. -
Page 47: C6Mo Enhebrar El Ojo-Guia Superior
L4;;Enganche el hilo a trav6s de la ranura _;, y luego pase el hilo a trav6s de la placa de los guia-hilos y el guia-hilo del ojo-guia, _4_Placa de los guia-hilos _5_Guia-hilo del ojo-guia L5, Pase el hilo a trav6s del gancho al frente de la palanca tira-hilo del ojo-guia superior, C6_Palanca tira-hilo del ojo-guia superior L6 Pase el hilo a trav6s del guia-hilo del ojo-guia superior. -
Page 48: Threading The Right Needle
Threading the right needle Place the spool of thread on the spool pin second from the left. Right needle threading points are marked in blue. A convenient threading chart is placed on the machine body which is located inside the looper cover. Thread guide Thread guide plate Right needle thread tension dial... -
Page 49: Enhebrado De La Aguja Derecha
aguja Enhebrado de la derecha Coloque el carrete de hilo en el segundo portacarretes izquierda. Los puntos de enhebrado para la aguja derecha est_n marcados en azuL En el cuerpo de la m_quina, dentro de la cubierta de los ojos- guia, hay un pr_ctico diagrama de enhebrado. -
Page 50: Threading The Left Needle
Threading the left needle Place the spool of thread on the left side spool pin. Left needle threading points are marked in gold. A convenient threading chart is placed on the machine body which is located inside the looper cover. (_ Thread guide Thread guide plate Left needle thread tension dial... -
Page 51: Enhebrado De La Aguja Izquierda
Enhebrado de la aguja izquierda Coloque el carrete de hilo en el portacarretes de la izquierda. Los puntos a enhebrar para la aguja de la izquierda est_n marcados en dorado. En el cuerpo de la m_quina, dentro de la cubierta de los ojos- guia, hay un pr_ctico diagrama de enhebrado. -
Page 52: 3-Thread Serging
3-thread serging Regular 3-thread serging: 1/8" (3.5 mm) width • Use only right needle Turn off the power switch and unplug the machine. Remove the needle and the thread on the left. Then tighten the needle clamp screw on the left slightly to avoid losing the screw. -
Page 53: Surjete Con Tres Hilos
Surjete con tres hilos Surjete regular con tres hilos: anchura de 3.5 mm (1/8") • Emplee (micamente la aguja derecha [1' Apague el interruptor de encendido y desenchufe la m_quina. L2 Saque la aguja y el hilo de la izquierda. L3 Luego, apriete ligeramente el tornillo de sujeci6n de la aguja izquierda para evitar perderlo. -
Page 54: Learn The Stitches
SECTION II1. LEARNTHE Starting to sew Insert the fabric under the front of the foot. (It is not necessary to raise the foot.) Turn the handwheet gently toward you a couple of turns and check the thread chain. Then start sewing slowly. The fabric will be automatically fed. -
Page 55: Aprenda Las Puntadas
SECCI6N III. APRENDA LAS PUNTADAS Para empezar a coser Introduzca la tela bajo la punta del prensatelas (No es necesario subir el prensatelas.) Gire el volante de mano suavemente hacia usted unas cuantas vueltas y compruebe la cadeneta de hilo. Luego, empiece a coser lentamente. -
Page 56: Securing Ends
Securing ends To avoid unraveling, it is necessary to leave a thread chain 2" (5 cm) long at the beginning and end of the seam. To secure the beginning and end of the seam choose one of the following methods. •... -
Page 57: C6Mo Asegurar Los Extremos De La Costura
Cbmo asegurar los extremos Para evitar que la costura se deshile, es necesario dejar una cadeneta de hilos de unos 5 cm (2")de Iongitud al principio y al final de la costura, Para asegurar el principio y el final de una costura, elija uno de los metodos siguientes: •... -
Page 58: Thread And Needle Chart
NOTE:Your Serger uses standard Kenmore sewing needles (HA-l, SP, #11, #14). • Consuite la p_gina 15 para ajustar la Iongitud de puntada y la relaci6n de avance diferenciaL NOTA: Esta m_quina de "overlock" utiliza Kenmore agujas de coser est_ndar (HA-l, SP,#11, #14). Cuadro... - Page 59 No.11- 14 • Reportez-vous _ la page 15 pour r6gler la Iongueur du point ainsi que le rapport d'entrai'nement diff6rentiel. REMARQUE: Cette surjeteuse utilise des aiguilles de machine _ coudre Kenmore standard (HA-1 SP, n° 11, n° 14). Stitchlength Relaci6n deavance d iferencial...
-
Page 60: Thread Tension (4 Threads)
Thread tension (4 threads) Adjusting the thread tension may be required depending on the type of fabdc and thread being used. Correct tension Wrong side of fabric Lower looper thread Right side of fabric Left needle thread Upper looper thread Right needle thread Thread tension adjustment Set alt four thread tension dials at "3". -
Page 61: Tensi6N Del Hito (4 Hilos)
Tensibn del hilo (4 hilos) Es posible que sea necesario ajustar la tensi6n del hilo seg_n el tipo de tela y de hilo que se est6n utilizando. Tensibn correcta Rev6s de la tela C2_ Hilo del ojo-guia inferior C3_ Derecho de la tela _4_Hilo de la aguja izquierda _5_Hilo del ojo-guia superior _@Hilo de la aguja derecha... -
Page 62: Incorrect Tension
Incorrect tension Lower looper thread Right side of fabric Upper looper thread tension Lower looper thread tension Right needle thread Right side of fabric Upper looper thread Left needle thread Upper looper thread tension Lower looper thread tension... -
Page 63: Tensi6N Incorrecta
Tensibn incorrecta Rev6s de la tela C2_ Hilo del ojo-guia inferior C3_ Hilo de la aguja derecha _4_Derecho de la tela _5_Hilo de la aguja izquierda C6_ Hilo del ojo-guia superior _?_Tensi6n del hilo del ojo-guia superior (8_ Tensi6n del hilo del ojo-guia inferior El hilo del ojo-guia inferior est_ tenso y/o el hilo del ojo-guia superior est_ flojo, Para corregir, afloje la tensi6n del hilo del ojo-guia inferior y/o... -
Page 64: Thread Tension (3 Threads)
(3 threads) Thread tension Correct tension (_ Wrong side of fabric Needle thread Lower looper thread Right side of fabric (_ Upper looper thread Adjusting the thread tension may be required depending on the type of fabric and thread being used. Thread tension adjustment Set all three thread tension dials at "3". -
Page 65: Tensi6N Del Hilo (3 Hilos)
Tensibn del hilo (3 hUos) Tensibn correcta Rev6s de la tela C2_ Hilo de la aguja C3_ Hilo del ojo-guia inferior _4_Derecho de la tela (5_ Hilo del ojo-guia superior Es posible que sea necesario ajustar la tensi6n de los hilos seg6n el tipo de tela e hilo que se est6n utilizando. -
Page 66: Narrow Hem
Narrow A technique used to finish the outside edges of light to medium weight fabrics. Avoid using fabrics that unravel easily. Machine setting Number of threads: Number of needles: (Remove the needle on the left.) Differential feed ratio: Stitch length: Right needle thread tension (Blue): Upper looper thread tension (Red): Lower looper thread tension (Green):... -
Page 67: Dobladilto Angosto
Dobladillo angosto T6cnica utilizada para acabar los bordes exteriores de telas de peso ligero a mediano. Evite usar telas que se deshilachen f_cilmente. Ajuste de la mbquina Nemero de hilos: NQmero de agujas: (Quite la aguja de la izquierda.) Relaci6n de avance diferencial: Longitud de puntada: Tensi6n del hilo de la aguja derecha (azul): Tensi6n del hilo del ojo-gufa superior (rojo):... -
Page 68: Rolled Hem
Rolled A decorative edge suitable for lightweight fabrics works great on the frills of blouses or the edges of napkins and tablecloths. Machine setting Number of threads: Number of needles: (Remove the needle on the left.) Differential feed ratio: Stitch length: Needle thread tension (Blue): Upper looper thread tension (Red): Lower looper thread tension (Green):... - Page 69 Dobladillo enrollado Un borde decorative adecuado para telas ligeras que funciona muy bien para volantes de biusas, yen bordes de servilletas y manteles. /Ajuste de la mbquina NDmero de hilos: NDmero de agujas: (Quite la aguja de ]a izquierda.) Relaci6n de avance diferencial: Longitud de pontada: Tensi6n del hilo de la aguja derecha (azul): Tensi6n del hilo del ojo-guia superior (rojo):...
-
Page 70: Picot Edge
Picot edge Machine setting Number of threads: Number of needles: (Remove the needle on the left.) Differential feed ratio: Stitch length: Right needle thread tension (Blue): Upper looper thread tension (Red): Lower looper thread tension (Green): Lower looper pre-tension setting slider: Needle plate setting knob: Thread: Needle:... - Page 71 Borde de encaje _Ajuste de la m&quina N0mero de hilos: Nt]mero de agujas: (Quite la aguja de la izquierda,) Relaci6n de avance diferencial: Longitud de puntada: Tensi6n del hilo de la aguja derecha (azul): Tensi6n del hilo del ojo-guia superior (rojo): Tensi6n del hilo del ojo-guia inferior (verde): Corredera de ajuste de pretensi6n del ojo-guia inferior:...
-
Page 72: Turning Corners
Turning corners Outside corners Use scissors to cut a 1" (2.5 cm) long strip from 3 corners of the fabric. See illustration. Cutting line Cut off Uncut corner Starting from uncut corner _, serge down the entdre length of the fabric side. Serge one stitch past the fabric edge. - Page 73 Doblado de esquinas Esquinas exteriores 1111 Con tijeras, corte tiras de tela de 2.5 cm (1") de Iongitud a partir de tres de las esquinas. Vea la ilustraci6n. Linea de corte C2_ Cortar _3_Esquina sin cortar [21 Comenzando por la esquina no cortada C3_, c osa con surjete a Io largo de todo el costado.
-
Page 74: Inside Corners
Inside corners Clip fabric corner, as illustrated, with scissors. Cutting line Clip Serge along the cutting line up to 1" (2.5 cm) before the corner. Pull the fabric toward you in order to keep the cutting line of the fabric straight. Then continue serging. Cutting line Edging curves... - Page 75 Esquinas interiores [11 Recorte la esquina de la tel& tal como se ilustra, con unas tijeras. _ Linea de corte (2) Recortar L2 Cosa a Io largo de la linea hasta 2.5 cm (1") antes de la esquina. L3 Tire de la tela hacia usted para que la Iinea de corte de la tela continQe siendo recta.
-
Page 76: Overedging
(_ Wrong side Seam allowance With right sides of fabric together, sew a 5/8" (1.6 cm) seam on a conventional sewing machine; reverse stitching at the beginning and end of the seam. Serge seam allowances separately, guiding the seam along the left edge of the serging foot. The serger will trim 1/8"... -
Page 77: Sobrehilado
Sobrehilado El sobrehilado con una m_quina de surjete es la manera m_s f_cil y r_pida de terminar los bordes no acabados de una tel& Es 6til para costuras abiertas de chaquetas, pantalones, etc., y suele coserse en una capa de tela. 3 Hilos Rev6s de la tela C2_ Hilo de la aguja... -
Page 78: Overlocking
Overlocking With the Kenmore Serger, you can trim, overedge and seam--all in one operation-- when making shirts, blouses, swimsuits and any type of knit sportswear. The flat narrow seam allowance can be pressed to one side. The color and weight of all threads should match the fabric you are serging. -
Page 79: Sobreorillado
Sobreorillado Con la Kenmore Overlock se puede recortar, sobrehilar y hacer costuras, todo en una sola operaci6n, al hacer camisas, blusas, trajes de baSo y cualquier tipo de ropa de-portiva de tejido tricotado. El espacio para costura delgado y piano se puede presionar hacia un lado. -
Page 80: Elastic (For Wide Elastic Band)
(for band) Elastic wide elastic Use this technique when applying elastic to lingerie. A soft elastic band is recommended. (Uneven or skipped stitches may occur on thick or hard elastic bands). Machine setting Number of threads: Number of needles: Differential feed ratio: Stitch length: Needle thread tensions (Gold &... -
Page 81: El_Stico (Para Cinta Elastica Ancha)
Eldstico (para cinta eldstica Utilice esta t6cnica al colocar el_sticos en lenceria. Se recomienda una cinta el_stica bland& (En cintas el_sticas gruesas o duras es posible que ocurran puntadas desiguales u omitidas.) Ajuste de la mbquina Nemero de hilos: Nemero de agujas: Relaci6n de avance diferencial: Longitud de puntada: Tensiones de los hilos de aguja (dorado y azul):... -
Page 82: Elastic (For Narrow Elastic Band)
Fold elastic to the wrong side of fabric and, with a conventional sewing machine, straight stitch on the right side of fabric through the elastic. Be sure to stretch elastic while sewing the straight stitch. -
Page 83: El_Stico (Para Cinta Elastica Estrecha)
Eldstico (para cinta eldstica Para trajes de ba_o y leotardos, ponga el el_stico de la manera siguiente. Ajuste de la mbquina Nemero de hilos: NQmero de agujas: (Quite la aguja de la izquierda.) Relaci6n de avance diferencial: Longitud de puntada: Tensi6n del hilo de la aguja derecha (azul): Tensi6n del hilo del ojo-guia superior (rojo): Tensi6n del hilo del ojo-guia inferior (verde):... -
Page 84: Lace Application
Lace application An inconspicuous stitch used to attach lace edging to lingerie or evening wear. Machine setting Number of threads: Number of needles: Differential feed ratio: Stitch length: Needle thread tensions (Gold & Blue): Upper looper thread tension (Red): Lower looper thread tension (Green): Lower looper pre-tension setting slider: Needle plate setting knob: Method... -
Page 85: Apliocaci6N De Encaje
Aplicacibn de encaje Una puntada discreta utilizada para poner bordes de encaje en lenceria y trajes de noche, Ajuste de la mbquina N6mero de hilos: N6mero de agujas: Relaci6n de avance diferencial: Longitud de puntada: Tensiones de los hilos de aguja (dorado y azul): Tensi6n del hilo del ojo-guia superior (rojo): Tensi6n del hilo del ojo-guia inferior (verde): Corredera de ajuste de pretensi6n del... -
Page 86: Decorative Edge
Decorative edge Brighten up a skirt or blouse with a decorative edge. Machine setting Number of threads: Number of needles: (Remove the needle on the right.) Differential feed ratio: Stitch length: Left needle thread tension (Gold): Upper looper thread tension (Red): Lower looper thread tension (Green): Lower looper pre-tension setting slider: Needle plate setting knob:... -
Page 87: Borde Decorative
Borde decorativo Alegre una falda o blusa con bordes decorativos, Ajuste de la mbquina Numero de hilos: Numero de agujas: (Quite la aguja de la derecha,) Relaci6n de avance diferencial: Longitud de puntada: Tensi6n del hilo de la aguja izquierda (dorado): Tensi6n del hilo del ojo-guia superior (rojo): Tensi6n del hilo del ojo-guia inferior (verde): Corredera de ajuste de pretensi6n del... -
Page 88: Decorative Flatlock (Topstitching)
(Topstitching) Decorative flatlock With the Kenmore Serger, a whole new world of decorative sewing opens up. Try using the following method to create a braid effect across the front of a blouse or around the bottom of a skirt. Use ornamental threads, yarns or ribbons in the upper looper. -
Page 89: Dobladilto Enroltado
Decoracibn plana (sobrecostura) Con la Kenmore Overlock se abre todo un nuevo mundo de costura decorativa. Intente utilizar el m6todo siguiente para crear un efecto de trenza sobre el frente de una blusa o alrededor de la parte inferior de una falda. -
Page 90: Blind Hem
Blind The blind hem stitch can be neatly done on most knit fabrics. Machine setting Number of threads: Number of needles: (Remove the needle on the left.) Differential feed ratio: Stitch length: Right needle thread tension (Blue): Upper looper thread tension (Red): Lower looper thread tension (Green): Lower looper pre-tension setting slider:STD Needle plate setting knob:... -
Page 91: Borde De Encaje
ciego ° Aguja: Ojos-guia superior e inferior: _ Rev6s de la tela C2_ Parte inferior del dobladillo _3_Reborde de 0.6 cm (1/4") _4_Linea del dobladillo la aguja s61o perfore el borde del pliegue. El resto del reborde ser_ cortado autom_ticamente. _ Rev6s de la tela _ Rev6s de la tela _2_Derecho de le tela... -
Page 92: Pintuck
Pintuck Pintucks add a personal touch to your garment. Machine setting Number of threads: Number of needles: (Remove the needle on the left.) Differential feed ratio: Stitch length: Right needle thread tension (Blue): Upper looper thread tension (Red): Lower looper thread tension (Green): Lower looper pre-tension setting slider:STD Needle plate setting knob: Thread:... -
Page 93: Doblado De Esquinas
Pliegue pequefio Los pliegues pequeSosaSaden un toque personal a sus prendas. Ajuste de la mbquina Nemero de hilos: NQmero de agujas: (Quite la aguja de la izquierda.) Relaci6n de avance diferencial: Longitud de puntada: Tensi6n del hilo de la aguja derecha (azul): Tensi6n del hilo del ojo-guia superior (rojo): Tensi6n del hilo del ojo-guia inferior (verde): Corredera de ajuste de pretensi6n del... -
Page 94: Attaching Stretch Waistband
Attaching stretch waistband Machine setting Number of threads: Number of needles: Differential feed ratio: Stitch length: Needle thread tensions (Gold & Blue): Upper looper thread tension (Red): Lower looper thread tension (Green): Lower looper pre-tension setting slider: Needle plate setting knob: Thread: Method With wrong sides together fold waistband in half... -
Page 95: Esquinas Interiores
Colocacibn de una cinta eldstica Ajuste de la mbquina Nemero de hilos: Nemero de agujas: Relaci6n de avance diferencial: Longitud de puntada: Tensiones de los hilos de aguja (dorado y azul): Tensi6n del hilo del ojo-guia superior (rojo): Tensi6n del hilo del ojo-guia inferior (verde): Corredera de ajuste de pretensi6n del ojo-guia inferior: Bot6n de posici6n de la placa de agujas:... -
Page 96: Braiding
Braiding When you want to make coordinating trim or belts, serge over a tape using ornamental threads, such as yarn, ribbon or buttonhole twist, in the upper looper. Choose matching or contrasting colors depending on the effect desired. Machine setting Number of threads: Number of needles: (Remove the needle on the right.) -
Page 97: Trenzado
Trenzado Cuando quiera hacer cordones o cinturones coordinados, cosa con surjete sobre una cinta usando hilos ornamentales, hilaza, list6n o punto de ojal, en el ojo-guia superior. Escoja colores que coincidan o contrasten segQn el efecto deseado. Ajuste de la mbquina NDmero de hilos: NDmero de agujas: (Quite la aguja de ]a derecha.) -
Page 98: Attach Sleeve
Attach sleeve Sleeves can be attached quickly and easily using the differential feed function. Machine setting Number of threads: Number of needles: Differential feed ratio: Stitch length: Needle thread tensions (Gold & Blue): 3 to 6 Upper looper thread tension (Red): Lower looper thread tension (Green): Lower looper pre-tension setting slider:STD Needle plate setting knob:... -
Page 99: Cotocaci6N De Mangas
Colocacibn de mangas Las mangas pueden colocarse f_cil y r_pidamente utilizando la funci6n de avarice diferenciaL Ajuste de la mbquina Nt]mero de hilos: Nt_mero de agujas: Relaci6n de avance diferencial: Longitud de puntada: Tensi6n del hilo de la aguja (dorado y azul): Tensi6n del hilo del ojo-guia superior (rojo): Tensi6n del hilo del ojo-guia inferior (verde): Corredera de ajuste de pretensi6n del... -
Page 100: Flared Skirt
Sew the pieces together using a conventional sewing machine. Serge the bottom edge of the skirt. You can gather it evenly and easily. Hem the bottom of the skirt using a conventional sewing machine. 1.25 3 to 6 3 to 6... -
Page 101: Falda En Campana
Falda en campana Usted puede terminar una hermosa falda en campana r_pidamente Vous pouvez finir votre jupe 6vas6e rapidement avec le rapport con el dispositivo de avarice diferencial, /Ajuste de la mbquina Nemero de hilos: Nemero de agujas: Relaci6n de avance diferencial: Longitud de puntada: Tensiones de los hilos de aguja (dorado y azul): Tensi6n del hilo del ojo-guia superior (rojo):... -
Page 102: Gathering
Gathering Machine setting Number of threads: Number of needles: Differential feed ratio: Stitch length: Needle thread tensions (Gold & Blue): 3 to 6 Upper looper thread tension (Red): Lower looper thread tension (Green) : 3 to 6 Lower looper pre-tension setting slider:STD Needle plate setting knob: Thread: Needle:... -
Page 103: Fruncido
Fruncido JAjuste de la m_quina NDmero de hilos: Nemero de agujas: Relaci6n de avance diferencial: Longitud de pontada: Tensiones de los hilos de aguja (dorado y azul): Tensi6n del hilo del ojo-guia superior (rojo): Tensi6n del hilo del ojo-guia inferior (verde): Corredera de ajuste de pretensi6n del ojo-guia inferior: Bot6n de posici6n de la placa de agujas:... -
Page 104: Care For Machine
SECTION IV. CARE FORYOUR Replacing the upper knife To remove: Upper knife Hexagon bolt Stopper pin Lower knife Turn off the power switch and unplug the machine. Open the looper and side covers. Turn the handwheel toward you until the upper knife reaches its highest position. -
Page 105: Secci
SECCI )N IV. CUIDADO superior Cambio de la cuchilla Para quitar la cuchUla: Cuchilla superior C2_ Tornillo hexagonal _3_Pasador de tope _4_Cuchilla inferior Apague el interruptor de encendido y desenchufe la m_quina. Abra la tapa de los ojos-guia y la tapa lateral. G/re el volante de mano hacia Ud. -
Page 106: Replacing The Light Bulb
Replacing the light bulb (_ Set screw Face plate Turn off the power switch and unplug the machine. Loosen the face plate set screw (_, and remove the face plate _. For your safety: • The machine is designed to use a 15 W Light Bulb, Maximum. -
Page 107: Cambio De La Bombilla
Cambio de la bombilla _ Tornillo de fijaci6n _2_Placa frontal Apague el interruptor de encendido y desenchufe la m_quina. Afioje el tornillo de fijaci6n de la placa frontal d_ y quite la placa frontal _2). Para su seguridad: • La m_quina esta dise_ada para utilizar una BOMBILLA DE 15 VATIOS COMO MAXIMO. -
Page 108: Oilingthe Machine
Oilingthe machine Applya fewdropsoffinequality sewingmachine oilto the partsindicated w itharrows. It is recommended thatyouapplyoiloncea weekinnormal use,oncein tenhours in continuous u se. (_ Oilthrough theoilinghole. Openthesidecoverandapplyoil Openthelooper c overandapply oit. Carrying the machine Put your fingers into the opening of the rear arm as illustrated. -
Page 109: Lubricaci6N De La Maquina
Lubricacibn de la mbquina Aplique unas cuantas gotas de aceite de buena calidad para m_quinas de coser en las partes indicadas con las flechas. Es recomendable que aceite su m_quina una vez por semana en caso de uso normal y una vez cada 10 horas si la utiliza continuamente. -
Page 110: Performance
The position of the upper knife is not adjusted properly. The upper knife is dull. For customer assistance call or e-mail: 1-877-SEWING-U (1-877-739-4648) 9 am - 4:30 pm, CST, Monday - Friday su pport@kenmore-sewing.com Reference See page 98. Lower the presser foot. See page 16. See page 16. - Page 111 SECCI6N V. GRAFICA hacer cuando Condicibn La tela no avanza uniformemente. La aguja se rompe. El hilo se rompe. La mbquina salta puntadas La costura no es uniforme. La costura se arruga. La mbquina no funciona. La tela no se corta bien. DE PROBLEMAS DE FUNCIONAMIENTO Causa...
-
Page 112: Surjeteuse
PARTIE V. CONSEILS Quoi quand faire Ddfaut Le tissu n'avance pas 1. Les griffes d'entra_nement sont remplies de peluches. r_guli_rement. 2. Le pied presseur a 6t6 relev6. L'aiguille se rompt. 1. I'aiguille n'est pas install6e correctement. 2. I'aiguille est 6mouss6e ou tordue. 3. - Page 113 Get it fixed, at your home or ours! For repair of major brand appliances no matter who made it, no matter who sold it! 1-800-4-MY-HOME (1-800-469-4663) www.sears.com For repair of carry-in products like vacuums, lawn equipment, and electronics, Sears Parts and Repair Center. 1-800-488-1222 For the replacement that you need to do-it-yourself,...