Table of Contents
Advertisement
SEARS
Owner's Manual
Manual de Instrucciones
Manuel d'lnstructions
OVERLOOK 3/4D
OVERLOCK 3/4D
SURJETEUSE 3/4D
Model
Modelo
ModUle
385. 16633
CAUTION:
Before using sewing machine,
read this manual and follow
all its Safety Rules and
Operating Instructions.
e Safety Instructions
•
Warranty
•
Specifications
•
Operation
•
Care and Maintenance
•
Troubleshooting
Sears, Roebuck and Co., Hoffman Estates, IL 60179 U.S.A.
Advertisement
Table of Contents

Related Manuals for Kenmore 385. 16633


Summary of Contents for Kenmore 385. 16633
- Page 1 SEARS Owner's Manual Manual de Instrucciones Manuel d'lnstructions OVERLOOK 3/4D Model OVERLOCK 3/4D Modelo 385. 16633 ModUle SURJETEUSE 3/4D CAUTION: e Safety Instructions • Warranty Before using sewing machine, • Specifications read this manual and follow • Operation all its Safety Rules and •...
- Page 2 IMPORTANT SAFETY INSTRUCTIONS Your overlock machine is designed and constructed only for HOUSEHOLD Read al! instructions before using this ovedock machine_ DANGER - To reduce the risk o felectric shock: 1_ An overlock machine should never be left unattended when plugged in. Always unplug from the electric outlet immediately after using and before cleaning.
- Page 3 INSTRUCCIONES DE SEGURIDAD IMPORTANTES Esta overlock estfi disefiada y constmida finicamente para uso dom4stico. Lea todas las inst:ucciones antes de usar esta overlock. PELIGRO Paxa reduci, el riesgo de sacudidas el4ctricas: 1 Nunca se debe dejar desatendido una ovettock cuando _ste se encuentle enchufiado Desenchufe siempre...
- Page 4 Consignes de S curit Importantes otre sutjeteuse est con¢ue umquement pout l us'age menager Prtere de life toutes les consignes avant de l'utiliser DANGER - Po.rr d.ite;e delacommotion risque _lectrique Nejamais raisser la machine branchde Ddbrancher la machine aprOs chaque utirisation et avant chaque nettoyage.
-
Page 5: Gathering
q,v _._ ,,_, .._ ,1_. _._. ,,,._. _h, _ ,w ._ _,_._ ,_,..._.. ,,_ .._ _1_,_ ,11, _ -_t¸ ._ ,_p.._ q_v _ ,_, 4_- ._j _ _J_ _ ,kl, -,_ .itp.._ _h _ 'l_p _1_-_ WARRANTY FULL FIVE YEAR WARRANTY ON MECHANICAL COMPONENTS OF OVERLOCK MACHINE... - Page 6 Machine Specifications Item Specification Sewing speed 1,150- 1,200 rp m, (maximum) Stitch length (feed amount) 1 - 4 mm (Ordinary average 3) Differential feed ratio 1:07-1:20 Overedge stitch width 3 5 mm or 5,7 mm (3 threads) 57 mm (4 threads) Needle bar stroke 26 mm Presser foot rise...
-
Page 7: Table Of Contents
TABLE OF CONTENTS CONTENIDO SECTION 1. KNOW YOUR MACHINE SECCION 1. CONOZCA SU MAQUINA Locate and identify the parts ........8 - 10 LocaJJzaciSn e identificaei6n de Jaspartes ... 9 - 11 Standard accessories ............10 Accesorios estfindar ............11 Available accessories and attachments .... - Page 8 TABLE MATIERES SECTION 1. CONNAISSEZ VOTRE MACHINE Identification des piOces ......9 d 11 Acce_sories Jbumis ....... Accessories disponibles ......... SECTION 2. PREPARATION DE LA MACHINE COUDRE Branchement et raise sous tension de la machine ..15 P_dale de vites_e ..........Comment tourner le volant ......
-
Page 9: Know Your Machine
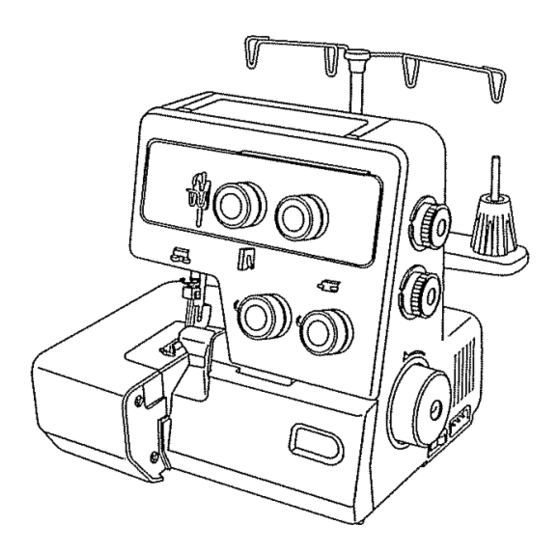
SECTION 1. KNOW YOUR MACHINE Locate and identify the parts Face plate Thread guide plate (_) Carrying handle Right needle thread tension dial (_) Stitch length dial Differential feed dial (_) Plug connector Power switch Looper thread guide Looper cover Lower looper thread tension dial Lower looper thread guide (1) q@ Upper looper thread tension dial... -
Page 10: Locajjzacisn E Identificaei6N De Jaspartes
SECCION 1. CONOZCA SU MAQUINA SECTION 1. CONNAISSEZ VOTRE MA CHINE Identification des pi&ces Localizaci6n e identificaci6n de las partes Tapafrontal Capot frontal Plancha del gufa-hilo Plaque du guide_fil Manija Machh_e de transport Tensidn del hilo de la aguja derecha Cadran de tension du fil de l'aiguille... -
Page 11: Standard Accessories
Locate and identify the parts (Continued) 2@ Needle clamp screws Upper knife Needle plate Presser foot Needle plate set screw Knife holder Lower knife Lower looper thread guide (4) Lower looper thread guide (3) 3GG_ Needle bar thread guide Needle clamp 3C8)Foot holder Upper looper 4_) Upper looper thread guide (3) -
Page 12: Accesorios Estfindar
Localizaci6n e identificaci6n de las partes Identification des pikces (Fin) (Continuaci6n) Sujetadores de las agujas Vi_ de serrage de l'aiguille Cuchilla superior CouteausupOrieur Placa de aguja Plaque t_ aiguille Piensatelas Pied-de-biche Tornillo sujetador de placa de aguja Sujetador de la cuchilla Porte-couteau Cuchilla inferior @) Couteau... -
Page 13: Available Accessories And Attachments
Available accessories and attachments All parts listed may be ordered from any Sears s;ore or service center WHEN ORDERING REPAIR PARTS, ALWAYS GIVE THE FOLLOWING iNFORMATION: 1 PART NUMBER 2 PART DESCRIPTION 3 MODEL NUMBER 4 NAME OF ITEM If the parts you need are not stocked locally, your order will be electronically transmitted to a Sears Repair Parts Distribution Center for expedited handing Ref, No. -
Page 14: Accesorios Y Refacciones Disponibles
Accesorios y refacciones disponibles Accessoires disponibles Todas las piezas que figuran aquf se pueden comprai Tottte_ ces pi&es peuvent due commanddes datT_ un pidi_ndolas a cualquier tienda o centio de servicio Sears magasin Sears AI_. PEDIR REPUESTOS, DE SIEMPRE .IOIGNEZ TOUJOURS a VOTRE COMMANDE... -
Page 15: Section 2. Prepare Your Machine For Sewing
SECTION 2. PREPARE YOUR MACHINE FOR SEWING Plug in the machine and switch on the power (_ Machine plug (_) Three-prong plug connector _) Power supply plug (_) Power supply (_) Light/power switch NOTE: Before inserting the plug into your machine, be sure the power switch is OFE Check your outlet to be sure it is a 110 to 120 Volt AC outlet... -
Page 16: Para Conectar Y Fender La Mfiquina
SECCION 2. PREPARE SECTION PREPARATION DE LA MACHINE A COUDRE MAQUINA PARA COSER Para conectar y prender la mdquina Branchement et raise sous tension de la machine @ Enchufe de tres puntas @ Fiche de pddale @ Enchufe de la mfiquina (_) Fiche enca_tt_e @ Enchufe de toma de coiriente... -
Page 17: How To Turn Handwheel
How to turn handwheel C) Handwheel Always turn handwheel toward you. Opening and closing the side cover C) Side cover To open: Push the side cover to the left. To close: Push the side cover to the right and slightly toward the machine body. -
Page 18: Come Girar El Volante
Para girar el volante Comment tourner le volant @ Volante de mano (_) Volant fi main Siempre gire el volante hacia usted Tournez toujours le volant vers votts Para abrir y cerrar la tapa lateral Ouverture ou fermeture le capot latOral @ Tapa lateral @ Capot latdra! -
Page 19: The Position Of Telescoping Thread Guide Bar
The position of telescoping thread guide C) Thread guide (_) Telescoping thread guide bar (_ Stoppers (_ Spoor pin Pull the telescoping thread guide bar (_ up as far as it will i't ! Turn the thread guide bar (_) until it clicks into position. I/ ,--F_ Thread guides (_ should stop directly above the spool pins Raising... -
Page 20: Posici6N De La Barra Del Gufa-Hilo
La posici6n de la barra del gufa-hilo position du support des guide-ills @ Gufa-hilo @ Guide-ill @ Basra del gufa-hilo (_) Support des guide-fil_ @ Topes @ ArrYt @ Pmtaconos (Portacarretes) @ Cheville_ d bobble Levante la baira del gufa-hilo (2) hasta donde suba,... -
Page 21: Threading The Machine
Threading the machine (&) Green (_) Red (_) Blue (&) Orange ® _) Thread Chart (Located behind looper cover) ® For your convenience, your overlock has been ® pre-threaded To prepare to sew with your choice of threads, follow these simple instructions: •... -
Page 22: Para Enhebrar La Mfiquina
Para enhebrar la m_iquina Enfilage de la machine C) Verde @Vett @ Rojo @ Rouge (_) Azul @ Bleu @ Naranja @ Orange @ Diagrama (Esta en el reves la cubierta de ganchos) 5chO.ma d'enf!lage (DerriOre le couvercle du boucleur) Para su comodidad, la m4quina de "overlock"... -
Page 23: Threading The Lower Looper
• Threading the lower looper Open the looper and side covers, Snap off presser foot, Place a spool of thread on the right side spool pin_ _' Points to thread for lower looper are marked in green, ' There is a convenient threading chart located inside the looper cover A (1) Thread guide Draw the thread through the right side thread guide... -
Page 24: Para Enhebrar El Gancho Infelior
• Para enhebrar el gancho inferior * Enfilage du crochet inf_rieur Abra ta tapa latetal y ta cubierta de los ganchos, Ouw'ez les capots des crochets et lat&aL quite el prensatelas. Coloque un caiiete de hilo en el Enlevez l'a_emblage du pied-de-biche portaconos derecho,... - Page 25 o Threading the lower looper (continued) D, (_ Lower looper thread tension dial (_) Lower looper thread guide (1) Insert the thread between tension discs from the righL Then pull both sides of the thread firmly between tension discs. Pass the thread through lower looper thread guide (1) E (_ Lower looper thread guide (2) (Z) Looper thread take-up lever (lower) ©...
- Page 26 , Enfilage du corchet h_f_rieur (Fit,) , Para enhebrar el gancho inferior (continuaci6n) @ Cadran de tenfion du fil du crochet inf&ieur D, @ Selector de tensi6n del hilo del gancho inferior du crochet @ Gu/a-hilo del gancho inferior (1) Guide-ill inf&ieur Meta...
-
Page 27: Threading The Upper Looper
= Threading the upper looper Place a spool of thread on the spool pin second from the right "_ Points to thread for upper looper are marked in red.. There is a convenient threading chart located inside the looper cover. A.. -
Page 28: Para Enhebrar El Gancho Superior
o Para enhebrar el gancho superior o Enfilage du crochet sup&ieur Coloque un carrete de hilo en el segundo pot tacono Placer le fi_eau de fil sur le second support de fuseau de la derecha. de cOtE droiL Los puntos para enhebrar el gancho superior... - Page 29 • Threading the upper Iowper (continued) D. (_) Upper looper thread tension dial Upper looper thread guide (1) Insert the thread between tension discs from the right. Then pul! both sides of thread. Pass the thread through upper looper thread guide (1) ©...
- Page 30 * Enfilage du crochet sup_rieur (Fin) * Para enhebrar el gancho superior (continuaci6n) @ Cadrandetensiondufilducrochet_updrieur @ Selector de tensi6n del hilo del gancho superim @ Guide-fil du crochet supdrieur (1) @ Gufa-hilo del gancho superior Passez le fil de la droit entre les disques de tension, Meta el hilo entre los discos...
-
Page 31: Threading The Needle On The Right
= Threading the needle on the right Place a spool of thread on the spool pin second from the left :" Points to thread for needle on the right are marked in blue. _' There is a convenient threading chart located inside the looper cover, A (_ Thread guide Draw the thread through the thread guide second from... -
Page 32: Para Enhebrar La Aguja Derecha
,, Para enhebrar la aguja derecha • Enfilage de l'aiguille, c6t_ droit Coloque un caliete de hilo en el segundo portaconos Placez le fuseau de fil sur le second support c'zfitseau de la izquielda, du cOtd gauche, * Los puntos para enhebrar la aguja de la deiecha estfin malcados en azul, de droite _ont marquOs... - Page 33 • Threading the needle on the right (continued) C. (_ Right needle thread tension dial Insert the thread between tension discs from the righL Then pull both sides of thread. © D. (_ Right needle thread guide (_) Thread take-up lever thread guide Turn the handwheel toward you to bring needle bar to its highest position, then pass the thread through right needle thread guide and thread take-up lever thread...
- Page 34 • Para enhebrar la aguja derecha (continuaci6n) o Enfilage de l'aiguille, c6t_ droit (Fin) C. @ Selector de tensi6n de la aguja delecha Cadran de tension droite C (_ dufil de l'aiguille Meta el hilo entte los discos de tensi6n y hale el hilo Passez le fil de la droite...
-
Page 35: Threading The Needle On The Left
• Threading the needle on the left Place a spool of thread on the left side spool pin. orange. Points to thread for needle on the left are marked in There is a convenient threading chart located inside the looper cover, A. -
Page 36: Para Enhebr Ar La Aguja Izquierda
o Para enhebrar la aguja izquierda , Enfilage de l'aiguille, c6t_ gauche Coloque un carrete de hilo en el portacono izquieIdo Placez une bobine sur le porte-bobine gauche. Les points ot't le fil doit pas_er pour enfiler l' aiguille de ": Los puntos paia enhebrar estfin marcados... - Page 37 Threading the needle on the left (continued) C. (_) Left needle thread tension dial 4_) Thread take-up lever thread guide Insert the thread between tension discs from the righL Then pull both sides of thread. Turn the handwheel toward you to bring needle bar to its highest position, then pass the thread through thread take-up lever thread guide ©...
- Page 38 • Para enhebrar la aguja izquierda (continuaci6n) Enfilage de l'aiguille, c6t_ gauche (Fin) C. @ Selector de tensidn de la aguja izuquietda @ Cadran de tension du fil de l'aiguille gauche @ Gufa-hilo de la palanca del tira-hilo @ Enfilez le guide fil du bra_ releveur Meta el hilo por la derecha al disco de tensi6n...
-
Page 39: Learn The Stitches
SECTION 3, LEARN THE STITCHES Starting to sew (i) Fabric (_) Threads Insert the fabric under the toe of the foot while aiming to the guide line with the edge of the fabric, (It is not necessary to raise the foot.) Turn the handwheel gently toward you a couple of turns and check the thread chain,... -
Page 40: Para Empezar A Coser
SECCION 3. APRENDA LAS PUNTADAS SECTION 3. CONNAISSEZ LES POINTS Pour dJbuter une couture Para empezar a coser @ Tela ® Nls @ Hilos Coloque la tela debajo del prensatelas. (No hay Relever le pied n'est par ndcessaire. necesidad de levantar el prensatelas,) Insdrez le tissu sou_ la patte du pied. -
Page 41: Securing Ends
Securing ends To avoid unravelling, it is necessary to leave a thread chain about 5 cm (2"') long at the beginning and end of seam. To secure the beginning and end of a seam choose one of the following methods,, At the beginning A. -
Page 42: Para Asegurar Los Extremos De La Costura
Para asegurar los extremos de ]a costura Pour' Her les fins de couture Para evitar que la costura deshile, es necesario dejar Pour _viter de pli_ser le tissu laissez une cha?ne d'environ una cadena de hilo de 5 cms. (2") de largo a los dos 5 cm (2po) au ddbttt et d latin de la coutttre_ PottrJ_'cer exttemos... - Page 43 Securing ends (continued) At the End You can use the same methods as at the beginning to secure the end of seam (except "Backstitching"), or the method shown below. Serge one stitch off the end of seam, Raise the needle and presser foot, and gently pull the threads off the prong,, Turn the fabric over so that the under side is up,, Serge about 2.5 cm (1 "')over stitching and angle off the...
- Page 44 Para asegurar los extremos de la costura Pour lier les fins de couture (Fin) (continuaci6n) A la Fin AI terminar Vous pouvez utilisez les mdthodes propo_des pour Usted puede usar los mdtodos de al principio, salvo la d(buts de couture satt[ celles de couture de retour puntada...
-
Page 45: Thread Tension (4 Threads)
Thread tension (4 threads) Thread tension dial C) Setting mark _) Tighten (_ Loosen ® Correct tension (D Needle thread (Left) (_) Needle thread (Right) (_ Upper looper thread (_ Lower looper thread (_) Right side of fabric (Top side) (_) Wrong side of fabric (Reverse side) Thread tension The number "3"on each of the dials indicates... -
Page 46: La Tensi6N Del Hilo (4 Hilos)
La tensi6n del hilo (4 hiios) Tension du fil (4ills) Selector de la tensi6n del hilo Cadran de tension du fil @ Indicador @ Marque de r_glage (_) Para aumentar @ Serrer @ Paia disminuir @ De_errer Bonne tension Tensi6n correcta @ Hilo de la aguja izquieida @ Fil de l'aiguille du cOt_ gauche... - Page 47 Thread tension (4 threads) (continued) Thread tension adjustment + Set all four thread tension dials at "3"_ Then sew, and check the thread tensions _ It is easier to adjust by using 4 different colors of thread+ Wrong tension Needle thread (Left) C) is loose, C) Needle thread (Left)
- Page 48 La tensi6n del hilo (4 hilos) (continuaci6n) Tension du fil (4 fils) (Contlnu) Ajuste de la tensi6n del hilo Ajustement de tension du fil * Coloque las cuatro selectores de tensi6n en "3", * Rdglez le_ trois tension des ills gt "3" cousez luego cosa y vefifique las tensiones de los hilos.
- Page 49 Thread tension (4 threads) (continued) Wrong tension Lower looper thread (_ is tight and/or upper looper thread ® is loose (_) Needle thread (Left) (_) Needle thread (Right) (_ Upper looper thread (_) Lower looper thread _) Right side of fabric {Top side) (_ Wrong side of fabric (Reverse side) ®...
- Page 50 La tensi6n del hilo (4 hilos) (continuaci6n) Tension du fil (4ills) (Fin) Mauvaise tension Tensi6n real ajustada E1 hilo de! gancho inferior @ estfi apretado y/6 el hilo La tension du fil dtt crochet infdriettr @ est dlev_e et/ott gancho superior@ estfi flojo la tension...
-
Page 51: Threading The Machine (3 Threads), Wide/Narrow Stitch
Threading the machine (3 threads), wide/narrow stitch Using the needle on the right only (for narrow 3-thread serging) 3.5 mm width Disconnect the machine from the power supply, Remove the needle on the left and its thread_ Then tighten the needle clamp screw on the left slightly to avoid losing the screw+ To change to the other needle in 3-thread serging Loosen both needle clamp screws and remove the needle,... -
Page 52: Para Enhebrar La M_Iquina (3 Hilos)
Para enhebrar la m:iquina (3 hilos) Enfilage de la machine (3fils) Utilimtion de l'aiguille (c6t_ droiO Con la aguja derecha (para puntadas estrechas de 3 hilos) (point de surjet dtroit it trois fils) Desconecte la mfiquina de la corriente Quite la aguja DObranchez la sutjeteuse de la prise Olectrique... - Page 53 Thread tension (3 threads) (continued) Thread tension adjustment '_; Set all three thread tension dials at "3" Then sew, and check the thread tensions, =_:It is easier to adjust by using 3 different colors of thread Wrong tension Needle thread _)/_ is loose (_/(_ Needle thread...
- Page 54 La tensi6n del hilo (3 hilos) (continuaci6n) Tension du fil (3 fils) (Continu) Ajuste de la tensi6n del hilo Ajustentent de tension dn fil * Coloque los tres selectores de tensi6n del hilo en * R_glez les trois tension des fils d "_" cottsez "3"_ Luego cosa y verifique las tensiones de los hilos, vOrifiez la ten_ion des fits"...
- Page 55 'Thread tension (3 threads) (continued) Wrong tension Upper looper thread ® is tight and/or lower looper thread @ is loose (_/('_ Needle thread (_) Upper looper thread (_ Lower looper thread (_) Right side of fabric (Top side) (_) Wrong side of fabric (Reverse side) Loosen upper looper thread tension ®...
- Page 56 La tensi6n del hiio (3 hilos) (continuaci6n) Tension dufil (3ills) (Fin) Mauvaise tension Tensi6n real ajustada El hilo del gancho superior @ estfi apretado y/6 el hilo del La tension du fil dtt crochet infOrieur @ est faible et/ou gancho inferior @ est_i flojo la tension du fil du crochet supdrieur...
-
Page 57: Adjustment Of Stitch Length
Adjustment of stitch length (!) Stitch iength dial _) Setting mark To select stitch length, turn the dial The larger the number, the longer the stitch The stitch length can be adjusted from 1 to 4 mm (approx. 1/32 " to 5/32 "') Position "R"... -
Page 58: Para Ajustar El Largo De Puntada
Para ajustar el largo de puntada Rdglage de la longueur dn point @ Gufa de ajuste (D Cadran de longueur du point (_) Selectoi del largo de puntada @ Marque de Mglage Mueva el selectm para escoger el largo de puntada Plus le chiffre attgmente plus long _era le poinL... -
Page 59: Removing The Presser Foot
Removing the presser foot Raise the needle and presser foot_ _) Presser foot lifter (_) Needle Press the lever located on the back of foot holder, The presser foot will drop off,, (_) Lever (_ Foot holder Attaching the presser foot Place the presser foot so that the pin on the foot lies just under the groove of the foot holder... -
Page 60: Para Quitar El Pie Prensatelas
Pour retirer le pied-de-biche Para quitar el pie prensatelas Tournez le volant vers vous pour lever l' aiguille _ la Levante la aguja y el prensatelas position la plu_ _lev_e Levez le pied-de-biche, @ Elevador del prensatelas @ aguja (_) Pressoir d'_l_vation du pied @ Aiguille Presione la palanca ubicada en la palte de atr_is del Pr'e_sez le levier gt l'arriOre du manche... -
Page 61: Changing Needle
Changing needle C) Right needle clamp screw (_) Left needle clamp screw Disconnect the machine from the power supply, Raise the needle to its highest position Then loosen needle clamp screw O or (_) for the needle you are going to remove. -
Page 62: Para Cambiar La Aguja
Para cambiar la aguja Changement des aiguille (j) Tornillo izquierdo del sujetador de la aguja @ Vis du serre aiguille cdtd droit @ Tornillo derecho deI sujetador de la aguja @ Vis du serre aiguille c6td gauche Desconecte la m_iquina de la coiiiente_ D_branchez la surjeteuse... -
Page 63: To Disengage The Upper Knife
To disengage the upper knife C) Upper knife knob (_) Upper knife (_) Stopper pin Disconnect the machine from the power supply, Open the looper and side covers, Turn the upper knife knob C) toward you while pushing it in to the right, then guide the hole on upper knife (_) to the stopper pin (_ to lock the upper knife in down position. -
Page 64: Para Desengranar La Cuchilla Superior
Para desengranar la cuchilla superior Pour immobiliser le couteau sup_rieur (D Botdn de la cuehilla superior OD Poign£e du couteau supOrieur @ Cuchi!la superior @ Couteau _up_rieur @ Pasador @ Cran d'arr_t Desconecte la mfiquina de la corriente Ddbranchez la surjeteu_e de la prise Olectrique murale, Abra la cubierta de los ganchos y la tapa lateral. -
Page 65: Types Of Needle Plates
Types of needle plates C) Standard (for normal sewing) Stamp on reverse side of the plate: "S" (_) Rolled hemming {for roiled hemming, picot edging and narrow hemming) Stamp on reverse side of the plate: "R" :J: Select the needle plate for your sewing need, '_: Your oveflock is shipped with the standard needle plate in place For your safety:... -
Page 66: Tipos De Placa De Aguja
Tipos de placa de aguia Types de plaques _ aiguille (!) Estandar pa:a costu:a no:mal @ Tout u_age (pour une couture normale) Marca "S"en el :ev_s de la placa EstampO sur l'envers de la plaque: "S" @ Redondo para costu:a redonda, picot, rollo y @ Ourlet_ rotdottds... -
Page 67: Thread And Needle Chart
Thread and needle chart Differential Needle Type of thread Stitch length feed ratio Type of fabric • E -3.= • .= Light Organdy, Georgette, Cotton: No. 80 - 100 HA-1 SP 2 0 - 3.0 &7 -_ weight Lawn, Crepe de chine, Silk: No 80 - 100 No 11... -
Page 68: Tabla De Hilos Y Agujas
Tabla de hilos y agujas Alimentaci6n Largo de la Tipo de hilo Aguja diferencial puntada Clase de tela Liviana 20~30 Otgandf, Georgette, Algod6n: No 80-.!00 07 -@ Sedas: No 80-100 No 11 Olan, C_ep6, Form Sint_ticos: No, 80-100 Media HA-1 SP 25 -, 35 Algod6n, Lino, Satin,... - Page 69 Rolled hemming, picot edging and narrow hemming * Refer to page 64 for changing the needle plate,, Rolled hemming Stitch length : Differential feed ratio : 1_0 Needle : 1 (Right needle) x HA-1 SP No, 11 Needle plate : Rolted hemming needle plate.
-
Page 70: Estrecho
Costura redonda, borde de picot y dobladilio Ourlet roulott_, bordurepicot, ourlet _troit estrecho Costura redonda Ourlet roulott_ Largo de Puntada Longueur du Point : Alimentaci6n Diferencial Rapport du Diff6rentiel : LO Aguja : 1 (Aguja detecha) x HAd Aiguille 1 (Aiguille du e6M droit) No. - Page 71 Rolled hemming, picot edging and narrow hemming (continued) Picot edging Stitch length : Differenti!l feed ratio : © Needle : 1 (Right needle) x HA-1 SP No. 11 Needle plate : Rolled hemming needle plate. (Marked "R" on reverse side.) Thread Needle : Long fiber polyester thread:...
- Page 72 Cosutura redonda, bord de picot y dobladillo Ourlet roulott_, bordure picot, ourlet _troit estrecho (continuaci6n) (continu) Borde de picot Bordue picot Largo de Puntada Longueur du Point : 3 _ 4 Alimentaci6n Diferencial Rapport du Diffdrentiel : 1.0 Aguja 1 (Aguja derecha) x HA-t Aiguille...
- Page 73 Roiled hemming, picot edging and narrow hemming (continued) Narrow Hemming Stitch length : Differential feed ratio : Needle : 1 (Right needle) x HA-1 SP No., '11 Needle plate : Rolled hemming needle plate, (Marked "R" on reverse side,) Thread Needle : Long fiber polyester thread ©...
- Page 74 Cosutura redonda, bord de picot y dobladillo Ourlet roulott_, bordure picot, ourlet _troit estrecho (continuaci6n) (continu) Dobladillo estrecho Ourlet _troit Laigo de Puntada Longueur du Point : Alimentacidn Diferencial: Rapport du Diff&entiel Aguja : 1 (Aguja derecha) x HA-1 Aiguille 1 (Aiguille du cote droit) x SP No_ 11 HA-1 SP N °...
- Page 75 Rolled hemming, picot edging and narrow hemming (continued) How to adjust the thread tension = For rolled hemming and picot edging Wrong tension Needle thread C) is loose. (_) Needle thread (_) Upper looper thread (_) Lower looper thread (_ Right side of fabric (Top side) (_) Wrong side of fabric (Reverse side) Tighten needle thread tension C).
- Page 76 Cosutura redonda, bord de picot y dobladillo Ourlet roulott+, bordure picot, outlet +troit (continu) estrecho (continuaci6n) Como ajustar la tensi6n del hilo Comment ajuster la tension de,sills • Pour ourlet roulott_ et bordurepicot • Para costura redonda y borde de picot Mauvaise tension Tensi6n...
- Page 77 Rolled hemming, picot edging and narrow hemming (continued) • For rolled hemming and picot edging Wrong tension Lower looper thread (%)is loose and/or upper looper thread (_ is tight (_) Needle thread _) Upper looper thread _) Lower looper thread (_) Right side of fabric (Top side) (_ Wrong side of fabric (Reverse side) Tighten lower looper thread tension (_) and/or loosen upper...
- Page 78 Cosutura redonda, borde de picot y dobladillo Outlet roulott_ bordurepieot, ourlet do'oit estrecho (continuaci6n) (FitO • Para costura redonda y borde de picot • Pour ourlet roulottd et bordurepieot Mauvaise tension Tensi6n mal ajustada La tension du fil du crochet infdrieur (_) est ,faible et/ou El hilo del gancho...
-
Page 79: Rolled Hemming, Picot Edging And 68 - 76 Decorative Overedging
Decorative overedging Stitch length : Differential feed ratio : Needle : Ior2xHA-ISPNo Needle plate : Standard needle plate. (Marked "S" on reverse side.) Thread Needle: Synthetic: No 60- 80, Silk: No. 50 - 80 © Upper looper : Buttonhole twist, Light weight wool yarn Lower looper : Synthetic: No. -
Page 80: Puntada Decorativa De Sobrehilado
Puntada decorativa de sobrehilado Smjet d&oratif LaIgo de Puntada Longueur du Poh_t : Alimentaci6n Rapport du Diff&entiel diferencial Aiguilles 1 ou 2 x HA-1 SP N ° 14 1 o 2 x HA-1 SP No, 14 Aguja : Plaque d aiguille Pour tout usage (Marque Placa de aguja : Placa... -
Page 81: Pin Tucking
Pin tucking Stitch length : Differential feed ratio : 1,0 Needle : 1 (Right needle) x HAq SP No, 11 © Needle plate : Rolled hemming needle plate (Marked "R" on reverse side.) Thread Needle : Synthetic: No, 60 - 80, Silk: No. -
Page 82: Afforzas
Alforzas Nervure Laigo de puntada Longueur du point Alimentacidn diferencial Rapport du diff&'entiel Aguja : 1 (Aguja derecha) Aiguilles 1 (Aiguille cOtO dtoit) HA-1 SP No_ 11 HA-I SP N ° 11 Placa de aguja : Placa de aguja para Pour ouHet roulottd Plaque _ aiguille costura redonda... - Page 83 Pin tucking (continued) Sewing C) Folded edge Remove the needle on the left. Disengage the upper knife (See page 62). Sew the folded edge (_) while guiding along the right side edge of lower knife. Press pin tucks to one side * Engage the upper knife (See page 62).,...
- Page 84 Alforzas (Continuaci6n) Nervure (Fin) Costura Couture @ Dobladillo (D Bord pli_e Retire la aguja izquierda Deactivez le couteau supdrieur (Voir page 6.3) Desengrane la cuchilla superior.(Vea p_igina 63.) Cousez en guidant votre bordure pli_e @ le long de la linge guide Cosa el dobladillo @ y guie la tela pot el lado delecho de la cuchilla...
-
Page 85: Gathering 8
Gathering Stitch length : 1.0 - 2.0 Differential feed ratio : Needle : 1 (Right needle) x HA-1 SPNo, 11 or14 Standard needle plate Needle plate : (Marked "S" on reverse side,) Thread Needle : Synthetic: No 60 - 80, ©... -
Page 86: Fruncido
Fruncido Plisser .3d4 Longueur du Point, Largo de Puntada Alimentaci6n Diferencial 1 0~ 2,0 lOd2,0 Rapport du D!ffOrentiel Aguja : 1 (Aguja derecha) x HAd Aiguille 1 (Aiguille du cOt_ droit) SPNo 11o14 HA-1 SP N ° 11 ou 14 Placa de aguja : Placa de aguja estandar, Pour tout usage. -
Page 87: Cleaning Upper Knife Area 8
SEC_TION 4. CARE FOR YOUR MACHINE :_' Disconnect the machine from the power supply before cleaning, _' You may use vacuum cleaner to clean the upper knife area or feed dog. Cleaning upper knife area Open the looper cover Remove the waste materials with a brush. Cleaning the feed dog Open the looper and side covers. -
Page 88: Seccion
SECCION 4. MANTENIMIENTO DE LA SECTION ENTRETIEN DE LA MAQUINA MA CHINE * Desconecte la m_iquina de la corriente_ * Avant de nettoyer la machine, d_branchez le cordon * Pueda usai la aspiradora paia limpiai el firea de la _lectrique de la pri_e murale_ cuchilla superior... -
Page 89: Replacing The Light Bulb
Replacing the light bulb Disconnect the machine from the power supply Remove the face plate set screw (_), and the face plate _). CAUTION ! The light bulb could be HOT. Protect your fingers when you handle It. C) Face plate set screw _) Face plate Push the bulb (_) up and turn the bulb counterclockwise to remove it_... -
Page 90: Para Cambiar La Bombilla
Para cambiar ia bombilla Remplacement de l'ampoule Desconecte la m_iquina de la co_riente Quite el Ddbranchez la _urjeteuse de la prise dlectrique murale, tmnillo de sujeci6n (_) y retire la tapa frontal @ Enlevez la capot.frontal @ en desserrant la vis (!) CUIDADO! La bombilla puede... -
Page 91: Oiling The Machine
Oiling the machine Disconnect the machine from the power suppty before oiling. Apply a few drops of fine quality sewing machine oil to the parts indicated with arrows, Oiling is recommended once a week in normal use, once in ten hours in continuous use. -
Page 92: Ubricacidn De La Mfiquina
Lubricaci6n de la mdquina Huilage de la machine Desconecte la m_iquina de la cmriente antes de Avant de htbrifier la machine, ddbranchez le cordon proceder a lub_icai, dlectrique de la prise murale Aplique unas gotas de aceite paia m_iquina de coser Huilez la surjeteuse avec quelques... -
Page 93: Replacing The Upper Knife
Replacing the upper knife To remove: C) Upper knife (_) Hexagon bolt (_) Lower knife Disconnect the machine from the power supply Open the looper and side covers. Disengage the upper knife C) (See page 62). , Remove the hexagon bolt (_), and remove the upper knife ®... -
Page 94: Para Cambial La Cuchilla Superior
Para cambiar la cuchilla superior Changement du couteau sup_rieur Para retirar la cuchilla: Pour enlever: (!) Cuchilla superioi @ Couteau supdrieur @ Vis @ Pelno hexagonal @ Cuchilla inferior _) Couteau infdrieur Desconecte la milquina de la corriente Ddbranchez la surjeteuse de la prise dlecttique murale Ouvr_z... -
Page 95: Troubleshooting
SECTION 5. PERFORMANCE PROBLEMS CHART Troubleshooting Condition Cause Reference The fabric is not 1 The feed dog is packed with lint Page 86, being fed smoothly. 2 The presser foot has been raised Lower the presser foot, The needle breaks. 1 The needle is incorrectly inserted Page 60_ 2 The needle is bent or blunt... -
Page 96: Que Hace Y Cuando
SECCION 5. TABLA DE PROBLEMAS Que hace y cuando M_todos de ajusle Pfiginas de Problema Causas referencia Cuando no se 1 El impelente estfi lleno de pelusas Pfigina 87 alimenta el material° 2 El prensatelas estfi levantado Baje el prensatelas Cuando se rompe la 1 La aguja no est_i puesta correctamente P_igina 61... - Page 97 For the repair or replacement parts you need delivered directly to your home. Call 7 am - 7 pm, 7 days a week. 1-800-366=PART (1-800-366-7278) Para ordenar piezas con entrega domicilio-1-800-659-7084 For in-house major brand repair service. Call 24 hours a day, 7 days a week. 1-800-4-REPAIR (1-800-473-7247) Para pedir servicio de reparacibn...