Table of Contents
Advertisement
Advertisement
Table of Contents

Related Manuals for Pride Mobility Jazzy 1107


Summary of Contents for Pride Mobility Jazzy 1107
- Page 1 Owner’s Manual Exeter, PA St. Catharines, ON 1-800-800-8586 www.pridemobility.com...
- Page 2 Performing a prohibited action can cause injury to personnel and/ or damage to equipment (black symbol with red circle and red slash). Copyright © 2004 Pride Mobility Products Corp. INFMANU2673/Rev B/October 2004 www.pridemobility.com Jazzy 1107...
-
Page 3: Table Of Contents
This owner’s manual is compiled from the latest specifications and product information available at the time of publication. We reserve the right to make changes as they become necessary. Any changes to our products may cause slight variations between the illustrations and explanations in this manual and the product you have purchased. Jazzy 1107 www.pridemobility.com... -
Page 4: Introduction
I N T R O D U C T I O N SAFETY WELCOME to Pride Mobility Products Corporation (Pride). The power chair you have purchased combines state-of- the-art components with safety, comfort, and styling in mind. We are confident that these design features will provide you with the conveniences you expect during your daily activities. - Page 5 Name:_____________________________________________________________________________________ Address:___________________________________________________________________________________ Phone Number:______________________________________________________________________________ Purchase Date:_______________________________________________________________________________ NOTE: If you ever lose or misplace your product registration card or your copy of this manual, contact us and we will be glad to send you a new one immediately. Jazzy 1107 www.pridemobility.com...
- Page 6 Place unit on level ground and stand behind or to one side when changing from drive mode to freewheel mode or freewheel mode to drive mode. Unlocked and in freewheel mode. Battery Configuration: T = Terminal Post Connect Red wire to T with + Connect Black wire to T with – www.pridemobility.com Jazzy 1107...
- Page 7 3-pronged adapter to an electrical outlet having 2-pronged plug access. Failure to heed could result in personal injury and/or property damage. Prevent personal injury and equipment damage. Do not connect an extension cord to the AC/DC converter or the battery charger. Jazzy 1107 www.pridemobility.com...
-
Page 8: Safety
Check all controller connections to the power base. Make sure they are secured properly. n Check the brakes. See VIII. “Care and Maintenance.” n Check battery charge. See VI. “Batteries and Charging.” NOTE: If you discover a problem, contact your authorized Pride Provider for assistance. www.pridemobility.com Jazzy 1107... -
Page 9: Your Power Chair
WARNING! When on any sort of an incline or decline, never place the power chair in freewheel mode while seated on it or standing next to it. Doing so may result in personal injury and/or damage to your power chair. WARNING! Never travel down an incline backward. This may result in personal injury. Jazzy 1107 www.pridemobility.com... - Page 10 Reduce your power chair’s speed when driving on uneven terrain and/or soft surfaces. n Avoid tall grass that can entangle the running gear. n Avoid loosely packed gravel and sand. n If you feel unsure about a driving surface, avoid that surface. www.pridemobility.com Jazzy 1107...
- Page 11 Power chairs are not designed to travel up or down stairs or escalators. Always use an elevator. WARNING! Never use your power chair to negotiate steps or escalators. You may cause injury to yourself and to others and/or damage your power chair. Jazzy 1107 www.pridemobility.com...
- Page 12 WARNING! Before transferring, position yourself as far back as possible in the power chair seat to prevent the power chair from tipping forward during transfer and causing injury. WARNING! Avoid using your armrests for weight bearing purposes. Such use may cause the power chair to tip and cause personal injury. www.pridemobility.com Jazzy 1107...
-
Page 13: Positioning Belts
Failure to do so may result in personal injury. Removable Parts WARNING! Do not attempt to lift or move a power chair by any of its removable parts. Personal injury and/or damage to the power chair may result. Jazzy 1107 www.pridemobility.com... - Page 14 NOTE: For further information on EMI/RFI, go to www.pridemobility.com. If unintended motion or brake release occurs, turn the power chair off as soon as it is safe to do so. Call Pride at 800-424-8205 to report the incident. www.pridemobility.com Jazzy 1107...
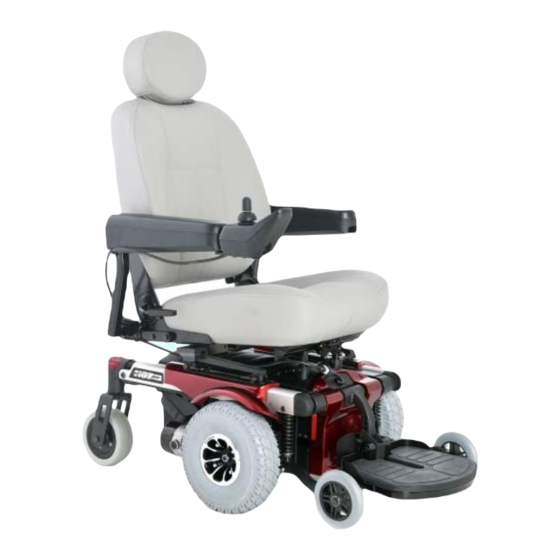
- Page 15 See figure 5, 6, and 7. SEATBACK ARMRESTS JOYSTICK SEAT ASSEMBLY CONTROLLER SEAT BASE CONTROLLER HARNESS SEATBACK RELEASE LEVER FOOT RIGGING (FOOT PLATFORM SHOWN) POWER BASE ANTI-TIP WHEELS CASTER WHEEL DRIVE WHEEL Figure 5. The Jazzy 1107 Jazzy 1107 www.pridemobility.com...
- Page 16 Y O U R P O W E R C H A I R SIDE TRAPEZE BARS FRONT TRAPEZE BAR BATTERY BOX CONTROLLER CONNECTOR BATTERY BOX MANUAL FREEWHEEL LEVER MOTOR/BRAKE ASSEMBLY Figure 6. The Jazzy 1107 Power Base www.pridemobility.com Jazzy 1107...
- Page 17 I I I . Y O U R P O W E R C H A I R JAZZY 1107 SPECIFICATIONS Suspension: Active Trac Drive Wheels: 10 in., pneumatic, (10 in., solid are optional) Caster Wheels: 6 in., solid, rear-mounted Anti-tip Wheels: 5 in., solid, front-mounted...
- Page 18 Motor Connectors: This is where the motors connect to the controller power module. CONTROLLER HARNESS CONNECTOR BATTERY HARNESS CONNECTOR MOTOR CONNECTOR MOTOR CONNECTOR CONTROLLER POWER MODULE Figure 7. Jazzy 1107 Electrical Components (Flight Controller Shown) www.pridemobility.com Jazzy 1107...
- Page 19 C H A I R Manual Freewheel Levers The Jazzy 1107 has a manual freewheel lever on each motor. See figure 6. Manual freewheel levers enable you to disen- gage the drive motors from the gearboxes and maneuver the chair manually.
-
Page 20: Assembly/Disassembly
ARMREST WIDTH ADJUSTMENT SEAT INSTALLATION ARMREST ANGLE ADJUSTMENT SEAT HEIGHT/ANGLE ADJUSTMENT CONTROLLER POSITION TIRE/TUBE REPLACEMENT ANTI-TIP WHEEL HEIGHT ADJUSTMENT FOOT PLATFORM HEIGHT/DEPTH ADJUSTMENT Figure 10. Jazzy 1107 Assembly View www.pridemobility.com Jazzy 1107... - Page 21 FRONT EXTRUSION 1. Prior to initial installation, the rear trapeze bar needs to be installed to the seat base. Figure 11. Jazzy 1107 Assembly View (Rear Trapeze Bar 2. Slide the rear trapeze bar into the rear extrusion. See Installation) figure 11.
- Page 22 A S S E M B L Y / D I S A S S E M B L Y Power Base Disassembly The Jazzy 1107 power base disassembles into six parts for easy transportation and storage. See figure 13. To disassemble the Jazzy 1107: 1.
- Page 23 A S S E M B L Y / D I S A S S E M B L Y BATTERY BOX LATCH BATTERY BOX LATCH CENTER SECTION LATCH (UNLOCKED) (LOCKED) Figure 14. Jazzy 1107 Battery Box Removal and Frame Separation Jazzy 1107 www.pridemobility.com...
-
Page 24: Comfort Adjustments
8. Remove each screw from the trapeze bars and apply thread lock. 9. Reinstall each screw into the trapeze bars and tighten. 10. Reinstall the seat. 11. Reconnect the controller to the power base. Figure 16. Side Trapeze Bar Height Adjustment www.pridemobility.com Jazzy 1107... - Page 25 3. Release the lever. ARMREST KNOB Armrest Width Adjustment You can change each armrest’s width independently of the Figure 18. Seatback Angle Adjustment other. NOTE: Changing the armrest width may increase the overall width of your power chair. Jazzy 1107 www.pridemobility.com...
-
Page 26: Armrest Angle Adjustment
The lever has a cam on the end that allows it to clamp into place. The quick release fastener has two states: clamped and unclamped. When the lever is open, the quick release fastener is unclamped. When the lever is closed, the quick release fastener is clamped. www.pridemobility.com Jazzy 1107... -
Page 27: Controller Position
10. Plug the controller into the power base. See figure 6. FOOTREST Swing-away Footrests EXTENSION Swing-away Footrests (SFRs) enable you to rotate the FOOTREST ADJUSTMENT footrests to the side before you transfer onto or off of SCREWS your power chair. Figure 23. Swing-Away Footrests Jazzy 1107 www.pridemobility.com... - Page 28 You can compensate for this by having your authorized Pride Provider make a small adjustment to the pre-programmed deceleration setting in the controller or by moving the seat assembly farther to the back of your power chair. PROHIBITED! Do not remove the anti-tip wheels. www.pridemobility.com Jazzy 1107...
- Page 29 2. Tilt the foot plate to desired position. 3. Tighten the hardware. To change foot plate angle (D): 1. Turn the setscrew clockwise to decrease the angle. 2. Turn the setscrew counterclockwise to increase the angle. SETSCREW Figure 26. Multi-Axis Foot Plate (ELR Shown) Jazzy 1107 www.pridemobility.com...
-
Page 30: Batteries And Charging
The bat- OFF-BOARD CHARGER PORT tery boxes must be connected in order to charge them. See figure 27. Figure 27. Battery Boxes (Removed from Power Base) www.pridemobility.com Jazzy 1107... - Page 31 If you use your power chair infrequently (once a week or less), you should charge the batteries at least once per week for 12 to 14 hours. NOTE: Keep your batteries fully charged and avoid deeply discharging your batteries. Do not charge the batteries for more than 24 hours at a charging cycle. Jazzy 1107 www.pridemobility.com...
- Page 32 A fully charged deep-cycle battery will provide reliable performance and extended battery life. Keep your power chair’s batteries fully charged whenever possible. Batteries that are regularly and deeply discharged, infrequently charged, or stored without a full charge may be permanently damaged, causing unreliable power chair operation and limited battery life. www.pridemobility.com Jazzy 1107...
- Page 33 What about shipping? If you wish to use a freight company to ship your power chair to your final destination, repack your power chair in the original shipping container and ship the batteries in separate boxes. Jazzy 1107 www.pridemobility.com...
-
Page 34: Operation
Unless the joy- stick is damaged, this action should stop your power chair. Keypad The keypad is located in front of the joystick. It contains keys necessary to operate your power chair. See figure 29. Figure 28. FLIGHT Controller www.pridemobility.com Jazzy 1107... - Page 35 NOTE: We recommend that the first few times you operate your power chair, you set the speed to the slowest setting until you become familiar with your new power chair. Horn Key The horn key activates the horn. Jazzy 1107 www.pridemobility.com...
-
Page 36: Thermal Rollback
The parking brakes have a bad connection. Check the parking brake and motor connections. Make sure the controller connections are secure. An excessive voltage has been applied to the controller. This is usually caused by a poor battery connection. Check the battery connections. www.pridemobility.com Jazzy 1107... - Page 37 Figure 30. VSI Controller the joystick is damaged, this action should stop your power chair. Keypad The keypad is located in front of the joystick. It contains keys necessary to operate your power chair. See figure 31. Jazzy 1107 www.pridemobility.com...
- Page 38 If your power chair was programmed with a drive profile, contact your authorized Pride Provider for more information. NOTE: We recommend that the first few times you operate your power chair, you use the lowest speed setting until you become familiar with your new power chair. www.pridemobility.com Jazzy 1107...
-
Page 39: Controller Connector
See your authorized Pride Provider for more information. Actuator Connector (Optional) The actuator connector connects the VSI to optional powered systems such as elevating leg rests. Controller Connector The controller connector connects the VSI to the power chair’s batteries, motors, and motor brakes. Jazzy 1107 www.pridemobility.com... - Page 40 The parking brakes have a bad connection. Check the parking brake and motor connections. Make sure the controller connections are secure. An excessive voltage has been applied to the controller. This is usually caused by a poor battery connection. Check the battery connections. www.pridemobility.com Jazzy 1107...
-
Page 41: Remote Plus Controller
WARNING! Unless faced with an emergency situation, do not use the on/off key to stop the chair. This will cause the power chair to stop abruptly. WARNING! Always turn the power off when you are stationary to prevent unexpected movement. Jazzy 1107 www.pridemobility.com... - Page 42 “ripple up and down of lights,” turn off the controller and allow the joystick to return to the neutral position. Then turn on the controller. NOTE: If you still get “ripple up and down of lights”, contact your authorized Pride Provider. www.pridemobility.com Jazzy 1107...
-
Page 43: Sleep Mode
122° F, the voltage is reduced by 5 volts. This reduces your power chair’s speed and allows the electrical components to cool down. When the temperature returns to a safe level, your power chair resumes its normal speed. Jazzy 1107 www.pridemobility.com... - Page 44 Unplug charger. Check connections. Right Motor Wiring Fault Check right motor wiring. Right Motor Disconnected Check right motor wiring. Left Motor Wiring Fault Check left motor wiring. Left Motor Disconnected Check left motor wiring. Low Battery Voltage Check batteries/battery wiring. www.pridemobility.com Jazzy 1107...
-
Page 45: Care And Maintenance
Use a rubber conditioner on the tire sidewalls to help preserve them. WARNING! Never use a rubber conditioner on the tread area of the tires; doing so may make the tires slippery and cause your power chair to skid. Jazzy 1107 www.pridemobility.com... -
Page 46: Weekly Checks
Check the caster forks for damage or fluttering which indicates that they may need to be adjusted or have the bearings replaced. See your authorized Pride Provider for repair. n Keep your power chair clean and free of foreign material, such as mud, dirt, hair, food, drink, etc. www.pridemobility.com Jazzy 1107... -
Page 47: Cleaning Instructions
10. Reinstall the drive wheel nut onto the axle and tighten. 11. Inflate the pneumatic tire to 35 psi (2.4 bar) (if equipped with pneumatic tires). Figure 34. Jazzy 1107 Drive Wheel 12. Remove the power chair from the blocks. Jazzy 1107... -
Page 48: Battery Replacement
8. Reinstall the battery boxes onto the power base. Make sure that the battery box latches are in the up (locked) position. REAR BOX 9. Charge the batteries. See VI. “Batteries and Charging.” FRONT BOX Figure 35. Battery Boxes Figure 36. Battery Wiring Diagram www.pridemobility.com Jazzy 1107... - Page 49 Disconnect both batteries before load testing and follow the directions that come with the load tester. If either one of the batteries fails the load test, replace both of them. If your power chair still does not power up, contact your authorized Pride Provider. Jazzy 1107 www.pridemobility.com...
-
Page 50: Warranty
Circumstances beyond the control of Pride n Labor, service calls, shipping, and other charges incurred for repair of the product, unless specifically authorized by Pride Mobility Products Corporation n Repairs and/or modifications made to any part without specific consent from Pride *There is a one year warranty for the electronic function of the brakes. - Page 51 This warranty gives you specific rights, and you may also have other rights which vary from state to state. Please fill out and return the product registration card to Pride. This will aid Pride in providing the best possible technical and customer service. Jazzy 1107 www.pridemobility.com...
- Page 52 N O T E S www.pridemobility.com Jazzy 1107...
- Page 53 N O T E S Jazzy 1107 www.pridemobility.com...
- Page 54 N O T E S www.pridemobility.com Jazzy 1107...
- Page 55 Quality Control- 1107 Thank you for making the Pride Jazzy your choice in power chairs. We have thoroughly inspected your power chair. The following checkmarks indicate that it has been test driven and inspected. Controller Controller Serial # Joystick Serial # Inclusion of all Parts Fit and Finish Performance...