
Related Manuals for Panasonic SC-PM10


Summary of Contents for Panasonic SC-PM10
-
Page 1: Operating Instructions
CD Stereo System Operating Instructions SC-PM10 Model No. Before connecting, operating or adjusting this product, please read these instructions completely. Please keep this manual for future reference. RQT6675-1P... -
Page 2: Table Of Contents
Supplied accessories ..........These operating instructions are applicable to the following system. IMPORTANT SAFETY INSTRUCTIONS ..... Listening caution ............Placement of speakers ..........System SC-PM10 The remote control ............. Connections ..............Main unit SA-PM10 Front panel controls ........... Speakers SB-PM10 Setting the time ............ -
Page 3: Supplied Accessories
Supplied accessories Please check and identify the supplied accessories. Use numbers indicated in parentheses CAUTION: TO REDUCE THE RISK OF ELECTRIC when asking for replacement parts. SHOCK, DO NOT REMOVE SCREWS. NO USER-SERVICEABLE PARTS INSIDE. AC power supply cord ........1 pc. REFER SERVICING TO QUALIFIED SERVICE PERSONNEL. -
Page 4: Important Safety Instructions
IMPORTANT SAFETY INSTRUCTIONS Read these operating instructions carefully before using the unit. Follow the safety instructions on the unit and the safety precautions listed below. Keep these operating instructions handy for future reference. 3. Power lines—Take care when setting up an outdoor Safety antenna that it is not near overhead power lines, elec- tric lights, or electrical circuits, and that there is no dan-... -
Page 5: Listening Caution
Listening caution The remote control Battery installation R6, AA, UM-3 EST. 1924 Selecting fine audio equipment such as the unit you’ve just purchased is only the start of your musical enjoyment. Now it’s time to consider how you can maximize the fun and ex- citement your equipment offers. -
Page 6: Connections
Connections • Plug the AC power supply cord into a household AC outlet socket only after all other connections have been made. • To prepare the AM loop antenna wire and speaker cords, twist the vinyl cover tip and pull off. Connect the FM indoor antenna. - Page 7 Connections FM outdoor antenna Optional antenna connections (not included) You may need an outdoor antenna if you use this system in a mountainous region or inside a reinforced-concrete building, etc. FM outdoor antenna ") Disconnect the FM indoor antenna if an FM outdoor Shield braid antenna is installed.
-
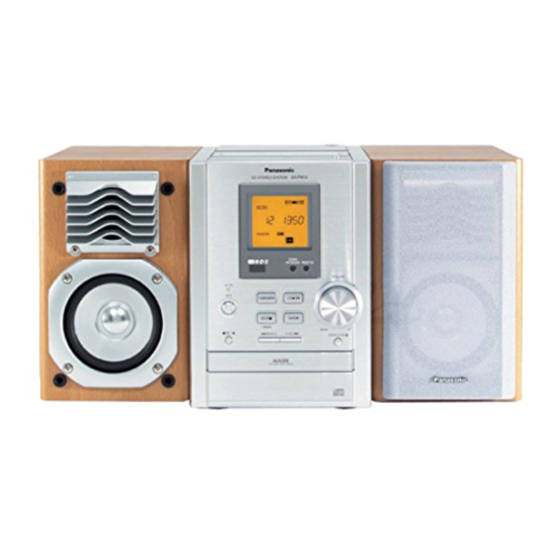
Page 8: Front Panel Controls
Front panel controls PHONES Main unit Headphone jack (PHONES) ........19 Top of the Cassette lid unit Cassette eject button (OPEN c) ......15 Display Tuner/band select button (TUNER/BAND) ..... 10 Remote control signal sensor AC supply indicator (AC IN) OPEN This indicator lights when the unit is connected to the AC power supply. -
Page 9: Setting The Time
Setting the time CL CLOCK CK PLAY SLEEP SLEEP TIMER TIMER PROGRAM/ PROGRAM/ CLEAR CLEAR by remote control only CD PLA CD PLAY MODE MODE This is a 12-hour clock. CD REC CD REC MODE MODE The example shows how to set the clock for 6:30 pm. Press [y y y y y ] to turn the unit on. -
Page 10: The Radio: Manual Tuning
The radio: manual tuning Press [TUNER/BAND] to select “FM” or “AM”. The unit comes on automatically. Every time you press the button: CL CLOCK PLAY SLEEP SLEEP TIMER TIMER PROGRAM/ PROGRAM/ CLEAR CLEAR Press [TUNE MODE] on the remote control to CD PLA CD PLAY MODE... -
Page 11: The Radio: Preset Tuning
The radio: preset tuning by remote control only There are two methods of presetting stations. Automatic presetting: All the stations the tuner can receive are preset. Manual presetting: You can select the stations to preset and the order they are preset in. -
Page 12: Cds
This unit can play CD-DA (digital audio) format audio CD-R and CD-RW that have been finalized (a process that enables CD-R/CD-RW players to play audio CD-R and CD-RW) upon completion of recording. It may not be able to play some CD-R or CD-RW due to the condition of the recording. - Page 13 by remote control only CL CLOCK CK PLAY SLEEP SLEEP TIMER TIMER PROGRAM/ PROGRAM/ CLEAR CLEAR Direct access play CD PLA CD PLAY MODE MODE CD REC CD REC MODE MODE Direct access allows you to start normal play from a specific track to the last track on the CD.
- Page 14 CL CLOCK CK PLAY SLEEP SLEEP TIMER TIMER Program play PROGRAM/ PROGRAM/ CLEAR CD PLA CD PLAY MODE by remote control only CD PLAY CD REC CD REC MODE MODE This function allows you to program up to 36 tracks. Press [STOP L] to select the CD mode.
-
Page 15: Cassette Tapes
Cassette tapes Press [OPEN c], insert a cassette with the tape facing in. When the button is pressed, the unit comes on automatically. Make sure the cassette is fully inserted and close the lid by hand. Press [TAPE 3] to start playback. One side is played, then playback stops automatically. -
Page 16: Before Recording
Before recording Side A Types of tapes which can be recorded correctly Use normal position tapes. High position and metal position tapes can be used, but the Tab for side B Tab for side A unit will not be able to record or erase them correctly. To re-record Normal tape Erasure prevention... -
Page 17: Recording Cds
Recording CDs Normal recording • Tracks are recorded in the order in which they are found on the CD. • Tracks are cut in the middle when the end of the tape is reached. • You can record from any point on the tape. Insert the cassette to be recorded on. - Page 18 Recording CDs ALL-REC You can record the whole CD with the ALL-REC function. It is not necessary to rewind the cassette. Recording always CLOCK PLAY SLEEP SLEEP TIMER TIMER PROGRAM/ PROGRAM/ begins from the beginning of the side facing up. CLEAR CLEAR CD PLA...
-
Page 19: Sound Quality
Sound Quality Using the built-in sound quality settings You can choose one of four types of sound quality. HEAVY: Adds punch to rock SOFT: For background music CLEAR: Clarifies higher sounds VOCAL: Adds gloss to vocal Press [PRESET EQ] to select a setting. Each time you press the button: HEAVY SOFT... -
Page 20: Using The Timers
Using the timers Using the play/record timer CL CLOCK CK PLAY SLEEP SLEEP TIMER TIMER by remote control only PROGRAM/ PROGRAM/ CLEAR CD PLA CD PLAY The timer has two functions. It can be set to on at a certain MODE CD REC CD REC... - Page 21 Using the timers Using the play/record timer CL CLOCK CK PLAY SLEEP SLEEP TIMER TIMER CLOCK/ PROGRAM/ PROGRAM/ CLEAR CLEAR TIMER by remote control only CD PLA CD PLAY MODE MODE CD REC CD REC MODE MODE To check the settings Press [CLOCK/ TIMER].
-
Page 22: Troubleshooting Guide
Before requesting service, make the below checks. If you are in doubt about some of the check points, or if the reme- dies indicated in the chart do not solve the problem, contact the Panasonic Canada Inc. Customer Care Centre at 905-624-5505, or visit the website (www.panasonic.ca), or an authorized Servicentre closest to you. -
Page 23: Warranty
Warranty RQT6675... -
Page 24: Specifications
˝ x 9 ˝) operation: Mass 1.95 kg (4.33 lb.) GENERAL Contact the Panasonic Canada Inc. Customer Care Power supply AC 120 V, 60 Hz Centre at 905-624-5505, or visit the website Power consumption 38 W (www.panasonic.ca), or an authorized Servicentre...