Lincoln Electric IDEALARC DC-600 Operator's Manual
Hide thumbs
Also See for IDEALARC DC-600:
- Service manual (121 pages) ,
- Operator's manual (56 pages) ,
- Operating manual (48 pages)
Table of Contents
Advertisement
For use with machines having Code Numbers:
This manual covers equipment which is no
longer in production by The Lincoln Electric Co.
Speci cations and availability of optional
features may have changed.
Safety Depends on You
Lincoln arc welding and cutting
equipment is designed and built
with safety in mind. However, your
overall safety can be increased by
proper installation ... and thought-
ful operation on your part. DO
NOT INSTALL, OPERATE OR
REPAIR THIS EQUIPMENT
WITHOUT
READING
MANUAL AND THE SAFETY
PRECAUTIONS CONTAINED
THROUGHOUT. And, most
importantly, think before you act
and be careful.
World's Leader in Welding and Cutting Products
• Sales and Service through Subsidiaries and Distributors Worldwide •
Cleveland, Ohio 44117-1199 U.S.A. TEL: 216.481.8100 FAX: 216.486.1751 WEB SITE: www.lincolnelectric.com
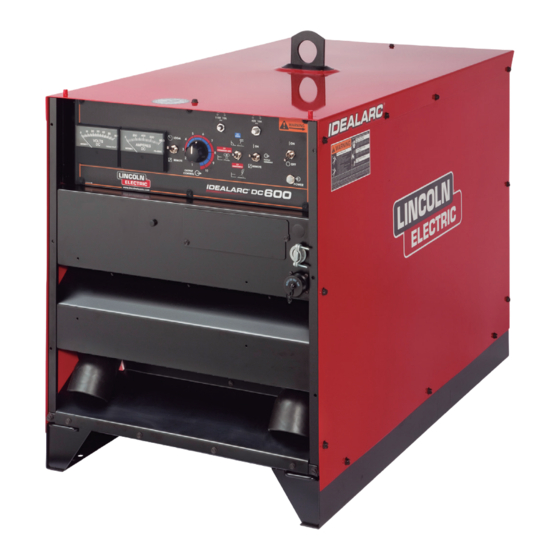
IDEALARC DC-600
9773 to 10419
8213; 8222; 8223; 8224; 8225; 8249; 8250; 8251; 8252; 8253; 8262; 8268; 8273; 8274; 8288; 8289;
8295; 8298; 8301; 8304; 8315; 8318; 8324; 8353; 8380; 8549; 8555; 8584; 8692; 8693; 8694; 8695;
8702; 8722; 8728; 8738; 8764; 8782; 8789; 8825; 8902; 8904; 8906; 8907; 8911; 8934; 8954; 8988;
9080; 9093; 9130; 9158; 9170; 9171; 9353; 9354; 9355; 9356; 9357; 9358; 9359; 9360; 9361; 9362;
9363; 9364; 9384; 9385; 9463; 9464; 9465; 9470; 9483; 9607; 9620; 9621; 9716; 9717; 9773; 9774;
9775; 9776; 9777; 9778; 9779; 9780; 9781; 9782; 9793; 9832; 9910; 10159; 10282; 10283; 10334;
10335; 10407; 10408; 10409; 10410; 10411; 10412; 10413; 10414; 10415; 10416; 10417; 10418;
10419
THIS
OPERATOR'S MANUAL
®
Premier Manufacturer of Industrial Motors
IM306-C
March, 1999
Advertisement
Table of Contents
Troubleshooting

Related Manuals for Lincoln Electric IDEALARC DC-600


Summary of Contents for Lincoln Electric IDEALARC DC-600
- Page 1 8702; 8722; 8728; 8738; 8764; 8782; 8789; 8825; 8902; 8904; 8906; 8907; 8911; 8934; 8954; 8988; longer in production by The Lincoln Electric Co. 9080; 9093; 9130; 9158; 9170; 9171; 9353; 9354; 9355; 9356; 9357; 9358; 9359; 9360; 9361; 9362;...
-
Page 2: California Proposition 65 Warnings
351040, Miami, Florida 33135 or CSA Standard W117.2-1974. A Free copy of “Arc Welding Safety” booklet E205 is available from the Lincoln Electric Company, 22801 St. Clair Avenue, Cleveland, Ohio 44117-1199. BE SURE THAT ALL INSTALLATION, OPERATION, MAINTENANCE AND REPAIR PROCEDURES ARE PERFORMED ONLY BY QUALIFIED INDIVIDUALS. -
Page 3: Electric Shock Can Kill
SAFETY ARC RAYS can burn. ELECTRIC SHOCK can 4.a. Use a shield with the proper filter and cover kill. plates to protect your eyes from sparks and 3.a. The electrode and work (or ground) circuits the rays of the arc when welding or observing are electrically “hot”... - Page 4 SAFETY WELDING SPARKS can CYLINDER may explode cause fire or explosion. if damaged. 6.a. Remove fire hazards from the welding area. 7.a. Use only compressed gas cylinders If this is not possible, cover them to prevent containing the correct shielding gas for the the welding sparks from starting a fire.
- Page 5 SAFETY zones où l’on pique le laitier. PRÉCAUTIONS DE SÛRETÉ 6. Eloigner les matériaux inflammables ou les recouvrir afin de Pour votre propre protection lire et observer toutes les instructions prévenir tout risque d’incendie dû aux étincelles. et les précautions de sûreté specifiques qui parraissent dans ce manuel aussi bien que les précautions de sûreté...
- Page 6 QUALITY product by Lincoln Electric. We want you Thank You to take pride in operating this Lincoln Electric Company product ••• as much pride as we have in bringing this product to you! Please Examine Carton and Equipment For Damage Immediately When this equipment is shipped, title passes to the purchaser upon receipt by the carrier.
-
Page 7: Table Of Contents
TABLE OF CONTENTS Page Installation .......................Section A Technical Specifications ..................... A-1 Safety Precautions ..................... A-2 Select Proper Location....................A-2 Stacking .........................A-2 Tilting ........................A-2 Electrical Input Connections ..................A-3 Fuses and Wire Sizes....................A-3 Ground Connection ....................A-3 Input Power Supply Connections................A-3 Reconnect Procedure ....................A-4 Output Connections .................... - Page 8 TABLE OF CONTENTS Page Maintenance ....................Section D Safety Precautions ....................D-1 Routine and Periodic Maintenance................D-2 3-D Exploded View ....................D-3 Troubleshooting ....................Section E Safety Precautions....................E-1 How to Use Troubleshooting Guide...............E-1 Troubleshooting Guide ..................E-2 Wiring Diagrams ....................Section F Parts List ......................P282 Series...
-
Page 9: Installation
INSTALLATION TECHNICAL SPECIFICATIONS - IDEALARC DC-600 INPUT - THREE PHASE ONLY Input Current at Rated Output Standard Voltage 208/230/416/460/575/3/60 125/113/63/57/45 RATED OUTPUT Duty Cycle AMPS Volts at Rated Amps 100% OUTPUT Mode Maximum Open Auxiliary Power Current Circuit Voltage Range... -
Page 10: Safety Precautions
Front of each machine flush with each other. See Figure A.1. • Set the IDEALARC DC-600 Power ON/OFF PUSH BUTTON to the OFF position when connecting power cord to input power. __________________ SELECT PROPER LOCATION STACKING HOLE... -
Page 11: Electrical Input Connections
Case Back of the machine near the input contac- Connections tor. Access to the Input Box Assembly is at the upper rear of the machine. See your local and national elec- trical codes for proper grounding methods. IDEALARC DC-600... -
Page 12: Reconnect Procedure
THE CRI CONTACTOR AS SHOWN. 4. CONNECT TERMINAL MARKED TO GROUND PER LOCAL AND NATIONAL ELECTRIC CODES. 5. MOUNT THE LINKS IN THE POSITIONS SHOWN WITH THE PROVIDED HEX NUTS. PILOT TRANSF. FIGURE A.4-Reconnect Panel Board Positions for Dual Voltage Machines IDEALARC DC-600... - Page 13 5. REMOVE THE HEX NUTS AND POSITION LINKS AS SHOWN. REPLACE AND TIGHTEN 5. REMOVE THE HEX NUTS AND POSITION LINKS AS SHOWN, REPLACE AND TIGHTEN ALL HEX NUTS ALL HEX NUTS FIGURE A.6-Reconnect Panel Board Positions for 380/500, 460/575 VAC Machines IDEALARC DC-600...
- Page 14 3. CONNECT THE L1, L2, & L3 INPUT SUPPLY LINES TO INPUT SIDE OF THE CRI CONTACTOR AS SHOWN. INPUT CONTACTOR FIGURE A.7-Reconnect Panel Board Positions for Single Voltage Machines FIGURE A.8-Reconnect Panel Board Positions for 230/460/575 VAC Machines IDEALARC DC-600...
-
Page 15: Output Connections
INSTALLATION OUTPUT CONNECTIONS See Table A.1 for recommended IDEALARC DC-600 cable sizes for combined lengths of electrode and work cables. TABLE A.1 IDEALARC DC-600 Cable Sizes for Combined Lengths of Electrode and Work Cable (Copper) at 100% Duty Cycle Cable Length... -
Page 16: Connection For Stick Welding And Air Carbon Arc
Tractors for both stick welding and air/carbon arc cutting. • LT-56 NOTE: To use the IDEALARC DC-600 for both stick welding / air/carbon arc cutting, AND semi-automatic / Connection for Stick Welding and Air/Carbon automatic welding, the optional Multi-Process Switch Arc Cutting Operation (K804) must be used. -
Page 17: Operation
• Keep flammable material away. • Do not weld, cut or gouge on containers that have held combustibles. ARC RAYS can burn. • Wear eye, ear and body protection. Observe additional Safety Guidelines detailed in the beginning of this manual. IDEALARC DC-600... -
Page 18: General Description
OPERATION GENERAL DESCRIPTION OPERATIONAL FEATURES AND CONTROLS The IDEALARC DC-600 is an SCR controlled three phase welding and cutting power source. It uses a The IDEALARC DC-600 comes with the following single range potentiometer to control: standard controls: • Submerged Arc Semi-Automatic or Automatic •... -
Page 19: Welding Capability
_____________________________________ WELDING CAPABILITY The IDEALARC DC-600 has the following duty cycle ratings: If the duty cycle is exceeded, a thermal protector will shut off the output of the machine until it cools to the normal operating temperature. Duty Cycle... -
Page 20: Controls And Settings
OPERATION CONTROLS AND SETTINGS All operator controls and adjustments are located on the Case Front Assembly of the IDEALARC DC-600. See Figure B.1 for the location of each control. AMMETER 8. VOLTMETER WELDING MODE OUTPUT CONTROL (optional) (optional) SWITCH SWITCH... -
Page 21: Operating Steps
750 amps with excellent arc control. The welder protection circuit 6. Make the weld (NOTE: Terminal #2 and #4 must protects the machine from extremely high short cir- be connected together to energize the machine cuiting pulses. output). IDEALARC DC-600... -
Page 22: Semi-Automatic And Automatic Wire Feeding
Control is set too low. This can cause the elec- trode to stub. GOOD ARC STRIKING GUIDELINES FOR THE NA- 3 WITH THE IDEALARC DC-600 IN THE CV 4. Start and make the weld. INNERSHIELD, CV SUBMERGED ARC OR CC STICK WELDING MODES. - Page 23 OPERATION ARC STRIKING WITH IDEALARC DC-600 AND THE 6. Establish the correct arc striking procedure with NA-3 START BOARD the NA-3 Start Board timer set at maximum. When electrical strikeouts exceed 1 3/4” (44.4mm) an a. For the best starting performance, the NA-3...
-
Page 24: Ln-8 Semi-Automatic Wire Feeder
To use the LN-8 Semi-Automatic Wire Feeder with WIRE FEEDER IDEALARC DC-600 When using the IDEALARC DC-600 with the NA-5 1. Set the IDEALARC DC-600 WELDING MODE wire feeder, set the controls on the IDEALARC DC- SWITCH to either CV Innershield mode or CV... -
Page 25: Ln-9 Semi-Automatic Wire Feeders
Follow these steps to install the MULTI-PROCESS SWITCH: MULTI-PROCESS SWITCH 1. Confirm that the IDEALARC DC-600 ON/OFF PUSH BUTTON is in the OFF position. The MULTI-PROCESS SWITCH gives you the ability 2. Disconnect main AC input power to the IDE- •... - Page 26 See Figure C.3. 11. Connect the right cable from the MULTI- MULTI- PROCESS SWITCH (facing the front of the PROCESS machine) to the IDEALARC DC-600 positive (+) SELF TAPPING SWITCH output terminal. See Figure C.4. SCREWS...
-
Page 27: Undercarriage
See connection diagrams for details. UNDERCARRIAGE (K817P, K842) 14. Connect wire feeder control cable to the terminal The IDEALARC DC-600 is designed for use with the strip of the IDEALARC DC-600. Lincoln K817P, or K842 Undercarriage. Complete installation instructions are included with the under- NOTE: Connect the control cable ground lead to carriage. - Page 28 1. Disconnect main AC input power to the IDE- use. ALARC DC-600. NOTE: The connection diagram shown in Figure C.5 2. Set IDEALARC DC-600 ON/OFF PUSH BUTTON shows the electrode connected for positive polarity. to OFF. To change polarity: a. Set the IDEALARC DC-600 ON/OFF PUSH 3.
- Page 29 An S-16586- X remote voltage sensing work ALARC DC-600. lead is available for this purpose. 2. Set the IDEALARC DC-600 ON/OFF PUSH c. Keep the # 21 lead electrically separate from BUTTON to OFF. the work cable circuit and connection.
- Page 30 CABLE 1. Disconnect AC input power to the IDEALARC DC- TO INPUT CABLE 600. 2. Set the IDEALARC DC-600 ON/OFF PUSH BUTTON to OFF. 21 4 2 31 32 75 76 77 80 81 3. Connect the wire feeder control cable leads to the IDEALARC DC-600 terminal strip as shown in Figure C.7.
- Page 31 IDEALARC DC-600. c. Keep the #21 lead electrically separate from the work cable circuit and connection. 2. Set the IDEALARC DC-600 ON/OFF PUSH BUTTON to OFF. d. Tape the #21 lead to work cable for ease of 3. Connect the wire feeder control cable leads to the use.
-
Page 32: Maintenance
SAFETY PRECAUTIONS WARNING ELECTRIC SHOCK CAN KILL. Only qualified personnel should perform this maintenance. Turn the input power OFF at the disconnect switch or fuse box before working on this equipment. Do not touch electrically hot parts. __________________ IDEALARC DC-600... -
Page 33: Routine And Periodic Maintenance
Main transformer and choke. • Electrode and work cable connections. • SCR rectifier bridge and heat sink fins. • Control board. • Firing board. • Fan Assembly. NOTE: The fan motor has sealed bearings which require no maintenance. IDEALARC DC-600... - Page 34 MAINTENANCE FIGURE D.1 - General Assembly Exploded View IDEALARC DC-600...
-
Page 35: Troubleshooting
HOW TO USE TROUBLESHOOTING GUIDE WARNING Service and Repair should only be performed by Lincoln Electric Factory Trained Personnel. Unauthorized repairs performed on this equipment may result in danger to the technician and machine operator and will invalidate your factory warranty. For your safety and to avoid Electrical Shock, please observe all safety notes and precautions detailed throughout this manual. -
Page 36: Pc Board Troubleshooting Procedures
CAUTION: Sometimes machine failures appear to be due to PC board failures. These - If you return a P.C. Board to The Lincoln problems can sometimes be traced to poor Electric Company for credit, it must be in the electrical connections. -
Page 37: Troubleshooting Guide
CAUTION If for any reason you do not understand the test procedures or are unable to perform the tests/repairs safely, contact your Local Lincoln Authorized Field Service Facility for technical troubleshooting assistance before you proceed. IDEALARC DC-600... - Page 38 DC600. CAUTION If for any reason you do not understand the test procedures or are unable to perform the tests/repairs safely, contact your Local Lincoln Authorized Field Service Facility for technical troubleshooting assistance before you proceed. IDEALARC DC-600...
- Page 39 4. Check for loose or faulty weld cable connections. CAUTION If for any reason you do not understand the test procedures or are unable to perform the tests/repairs safely, contact your Local Lincoln Authorized Field Service Facility for technical troubleshooting assistance before you proceed. IDEALARC DC-600...
- Page 40 CAUTION If for any reason you do not understand the test procedures or are unable to perform the tests/repairs safely, contact your Local Lincoln Authorized Field Service Facility for technical troubleshooting assistance before you proceed. IDEALARC DC-600...
- Page 41 CAUTION If for any reason you do not understand the test procedures or are unable to perform the tests/repairs safely, contact your Local Lincoln Authorized Field Service Facility for technical troubleshooting assistance before you proceed. IDEALARC DC-600...
- Page 42 Authorized Field Ser vice Facility. CAUTION If for any reason you do not understand the test procedures or are unable to perform the tests/repairs safely, contact your Local Lincoln Authorized Field Service Facility for technical troubleshooting assistance before you proceed. IDEALARC DC-600...
- Page 43 DC600. CAUTION If for any reason you do not understand the test procedures or are unable to perform the tests/repairs safely, contact your Local Lincoln Authorized Field Service Facility for technical troubleshooting assistance before you proceed. IDEALARC DC-600...
- Page 44 2. Check weld cables for loose or faulty connections. CAUTION If for any reason you do not understand the test procedures or are unable to perform the tests/repairs safely, contact your Local Lincoln Authorized Field Service Facility for technical troubleshooting assistance before you proceed. IDEALARC DC-600...
- Page 45 CAUTION If for any reason you do not understand the test procedures or are unable to perform the tests/repairs safely, contact your Local Lincoln Authorized Field Service Facility for technical troubleshooting assistance before you proceed. IDEALARC DC-600...
- Page 46 DIAGRAMS IDEALARC DC-600...
- Page 47 DIAGRAMS IDEALARC DC-600...
- Page 48 DIAGRAMS IDEALARC DC-600...
- Page 49 NOTES IDEALARC DC-600...
- Page 50 NOTES IDEALARC DC-600...
- Page 51 Month Year USE THIS FORM TO ORDER: Order from: BOOK DIVISION, The Lincoln Electric Company, 22801 St. Clair Avenue, Cleveland, Ohio 44117-1199 for fastest service, FAX this completed form to: 216-361-5901 BOOKS OR FREE INFORMATIVE CATALOGS Telephone: 216-383-2211 or, Lincoln Welding School...
- Page 52 ● ● ● Do not touch electrically live parts or Keep flammable materials away. Wear eye, ear and body protection. WARNING electrode with skin or wet clothing. ● Insulate yourself from work and ground. Spanish ● ● ● No toque las partes o los electrodos Mantenga el material combustible Protéjase los ojos, los oídos y el AVISO DE...
- Page 53 ● ● ● Keep your head out of fumes. Turn power off before servicing. Do not operate with panel open or ● WARNING Use ventilation or exhaust to guards off. remove fumes from breathing zone. ● Spanish Los humos fuera de la zona de res- ●...
-
Page 54: Limited Warranty
Service Facility about any defect claimed under Lincoln’s that it will be free of defects in workmanship and material. warranty. This warranty is void if Lincoln or its Authorized Service Facility finds that the equipment has been subjected to Determination of warranty on welding and cutting equip- improper installation, improper care or abnormal opera- ment will be made by Lincoln or Lincoln’s Authorized...