Table of Contents
Advertisement
Advertisement
Table of Contents

Related Manuals for Chamberlain LM60K-MB


Summary of Contents for Chamberlain LM60K-MB
- Page 1 Instructions – Garage Door Operator Model LM60K-MB / LM60R-MB 114A3356...
-
Page 2: Table Of Contents
Start by Reading These Important Safety Instructions Failure to comply with the following instructions may result in serious personal injury or property damage. • Read these instructions carefully • The garage door opener is designed and tested to offer reasonable safe service provided it is installed and operated in strict accordance with the instructions in this manual. -
Page 3: Door Types
(9) Light Lens The Protector System™ (30(8)) required for 3m length doors. (2) Idler Pulley Bracket (10) Manual Release Canopy door – Special door arm (E, The Liftmaster Arm) The Protector System™ (30(8)) required. See your dealer. Rope & Handle (3) Trolley The Liftmaster Arm. -
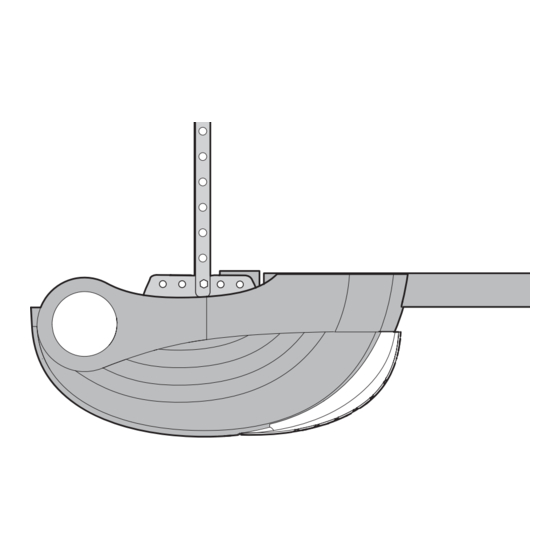
Page 4: Attach Sprocket Cover
Install the Chain/Belt Fasten Rail to Opener and Install Chain/Belt Remove chain/belt from carton and lay chain out on floor (do not allow chain/belt to twist). Remove four washered bolts (1) from top of opener. Place rail (2) on A. Chain: Push pins of master link bar (3) through chain link (4) and opener, flush with stop (3) on top of opener. -
Page 5: Installation Section
INSTALLATION SECTION Install the Header Bracket Wear protective goggles when working overhead to protect your NOTE: Refer to vertical center and horizontal lines created in step eyes from injury. 12 for proper placement of header bracket. Disengage all existing garage door locks to avoid damage to the A. -
Page 6: Position The Opener
Position the Opener Attach Emergency Release Rope & Handle NOTE: A 25mm (1") board (1) is convenient for setting an ideal Thread one end of rope (1) through hole in top door-to-rail distance (unless headroom is not sufficient). of red handle so "NOTICE" reads right side up as shown (3). -
Page 7: Fasten Door Bracket
Fasten Door Bracket Assemble Door Arm A. ONE-PIECE DOOR INSTALLATION: If you have a canopy garage door, a door arm conversion kit is required. Follow the installation instructions included with the replacement door Fasten the straight (1) and curved (2) door arm sections together to arm. - Page 8 Install Door Control Program your Opener & Remote Locate door control where the garage door is visible, away from Activate the opener only when door is in full view, free of door and door hardware and out of the reach of children. Mount obstruction and properly adjusted.
-
Page 9: Using The Wall-Mounted Door Control
Using the Wall-Mounted Door Control Program your Keyless Entry Activate the opener only when door is in full view, free of THE MULTI-FUNCTION DOOR CONTROL obstruction and properly adjusted. No one should enter or leave garage while door is in motion. Do not allow children to operate Press the push bar (1) to open or close the door. -
Page 10: Special Features
(8) Model 770E The Protector System™ reverse on contact with a 40mm obstacle laid flat on the floor. (9) Model 1703E The Liftmaster Arm™ Failure to properly adjust opener may result in serious personal (10) Model FLA230 Flashing Light Kit injury from a closing garage door. -
Page 11: Replacement Parts
31 32 Replacement Parts 41A5639-7 31D533 41B4616 10A20 41A5843 41B4494-1 41A5801 41A2828 41A5887 12C810 83A11 31D536 12C777 178B34 183D177 12C778 183D178 210C42 12C855 41A5643-3 178B35 12B374 146A112 12B380 144C77 216A206 4A1008 1/2” 109A46 1” 41A5800 178B69 114A3356... - Page 12 31 32 Replacement Parts 158A49 41A589-1 41A5797 41A5908 41A5734C 111A79 41D577 108C83 114A3356...
-
Page 13: Having A Problem
HAVING A PROBLEM? HAVING A PROBLEM? (CONT.) 1. Opener doesn't operate from either door control or remote: 12. Opener strains: • Does the opener have electric power? Plug lamp into outlet. If it Door may be unbalanced or springs are broken. Close door and use doesn't light, check the fuse box or the circuit breaker. -
Page 14: Care Of Your Opener
The door can be opened manually by pulling the release handle down SPECIAL NOTE: Liftmaster strongly recommends that the protector and back (toward the opener). To reconnect the door, pull the release system be installed on all garage door openers. - Page 15 A product under warranty which is determined to be defective in materials and/or workmanship will be repaired or replaced (at Liftmaster's option) at no cost to the owner for the repair and/or replacement parts and/or product. Defective parts will be repaired or replaced with new or factory rebuilt parts at Liftmaster's option.
- Page 16 114A3356 © 2006, All rights reserved...