Table of Contents
Advertisement
Quick Links
Advertisement
Table of Contents
Troubleshooting

Related Manuals for Symbol MK2200 MicroKiosk


Summary of Contents for Symbol MK2200 MicroKiosk
- Page 1 MK2200 MicroKiosk for CE .NET 4.2 Product Reference Guide...
- Page 3 MK2200 MicroKiosk for CE .NET 4.2 Product Reference Guide 72E-87925-01 Revision A August 2006...
- Page 4 Symbol reserves the right to make changes to any software or product to improve reliability, function, or design. Symbol does not assume any product liability arising out of, or in connection with, the application or use of any product, circuit, or application described herein.
-
Page 5: Table Of Contents
Introduction ........................xi Chapter Descriptions ..................... xi Notational Conventions....................xii Related Publications ...................... xii Service Information ......................xiii Symbol Global Customer Interaction Center ............xiii Chapter 1: MK2200 Introduction Overview ........................1-1 MK2200 Configurations ....................1-1 MK2200 Parts ....................... 1-2 Touch Screen LCD .................... - Page 6 MK2200 MicroKiosk for CE .NET 4.2 Product Reference Guide Chapter 2: Installation Overview ........................2-1 Unpacking the MK2200 ....................2-1 Installation Overview ..................... 2-2 MK2200 Mounting ......................2-2 MK2200 Wall Mounting Options ................2-3 Pole Mounting ......................2-6 Connecting the MK2200 ....................2-7 AC Power Supply ....................
- Page 7 Automated Staging/Configuring/Provisioning of Networked Devices ......4-2 Remote Monitoring ......................4-2 Remotely Initiating Select Device Functionality ............4-2 Installing the Symbol Remote Device Manager ............4-3 Symbol Remote Device Manager Main Screen ............4-5 Symbol Remote Device Manager Menus ..............4-5 Symbol Remote Device Manager Toolbar ..............
- Page 8 MK2200 MicroKiosk for CE .NET 4.2 Product Reference Guide Web Kiosk Software Suite .................... 6-2 Web Kiosk Software Suite Bar Codes ..............6-2 Installing the Web Kiosk Software Suite ..............6-2 Disabling and Restoring the Web Kiosk Software Suite ......... 6-4 Starting and Exiting the Web Kiosk Software Suite ..........
- Page 9 Table of Contents Price Verification ..................... 7-7 Loyalty Program ...................... 7-7 Guided Selling Tool (Fitting Guide) ................. 7-8 CD Listening Station ....................7-8 Store Operations Screen ....................7-9 In-Store Messaging ....................7-9 C# KSS Source Code Index ..................7-12 Scan Engine Control ....................7-12 Screen Layout ......................
- Page 10 MK2200 MicroKiosk for CE .NET 4.2 Product Reference Guide Microsoft WordPad ....................... 8-18 Windows Media Player ....................8-19 Internet Explorer ......................8-19 Browsing the Web ....................8-20 Printer Object Test ......................8-21 MSR Object Test ......................8-22 Scanner Object Test ..................... 8-23 Audio Object Test ......................
- Page 11 Table of Contents Glue Stick ........................D-3 Transparent Tape ......................D-3 Standard Staples ......................D-4 Tylenol .......................... D-4 Rolaids .......................... D-5 CD ..........................D-5 Color Printer - Ink Cartridge ..................D-6 KichenAid Mixer ......................D-6 Employee Badge ......................D-7 Loyalty Card ........................D-7 2D Bar Code (PDF417) ....................
- Page 12 MK2200 MicroKiosk for CE .NET 4.2 Product Reference Guide Calibrating the Screen ................... G-10 Update Corona Scanner Engine Firmware ............. G-11 Appendix H: Troubleshooting Overview ........................H-1 Troubleshooting Notes .................... H-1 Troubleshooting ...................... H-1 OS Upgrade Troubleshooting ................. H-5 MK2200 Version Information .................. H-6 Appendix I: Setting Scanner Parameters Overview ........................
-
Page 13: About This Guide
About This Guide About This Guide Introduction The MK2200 MicroKiosk for CE .NET 4.2 Product Reference Guide provides information on installing, operating, and programming the MK2200. Unless otherwise noted, the term MK2200 refers to all configurations of the device. NOTE Chapter Descriptions Following are brief descriptions of each chapter in this guide. -
Page 14: Notational Conventions
MK2200 MicroKiosk for CE .NET 4.2 Product Reference Guide • Appendix E, C# Kiosk Software Suite Bar Codes, provides sample bar codes used with the C# Kiosk Software Suite. • Appendix F, Terminal Configuration Manager, provides an overview of the Terminal Configuration Manager (TCM), used to specify and load files into the MK2200 flash memory using the MK2200 Initial Program Loader (IPL). -
Page 15: Service Information
Call the Global Customer Interaction Center from a phone near the equipment so that the service person can try to talk you through the problem. If the equipment is found to be working properly and the problem is symbol readability, the Center will request samples of your bar codes for analysis at our plant. - Page 16 MK2200 MicroKiosk for CE .NET 4.2 Product Reference Guide...
-
Page 17: Chapter 1 Mk2200 Introduction
Chapter 1 MK2200 Introduction Overview The MK2200 MicroKiosk provides retail consumers access to data critical to making an informed purchasing decision. The MK2200 verifies prices on bar coded merchandise and obtains up-to-the-minute information on in-store promotions. Its large, easy-to-read display can be used as an electronic billboard for instant in-store merchandising and multimedia presentations to promote seasonal sales and upcoming events. -
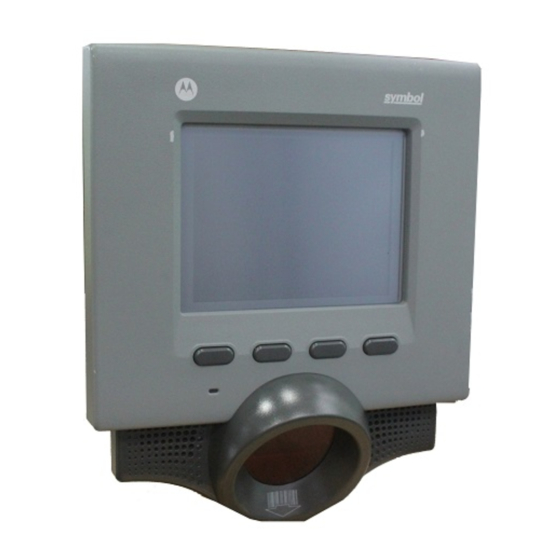
Page 18: Mk2200 Parts
1 - 2 MK2200 MicroKiosk for CE .NET 4.2 Product Reference Guide MK2200 Parts MK2200 parts include: Touch screen • Speakers and microphone • Scanner window • Function buttons • Access covers • External ports. • Figure 1-1 on page... - Page 19 MK2200 Introduction 1 - 3 Touch Screen Function Function Button (A) Button (D) Function Button (B) Function Button (C) Speakers (2) Scanner Window Microphone MK2200 Front View Figure 1-1...
- Page 20 1 - 4 MK2200 MicroKiosk for CE .NET 4.2 Product Reference Guide PCMCIA Access Cover* Vertical Cable Run Keyhole Mounts (4) Accessory Connections Access Cover* MK2200 Rear View Figure 1-2 CAUTION When removing an access cover, follow proper (Electro-Static Discharge) ESD precautions to avoid damaging sensitive components.
-
Page 21: External Ports
Wired Ethernet: Power through AC Outlet The Ethernet / Bias-T (10-conductor RJ-45) port accommodates Ethernet data connection. The MK2200 receives power through the Symbol approved power supply. Wired Ethernet: Power through Power-over-Ethernet The MK2200 supports Power-over-Ethernet (POE), Symbol Technologies' proprietary Bias-T functionality. -
Page 22: Mk2200 Features
1 - 6 MK2200 MicroKiosk for CE .NET 4.2 Product Reference Guide Power Port A Symbol power supply connects to the power port (2.0 mm barrel jack connector) on the MK2200. For more information, see Connecting the MK2200 on page 2-7 Technical Specifications on page A-1. -
Page 23: Connectivity Options
The MK2200 contains one Personal Computer Memory Card International Association (PCMCIA/PC Card) expansion slot. Power Options To supply power, use the standard Symbol approved power supply or the Symbol proprietary Power-Over-Ethernet (POE). Mounting Options You can mount the MK2200 on a wall or pole. See MK2200 Mounting on page 2-2. -
Page 24: Bar Code Scanning
1 - 8 MK2200 MicroKiosk for CE .NET 4.2 Product Reference Guide Bar Code Scanning The MK2200 decodes any traditional retail or PDF417 bar code presented in its field of view. Scanning Modes Table 1-1 describes the MK2200 scan modes. -
Page 25: Scanning Guidelines
MK2200 Introduction 1 - 9 Scanning Guidelines When scanning a bar code: Hold the bar code below the scan window at an approximately 45 angle. • Hold the bar code at an angle which does not cause specular reflection (see Specular Reflection on page •... -
Page 26: Cyclone Omnidirectional
1 - 10 MK2200 MicroKiosk for CE .NET 4.2 Product Reference Guide Cyclone Omnidirectional In Cyclone Omnidirectional mode the scan pattern decodes standard 1-dimensional symbologies in any orientation. This mode cannot be used to decode 2D bar codes like PDF417. - Page 27 MK2200 Introduction 1 - 11 The raster pattern must cover the top and bottom of a 2D symbol. If not, pull the bar code further away until the pattern completely covers the bar code. Make sure the scan pattern extends at least three quarters of an inch beyond the edges of the bar code.
-
Page 28: Specular Reflection
1 - 12 MK2200 MicroKiosk for CE .NET 4.2 Product Reference Guide Specular Reflection When laser beams reflect directly back into the scanner from the bar code, they can “blind” the scanner and make decoding difficult. This phenomenon is called specular reflection. - Page 29 Installation Chapter 2 Chapter 2 Chapter 2 Installation Overview This chapter describes MK2200 installation, including: Unpacking • Installation • Mounting Providing power Communication interfaces Installing accessories Peripherals Connector pin-outs • Optional accessories. • Unpacking the MK2200 Remove the MK2200 from its packing and inspect it for damage. Keep the packing, it is the approved shipping container and should be used if the MK2200 needs to be returned for servicing.
-
Page 30: Chapter 2: Installation Overview
2 - 2 MK2200 MicroKiosk for CE .NET 4.2 Product Reference Guide Installation Overview To install the MK2200: Select the mounting method (see MK2200 Mounting on page 2-2): Wall Mount Pole Mount Desk Mount. Select the method of supplying power (see... -
Page 31: Mk2200 Wall Mounting Options
The MK2200 is designed to be used with VESA flat panel monitor physical mounting interface standard mounting brackets or Symbol's keyhole slide-on mounting brackets. It can also be placed into a flush panel kiosk environment by setting it into an 8.0 x 8.63 opening. - Page 32 2 - 4 MK2200 MicroKiosk for CE .NET 4.2 Product Reference Guide To install the Connector/Port Cover, place the keyholes on the back housing over the shoulder head bolts protruding from the plate and slide the MK2200 to the left and down to secure in place. See...
- Page 33 Place the back housing into the opening, following the instructions in Using the Wall Mount Kit on page 2-3. Figure 2-2 Figure 2-3 on page 2-4. Symbol does not provide hardware to support this installation. Recessed mounting may degrade wireless network performance. NOTE...
-
Page 34: Pole Mounting
2 - 6 MK2200 MicroKiosk for CE .NET 4.2 Product Reference Guide Pole Mounting The Pole Mounting Kit accommodates poles up to 11.5 inches in diameter. To install the MK2200 using the Pole Mounting Kit: Wrap the pole mount straps around the pole and tighten. -
Page 35: Connecting The Mk2200
AC Power Supply The Symbol universal AC power supply connects to the power port on the MK2200 using a 2.0 mm barrel jack. The power supply has a positive center pin and the outer tab is ground. It is compatible with: 120V 60 Hz (North America) •... - Page 36 2 - 8 MK2200 MicroKiosk for CE .NET 4.2 Product Reference Guide Wired Ethernet: Power through POE The POE installation option allows the MK2200 to communicate and receive power on the same 10/100Base-T Ethernet cable. See Figure 2-6 on page 2-9 Figure 2-7 on page 2-10.
- Page 37 Installation 2 - 9 Customer Switch / Hub P/N 50-14001-006R DC Power Supply DC Power AP-PSBIAS-TR AP-PSBIAS-TR Supply Category 5 Patch Cable P/N 50-14001-006R Customer Patch Panel Category 5 Category 5 MK2200 MicroKiosk MK2200 Power-Over-Ethernet, Network Connectivity Figure 2-6...
- Page 38 2 - 10 MK2200 MicroKiosk for CE .NET 4.2 Product Reference Guide Customer Switch / Hub (Main Computer Room / MDF) Fiber Optic Cable Customer Patch Panel (Remote Computer Room / IDF) P/N 50-14001-006R DC Power Supply DC Power AP-PSBIAS-TR...
-
Page 39: Wired Rs-485 Setup
The MK2200 can communicate with a host using a wired RS-485 serial connection, typically using the MK2200 Symbol AC power supply. When installing MK2200s where PCK 9100, PCK 9140, or MK1000 wiring exists, connect that wiring directly to the MK2200. -
Page 40: Wired Rs-232 Setup
2 - 12 MK2200 MicroKiosk for CE .NET 4.2 Product Reference Guide Wired RS-232 Setup The MK2200 can communicate with a host using a serial cable connected to the Scanner/Printer (RS-232) port. Insert the power supply barrel connector into the MK2200 power port. See Figure 1-3 on page 1-5. - Page 41 Installation 2 - 13 RS-485 Two-Wire Multidrop Network Example Figure 2-9...
-
Page 42: Peripherals
2 - 14 MK2200 MicroKiosk for CE .NET 4.2 Product Reference Guide Peripherals You can use the RS-232 port to connect to a peripheral device such as a printer or a decoded scanner. For port locations, see Figure 1-3 on page 1-5. -
Page 43: Connector Pin-Outs
Ethernet / Bias-T Port Connections The Ethernet connector provides both Ethernet signals and power supply voltage to the MK2200 through a single Ethernet cable. If providing power to the MK2200 through POE, do not use the Symbol AC power supply. -
Page 44: Rs-485 Port Connections
2 - 16 MK2200 MicroKiosk for CE .NET 4.2 Product Reference Guide RS-485 Port Connections RS-485 Connector: 10-Pin Table 2-3 Description Pin 1 RS-485 (+) Pin 2 RS-485 (+) Pin 3 Reserved Pin 4 Reserved Pin 5 USB PWR Pin 6... -
Page 45: Magnetic Stripe Reader (Msr) Mounting
Installation 2 - 17 Magnetic Stripe Reader (MSR) Mounting The MSR increases the width of the MK2200 from 8.92 inches to 11.5 inches. The height NOTE and depth do not change. To mount the optional Magnetic Stripe Reader (MSR) onto the MK2200: Gently place the MK2200 face down on a flat surface, using care not to damage the touch panel display. - Page 46 2 - 18 MK2200 MicroKiosk for CE .NET 4.2 Product Reference Guide Remove the three screws shown in Figure 2-12 from the back of the MK2200 and remove the protective cover. Retain only the screw from the protective cover. Two new (longer) screws are provided with the MSR.
- Page 47 Installation 2 - 19 Align the mounting holes on the MSR with the MSR mounting holes on the MK2200 as shown in Figure 2-14. Positioning the MSR on the MK2200 Figure 2-14 Secure the MSR to the MK2200 as shown in Figure 2-15.
- Page 48 2 - 20 MK2200 MicroKiosk for CE .NET 4.2 Product Reference Guide Figure 2-16 shows the MSR mounted to the MK2200 for card reading. View of MSR Mounted to the MK2200 Figure 2-16...
-
Page 49: Installing/Removing The Rf Card
Installation 2 - 21 Installing/Removing the RF Card his section applies to factory-shipped RF models only. NOTE To remove and re-install the RF card: Disconnect power from the MK2200. Gently place the MK2200 face down on a flat surface, using care not to damage the touch panel display. Remove the PCMCIA access cover. - Page 50 2 - 22 MK2200 MicroKiosk for CE .NET 4.2 Product Reference Guide Remove the RF card as shown in Figure 2-18. Carefully disconnect cable. Remove two screws Pull connector straight on the bracket, then out from back of card. remove bracket.
-
Page 51: Chapter 3 Configuration
Configure these settings remotely using the Symbol Remote Device Manager (RDM), or locally on the MK2200 using the System Menu. These settings are saved in the configuration registry file (mkconfig.reg) in the MK2200 Application folder to maintain them across cold boot cycles. -
Page 52: Updating The Device Configuration File
Control Panel to change the functions listed in Control Panel Configuration Parameters on page 3-24; however Symbol recommends only changing the Stylus Settings/Touch Screen Calibration using the Control Panel. To save changes to the mkconfig.reg configuration file, select to maintain Start >... -
Page 53: Downloading The Configuration File To The Mk2200
Application My Computer/Application using ActiveSync: Connect the MK2200 to the host computer by connecting the USB cable (Symbol p/n 25-64626-01) to the RS-485 port on the MK2200, and the other end to a USB port on the host computer. ®... -
Page 54: Rebooting The Mk2200
3 - 4 MK2200 MicroKiosk for CE .NET 4.2 Product Reference Guide Rebooting the MK2200 After downloading the mkconfig.reg file, perform a remote or local cold boot to apply the new settings. Remote Boot After loading the configuration file onto the MK2200 using the wired or wireless Ethernet connection, use the RDM to send a command over the network to initiate a remote cold boot of the MK2200. -
Page 55: System Menu
Configuration 3 - 5 System Menu Setting Defaults Using the System Menu Use the System Menu to set parameter values locally on the MK2200. See Default Parameters on page 3-6 these options. The System Menu is identical to the MK2200 Configuration Utility window, and provides local instead of remote access to the same parameters. -
Page 56: Default Parameters
3 - 6 MK2200 MicroKiosk for CE .NET 4.2 Product Reference Guide Default Parameters The default settings that follow apply to both the Remote Device Manager on a host computer and System Menu on the MK2200. Configuration File Information The first branch of the MK2200 Configuration Utility window and System Menu is Configuration File Information. - Page 57 Configuration 3 - 7 Application Default Parameters (Continued) Table 3-3 Application Parameters Description Default Start Page The default home page for file:///windows/mk2200.htm Internet Explorer. Play Background Sounds Check to enable playing of Enabled sound files in an html page. Kiosk IE Kiosk IE Configuration ErrorRecoveryPage Specifies an error recovery page...
-
Page 58: Communications
3 - 8 MK2200 MicroKiosk for CE .NET 4.2 Product Reference Guide Application Default Parameters (Continued) Table 3-3 Application Parameters Description Default Transmit Code ID Transmit bar code type identifier. None No Shell Present Flag indicating the wedge Disabled should not put an item on the system tray. - Page 59 Configuration 3 - 9 Communication Default Parameters (Continued) Table 3-4 Communication Description Default Parameters DHCP Options Opens dialog (see None DHCP Options DHCP Configuration on page 4-25). DHCP Server Specifies DHCP server. The device None contacts the specified server for retrieving IP address and other network parameters.
-
Page 60: System Configuration
3 - 10 MK2200 MicroKiosk for CE .NET 4.2 Product Reference Guide System Configuration The fourth branch of the MK2200 Configuration Utility window and System Menu is System Configuration Table 3-5 lists these parameters and their descriptions. Also see: Device Activity Management (Sleep/Wake-up Functionality) on page 3-20 •... - Page 61 Configuration 3 - 11 System Configuration Default Parameters (Continued) Table 3-5 System Configuration Parameters Description Default Trigger Time Button combination trigger 500 (0x1f4hex) time, in milliseconds. Specifies the maximum time between button presses for them to be considered a button combination.
- Page 62 3 - 12 MK2200 MicroKiosk for CE .NET 4.2 Product Reference Guide System Configuration Default Parameters (Continued) Table 3-5 System Configuration Parameters Description Default Device Activity Management There are three slots with identical parameters: First Activity Configuration Second Activity Configuration...
- Page 63 Configuration 3 - 13 System Configuration Default Parameters (Continued) Table 3-5 System Configuration Parameters Description Default Inactivity Manager Inactivity Manager Configuration (see Inactivity Application (Screen Saver) on page 8-12) Inactivity Application Name Inactivity application. \Windows\SimpleSaver.exe Idle Time Before Launch Idle time before inactivity 0 (0x0 hex) application launches, in seconds.
- Page 64 3 - 14 MK2200 MicroKiosk for CE .NET 4.2 Product Reference Guide System Configuration Default Parameters (Continued) Table 3-5 System Configuration Parameters Description Default Recovery Refresh Specifies the time period, in 86400000 (0x5265c00 hex) milliseconds, until next synchronization, if the previous synchronization attempt failed.
- Page 65 Configuration 3 - 15 System Configuration Default Parameters (Continued) Table 3-5 System Configuration Parameters Description Default Zebra ZPL Series Transport Specifies the transport mode Serial for the Zebra ZPL Series printer if it is the selected active printer. For a list of supported ZPL printers, see Printing on page 3-20.
- Page 66 3 - 16 MK2200 MicroKiosk for CE .NET 4.2 Product Reference Guide System Configuration Default Parameters (Continued) Table 3-5 System Configuration Parameters Description Default Application Application to run in Protected \windows\explorer.exe Mode. Regional Settings - General HTML in web pages does not use regional settings without programmatic support.
- Page 67 Configuration 3 - 17 System Configuration Default Parameters (Continued) Table 3-5 System Configuration Parameters Description Default Currency Symbol Position Position of currency symbol. *1.1 The asterisk (\"*\") denotes the universal currency symbol. The period (\".\") indicates the chosen decimal separator. Currency Symbol Currency symbol.
- Page 68 3 - 18 MK2200 MicroKiosk for CE .NET 4.2 Product Reference Guide System Configuration Default Parameters (Continued) Table 3-5 System Configuration Parameters Description Default Tethered Scanner Tethered Scanner Configuration Enabled Enables or disables tethered Disabled scanner support. Disable if no tethered scanner is connected.
- Page 69 Configuration 3 - 19 System Configuration Default Parameters (Continued) Table 3-5 System Configuration Parameters Description Default Volume and Sounds Volume and Sound Configuration Default System Volume Sets the overall default Maximum volume. Default Beeper Volume Specifies volume of beeper. High Sounds Generated By Controls whether system Events, Applications and...
- Page 70 3 - 20 MK2200 MicroKiosk for CE .NET 4.2 Product Reference Guide Device Activity Management (Sleep/Wake-up Functionality) Use the Device Activity Manager to manage the device usage profile and lifecycle by turning on/off the scan engine laser and the display backlight. Set the sleep and wake-up times by day, weekday, weekend, etc.
- Page 71 • Connecting a Tethered Scanner The MK2200 supports attachment of the Symbol LS1902T external tethered hand-held scanner. The tethered scanner data integrates into the data stream generated by the internal scanner driver. The data originating from the tethered scanner uses the same format as the data from the internal scanner.
- Page 72 3 - 22 MK2200 MicroKiosk for CE .NET 4.2 Product Reference Guide Configuring User Application(s) The MK2200 Configuration Utility window configures the launching of user application(s). The seven definable application "slots" are processed upon power up. Programs launch in sequence with no delay, unless you set parameter.
-
Page 73: Update
Configuration 3 - 23 Update The fifth branch of the MK2200 Configuration Utility window and System Menu is . The default Update parameters are listed in Table 3-7. Update Default Parameters Table 3-7 Update Parameters Description Default FTP Server FTP Configuration Allow Anonymous Determines whether the server Enabled... -
Page 74: Control Panel Configuration Parameters
3 - 24 MK2200 MicroKiosk for CE .NET 4.2 Product Reference Guide Control Panel Configuration Parameters ® When using the Windows desktop Control Panel to modify certain MK2200 configuration settings, select Start on the MK2200. This saves the changes to the mkconfig.reg file and retains >... -
Page 75: Button Definitions
Configuration 3 - 25 Button Definitions To change the button mapping on the MK2200: Start > Settings > Control Panel Double-tap the icon from the Control Panel window. Button Definitions Button Definitions Screen Figure 3-5 Tap on the button to remap. The button’s current hex code appears in the text box. Using the input panel, enter the new value of the hex code in the text box to remap the button. -
Page 76: Inactivity Manager
3 - 26 MK2200 MicroKiosk for CE .NET 4.2 Product Reference Guide To set the month, tap the arrows on either side of the month shown, or select the month label to choose from a list of months. To select a date, tap the date in the calendar. -
Page 77: Gate Keeper (Password Protection)
Configuration 3 - 27 Gate Keeper (Password Protection) To run an application in protected mode: Start > Settings > Control Panel Double-tap the icon from the window. The screen displays. Gate Keeper Control Panel Gate Keeper Gate Keeper Screen Figure 3-8 Select the application to run in protected mode by tapping the button. -
Page 78: Stylus Settings/Touch Screen Calibration
3 - 28 MK2200 MicroKiosk for CE .NET 4.2 Product Reference Guide Tap the tab to change event sounds. Sounds Volume & Sound Properties Screen - Sounds Tab Figure 3-10 From the name list, select an event. Event From the list, select a sound. - Page 79 Configuration 3 - 29 If the MK2200 is not responding properly to taps, tap the tab to calibrate the screen. Calibration Stylus Properties Screen - Calibrate Tab Figure 3-12 Alternatively, to access the Calibrate screen simultaneously press the buttons A, C, and D NOTE (see Figure 1-1 on page...
-
Page 80: Regional Settings
3 - 30 MK2200 MicroKiosk for CE .NET 4.2 Product Reference Guide Regional Settings To set up or change regional settings: icon. Start > Settings > Control Panel > Regional Settings Regional Settings Properties Screen - Regional Settings Tab Figure 3-14... -
Page 81: Memory Allocation
Configuration 3 - 31 To change the way the time appears, tap the tab and make the changes. Time Regional Settings Properties Screen - Time Tab Figure 3-17 To change the way the date appears, tap the tab and make the changes. Date Regional Settings Properties Screen - Date Tab Figure 3-18... - Page 82 3 - 32 MK2200 MicroKiosk for CE .NET 4.2 Product Reference Guide...
-
Page 83: Chapter 4 Remote Device Manager
Chapter 4 Remote Device Manager Overview ® The Symbol Remote Device Manager (RDM) v 2.4.X is a simple, menu-based Windows utility for streamlining large and small site deployments. This utility allows a user to remotely stage (discover and configure) and monitor networked MK2200s. -
Page 84: Performing Discovery (Detection) Of Devices On A Network
4 - 2 MK2200 MicroKiosk for CE .NET 4.2 Product Reference Guide Performing Discovery (Detection) of Devices on a Network The RDM discovers and displays the IP addresses of MK2200s on different subnets to which the host computer is connected, provided that the broadcast IP address is set correctly. See... -
Page 85: Installing The Symbol Remote Device Manager
Remote Device Manager 4 - 3 Installing the Symbol Remote Device Manager The RDM is available for download from the Symbol Developer Zone web site (http://devzone.symbol.com/). Download the install file and save it on the host computer hard drive. Symbol Remote Device Manager ®... - Page 86 4 - 4 MK2200 MicroKiosk for CE .NET 4.2 Product Reference Guide Symbol Remote Device Manager Confirm Installation screen requests to confirm installation. Click Next to continue. Symbol Remote Device Manager Confirm Installation Figure 4-3 Symbol Remote Device Manager Installation Complete screen confirms the installation was completed successfully.
-
Page 87: Symbol Remote Device Manager Main Screen
Remote Device Manager 4 - 5 Symbol Remote Device Manager Main Screen To open the Symbol Remote Device Manager on the host computer, select Start > Programs > Symbol Remote Device Manager > Symbol Remote Device Manager MK2200 Symbol Remote Device Manager... - Page 88 4 - 6 MK2200 MicroKiosk for CE .NET 4.2 Product Reference Guide Symbol Remote Device Manager Menu Items (Continued) Table 4-1 Menu Item Function Device Information Displays information on the selected MK2200. See Monitoring MK2200s on a Network on page 4-16.
- Page 89 Custom DHCP Options Displays the window. Use this window to Customer DHCP Options add/edit/remove DHCP options available within the Symbol RDM. Options Customizes Remote Device Manager options such as FTP security and broadcast IP address. See Setting RDM Options on page 4-14.
-
Page 90: Symbol Remote Device Manager Toolbar
RDM. Cold boot the selected Turns on and off the device. Filter Parameters panel. Row Colors The Symbol RDM uses a color scheme to indicate the state of the MK2200 devices. Color Status Green Successfully retrieved/pushed configuration file. Yellow Selected for downloading a configuration file. -
Page 91: State Icons
Remote Device Manager 4 - 9 State Icons The Symbol RDM uses a color scheme on the State Icons (the left most column) to indicate the state of the MK2200 devices. Color of Icon Status Successfully discovered device. Successfully retrieved/pushed configuration file. - Page 92 4 - 10 MK2200 MicroKiosk for CE .NET 4.2 Product Reference Guide Filter Parameters Fields (Continued) Table 4-3 Menu Item Function Location Select a device location to display. To set locations, use the System Configuration feature of RDM or System Menu. See Identification on page 3-12.
-
Page 93: Electronic Serial Number
Remote Device Manager 4 - 11 Electronic Serial Number The MK22XX has an electronic serial number accessible via network query. This information appears in RDM’s column. A sample serial number is M1J37B90R. Note that only devices manufactured with Serial Number Windows CE .NET 4.2 support this. -
Page 94: Creating A Configuration File
4 - 12 MK2200 MicroKiosk for CE .NET 4.2 Product Reference Guide Creating a Configuration File To create a new configuration file: From the Remote Device Manager, select from the menu bar. Tools > Create Local Configuration File In the window, select the applicable domain/product (MK2200) and click OK. -
Page 95: Modifying An Existing Configuration File
Remote Device Manager 4 - 13 Modifying an Existing Configuration File To edit an existing configuration file: From the RDM on the host computer, choose to open the Tools > Open Local Configuration File MK2200 window. Configuration Utility Select a configuration file (with a .reg extension) to edit and click OK. Only open files created by the RDM, System Menu, or Save Configuration. -
Page 96: Downloading The Configuration File To The Mk2200 Using The Rdm
RDM). Downloading the Configuration File to the MK2200 Using the RDM To “push” the file to the MK2200(s): In the Symbol Remote Device Manager (RDM) window, select/highlight the MK2200(s) to receive the configuration file. Select Tools > Push Configuration File Select the configuration file to send, then click Open. - Page 97 Tools > Options Options Symbol Remote Device Manager Options Window Figure 4-8 Set desired options: for launching AirBeam. For more information on AirBeam command line AirBeam Parameters parameters, refer to the AirBeam Package Builder Product Reference Guide.
-
Page 98: Monitoring Mk2200S On A Network
4 - 16 MK2200 MicroKiosk for CE .NET 4.2 Product Reference Guide Specify the , used in discovering devices on the network. The default value is Broadcast IP Address 255.255.255.255. This causes discovery of all device in all network interfaces attached to a single computer (multi-homed computer). -
Page 99: Device Information - Info Tab: Detected Device Information
Remote Device Manager 4 - 17 Device Information - Info Tab: Detected Device Information tab displays identification information about the selected MK2200. Also see Performing Discovery Info (Detection) of Devices on a Network on page 4-2 MK2200 Remote Device Monitor - Info Tab Figure 4-9... -
Page 100: Device Information - Software Tab: Version Information
4 - 18 MK2200 MicroKiosk for CE .NET 4.2 Product Reference Guide Device Information - Software Tab: Version Information tab displays the applications, operating system, monitor driver, and platform, and their version Software information for the selected MK2200. MK2200 Remote Device Monitor - Software Tab... -
Page 101: Device Information - Storage Tab: Memory Availability And Usage
Remote Device Manager 4 - 19 Device Information - Storage Tab: Memory Availability and Usage tab displays storage areas on the selected MK2200, their physical size, and available free Storage memory. MK2200 Remote Device Monitor - Storage Tab Figure 4-11... -
Page 102: Device Information - Partitions Tab
4 - 20 MK2200 MicroKiosk for CE .NET 4.2 Product Reference Guide Device Information - Partitions Tab tab displays the number and size of the storage areas on the selected MK2200. Partitions MK2200 Remote Device Monitor - Partitions Tab Figure 4-12... -
Page 103: Setting A Static Ip Address
Managing Static IP Addresses Specify the static IP address of an MK2200, which is on a different subnet than the Symbol Remote Device Manager PC, to establish a connection and still be managed by the RDM. This causes the RDM to list the devices and their IP addresses, without performing discovery, in the main screen. -
Page 104: Adding Static Ip Addresses
4 - 22 MK2200 MicroKiosk for CE .NET 4.2 Product Reference Guide Adding Static IP Addresses In the Symbol Remote Device Manager, select Tools > Manage Static Addresses Manage Static Addresses Window Figure 4-14 Enter the IP address and the name, and click Add. Repeat this to enter other static IP addresses. -
Page 105: Modifying Static Ip Addresses
Remote Device Manager 4 - 23 Modifying Static IP Addresses In the Symbol Remote Device Manager, select Tools > Manage Static IP Addresses Modifying Static Addresses Figure 4-15 Select the IP address and click Modify. Change the appropriate settings and click Update to update the static IP addresses list. -
Page 106: Deleting Static Ip Addresses
4 - 24 MK2200 MicroKiosk for CE .NET 4.2 Product Reference Guide Deleting Static IP Addresses In the Symbol Remote Device Manager, select Tools > Manage Static IP Addresses Deleting Static Addresses Figure 4-16 Select the IP address to delete, and click Delete. Repeat this to delete other static IP addresses. -
Page 107: Dhcp Configuration
Remote Device Manager 4 - 25 DHCP Configuration Familiarity with Dynamic Host Configuration Protocol (DHCP) options is required to edit options and save them to the configuration file. Do not use the System Menu or RDM to enable DHCP receive options 1, 3, 6, 15, 44, 46, 47, 66 and 67. NOTE They are already enabled in dhcpoptions.reg as a part of the AirBeam package. - Page 108 4 - 26 MK2200 MicroKiosk for CE .NET 4.2 Product Reference Guide upon launch. If using another computer to edit a configuration file that contains custom DHCP options, transfer the file <install_dir>\dhcpoptions.reg to this computer to view these custom options.
-
Page 109: Custom Dhcp Options
Remote Device Manager 4 - 27 Custom DHCP Options Use the RDM to add/edit/remove custom DHCP options available within the RDM. Select Tools > Custom DHCP Options Custom DHCP Options Screen Figure 4-19 Adding Custom DHCP Options Use the window to add a new DHCP option. Custom DHCP Options Select a code that is not currently used from the drop-down list. -
Page 110: Updating The Rdm On The Host Computer
4 - 28 MK2200 MicroKiosk for CE .NET 4.2 Product Reference Guide Updating the RDM on the Host Computer To update the RDM: ® Use the Windows utility to remove the RDM from the host computer. Add/Remove a Program Install an updated RDM. See Installing the Symbol Remote Device Manager on page 4-3. - Page 111 Remote Device Manager 4 - 29 entry, the DLL invokes the input method and translates the data back to a valid form. It is displayed in the Configuration Utility /System Menu. All validation for the value entered is done through the DLL. No validation is done through the Configuration Utility/System Menu.
- Page 112 4 - 30 MK2200 MicroKiosk for CE .NET 4.2 Product Reference Guide...
-
Page 113: Chapter 5 Transferring Files To The Mk2200
Transferring Files to the MK2200 Chapter 5 Chapter 5 Chapter 5 Transferring Files to the MK2200 Overview Use the following tools to copy files to the MK2200: ActiveSync • FTP Server (see FTP Server on page 8-11) • AirBEAM version 2.16 (see AirBeam Package Builder Product Reference Guide). •... -
Page 114: Connecting The Mk2200 To The Host Computer
5 - 2 MK2200 MicroKiosk for CE .NET 4.2 Product Reference Guide Connecting the MK2200 to the Host Computer To configure ActiveSync for Guest access (suitable for copying files between the host computer and the MK2200): Connect the RJ-45 connector of the ActiveSync Developer Cable, p/n 25-64626-01R, to the RS-485 port... - Page 115 Transferring Files to the MK2200 5 - 3 Click Next. The window displays. Microsoft ActiveSync Guest Connected Microsoft ActiveSync Guest Connected Window Figure 5-3 To download files (such as the mkconfig.reg file) from the host computer to the MK2200, use Windows Explorer to copy the files.
- Page 116 5 - 4 MK2200 MicroKiosk for CE .NET 4.2 Product Reference Guide...
-
Page 117: Chapter 6 Web Kiosk Software Suite
Overview The Web Kiosk Software Suite (Web KSS) is a comprehensive browser solution that demonstrates the many capabilities of the MK2200 MicroKiosk. For software developers, production quality HTML source code is included as a reference implementation for creating custom solutions. -
Page 118: Web Kiosk Software Suite
Web Kiosk Software Suite The Web Kiosk Software Suite MK2000WEBKSS_X.XX.zip and source code are available at http://devzone.symbol.com. The Web Kiosk Software Suite does not require external connectivity to run. Web Kiosk Software Suite Bar Codes The Web Kiosk Software Suite uses the bar codes in Appendix D, Web Kiosk Software Suite Bar Codes demonstrate MK2200 capabilities. - Page 119 Create a folder on the host computer called SoftwareSuite Download the MK2000 Web Kiosk Software Suite MK2000WEBKSS_X.XX.zip from http://devzone.symbol.com, saving it to the desktop. The downloaded files are compressed in a .zip file. Extract all files to the folder to create the following files and folders:...
-
Page 120: Disabling And Restoring The Web Kiosk Software Suite
6 - 4 MK2200 MicroKiosk for CE .NET 4.2 Product Reference Guide Disabling and Restoring the Web Kiosk Software Suite To prevent the MK2200 from entering an application, simultaneously hold down buttons A and D just after the blue screen displays, and before the message changes to Performing System Initialization (Phase 1) . -
Page 121: Scanning Bar Codes
Web Kiosk Software Suite 6 - 5 Gift Registry on page 6-14. • Store Operations Screen on page 6-16 demonstrates sample store operations that the MK2200 supports, including: Work Schedule Screen on page 6-17 • Calculator on page 6-17 • Scan a 2D Bar Code Screen on page 6-18 •... -
Page 122: Attract Mode
6 - 6 MK2200 MicroKiosk for CE .NET 4.2 Product Reference Guide Attract Mode The MK2200 Web Kiosk Software Suite enters Attract Mode after a period of inactivity, and displays a slide show. The bar is visible during the slide show. -
Page 123: Price Verification
Web Kiosk Software Suite 6 - 7 Price Verification The Web Kiosk Software Suite has three price verification screen formats: screen (Loyalty Program enabled) - requires the Loyalty Program bar code to access Price Verification • special Loyalty Program product information. screen (non-Loyalty Program) - displays standard non-Loyalty Program product Price Verification •... -
Page 124: Price Verification Menu Bar
6 - 8 MK2200 MicroKiosk for CE .NET 4.2 Product Reference Guide Scan the bar code CD on page D-5. Audio Enabled Price Verification Screen Figure 6-5 For sample source code that demonstrates volume control from a browser application, refer to the file, which is part of the Web Kiosk Software Suite. - Page 125 Web Kiosk Software Suite 6 - 9 Home - returns the MK2200 to Attract Mode on page 6-6. • Select Printer Screen Figure 6-7 The Web Kiosk Software Suite supports printing using the Zebra QL220/320/420 or Zebra LP2834/2844 series printers, and demonstrates how to print on receipt stock (continuous printing) or label stock. The QL series printers support advanced printer monitoring functionality (see Advanced Printer Monitoring Functionality on page...
-
Page 126: Loyalty Program
6 - 10 MK2200 MicroKiosk for CE .NET 4.2 Product Reference Guide Loyalty Program Select the Loyalty Program button from the bar (see page 6-5) or from the screen Main Menu Price Verification (see page 6-7) to view the screen. -
Page 127: Guided Selling Tool (Select Ink Cartridge)
Web Kiosk Software Suite 6 - 11 Guided Selling Tool (Select Ink Cartridge) Select the Select Ink Cartridge button from the bar (see page 6-5) to view the Main Menu Print Cartridge screen. Print Cartridge Screen Figure 6-11 The Web Kiosk Software Suite plays audio clips, on every screen of the guided selling screen flow, to explain instructions and available choices for the consumer. - Page 128 6 - 12 MK2200 MicroKiosk for CE .NET 4.2 Product Reference Guide Select either Black Cartridges or Color Cartridges to view information for that cartridge. Cartridge Information Screen Figure 6-13 For an MSR demonstration on MK2200s with an attached MSR, tap Buy.
-
Page 129: Kichenaid Mixer
Web Kiosk Software Suite 6 - 13 KichenAid Mixer The screen flow for KichenAid Mixer demonstrates the Web Kiosk Software Suite capability to handle sales of complex items. Scan the bar code for KichenAid Mixer on page D-6, to move to the screens. -
Page 130: Gift Registry
6 - 14 MK2200 MicroKiosk for CE .NET 4.2 Product Reference Guide Select Back to move to the screen. KichenAid Mixer KichenAid Mixer Accessories Screen Figure 6-17 Select Back to move to the KichenAid Mixer screen. Gift Registry Use the voice guided screen flow to create/register user accounts. - Page 131 Web Kiosk Software Suite 6 - 15 Enter the last name using the virtual keyboard. Select Next to move to the screen. Enter Phone Number Enter Phone Number Enter Phone Number Figure 6-20 Enter the phone number using the virtual keyboard. Select Next to move to the screen.
-
Page 132: Store Operations Screen
6 - 16 MK2200 MicroKiosk for CE .NET 4.2 Product Reference Guide Store Operations Screen Scan the Employee Badge on page D-7 (5 digit code 128) to enter mode. On this screen, the Store Operations internal scan engine is disabled. -
Page 133: Work Schedule Screen
Web Kiosk Software Suite 6 - 17 Work Schedule Screen Select Work Schedule from the screen to view the screen, which displays an Store Operations Work Schedule employee’s schedule. Select Back to return to the Store Operations Screen on page 6-16. -
Page 134: In-Store Messaging
6 - 18 MK2200 MicroKiosk for CE .NET 4.2 Product Reference Guide Scan a 2D Bar Code Screen Select Scan 2D from the Calculator to view the screen, where store associates can scan Scan a 2D Bar Code a 2D bar code such as a PDF417 code. See 2D Bar Code (PDF417) on page D-8. - Page 135 Web Kiosk Software Suite 6 - 19 In-Store Messaging Screen Figure 6-27 Voicemail Options Screen Select a voicemail item from the screen to use the screen to listen or In-Store Messaging Voicemail Options respond to a voice message. Options include: Right pointer - plays the message.
- Page 136 6 - 20 MK2200 MicroKiosk for CE .NET 4.2 Product Reference Guide Voicemail Playback Screen Select an item from the screen to use the screen to listen to and/or reply Voicemail Options Voicemail Playback to a message. Options include: First speaker - increases volume.
- Page 137 Web Kiosk Software Suite 6 - 21 Voicemail Response Screen Figure 6-30 For sample source code that demonstrates audio recording using the microphone from a browser application, refer to the MK2000_WebKSS_Install+SourceCode.doc file, which is part of the Web Kiosk Software Suite. Text Messaging Screen Select a text-based message item from the screen to use the...
- Page 138 6 - 22 MK2200 MicroKiosk for CE .NET 4.2 Product Reference Guide Video Message Screen Select a video item from the screen to use the screen to view a training or In-Store Messaging Video Message informative full screen video. Options include: First speaker - increases volume.
-
Page 139: Web Kss Source Code Index
Web Kiosk Software Suite 6 - 23 Web KSS Source Code Index Refer to the file for sample source code for the following MK2000_WebKSS_Install+SourceCode.doc functionality. Screen Layout Touch screen "click" sound control: • Deactivating the click sound on the screen except where a button is located Enabling a click sound for a virtual button. -
Page 140: Scan Engine
6 - 24 MK2200 MicroKiosk for CE .NET 4.2 Product Reference Guide Scan Engine Scan engine control: • Turning the engine on and configuring Turning the engine off. Switching between omnidirectional and 2D • Embedding the Active X object in a hidden frame •... -
Page 141: Advertising
Web Kiosk Software Suite 6 - 25 Advertising Attract loop: • How the loop works Changing the amount of time each image displays Locating images. Running a slide show. • Device Startup Enabling automatic device setup (refer to the Web Kiosk Software Suite mkconfig.reg file) •... - Page 142 6 - 26 MK2200 MicroKiosk for CE .NET 4.2 Product Reference Guide...
-
Page 143: Chapter 7 C# Kiosk Software Suite
Chapter 7 C# Kiosk Software Suite Overview The Symbol C# Kiosk Software Suite is a sample application for the C# environment available for the MK2200. The MK2200 C# Kiosk Software Suite (MK2000C#KSS_X.XX.zip) is a comprehensive solution that demonstrates the many capabilities of the MK2200 Micro Kiosk. -
Page 144: Installing The C# Kiosk Software Suite
Support Installing the C# Kiosk Software Suite To install and run the C# KSS, first install the .NET Compact Framework and the Symbol Mobility Developer Kit v1.1 (SMDK) for .NET in the target device. Loading .NET Compact Framework onto an MK Device The SMDK includes Microsoft .NET Compact Framework installation files. -
Page 145: Install The C# Kss Onto The Mk2200
7 - 3 Installing .NET Compact Framework onto the MK2200 Create a temporary folder with Symbol-specific CAB files and generic .NET framework CAB files described in Loading .NET Compact Framework onto an MK Device on page 7-2. Include the .CPY files as well as the .REG together with the wceldcmd.exe available in the MK Series mass deployment directory. -
Page 146: Auto Launching The C# Kss At Power Up
7 - 4 MK2200 MicroKiosk for CE .NET 4.2 Product Reference Guide [HKEY_CURRENT_USER\Software\Symbol\Startup\Programs\Prog12] "Name"="\windows\wceldcmd.exe" "Command"="\Windows\symbol.all.arm.cab" "Continue"=dword:0 "ColdBootOnly"=dword:1 [HKEY_CURRENT_USER\Software\Symbol\Startup\Programs\Prog13] "Name"="\windows\wceldcmd.exe" "Command"="\Windows\symbol.mkseries.all.arm.cab" "Continue"=dword:0 "ColdBootOnly"=dword:1 [HKEY_CURRENT_USER\Software\Symbol\StartUp\Programs\Prog14] "Name"="\\Application\\MK2000 C# Kiosk Software Suite \\MK2000 C# Kiosk Software Suite.exe" "Continue"=dword:1 Prog11- Prog17 indicates the sequence of the startup applications. Prog13, Prog14, Prog15 NOTE is used for installing SMDK CAB files as well as the .NET CF CAB files using wceldcmd.exe. - Page 147 C# Kiosk Software Suite 7 - 5 Loyalty Program on page 7-7 • Guided Selling Tool (Fitting Guide) on page 7-8. • Store Operations Screen on page 7-9 demonstrates sample store operations that the MK2200 supports, including: In-Store Messaging on page 7-9 •...
-
Page 148: Attract Mode
7 - 6 MK2200 MicroKiosk for CE .NET 4.2 Product Reference Guide Attract Mode Attract Mode Ads C# Kiosk Software Suite enters Attract Mode after a period of inactivity, and displays a series of advertisements. The bar is visible during the slide show. The C# Kiosk Software Suite Attract Mode Main Menu rotates five sample promotional messages in the main dialog. -
Page 149: Price Verification
C# Kiosk Software Suite 7 - 7 Price Verification The C# Kiosk Software Suite has three screen formats: Price Verification screen (Loyalty Program enabled) - requires the Loyalty Program bar code to access Price Verification • special Loyalty Program product information. screen (non-Loyalty Program) - displays standard non-Loyalty Program product Price Verification •... -
Page 150: Guided Selling Tool (Fitting Guide)
7 - 8 MK2200 MicroKiosk for CE .NET 4.2 Product Reference Guide Guided Selling Tool (Fitting Guide) Scan the bar code Pants UPC-A on page E-1. Non-Loyalty Program, Price Verification Screen Figure 7-5 The Pants UPC-A screen flow demonstrates the guided-selling capability of the C# KSS. -
Page 151: Store Operations Screen
C# Kiosk Software Suite 7 - 9 Store Operations Screen Scan the Employee Badge on page E-3 (5 digit code 128) to enter mode. Store Operations menu bar offers the following buttons: Store Operations Messages (see In-Store Messaging on page 7-9) •... - Page 152 7 - 10 MK2200 MicroKiosk for CE .NET 4.2 Product Reference Guide Home - returns to the Store Operations Screen on page 7-9. • In-Store Messaging Screen Figure 7-8 Voicemail Messages Screen Select a voicemail item from the screen to view a...
- Page 153 C# Kiosk Software Suite 7 - 11 First speaker - decreases volume. • Second speaker - increases volume. • Double bar - pauses the recorded message. • Home - returns to the Voicemail Screen on page 7-10. • Voicemail Recording Screen Select Reply from the Voicemail screen to record a voice mail reply using the MK2200 built-in microphone (see Figure 1-1 on page 1-3), and play the message back.
-
Page 154: C# Kss Source Code Index
7 - 12 MK2200 MicroKiosk for CE .NET 4.2 Product Reference Guide Video Message Screen Select a video training message from the main message screen to view a full screen video. Video Message Screen Figure 7-13 Use the controls in the Windows Media Player for viewing the video message. -
Page 155: Button Control
C# Kiosk Software Suite 7 - 13 Button Control Physical button control • External button events • Virtual buttons • Click sound inside virtual buttons Deactivate sound outside virtual buttons. Version Tracking Remote tracking of version number • Application revision history - local (version.txt). •... - Page 156 7 - 14 MK2200 MicroKiosk for CE .NET 4.2 Product Reference Guide...
-
Page 157: Chapter 8 System Features
System Features Chapter 8 Chapter 8 Chapter 8 System Features Overview This chapter discusses the following operating system features: Network Security on page 8-2 • SNMP-Based Remote Monitoring on page 8-3 • RegMerge and CopyFiles on page 8-6 • Accessing the Windows® CE Desktop on page 8-7 •... -
Page 158: Security Overview
8 - 2 MK2200 MicroKiosk for CE .NET 4.2 Product Reference Guide Security Overview The following items and features help secure the device from external intrusion: ActiveSync - deactivation when an application is running: pages 3-10 and 5-1. • FTP Server - partial or complete deactivation: pages 3-23 and 8-11. -
Page 159: Snmp-Based Remote Monitoring
SysOID MK2200 .1.3.6.1.4.1.388.10.3 These SysOIDs come from the tree officially assigned to Symbol Technologies (.1.3.6.1.4.1.388) and are registered with the body within Symbol that manages our SNMP OIDs. List of Reported Software Component Versions The Host Resource MIB reports the items in... -
Page 160: User Application Version Reporting
Each value/data pair specifies the name of the component and its version, respectively. These values must be string values. The Symbol RDM and a number of off-the-shelf SNMP-based network management packages can read application version information (see Software Version Information under... -
Page 161: Actions - Custom Mib
System Features 8 - 5 Actions - Custom MIB When running OS version 1.1.1 and platform MK20XXPlat_2.00.17.hex or later, the MicroKiosk Custom HR MIB supports the actions and commands in Table 8-3. Custom MIB Actions/Commands Table 8-3 Action/Value Var Name Access Data Type Cold Boot... -
Page 162: Regmerge And Copyfiles
8 - 6 MK2200 MicroKiosk for CE .NET 4.2 Product Reference Guide Custom MIB Actions/Commands (Continued) Table 8-3 Action/Value Var Name Access Data Type Configuration A user-defined string that can be filtered in the Remote Terminal Manager Group 2 (e.g., hardware, housewares, East Coast). -
Page 163: Copyfiles
System Features 8 - 7 CopyFiles Windows CE expects certain files to be in the Windows folder, residing in volatile storage. Windows CE maintains the System Registry in volatile storage. CopyFiles copies files from one folder to another on a cold boot. -
Page 164: Remapping Buttons
8 - 8 MK2200 MicroKiosk for CE .NET 4.2 Product Reference Guide Use the RDM Protected Mode feature (System Configuration/Protected Mode) to set up password protection. Protected Mode on page 3-15. Button Mappings for Protected Mode Table 8-4 Button Combo... -
Page 165: Button Remapping - Keycode Values
System Features 8 - 9 Default Button Mapping (Continued) Table 8-5 Button Combo Mapping Hex Code 0x09 Cancel/Escape 0x1B ABCD Signal Strength (Mobile Companion Information tab) 0xC6 To disable a button combination, set its mapping to 0. NOTE To perform a cold boot press and hold buttons B and C until the display goes blank (typically 15 seconds) then release the buttons. -
Page 166: Network Time Update: Sntp Client
8 - 10 MK2200 MicroKiosk for CE .NET 4.2 Product Reference Guide Keycode Values (Continued) Table 8-6 Button Values Function Value Function Value DOWN 0x28 0 thru 9 are the same as ASCII '0' thru '9' 0x30 – 0x39 MULTIPLY... -
Page 167: Ram: Volatile (Non-Persistent) Memory
(volatile) memory allocation (storage vs. memory used to run programs) to persist memory allocation settings through cold boot cycles. Use the Symbol RDM or the System Menu to permanently configure RAM memory allocations (memory used to run programs). ( System Configuration > Memory Allocation > SystemStorePercent The RDM/System Menu can only configure unused RAM. -
Page 168: Inactivity Application (Screen Saver)
8 - 12 MK2200 MicroKiosk for CE .NET 4.2 Product Reference Guide User Authentication Domain - Valid Windows domain to look for users that are allowed to access FTP • service. The FTP server authenticates user password from this Domain Controller. -
Page 169: Browser Applications - Hiding Toolbars
System Features 8 - 13 The program uses the following registry entries under the [HKEY_LOCAL_MACHINE\Software\Symbol\SlideShow] key: Directory - A string value specifying the directory containing the graphic files. Only one directory is • supported. Delay - A DWORD value indicating the number of seconds to display each graphic. If not specified, the •... -
Page 170: Browser Applications - Handling Network Disconnects
The KioskIE.exe browser can redirect to a custom Error Recovery Page if it detects an Internet Explorer error page (like a error 404). Since the errors are likely to occur during network outages, Symbol recommends using locally stored files to drive the custom error recovery page. Once directed to a local URL, a customer friendly message appears while script code retries to connect. -
Page 171: Loading Additional Fonts On The Mk2200
.ttf extension. \windows Arial • Comic Sans MS • Courier New • Georgia • Symbol • Tahoma • Times New Roman • Verdana • Wingding. • The default system font path for these fonts is \windows. -
Page 172: Using Additional Fonts In Browser Applications
8 - 16 MK2200 MicroKiosk for CE .NET 4.2 Product Reference Guide Using Additional Fonts in Browser Applications Regardless of how you installed the font in the system, to reference it using a browser page, specify the font as a STYLE, or use FONT tags. Use intuitive names for the fonts (use FontViewer on a Windows desktop and locate the line), and use quotes to enclose names with spaces. -
Page 173: Input Panel (Virtual Keyboard)
System Features 8 - 17 Input Panel (Virtual Keyboard) Use the input panel (virtual keyboard) on the touchscreen of the MK2200 to enter information. To access the , tap the icon in the icon tray. To enter information, use a stylus to select the keys Input Panel on the input panel. -
Page 174: Microsoft Wordpad
8 - 18 MK2200 MicroKiosk for CE .NET 4.2 Product Reference Guide Microsoft WordPad Microsoft is an application that allows creating, editing, and viewing documents on the MK2200. WordPad Password-protect a document if desired. Using WordPad Figure 8-2 To open a file on the MK2200, tap . -
Page 175: Windows Media Player
The MK2200 OS also includes kioskie.exe, which hides the toolbar and the Windows Start bar, menus, title bar, and status bar. Symbol recommends using kioskie.exe as the default browser when running web applications. Browser Applications - Hiding Toolbars on page 8-13. -
Page 176: Browsing The Web
8 - 20 MK2200 MicroKiosk for CE .NET 4.2 Product Reference Guide For information on handling network disconnects and their associated error recovery pages such as error 404, Browser Applications - Handling Network Disconnects on page 8-14. Browsing the Web Go to a specific Web page in one of the following ways: , then tap the favorite to view. -
Page 177: Printer Object Test
System Features 8 - 21 Printer Object Test Use the to debug serial printer connections and to print test bar codes, bitmaps, and Printer Object Test Page text. Within Internet Explorer, select . The drop-down Favorites > Printer Object Test Page Printer Language menu lists supported printers, and includes the following information for each printer: Programming language acronym (for example, CPL) -
Page 178: Msr Object Test
8 - 22 MK2200 MicroKiosk for CE .NET 4.2 Product Reference Guide MSR Object Test Use the to test the MSR from the browser application. Select MSR Object Test Page Favorites > MSR Object Test to load the MSR Object Test Page. -
Page 179: Scanner Object Test
System Features 8 - 23 Scanner Object Test Use the for debugging scanner setup from the browser application. Select Scanner Object Test Page Favorites > to load the Scanner Object Test Page. Scanner Object Test Page Scanner Object Test Page Figure 8-8... -
Page 180: Audio Object Test
8 - 24 MK2200 MicroKiosk for CE .NET 4.2 Product Reference Guide Audio Object Test Use the for debugging Audio Object setup from the browser application. Select Audio Object Test Page to load the Audio Object Test Page. Favorites > Audio Object Test Page... -
Page 181: Microkiosk Object Test
System Features 8 - 25 MicroKiosk Object Test Use the for debugging MicroKiosk Object setup from the browser application. Select MK Object Test Page to load the MicroKiosk Object Test Page. Favorites > MK Object Test Page MicroKiosk Object Test Page Figure 8-10... - Page 182 8 - 26 MK2200 MicroKiosk for CE .NET 4.2 Product Reference Guide...
-
Page 183: Chapter 9 Software Development Environments
PocketBrowser v2.01 support for web development • SMDK for .NET - for developing managed .NET applications in C# or VB.NET. • All Symbol Mobility Developer Kits are available as free downloads from the Symbol DevZone: http://devzone.symbol.com/. Symbol Mobility Developer Kit (SMDK) for C ®... -
Page 184: Symbol Mobility Developer Kit (Smdk) For The Web
MK2200 MicroKiosk for CE .NET 4.2 Product Reference Guide Sample Applications The sample applications are included as a learning tool, to show developers how to interface with the Symbol C API functions. Some of the sample applications contained in the kit include: Hello: A simple Hello World application. -
Page 185: Pocketbrowser V2.01 For The Web
9 - 3 PocketBrowser v2.01 for the Web The Symbol PocketBrowser is a web development kit that provides access to the functionalities of a Symbol device. The PocketBrowser is used across all vertical markets and in a wide variety of applications, enabling developers and integrators to provide advanced Web-based solutions for Symbol devices. - Page 186 9 - 4 MK2200 MicroKiosk for CE .NET 4.2 Product Reference Guide...
-
Page 187: Appendix A: Technical Specifications Technical Specifications
Technical Specifications Appendix A Appendix A Technical Specifications Technical Specifications For the latest technical specification information for the MK2200, visit: http://www.symbol.com/MK2200... - Page 188 A - 2 MK2200 MicroKiosk for CE .NET 4.2 Product Reference Guide...
-
Page 189: Appendix Brf Network Configuration
To implement WPA enterprise-level wireless security in the wireless connection, use the Aegis Client • version 2.1.4 to configure the wireless connection. Alternatively, use Symbol Mobile Companion version 3.9.3.76. • Mobile Companion supports WPA Home, but not WPA Enterprise. NOTE... -
Page 190: Aegis Client
B - 2 MK2200 MicroKiosk for CE .NET 4.2 Product Reference Guide Aegis Client Install the Aegis Client included in the platform partition 2046c42Plat64Mxxx.hex onto the MK2200 to implement WPA enterprise wireless security. Wireless MK2200s ship from the factory with this client installed. -
Page 191: Mobile Companion (11 Mbps Radio
Appendix B: RF Network Configuration B - 3 Mobile Companion (11 Mbps Radio) The MK2200 supports wireless communication using Spectrum24 wireless LAN connection. This requires properly configured Access Points (APs) within the facility. Refer to the AP documentation to set up the wireless LAN hardware. - Page 192 B - 4 MK2200 MicroKiosk for CE .NET 4.2 Product Reference Guide When the menu opens, select , or Status WLAN Profiles Find WLANs Options Mobile Companion Menu Descriptions Table B-1 Menu Item Description Status Displays the current status and information for the wireless connection.
-
Page 193: Configuring Mobile Companion
Appendix B: RF Network Configuration B - 5 Configuring Mobile Companion Mobile Companion is launched at power-up if an 11 Mbps Spectrum24 radio and driver are installed in the MK2200. The Mobile Companion icon appears in the task tray. If it does not launch, manually launch Mobile Companion on the MK2200 by double clicking \Windows\EVMON.EXE Select... -
Page 194: Editing Profiles
B - 6 MK2200 MicroKiosk for CE .NET 4.2 Product Reference Guide Editing Profiles Mode Tab To change the ESSID and operating mode for a profile, select the profile and tap Edit to display the Mode tab. Infrastructure Mode Mode Tab... - Page 195 Appendix B: RF Network Configuration B - 7 Authentication Tab Select the Authentication tab to configure server-based authentication. Select one of the following Authentication options from the drop-down list. Authentication None - Default setting when authentication is not required on the network. The client adapter does not •...
- Page 196 B - 8 MK2200 MicroKiosk for CE .NET 4.2 Product Reference Guide Authentication Tab Fields - Kerberos Table B-2 Authentication Description Kerberos Kerberos is a different form of 128-bit data security. An adapter is required to have its request for access point resources authenticated with a Kerberos...
- Page 197 Appendix B: RF Network Configuration B - 9 Mobile Companion - Authentication Tab (LEAP) Figure B-5 Authentication Tab Fields - LEAP Table B-3 Authentication Description LEAP Select this option to enable LEAP authentication. LEAP is founded on mutual authentication. The AP and the mobile computer attempting to (see Figure B-5)
- Page 198 B - 10 MK2200 MicroKiosk for CE .NET 4.2 Product Reference Guide EAP-TLS Authentication Install / View Certificates Mobile Companion - Authentication Tab (EAP-TLS) Figure B-6 Authentication Tab Fields - EAP/TLS Table B-4 Authentication Description EAP/TLS EAP/TLS is an authentication scheme through IEEE 802.1x. It...
- Page 199 Appendix B: RF Network Configuration B - 11 PEAP Authentication Install / View Certificates Mobile Companion - Authentication Tab (PEAP) Figure B-7 Authentication Tab Fields - PEAP Table B-5 Authentication Description PEAP Select this option to enable PEAP authentication. This method uses a digital certificate to verify and authenticate an user identity.
- Page 200 B - 12 MK2200 MicroKiosk for CE .NET 4.2 Product Reference Guide Encryption Tab Select the tab to set the adapter profile security level by configuring the encryption scheme and Encryption corresponding keys. Select an option (Open System, WEP, Keyguard-MCM, TKIP (WPA)) from the Encryption drop-down list.
- Page 201 Appendix B: RF Network Configuration B - 13 Open System Select this option when no data packet encryption is needed over the network. (no encryption) This option provides no security for data transmitted over the network. The window displays only the OK and Cancel buttons. Select this option to use WEP keys for encryption.
- Page 202 B - 14 MK2200 MicroKiosk for CE .NET 4.2 Product Reference Guide IP Config Tab Tap the tab to configure the following MK2200 profile network address parameters: IP address, IP Config subnet, gateway, DNS, and WINS. Changes made within the...
-
Page 203: Persisting Mobile Companion Settings
Appendix B: RF Network Configuration B - 15 IP Address The Internet is a collection of networks with users that communicate with each other. Each communication carries the address of the source and destination networks and the particular machine within the network associated with the user or host computer at each end. -
Page 204: Find Wlans
B - 16 MK2200 MicroKiosk for CE .NET 4.2 Product Reference Guide Find WLANs Select from the Mobile Companion menu to list the ESSIDs of active wireless LANs operating in Find WLANs the vicinity of the MK2200. Available WLAN Networks... - Page 205 Appendix B: RF Network Configuration B - 17 Status To view the status of the wireless network connection, select from the menu. Status Mobile Companion Tap the tab to view a real-time graph of the signal quality of the MK2200 to the associated AP Signal (Infrastructure Mode only), including the number of times the MK2200 roams to and from APs, the current data rate, and the network status.
- Page 206 B - 18 MK2200 MicroKiosk for CE .NET 4.2 Product Reference Guide Tap the tab to view the MK2200 current software and driver revision data and the operating Info parameters of the current profile. Mobile Companion - Info Tab Figure B-13...
- Page 207 Appendix B: RF Network Configuration B - 19 IP Type If DHCP was selected from the tab, leased IP address and IP Config network address data appears. If Static was selected, the values entered in the tab on page B-14 appear.
-
Page 208: Options
B - 20 MK2200 MicroKiosk for CE .NET 4.2 Product Reference Guide Select the tab (Infrastructure operating mode only) to view APs with the same ESSID as the MK2200 profile. Mobile Companion - APs Tab Figure B-16 The associated AP displays a radio wave radiating from its antenna to indicate its associated status. -
Page 209: Appendix C: Rapid Deployment Client
Rapid Deployment Client Appendix C Appendix C Rapid Deployment Client Overview The Rapid Deployment (RD) Client facilitates software downloads to a device from a Mobility Services Platform (MSP) Console’s FTP server. The MK2200 ships from the factory with RD Client version 1.6. You can upgrade this client over a network. When software packages are transferred to the FTP server, the MK2200 on the wireless network can download them to the device. - Page 210 C - 2 MK2200 MicroKiosk for CE .NET 4.2 Product Reference Guide Rapid Deployment Window Table C-1 Text Box/Button Description Please scan all of the bar This text box displays the status of a scanned bar code. codes... - indicates the MK2200 is ready to scan a bar code.
-
Page 211: Scanning Rd Bar Codes
Appendix C: Rapid Deployment Client C - 3 Scanning RD Bar Codes When the MK2200 scans and successfully decodes a single or multiple RD bar codes, the data encoded in the bar code can: Reset the MK2200’s connection profile. A connection profile is a set of Mobile Companion parameters •... - Page 212 C - 4 MK2200 MicroKiosk for CE .NET 4.2 Product Reference Guide After scanning all appropriate bar codes, the MK2200 connects to the server and the Rapid Deployment window displays while network settings are configured. Configuring Rapid Deployment Window - Configuring Figure C-3 If the MK2200 cannot connect to the server, it retries until you cancel (exit) the application.
-
Page 213: Appendix D Web Kiosk Software Suite Bar Codes
Web Kiosk Software Suite Bar Codes Appendix D Appendix D Web Kiosk Software Suite Bar Codes Overview Use these sample bar codes with the Web Kiosk Software Suite. Wide Screen TV 11048 83112... -
Page 214: Dvd Player
D - 2 MK2200 MicroKiosk for CE .NET 4.2 Product Reference Guide DVD Player 11096 38390 White Correction Fluid 70330 50367... -
Page 215: Glue Stick
Appendix D: Web Kiosk Software Suite Bar Codes D - 3 Glue Stick 71709 00166 Transparent Tape 51131 77138... -
Page 216: Standard Staples
D - 4 MK2200 MicroKiosk for CE .NET 4.2 Product Reference Guide Standard Staples 74711 35440 Tylenol 00450 44909... -
Page 217: Rolaids
Appendix D: Web Kiosk Software Suite Bar Codes D - 5 Rolaids 12546 65021 75678 12772... -
Page 218: Color Printer - Ink Cartridge
D - 6 MK2200 MicroKiosk for CE .NET 4.2 Product Reference Guide Color Printer - Ink Cartridge 34646 89800 KichenAid Mixer 6 0 2 5 4 8 3 2 4 7... -
Page 219: Employee Badge
Appendix D: Web Kiosk Software Suite Bar Codes D - 7 Employee Badge John Ryan (Code 128) Employee Badge John Ryan 56842 Loyalty Card Clark Kent (Code 39) Loyalty Card Clark Kent 4125279101... -
Page 220: Bar Code (Pdf417
D - 8 MK2200 MicroKiosk for CE .NET 4.2 Product Reference Guide 2D Bar Code (PDF417) Text Reads: “You have just scanned a PDF417 bar code using the MK2000!"... -
Page 221: Appendix E C# Kiosk Software Suite Bar Codes
C# Kiosk Software Suite Bar Codes Appendix E Appendix E C# Kiosk Software Suite Bar Codes Overview Use these sample bar codes with the C# Kiosk Software Suite. Pants UPC-A Pants UPC-A DEMO 0 0 4 5 0 4 4 9 0 9... -
Page 222: Transparent Tape
E - 2 MK2200 MicroKiosk for CE .NET 4.2 Product Reference Guide Transparent Tape Scotch Tape UPC-A DEMO 1 2 5 4 6 6 5 0 2 1 75678 12772... -
Page 223: Employee Badge
Appendix E: C# Kiosk Software Suite Bar Codes E - 3 Employee Badge John Ryan (Code 128) Employee Badge John Ryan 56842 Loyalty Card Clark Kent (Code 39) Loyalty Card Code 39 Clark Kent 4125279101... - Page 224 E - 4 MK2200 MicroKiosk for CE .NET 4.2 Product Reference Guide...
-
Page 225: Appendix F Terminal Configuration Manager
When building the image, TCM adds all the files and directories referenced in the script to the image. The Symbol MK2200 DCP (Device Configuration Package) includes TCM, standard script, and flash partition source files to use as a base for creating new scripts. These scripts are located in: C:\Program Files\Symbol Device Configuration Packages\MK2000cXX\vX.X\ TCMScripts... -
Page 226: Starting Terminal Configuration Manager
MK2200 MicroKiosk for CE .NET 4.2 Product Reference Guide Starting Terminal Configuration Manager To start TCM, select . The Start > Programs > Symbol Device Configuration Packages > MK2000cXX vX.X following screen displays two directory windows: Script1 File Explorer Terminal Configuration Manager... - Page 227 Appendix F: Terminal Configuration Manager F - 3 Table F-1 lists the components of the TCM start-up screen. TCM Start-Up Screen Components Table F-1 Component Description Script Window Associated with a script file containing the information to create a Flash Disk image.
-
Page 228: Defining Script Properties
F - 4 MK2200 MicroKiosk for CE .NET 4.2 Product Reference Guide Defining Script Properties Before a script is created, define script properties, including the type of device, flash type, number of disks being created, and the memory configuration of each disk partition. -
Page 229: Creating The Script For The Hex Image
Saving changes made to an existing script overwrites the original script. To use an original NOTE or Symbol-supplied standard script as a base and save the changes in a new script, use Save As instead of Save after making the changes and save to a different file name. -
Page 230: Saving The Script
Saving changes to an existing script overwrites the original script. NOTE To use an original or Symbol-supplied standard script as a base and save the changes in a new script, use Save As instead of Save after making the changes and save to a different file name. -
Page 231: Building The Image
Appendix F: Terminal Configuration Manager F - 7 Building the Image Before building the image, TCM checks the script to verify that all files referenced in the script exist. Performing a check is more important for existing scripts to ensure that files referenced in NOTE the script are still in the designated locations. -
Page 232: Sending The Hex Image
F - 8 MK2200 MicroKiosk for CE .NET 4.2 Product Reference Guide Sending the Hex Image After building the hex file, download it to the device using IPL. See IPL Menu Navigation on page G-3 detailed procedures. Saving the Script Save the script if changes were made since last saving it. - Page 233 Appendix F: Terminal Configuration Manager F - 9 TCM Error Messages (Continued) Table F-2 Error Description/Solution Incorrect disk sizes in TCM.ini The total disk size specified in the script does not match the total disk file size defined in the corresponding TCM.ini section. Check if the script is corrupt or the TCM.ini changed after the script was created.
-
Page 234: Creating A Splash Screen
F - 10 MK2200 MicroKiosk for CE .NET 4.2 Product Reference Guide Creating a Splash Screen screen appears briefly when the device cold boots. To generate a custom screen, use a Splash Splash bitmap editor, such as Paintbrush Creating a Splash Screen on Color Terminals... -
Page 235: Appendix Gos Upgrade Procedures
PC card with the appropriate upgrade files. • Symbol recommends using a freshly formatted PC card for storing the upgrade files. Format NOTE the PC card using the FAT file system in the host computer, then copy the upgrade files to the PC card. -
Page 236: Software Requirements
G - 2 MK2200 MicroKiosk for CE .NET 4.2 Product Reference Guide Software Requirements The files required to upgrade the MK2200 include: Command file for the MK2200: • PC_MK2000_XXX.mcf Command file for the MK2250: • PC_MK2046_XXX.mcf The following partition files: •... -
Page 237: Ipl Menu Navigation
Appendix G: OS Upgrade Procedures G - 3 IPL Menu Navigation IPL is a menu-based method of downloading partitions to non-volatile storage (flash) on the MK2200. You can download the following partitions: OS Partition • Platform Partition • Application Partition •... -
Page 238: Os Upgrade
G - 4 MK2200 MicroKiosk for CE .NET 4.2 Product Reference Guide OS Upgrade To upgrade the MK2200 operating system using a PC card, see the following sections to perform monitor, partition table, and command file upgrades. To begin the operating system upgrade: Power off the MK2200. - Page 239 Appendix G: OS Upgrade Procedures G - 5 Press the A or B button to select the file media source and highlight PC Card. Press the C button to select PC Card. The menu displays. Select File Name Select File Name Timer off 20xxc42Monxxxxxxxx.bgz 20xxc42OSxxxxxx.bgz...
-
Page 240: Partition Table Upgrade
G - 6 MK2200 MicroKiosk for CE .NET 4.2 Product Reference Guide Continue the OS upgrade by holding the A button during the reboot to display the main menu. Proceed to Partition Table Upgrade on page G-6. Partition Table Upgrade... -
Page 241: Command File Upgrade
Appendix G: OS Upgrade Procedures G - 7 Press the C button to select 20xxc42Pt64Mxxx.hex. The menu displays. Download File? Download File? Timer off Download Cancel Show Parms Previous Download File? Menu Figure G-9 Press the A or B button to highlight Download. Press the C button to select Download and initiate the partition table upgrade. -
Page 242: Mk2200 Microkiosk For Ce .Net 4.2 Product Reference Guide
G - 8 MK2200 MicroKiosk for CE .NET 4.2 Product Reference Guide Select the file media source by pressing the A or B button to highlight PC Card. Press the C button to select PC Card. The menu displays. Select File Name... - Page 243 Appendix G: OS Upgrade Procedures G - 9 When the command file upgrade begins, the following message displays. Downloading: Command File Via PC Card CF_MK2000_XXX.mcf Obtaining script file from given transport . . . ################### 100% Begin script execution ----------------------------------------------------------- Partition Table ################### 100% Download complete...
-
Page 244: Calibrating The Screen
G - 10 MK2200 MicroKiosk for CE .NET 4.2 Product Reference Guide Calibrating the Screen Use the screen to align the touch screen: Calibration Remove and restore power to the MK2200 to reboot. From the window, press buttons , and... -
Page 245: Update Corona Scanner Engine Firmware
Appendix G: OS Upgrade Procedures G - 11 Update Corona Scanner Engine Firmware Unzip ScanflashVX.X_CE4.x.zip file and copy its contents to the root "\" directory on the MK2200 device. The zip file contains: Corona scanner firmware binary image file (*.FDL) •... - Page 246 G - 12 MK2200 MicroKiosk for CE .NET 4.2 Product Reference Guide...
-
Page 247: Overview
Troubleshooting Appendix H Appendix H Troubleshooting Overview The MK2200 troubleshooting is provided in three sections: Troubleshooting on page H-2 offers troubleshooting scenarios for the MK2200. • OS Upgrade Troubleshooting on page H-5 provides OS upgrade troubleshooting scenarios for the • MK2200. -
Page 248: Troubleshooting
H - 2 MK2200 MicroKiosk for CE .NET 4.2 Product Reference Guide When downloading files to the MK2200 from a .zip file using ActiveSync, a message displays indicating • there is not enough free disk space to copy the application on page H-4 When downloading a large file over ethernet, IE issues an insufficient memory message on page H-4 •... -
Page 249: Configuration
Appendix H: Troubleshooting H - 3 Troubleshooting (Continued) Table H-1 Problem Possible Causes Possible Solutions MK2200 does not send data to MK2200 is not Check setup communication host computer programmed to work parameters. with the host. MK2200 is not Check cables to host computer. connected to the host. -
Page 250: The Wireless Mk2200 Does Not Retain Its Wep Key Encryption After A Reboot
H - 4 MK2200 MicroKiosk for CE .NET 4.2 Product Reference Guide Troubleshooting (Continued) Table H-1 Problem Possible Causes Possible Solutions The wireless MK2200 does not Encryption keys not Set encryption keys using Mobile retain its WEP Key encryption saved in Aegis.reg or Companion, then select Start >... -
Page 251: Os Upgrade Troubleshooting
MK2200 does not boot after Monitor upgrade Failures during the monitor upgrade performing a monitor update failure. often render the MK2200 inoperable. If the MK2200 does not boot after performing a monitor update, contact Symbol Support. -
Page 252: Mk2200 Version Information
H - 6 MK2200 MicroKiosk for CE .NET 4.2 Product Reference Guide OS Upgrade Troubleshooting (Continued) Table H-2 Problem Possible Causes Possible Solutions Partition Table Upgrade Troubleshooting Downloading Message, error Partition table Remove power from the MK2200, and screen upgrade error. -
Page 253: Appendix I Setting Scanner Parameters
Setting Scanner Parameters Appendix I Appendix I Setting Scanner Parameters Overview This chapter describes the scanning default parameters for the MK2200, useful when developing applications that control the MK2200 scan engine. Enabling and Disabling Symbologies See the following for information on where to find programming examples for enabling and disabling symbologies. - Page 254 I - 2 MK2200 MicroKiosk for CE .NET 4.2 Product Reference Guide Scanning Default Table Table I-1 Parameter Parameter Number Default Scanning Options Beeper Tone High Frequency Laser On Time 5.0 sec Power Mode Continuous Trigger Mode Host Scanning Mode...
- Page 255 Appendix I: Setting Scanner Parameters I - 3 Scanning Default Table (Continued) Table I-1 Parameter Parameter Number Default Transmit UPC-E1 Check Digit Disable UPC-A Preamble System Character UPC-E Preamble No Preamble UPC-E1 Preamble No Preamble Convert UPC-E to A Disable Convert UPC-E1 to A Disable EAN-8 Zero Extend...
- Page 256 I - 4 MK2200 MicroKiosk for CE .NET 4.2 Product Reference Guide Scanning Default Table (Continued) Table I-1 Parameter Parameter Number Default Code 93 Code 93 Disable Set Length(s) for Code 93 Length within Range: 0-55 Interleaved 2 of 5...
- Page 257 2 sec Host Character Time-out 200 msec Event Reporting Decode Event F0h 00h Enable Boot Up Event F0h 02h Enable Parameter Event F0h 03h Enable Macro PDF Transmit Each Symbol in Disable Codeword Format Transmit Unknown Codewords Disable Escape Character None...
-
Page 258: Set Default Parameters
I - 6 MK2200 MicroKiosk for CE .NET 4.2 Product Reference Guide Scanning Default Table (Continued) Table I-1 Parameter Parameter Number Default Delete Character Set ECIs Enable ECI Decoder Enable Transmit Macro PDF User-Selected Field Transmit File Name Disable Transmit Block Count... -
Page 259: Glossary
(e.g., characters per inch). Bar Height. The dimension of a bar measured perpendicular to the bar width. Bar Width. Thickness of a bar measured from the edge closest to the symbol start character to the trailing edge of the same bar. - Page 260 Those characters available for encoding in a particular bar code symbology. Check Digit. A digit used to verify a correct symbol decode. The scanner inserts the decoded data into an arithmetic formula and checks that the resulting number matches the encoded check digit. Check digits are required for UPC but are optional for other symbologies.
- Page 261 Continuous Code. A bar code or symbol in which all spaces within the symbol are parts of characters. There are no intercharacter gaps in a continuous code. The absence of gaps allows for greater information density.
- Page 262 Glossary - 4 MK2200 MicroKiosk for CE .NET 4.2 Product Reference Guide Encryption. Encryption is the scrambling and coding of data, typically using mathematical formulas called algorithms, before information is transmitted over any communications link or network. A key is the specific code used by the algorithm to encrypt or decrypt the data.
- Page 263 The exact (or ideal) intended value for a specified parameter. Tolerances are specified as positive and negative deviations from this value. Nominal Size. Standard size for a bar code symbol. Most UPC/EAN codes are used over a range of magnifications (e.g., from 0.80 to 2.00 of nominal). Open System Open System authentication is a null authentication algorithm.
- Page 264 Measurement of the contrast (brightness difference) between the bars and spaces (PCS). of a symbol. A minimum PCS value is needed for a bar code symbol to be scannable. PCS = (RL - RD) / RL, where RL is the reflectance factor of the background and RD the reflectance factor of the dark bars.
- Page 265 The distance between the outside edges of the quiet zones of the first row and the last row. Symbol Length. Length of symbol measured from the beginning of the quiet zone (margin) adjacent to the start character to the end of the quiet zone (margin) adjacent to a stop character.
- Page 266 Glossary - 8 MK2200 MicroKiosk for CE .NET 4.2 Product Reference Guide TFTP. (Trivial File Transfer Protocol) A version of the TCP/IP FTP (File Transfer Protocol) protocol that has no directory or password capability. It is the protocol used for upgrading firmware, downloading software and remote booting of diskless devices.
- Page 267 Index beeper volume ......3-19 browsers AC power supply ......2-7 handling network disconnects .
- Page 268 Index - 2 MK2200 MicroKiosk for CE .NET 4.2 Product Reference Guide ethernet, wired ......2-7 DHCP .
- Page 269 Index - 3 source code ......8-13 menu bar ....... 6-5 host communications messaging .
- Page 270 ....... . 1-2 tall symbol ......1-11...
- Page 271 Index - 5 slab ........1-10 scan engine ....... . .I-1 RD Client .
- Page 272 NET ....... . 9-3 Symbol Mobility Developer Kits (SMDKs) ..1-7 for the web .
- Page 273 Index - 7 updating data flash screen ......G-3 monitor ....... . G-3 OS partition .
- Page 274 Index - 8 MK2200 MicroKiosk for CE .NET 4.2 Product Reference Guide...
- Page 275 We’d like to know what you think about this Manual. Please take a moment to fill out this questionnaire and fax this form to: (631) 738-3318, or mail to: Symbol Technologies, Inc. One Symbol Plaza M/S B-10 Holtsville, NY 11742-1300 Attention: Technical Publications Manager - Advanced Data Capture IMPORTANT: If you need product support, please call the appropriate customer support number provided.
- Page 278 - Memory Management 8-10 - Securing Device from Electronic Hacking 3-11, 3-15, 3-20, 3-23, 8-2, 8-7, 8-11 - Life Cycle Management 3-12, 3-20 Symbol Technologies, Inc. One Symbol Plaza Holtsville, New York 11742-1300 http://www.symbol.com 72E-87925-01 Revision A - August 2006...