
Related Manuals for SonicWALL TZ 190 Wireless


Summary of Contents for SonicWALL TZ 190 Wireless
- Page 1 COMPREHENSIVE INTERNET SECURITY ™ SonicWALL Internet Security Appliances SonicWALL TZ 190 Wireless Getting Started Guide...
- Page 2 SonicWALL TZ 190 Wireless Getting Started Guide Thank you for your purchase of the SonicWALL TZ 190 Wireless, the ultimate security platform for home and small office deployments. With integrated support for SonicWALL's Gateway Anti-Virus, the SonicWALL TZ 190 Wireless delivers powerful, yet easy-to-use protection against malicious users and viruses.
- Page 3 READ BEFORE CONTINUING - Important Information Regarding WWAN Service Providers It is important to understand that not all WWAN service providers operate in the same way or support all the same feature sets. Because of this, there exists some inherent “service provider-specific” variances in service area and more importantly, in supported features.
- Page 4 Connecting to Your Network - page 47 Appendix Appendix A: Configuring DHCP IP Addressing - page 51 Appendix B: Troubleshooting Internet Connectivity - page 52 Appendix C: Safety Instructions and Regulatory Information - page 53 SonicWALL TZ 190 Wireless Getting Started Guide Page 3...
- Page 5 Page 4 READ BEFORE CONTINUING - Important Information Regarding WWAN Service Providers...
-
Page 6: In This Section
Completing Pre-Configuration Tasks In this Section: This section provides pre-configuration information. It is necessary to review this section before setting up your SonicWALL TZ 190 Wireless. • System Requirements , on page 6 • Check Package Contents , on page 7 •... -
Page 7: System Requirements
LAN interface set to obtain an IP address automatically (DHCP addressing enabled) Note: In order to connect to the SonicWALL TZ 190 Wireless, your computer must be set to obtain an IP address automatically using DHCP. For more information on configuring DHCP on your computer, turn to Appendix A: Configuring DHCP IP Addressing , on page 51. -
Page 8: Check Package Contents
(EU) customers, a power cord is not included. Release Notes document wwan wlan wan opt link/act signal WiFiSec TZ 190 link/act on/act 10/100 w i r e l e s s SonicWALL TZ 190 Wireless Getting Started Guide Page 7... -
Page 9: Networking Information
Record the authentication code found on the bottom panel of your SonicWALL appliance. Networking Information LAN IP Address: Select a static IP address for your SonicWALL appliance that is within the range of your local subnet. If you are unsure, you can use the default IP address (192.168.168.168). - Page 10 Static broadband, Subnet Mask: Cable or DSL with Default Gateway a static IP (Router IP Address): Primary DNS: Secondary DNS (optional): Dial-in to a server PPTP Server Address: User Name: Password: SonicWALL TZ 190 Wireless Getting Started Guide Page 9...
- Page 11 Obtain WWAN Service Provider Information Record the following information about your current WWAN service: WWAN Service Provider Country: Record the country where you purchased your WWAN card. Service Provider: Record the service provider from whom you purchased your WWAN card. This is the brand name of the card.
- Page 12 This section provides instructions to set up your WWAN PC card for use in the SonicWALL TZ 190 Wireless appliance. Alert: DO NOT insert your PC card into the SonicWALL TZ 190 Wireless appliance until you have completed the setup process for your card as described in this section.
- Page 13 If your service provider is not listed here, you must still complete the setup and activation for your PC card. Refer to the documentation that came with your PC card before using it with the SonicWALL TZ 190 Wireless appliance. General WWAN PC Card Setup This section provides general instructions for setting up most WWAN PC cards: •...
- Page 14 Complete the following steps to set up and provision your WWAN PC card. Before continuing, verify that your WWAN PC card and service provider are supported by the SonicWALL TZ 190 Wireless appliance by visiting the SonicWALL TZ 190 Wireless product page at: <http://www.sonicwall.com/us/tz190cards.html>...
- Page 15 Verifying Your Connection After the card has been set up on your PC, you can view your connection type and verify that the WWAN PC card is transferring data. Note: In order for the connection testing to be valid, it is important that you first disable all other network connections, such as a Wi-Fi or LAN connection, before continuing.
- Page 16 Open a Web browser and navigate to a Web site, such as <http://www.sonicwall.com/> to verify that your connection can transfer data. Congratulations! You have set up and provisioned your WWAN PC card. Continue with Connecting for Initial Setup , on page 31. SonicWALL TZ 190 Wireless Getting Started Guide Page 15...
- Page 17 Sprint Wireless PC Card Setup Complete the following steps to set up and provision your Sprint Wireless Mobile Broadband (WWAN) PC card. Contact your PC card vendor for troubleshooting help with this section. Alert: DO NOT insert your PC card into the computer until you have completed the setup process for your card as described in this section and successfully accessed the Internet through your PC using the PC card.
- Page 18 Sprint Technical Support. Click Yes once you have verified the numbers. You will be presented with a screen indicating the completion of the activation process. Click Finish to proceed. SonicWALL TZ 190 Wireless Getting Started Guide Page 17...
- Page 19 Verifying Your Connection It may take up to 4 hours for your WWAN PC card to become active on the Sprint network. After the card has been set up and is active, you can view your connection type and verify that the WWAN PC card is transferring data. Alert: In order for the connection testing to be valid, it is important that you first disable all other network connections, such as...
- Page 20 Open a Web browser and navigate to a Web site, such as <http://www.sonicwall.com/> to verify that your connection can transfer data. Congratulations! You have set up and provisioned your WWAN PC card. Continue with Connecting for Initial Setup , on page 31. SonicWALL TZ 190 Wireless Getting Started Guide Page 19...
- Page 21 Cingular Wireless PC Card Setup Complete the following steps to set up and provision your Cingular Wireless 3G PC card. Contact your PC card vendor for troubleshooting help with this section. Alert: DO NOT insert your PC card into the computer until you have completed the setup process for your card as described in this section and successfully accessed the Internet through your PC using the PC card.
- Page 22 Pay close attention to the orientation of your SIM card when inserting. Follow the manufacturer’s directions carefully when completing this procedure. WWAN PC Card chip Insert the PC card into an available Type II PC card slot on your Windows SonicWALL TZ 190 Wireless Getting Started Guide Page 21...
- Page 23 If the Cingular Communications Manager program is running, skip to the next step. Otherwise, navigate to Start > Programs > Cingular > Cingular Communications Manager to start the Communications Manager program. When the program is launched, you will see an interface similar to the one below.
- Page 24 Your network device status will display. Verify that you have obtained an IP Address for your Ethernet adaptor. Verify that all other Local Area Network Connections display “Media disconnected” as their status. SonicWALL TZ 190 Wireless Getting Started Guide Page 23...
- Page 25 Common names for newly acquired cards are “Local Area Connection 2” or “Local Area Connection 3”. Open a Web browser and navigate to a Web site, such as <http://www.sonicwall.com/> to verify that your connection can transfer data. Congratulations! You have set up and provisioned your WWAN PC card.
- Page 26 Next button to continue. Click the Next button to search for your WWAN PC card. Select the PC card radio button and click the Next button to continue. SonicWALL TZ 190 Wireless Getting Started Guide Page 25...
- Page 27 Click the Finish button to complete post-install configuration. 10. Insert the PC card into an available Type II PC card slot on your Windows 11. When your card is found, click the Next button to continue. 12. Click the Activate button to activate your WWAN PC card. Note: If activation fails on the first attempt, exit and then re-launch the program, keeping the WWAN PC card inserted during the...
- Page 28 The WWAN PC card will take a few minutes to connect to the network. When the connection is ready, the signal indicator will light up green with bars to indicate connection strength. Click the Connect button to enable the network connection. SonicWALL TZ 190 Wireless Getting Started Guide Page 27...
- Page 29 Common names for newly acquired cards are “Local Area Connection 2” or “Local Area Connection 3”. Open a Web browser and navigate to a Web site, such as <http://www.sonicwall.com/> to verify that your connection can transfer data. Congratulations! You have set up and provisioned your WWAN PC card.
- Page 30 • Registering with MySonicWALL.com , on page 30 Note: Product registration is an important part of the setup process, allowing you to enable product support, firmware updates and other key features. SonicWALL TZ 190 Wireless Getting Started Guide Page 29...
- Page 31 If you do not yet have a mysonicwall.com account, point your Web browser <http://www.mysonicwall.com/> to register before continuing. Locate and record your SonicWALL TZ 190 Wireless Serial Number and Authentication Code. This information is printed on the bottom panel of the appliance. This information was also recorded earlier, turn to Obtain Configuration Information , on page 8.
-
Page 32: Table Of Contents
Apply Power , on page 33 • Connect the Computer to the LAN (1) Port , on page 34 • Verify WAN / LAN / WLAN Connection , on page 35 SonicWALL TZ 190 Wireless Getting Started Guide Page 31... -
Page 33: Sonicwall Tz 190 Wireless
Power Insert the WWAN PC card Before inserting the WWAN PC card into your SonicWALL TZ 190 Wireless appliance, be sure your WWAN PC card is activated and unlocked. If you are not sure whether your card is unlocked or not, contact the PC card vendor to verify. -
Page 34: Apply Power
10/100 wireless Apply Power Connect the AC plug to the power supply. Plug one end of the power supply to the back of the SonicWALL TZ 190 Wireless. Connect the AC plug to an appropriate power outlet. Power To AC power... -
Page 35: Connect The Computer To The Lan (1) Port
When the Test LED is no longer lit, the SonicWALL TZ 190 Wireless is ready for configuration. If the Test LED stays lit for more than a few minutes, power cycle the appliance. Connect the Computer to the LAN (1) Port... -
Page 36: Verify Wan / Lan / Wlan Connection
Once the cables are correctly connected, the WAN, LAN (1) and WLAN lights on the front panel of your SonicWALL TZ 190 Wireless illuminate, with the exception of the WAN if it is not in use. See the illustration below:... - Page 37 Page 36 Verify WAN / LAN / WLAN Connection...
- Page 38 Running the Setup Wizard In this Section: This section provides instructions to log in and configure your SonicWALL TZ 190 Wireless using the SonicWALL Setup Wizard. • Accessing the SonicOS Web Management Interface , on page 38 • Verify Management Interface Connectivity , on page 41 •...
- Page 39 (the default IP address of the SonicWALL TZ 190 Wireless). The Setup Wizard will load. If the Setup Wizard does not display upon initial loading of the SonicWALL TZ 190 Wireless management interface, refer to page 40 for additional troubleshooting information.
- Page 40 WPA2 encryption, you must also run the Wireless Wizard. For more information on securing your wireless network, refer to the latest SonicOS Enhanced Administrator's Guide, available at <http://www.sonicwall.com>. SonicWALL TZ 190 Wireless Getting Started Guide Page 39...
- Page 41 Do you have the Ethernet cable connected between your computer and the LAN (1) port on your SonicWALL TZ 190 Wireless? • Do you need to add the SonicWALL TZ 190 Wireless to your list of trusted sites? Use the default IP address (192.168.168.168) for this purpose.
- Page 42 Wait for the SonicWALL TZ 190 Wireless to reboot. When the Test is no longer lit, the SonicWALL TZ 190 Wireless is ready for login. If the login page does not display after reboot, open a Web browser on the computer and manually navigate to the LAN IP address of your SonicWALL TZ 190 Wireless.
- Page 43 If the ping is successful, use a computer connected to the LAN (1) port to launch a new Web browser. Navigate to an Web site such as <http://www.sonicwall.com/>. If the Web site displays, your SonicWALL TZ 190 Wireless is configured correctly as your gateway device. SonicWALL...
- Page 44 This section provides instructions to ensure proper connectivity of your SonicWALL TZ 190 Wireless appliance. • Managing the WWAN Connection Status , on page 44 • Check WWAN Internet Connectivity , on page 46 SonicWALL TZ 190 Wireless Getting Started Guide Page 43...
- Page 45 The Network > Interfaces page allows you to view the current WWAN connection status. Log into the SonicWALL TZ 190 Wireless appliance management interface. Navigate to Network > Interfaces. In the Interface Settings section, the WWAN interface line displays the...
- Page 46 The Connection Manager window allows you to connect, disconnect and view current WWAN connection status. In the SonicWALL TZ 190 Wireless appliance management interface, navigate to Network > Interfaces. In the Interface Settings section, under WWAN, click the Manage button.
- Page 47 SonicWALL TZ 190 Wireless appliance and using the SonicWALL as its sole Internet connection. If the Web site displays, your SonicWALL TZ 190 Wireless is operational and connected to a valid WWAN service provider account. If the Web site does not display, refer to Appendix B: Troubleshooting Internet Connectivity , on page 52.
- Page 48 Connecting to Your Network In this Section: This section provides SonicWALL TZ 190 Wireless basic network connectivity verification procedures and examples. • Connect and Configure Your Network , on page 48 • The Front Panel , on page 49 •...
- Page 49 WWAN Internet Local Wired Clients Your SonicWALL TZ 190 Wireless is equipped with a DHCP server. If you enabled this feature in the Setup Wizard, your DHCP-enabled network clients are automatically provisioned by the SonicWALL appliance. To set up: Set your clients to obtain their IP address automatically.
-
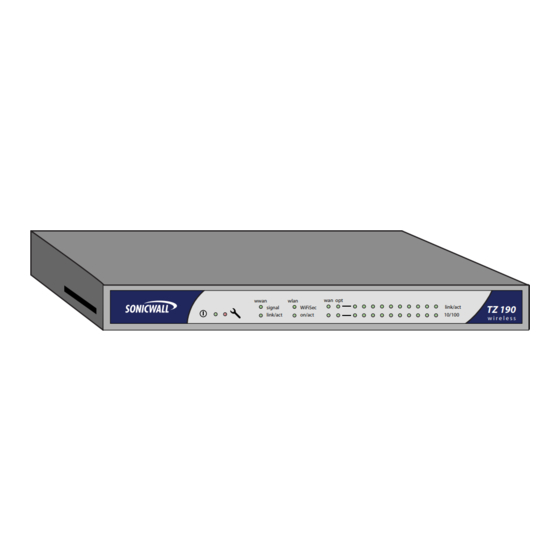
Page 50: The Front Panel
10/100 w i r e l e s s Feature Description Power LED Indicates the SonicWALL TZ 190 Wireless is powered on. Test LED Solid: Indicates that the SonicWALL TZ 190 Wireless is in test mode. Blinking: The unit is booting up, or restarting. This can also indicate that the unit is in safe mode. -
Page 51: The Back Panel
The OPT Port is not configurable on this appliance. LAN Ports (1-8) Provides 8 fully-configurable ports for connection between your SonicWALL TZ 190 Wireless and the devices on your network. These ports can be connected directly to a computer, or to a network switch or hub. - Page 52 Open Network and Dial-up Connections. Click Properties. Highlight Internet Protocol (TCP/IP) and click Properties. Select Obtain an IP address automatically and Obtain a DNS address automatically. Click OK for the settings to take effect. SonicWALL TZ 190 Wireless Getting Started Guide Page 51...
- Page 53 • Is your computer set to accept DHCP addressing or, if using static IP addressing, is your IP address set to a range within the SonicWALL’s LAN subnet? • Has your IP address renewed from the setting changes? Manually refresh them or reboot your computer.
-
Page 54: Lithium Battery Warning
This product should only be ratings must be used when addressing used with a UL listed power supply marked this concern. “Class 2” or “LPS”, with an output rated 12 VDC, minimum 1.66 A. SonicWALL TZ 190 Wireless Getting Started Guide Page 53... - Page 55 Verbindung von Geräten in • Gerät herum zirkulieren kann und die Innenräumen. Schließen Sie an die Anschlüsse der SonicWALL keine Kabel an, die aus dem Lüftungsschlitze an der Seite des Gebäude herausgeführt werden, in dem sich Gehäuses frei sind. Hier ist ein das Gerät befindet.
- Page 56 *Refer to the label on the bottom of the unit for device information including Class A or Class B FCC information. North American Authorized Channels SonicWALL declares that the APL17-049 (FCC ID: QWU-049) (IC: 4408A-049) when sold in US or Canada is limited to CH1~CH11 by specified firmware controlled in the USA. FCC RF Radiation Exposure Statement This equipment complies with FCC RF radiation exposure limits set forth for an uncontrolled environment.
- Page 57 Verbraucherdokumentation, um Land und Kanal zu machen, compliance with the essential requirements and other relevant Por medio de la presente Sonicwall declara que el APL18-046 Par la présente Sonicwall déclare que l'appareil APL18-046 est conforme aux exigences essentielles et aux autres dispositions è...
- Page 58 All products with country code “” (blank) and “A” are made in the USA. All products with country code “B” are made in China. All products with country code "C" or "D" are made in Taiwan R.O.C. SonicWALL TZ 190 Wireless Getting Started Guide Page 57...
-
Page 59: Copyright Notice
Specifications and descriptions subject to change without notice. Trademarks SonicWALL is a registered trademark of SonicWALL, Inc. Microsoft Windows 98, Windows Vista, Windows 2000, Windows XP, Windows Server 2003, Internet Explorer, and Active Directory are trademarks or registered trademarks of Microsoft Corporation. - Page 60 Notes SonicWALL TZ 190 Wireless Getting Started Guide Page 59...
- Page 61 Notes Page 60 Notes...
- Page 62 F +1 408.745.9300 PN: 232-001032-00 Rev A 5/07 ©2007 SonicWALL, Inc. is a registered trademark of SonicWALL, Inc. Other product names mentioned herein may be trademarks and/or registered trademarks of their respective companies. Specifications and descriptions subject to change without notice.