Table of Contents
Advertisement
Quick Links
Advertisement
Table of Contents

Related Manuals for Uniden UWS1100


Summary of Contents for Uniden UWS1100
- Page 1 UWS1100 Accessory Indoor Camera for UWS1101 Surveillance System...
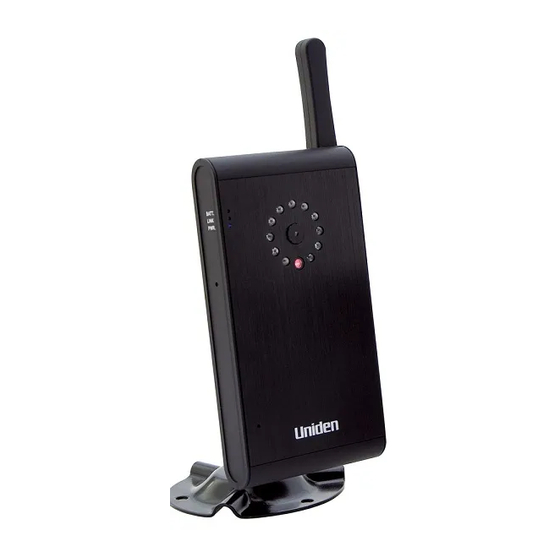
- Page 2 UWS1100 Accessory Camera Owner’s Manual What’s in the Box If any items are missing or damaged, contact your place of purchase immediately. Never use damaged Camera stand products! AC adapter Portable video camera Need Help? Get answers at our website: www.uniden.com.au for Australian model or...
-
Page 3: Important Safety Instructions
Important Safety Instructions! This manual contains important information about this product’s operation. If you are installing this product for others, you must leave this manual or a copy with the end user. When using your equipment, always follow basic safety precautions to reduce the risk of fire, electric shock and injury to persons, including the following: This equipment is NOT waterproof. -
Page 4: Table Of Contents
Clean only with a dry cloth. Failure to follow the instructions in this operating manual will void the warranty. Uniden assumes no liability for damages to property or injury to persons caused by improper handling or failure to comply with these safety instructions. -
Page 5: Getting Started
Getting Started Connecting the Power 1. Connect one end of the AC adapter Battery to the camera’s status power connector Link and the other status end to a standard Power Antenna 240 volt AC status indoor outlet. Lens Press the POWER button on the camera;... -
Page 6: Learning The Buttons And Lights
Learning the Buttons and Lights Button What it does Turn the camera on. Press and hold to turn it off. POWER Enter pairing mode. LInk Light State What it means The camera is on. Power Status light The camera is off. Flashing The camera is in pairing mode. - Page 7 Mounting Hold the base of the mount where you Camera screw brace want to attach it, and mark the location of the screw holes. Mounting Use the included screws and anchors to post attach the base to the wall or ceiling. Post lock Attach the camera to the mounting screw.
-
Page 8: Pairing The Camera
Pairing the Camera Before you can use the camera, you’ll need to “introduce” or pair it to the receiver so they can communicate. You might also perform the pairing procedure if you are having trouble with the camera. Make sure the camera is powered on. On the receiver, select the channel you want to pair this camera to, and put the receiver into pairing mode. -
Page 9: Additional Information
Additional Information Product Specifications Radio Frequency Transceiver RF Frequency 2402 Mhz ~ 2483.5 Mhz Modulation GFSK Spread spectrum Frequency Hopping Anti Interference Clean Channel Dynamic Select Data rate 2 Mbps Channel bandwidth 2 MHz Transmitting range 200 meters/600 feet in an open area (line of sight) Image Specification Output Image resolution 640 x 480 (VGA)/ 320 x 240 (QVGA) -
Page 10: Polymer-Lithium Battery Warning
Camera Specifications Low light solution 11 IR LEDs, 1 Low light sensor Low light sensitivity 1-8 lux Picture sensor OV7725 1/4’ Color CMOS Lens F3.6mm H:53 V:40 Polymer-Lithium Battery Warning This receiver and camera contains a lithium-polymer battery. The battery must be recycled or disposed of properly. -
Page 11: One-Year Limited Warranty
Terms of Warranty Uniden Aust/NZ warrants to the original retail purchaser only that the UWS 1100 (“the Product”), will be free from defects in materials and craftsmanship for the duration of the warranty period, subject to the limitations and exclusions set out below. - Page 12 © 2011 Uniden Australia Pty Ltd/Uniden New Zealand Limited Printed in PRC...