Advertisement
Advertisement
Table of Contents

Related Manuals for Uniden App Cam Solo Pro Series


Summary of Contents for Uniden App Cam Solo Pro Series
- Page 1 App Cam Solo Pro Series Quick Start Guide...
-
Page 2: What's In The Box
What’s in the Box Straping Mount App Cam Solo Pro Magenetic Mount Metal Mount Micro USB Cable Quick Start Guide Reset Needle Mounting Template Screw Kit... -
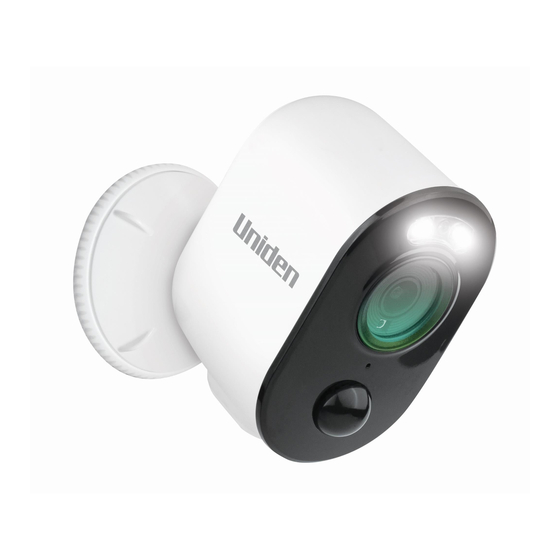
Page 3: General Introduction
General Introduction Battery Status LED Micro USB Power Port Speaker Spotlight Status LED Lens Daylight Sensor Built-in Mic Built-in PIR Sensor Reset Hole Press more than 5 seconds to restore the device to factory settings Power Switch Micro SD Card Slot Red LED (WiFi connection failed) Blue LED (WiFi connection succeeded) Blinking: Standby status... -
Page 4: Turn On The Camera
2. Charge the camera with power adapter. Uniden solar panel. * The battery is built-in,please do not remove it from the camera. * Please note that the USB charger and Solar Panel are NOT included in the package. You can buy the solar panel separately. - Page 5 Important Safeguards on Rechargeable Battery Use App Cam Solo Pro is not designed for 24/7 full capacity running or around-the-clock live streaming. It’s designed to record motion events and remotely view live streaming only when you need it. 1. Please charge the rechargeable battery with a standard and high-quality DC 5V or 9V battery charger. 2.
-
Page 6: Install Uniden Solo App
Install Uniden Solo App There are two ways to get the Uniden Solo App: • Search “Uniden Solo” in App Store (for iOS), download and install the app. • Search “Uniden Solo” in Google Play (for Android), download and install the app. - Page 7 Note: When the setup for the camera is completed, your family can access the cam- era simply by clicking “WiFi Already Configured” without reconfiguring it. App Cam Solo Pro Camera can only connect to 2.4GHz Wi-Fi. 2. Scan the QR code on the back 3.
- Page 8 4. Select “I have heard the voice prompt” 5. Enter the Wi-Fi password of the selected and tap “Next” to enter the next page. Wi-Fi network and tap “Next” to continue. If you did not hear the voice prompt, please press “I didn’t hear the voice prompt”...
- Page 9 Scan succeeded. Camera is connecting to the router. Please wait. 6. Tap “Scan Now” to proceed. A QR code will be generated on the phone. Please place the QR code on your phone towards App Cam Solo Pro camera’ lens at a distance of about 20cm to let the camera scan the QR code.
- Page 10 Connection to the router failed! 7. If you hear the above voice prompt, please ” press “I heard ‘Wi-Fi connection failed’ for help. Connection to the router succeeded. 8. If you hear the above voice prompt, please press Select “I have heard the voice prompt” and tap “Next”...
- Page 11 9. Create a password (at least 6 characters), name the camera and set the DST time. Then start live view or go to “Device Settings” for more configurations. Note: “Name your camera” field refers to the display name of the camera rather than the login username.
-
Page 12: Device Menu
Device Menu Menu Add New Device Enable/Disable PIR Motion Sensor (the PIR sensor is enabled by default) Device Settings Access Live View Battery Status... - Page 13 Attention for Camera Installation • PIR Sensor Detecting Distance The PIR detection range can be customized to meet your specific needs. You can refer to the following table to set it up in the Uniden Solo App. Detecting Distance Detecting Distance...
- Page 14 • PIR Sensor Installation Angle Pease install the camera 2-3 meters above the ground. The detection range of the motion sensor would be maximized at such a height. For effective motion detection, please install the camera angularly and the angle between the PIR sensor and the detected object must be larger than 10°.
- Page 15 Important Notes for Reducing False Alarms For reducing false alarms, please note that: • Do not install the camera facing any objects with bright lights, including sunshine, bright lamplights, etc. • Do not place the camera too close to a place where there are frequently moving vehicles.
- Page 16 How to Install Magnetic Mount Step 1 Step 2 Rotate to separate parts of Drill holes in accordance with the mounting hole template and the bracket. screw the mount to the wall. Screw the base of the camera bracket onto the wall and then attach the other part of the bracket onto the base.
- Page 17 Step 4 Attach the camera on the wall mount and twist the camera in any direction you want. How to Install Metal Mount Step 1 Step 2 Rotate to separate parts of Drill holes in accordance with the mounting hole template and the bracket.
- Page 18 Uniden Solo App. NOTE: In case you will need to adjust the camera angle later, please loosen the bracket by turning the upper part anti-clockwise.
-
Page 19: Troubleshooting
Troubleshooting Camera is not turning on If your camera is not turning on, please apply the following solutions: • Make sure you’ve turned the power button on. • Charge the camera with a DC 5V/2A power adapter. When the green light is on, the battery is fully charged. Fail to scan the QR code on the phone If the camera failed to scan the QR code on your phone, please apply the following solutions: •... -
Page 20: Specifications
Specifications Model App Cam Solo Pro Image Sensor Starlight CMOS Image Sensor Video Resolution 1920 x 1080 (2.0Megapixel) 15 fps Video Compression H.264 Viewing Angle Diagonal: 120° Video & Audio PIR Detecting Distance Up to 10 meters PIR Detecting Angle Horizontal: 100°... -
Page 22: Warranty
Accessories and Battery 90 Days If a warranty claim is made, this warranty will not apply if the Product is found by Uniden to be: A. Damaged or not maintained in a reasonable manner or as recommended in the relevant Owner’s Manual;... - Page 23 Product does not conform with this warranty, you should deliver the Product, together with satisfactory evidence of your original purchase (such as a legible copy of the sales docket) to Uniden. Please refer to the Uniden website for address details. You should contact Uniden regarding any compensation that may be payable for your expenses incurred in making a warranty claim.
- Page 24 THANK YOU FOR BUYING A UNIDEN PRODUCT © 2020 Uniden Australia Pty Limited V1.0 Printed in PRC...